Spiced Shrimp Dinner: An Easy Air Fryer Recipe
There’s something about the smell of freshly baked bread that instantly makes my home feel cozier, especially when it’s filled with fresh zucchini and a luscious cream cheese swirl. I remember the first time I tried making zucchini bread — it was a rainy Sunday, and I had a lone zucchini sitting on my counter, looking a little sad. I always do this when I want something comforting that’s easy to throw together, and let’s be honest — this one’s a lifesaver on busy nights when the kids ask for a sweet treat but I don’t want to fuss over complicated baking. It’s just the right amount of moist, tender, and a little bit indulgent. Plus, everyone in my family asks for seconds, especially when I drizzle a little extra glaze on top. Honestly, it’s become a little family tradition that I’m happy to keep. Whether it’s breakfast or a quick snack, this zucchini swirl bread always disappears in minutes at my house. Ready to make your kitchen smell amazing? Let’s dive in!
What is Zucchini Swirl Bread?
Think of zucchini swirl bread as a cozy twist on classic banana or pumpkin bread, but with fresh zucchini taking center stage. It’s essentially a loaf that’s tender, slightly sweet, and boasts a beautiful ribbon of cream cheese swirled right through the batter. The name may sound fancy, but trust me — it’s so simple to whip up. The name “swirl bread” comes from the way you layer the cream cheese mixture and the batter, creating those pretty marbled lines you see when you slice into it. The zucchini keeps everything moist and adds a subtle veggie boost, which makes this feel almost wholesome enough for breakfast but indulgent enough for dessert. I’ve made this with leftover garden zucchini, and my kids ask for this all the time, especially with a cup of coffee or glass of milk. The best part? It’s versatile—you can add nuts, swap the glaze for dusted powdered sugar, or even throw in a handful of chocolate chips if you’re feeling fancy. It’s the kind of recipe that feels like a warm hug, and once you try it, you’ll keep coming back for more.
Why you’ll love this recipe?
What I love most about this zucchini swirl bread is how incredibly forgiving it is — I’ve tested it with everything from gluten-free flour to almond milk, and it still turns out deliciously moist. The flavor? Oh boy, it’s subtly sweet with that comforting zucchini vibe, but the cream cheese ribbon gives it a tangy richness that balances everything perfectly. Plus, the aroma that fills my kitchen when it’s baking? Pure magic. It’s pretty much a one-bowl wonder, which means less mess and more time enjoying my coffee while the house smells like a bakery. And can we talk about versatility? This bread works in so many ways: for a quick breakfast, a brunch centerpiece, or a cozy snack during afternoon tea. My kids actually ask for this all the time, especially when I swap out the glaze for a drizzle of honey — it makes it feel a little more indulgent. I also love how cost-effective it is; simple pantry staples come together beautifully. Honestly, it’s become my go-to whenever I want something homemade and comforting that’s a little fancy but totally approachable. No matter your skill level, I promise this recipe will become a favorite recommendation for your family — I’ve made it countless times, and it never fails to make my house smell like happiness.
How do you make Zucchini Swirl Bread?
Quick Overview
This bread is as easy as mixing a handful of ingredients, layering in a swirl of cream cheese mixture, and baking until golden. The secret is in the gentle folding of wet and dry ingredients, which keeps the bread super moist. The cream cheese swirl adds a luscious surprise in every bite, and you can customize the flavor by adding nuts or even some citrus zest. It’s straightforward, forgiving, and perfect for busy mornings or a lazy weekend baking session. Just a few simple steps and you’ll have a show-stopping loaf that looks as gorgeous as it tastes, filling your kitchen with that irresistible baked scent. Trust me, once you get the texture right — moist but not gummy — you’ll be hooked! Bonus: the hardest part is waiting for it to cool down before slicing, and even then, it’s tempting to sneak a piece warm.
Ingredients
For the Main Batter:
– 2 cups all-purpose flour (or a gluten-free blend, if you like)
– 1 cup granulated sugar
– 1 teaspoon baking soda
– ½ teaspoon baking powder
– ½ teaspoon salt
– 1 teaspoon ground cinnamon (optional but adds warmth)
– ½ cup vegetable oil or melted coconut oil
– 1 cup grated zucchini (squeeze out excess moisture with a paper towel)
– 3 large eggs
– 1 teaspoon vanilla extract
For the Filling:
– 8 oz cream cheese, softened
– ¼ cup granulated sugar
– 1 teaspoon vanilla extract
– ½ cup chopped nuts or chocolate chips if desired (optional)
For the Glaze:
– ½ cup powdered sugar
– 1-2 tablespoons milk or lemon juice
– A few drops of vanilla or lemon zest for extra flavor
Step-by-Step Instructions
Step 1: Preheat & Prep Pan
Set your oven to 350°F (175°C). Grease a standard loaf pan with butter or non-stick spray, then line it with parchment paper for easy removal. Keeping everything ready makes the process smoother — I always do this first so I don’t forget later. It helps prevent sticking and ensures an even bake.
Step 2: Mix Dry Ingredients
In a large mixing bowl, whisk together the flour, sugar, baking soda, baking powder, salt, and cinnamon. This helps distribute everything evenly, and I’ve learned that mixing these well from the start gives my bread a more uniform texture. You want everything to look kind of sandy and well combined before adding the wet ingredients.
Step 3: Mix Wet Ingredients
In a separate bowl, beat the eggs with the vanilla, then stir in the oil. Add the shredded zucchini — don’t skip squeezing out the excess moisture, or your bread might turn out a little denser than you want. I tested this with just a tiny bit of almond milk once, and it actually made it even creamier, so feel free to experiment! Combine the wet ingredients until smooth.
Step 4: Combine
Pour the wet mixture into the bowl with the dry ingredients, then gently fold everything together until just combined — don’t overmix, or the bread can get tough. It should look thick but moist. If there are a few flour streaks, that’s fine. Just don’t go nuts stirring super vigorously.
Step 5: Prepare Filling
In a small bowl, beat the softened cream cheese with sugar and vanilla until smooth. If you want to add nuts or chocolate chips, fold them in now. This step is where the magic happens—think of it like creating a sweet and tangy ripple of richness through your bread. I love sprinkling a few chopped walnuts here if I want extra crunch.
Step 6: Layer & Swirl
Pour half of the batter into your prepared pan. Spread the cream cheese mixture evenly over the top, then pour the remaining batter over that. To create a beautiful swirl, use a skewer or a butter knife to gently drag through the batter, creating those pretty marbled lines. It’s easier than it looks, and I always love how it turns out to be almost art in a loaf.
Step 7: Bake
Pop the loaf into your preheated oven. Bake for about 60-70 minutes, or until a toothpick inserted in the center comes out clean. Every oven is different, so start checking around the 55-minute mark. If your bread starts browning too quickly, tent it with foil. Keep an eye on it, and don’t open the oven door too often — patience is key!
Step 8: Cool & Glaze
Remove the bread from the oven and let it cool in the pan for about 15 minutes. Then transfer it to a wire rack and let it cool completely before glazing. Mix the powdered sugar with milk or lemon juice until smooth. Drizzle generously over the cooled loaf — the glaze is what makes it extra special and pretty.
Step 9: Slice & Serve
Use a serrated knife and slice when the bread is fully cooled — this prevents squashing the beautiful swirl. Serve at room temperature, maybe with a cup of tea or coffee. I like mine with a bit of butter or a dollop of jam, but honestly, it’s perfect just as it is. The slices look stunning with the marbled pattern, and each bite is a delightful combo of moist bread and tangy cream cheese.
What To Serve It With
This zucchini swirl bread is so versatile, I often serve it differently depending on the occasion. For breakfast, a warm slice with butter and a mug of strong coffee is unbeatable — the aroma alone wakes up everyone in the house. For brunch, I love presenting it alongside fresh fruit and yogurt, maybe even with a quick dusting of powdered sugar or a smear of honey. When I want to keep it more dessert-like, I make an extra thick glaze and sprinkle some chopped nuts or chocolate chips on top. It’s also fantastic as an afternoon snack with a glass of milk or iced tea. My kids ask for this all the time, especially when I swap out the glaze for a drizzle of honey — it makes it feel like a little indulgence. And if you’re feeling really fancy, a scoop of vanilla ice cream on a warm slice? Pure heaven. Trust me, once you’ve made this, it’ll become a beloved staple in your kitchen, just like it is in ours.
Top Tips for Perfecting Your Zucchini Swirl Bread
As someone who’s made this dozens of times, I’ve picked up a few tricks along the way that help ensure perfect results:
- Zucchini Prep: Squeeze out as much moisture as possible after grating — this stops your bread from getting soggy. I usually wrap the shredded zucchini in a clean dish towel and give it a good squeeze. It might seem like a small step, but it makes all the difference.
- Mixing Advice: Overmixing is a sneaky culprit for dense bread. Mix until just combined — that’s when you’ll get that tender crumb. If you see a few small lumps, that’s fine!
- Swirl Customization: Don’t worry about perfect patterns; a gentle swirl is best. You want a marbled effect, not a marble sculpture. Use a skewer or butter knife to turn the batter in broad, gentle strokes.
- Ingredient Swaps: I’ve tested this with coconut sugar, which adds a lovely caramel note, and even coconut oil for a tropical twist. They all work well — just adjust the sweetness slightly if using less refined sugars. Want to add zest? Lemon or orange zest enhances the tangy cream cheese flavor beautifully.
- Baking Tips: Oven temperatures vary. If your bread gets too dark too quickly, tent it with foil halfway through. The toothpick test is your best friend — poke it in the center, and if it comes out clean, you’re golden.
- Glaze Variations: Don’t feel confined to powdered sugar. Melted chocolate drizzles, caramel sauce, or even a simple sprinkle of cinnamon sugar are all delicious extensions. The key is the timing—wait until your bread is fully cooled before glazing, especially if you want a clean marbled look.
Over the years, I’ve learned that patience and gentle mixing are my best friends. Sometimes, I even add a tiny splash of lemon juice to brighten up the flavor or sprinkle a handful of blueberries for some extra juiciness. The beauty of this recipe is how forgiving and adaptable it is. The one thing I always do is keep a close eye on it during the last 15 minutes — every oven is different, and I don’t want to miss that perfect golden crust.
Storing and Reheating Tips
This bread stays soft and delicious for days — I usually store it in an airtight container or wrap it tightly with plastic wrap. If you’re planning to enjoy it over a few days, I recommend keeping it at room temperature for up to 2 days. After that, move it to the fridge, where it should stay fresh for about a week, though I doubt it’ll last that long! To reheat, just warm a slice in the microwave for about 10-15 seconds or pop it in a low oven for a few minutes. The glaze can be added later if you want it to stay shiny and fresh. I tested freezing slices, wrapped tightly in plastic, and they thaw beautifully — just give it a quick reheat, and it’s like new. If you like your glaze fresh, add a drizzle right before serving so it keeps that shiny, decadent look. Honestly, this bread is so good, I find myself sneaking little bites even days later — it’s that kind of comfort food.
Frequently Asked Questions
Final Thoughts
If there’s one recipe I keep coming back to, it’s this zucchini swirl bread. It’s simple enough for weekday mornings but special enough to serve at brunch or even as a gift for friends. The blend of moist bread, tangy cream cheese, and that gorgeous marbled swirl is just irresistible. I love experimenting with add-ins and flavors, but honestly, the classic version is a total star. Every time I bake it, I get that warm, nostalgic feeling — like I’m sharing a secret family recipe. Whether you’re a seasoned baker or a kitchen newbie, I promise this will become a new favorite. Happy baking! And I can’t wait to hear how yours turns out. Drop a comment or share your variations — I love seeing how everyone makes dishes their own. Here’s to cozy mornings, delicious smells, and that first warm slice — enjoy!
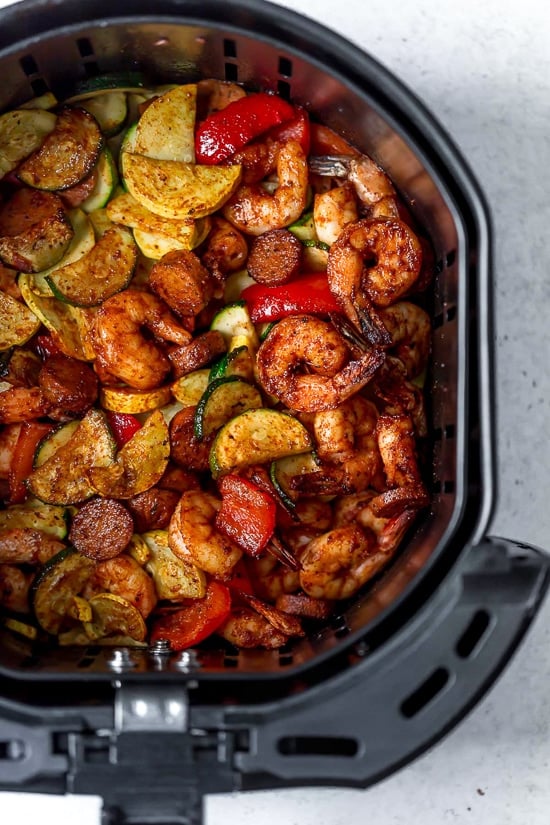
Cajun Shrimp
Ingredients
Method
- In a large bowl, combine the Cajun seasoning and shrimp, toss to coat.
- Add the sausage, zucchini, squash, red bell pepper, and salt; toss with the oil.
- Preheat the air fryer to 400°F.
- Transfer the shrimp and vegetables to the air fryer basket in two batches and cook for 8 minutes, shaking the basket 2-3 times.
- Set aside, then repeat with remaining shrimp and vegetables.
- Combine both batches and cook for an additional 1 minute in the air fryer.