Spiced Oatmeal Recipe: How to Bake Breakfast
Have you ever bitten into something that’s secretly a vegetable but tastes so divine you can’t believe it’s good for you? That’s exactly what happened to me the first time I made this moist chocolate zucchini cake. I was looking for a way to sneak some veggies into my kids’ snacks, and oh boy, did this come through! The smell alone brings everyone to the kitchen — rich, cocoa-scented air that makes it impossible to resist. It’s incredibly easy to throw together, even on a busy weeknight, and the best part? No one ever guesses the secret ingredient. Plus, I always do this when I need a quick dessert that feels special but doesn’t require hours of fussing. Trust me, this one’s a lifesaver — especially when I want something warm and fudgy without turning on a complicated oven. My kids ask for this all the time, and I think it’s because it’s moist, flavorful, and loaded with chocolate goodness. It’s become our go-to for birthdays, after-dinner treats, or just when I crave something sweet but don’t want to spend forever in the kitchen. Just wait until you smell it baking… pure heaven! A slice of this, topped with a shiny, creamy glaze, is pure comfort in every bite.
What is Moist Chocolate Zucchini Cake?
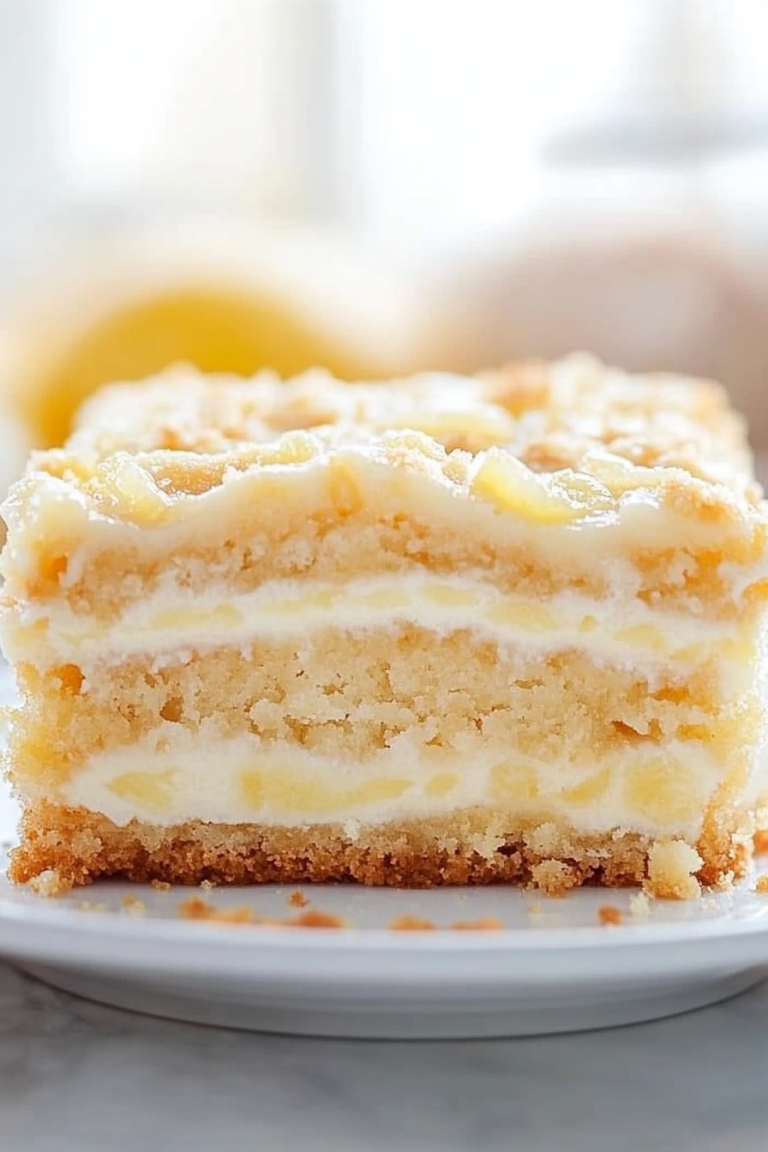
Think of this as a cozy, tender cake that’s packed with the sneakiest vegetable you’ve ever tasted — zucchini. It’s essentially a riff on classic chocolate cake but with shredded zucchini folded into the batter. The magic happens because zucchini adds moisture without overpowering the flavor; instead, it amplifies that rich, fudgy chocolate goodness. The name might sound fancy or health-conscious, but really, it’s just a straightforward, homey treat that’s perfect for using up summer zucchini or any leftover squash in your fridge. It’s one of those recipes that’s been handed down in my family — I grew up nibbling on slices made by my grandma, who claimed it was the secret to keeping the cake super moist. Over the years, I’ve added my spin with a luscious glaze on top, making it look as fancy as it tastes. Think of it as a little secret weapon for when you want a dessert that’s as healthy as it is decadent. Honestly, once you try it, I bet you’ll keep this recipe close — I’ve made this countless times and it never fails to impress.
Why you’ll love this recipe?
What I love most about this is how deceptively simple it is. You throw together a few ingredients, and before you know it, your house fills with the irresistible aroma of warm chocolate and fresh-baked goodness. The flavor? Pure chocolatey bliss with just enough zucchini to keep it moist and tender — it’s like a brownie and a cake had a beautiful lovechild. Plus, the zucchini keeps this cake from feeling overly sweet or heavy, making it a perfect after-dinner treat or even a brunch highlight. Budget-wise, it’s super friendly — you probably have most of these ingredients already in your pantry and fridge. I’ve made this with different types of cocoa (trust me, dark cocoa adds a punch), and it always surprises me how flexible the recipe is. It’s versatile, too — I’ve added chopped nuts, chocolate chips, or even swapped the glaze for a dusting of powdered sugar when I’m in a rush. What I love most about this is how it combines a little nostalgia with modern comfort, making everyone in my family ask for seconds. It’s great for casual weekends but also feels fancy enough for sharing with friends. No matter how many times I make it, each slice feels like a warm hug.
How do I make Moist Chocolate Zucchini Cake?
Quick Overview
This cake comes together in just a few steps — grate the zucchini, mix the batter, layer in the pan, and bake. The secret is not overmixing — just gently combine everything for that tender crumb. While it bakes, you can prepare a simple glaze, which takes the cake to a whole new level. The batter is thick yet easy to stir, and the zucchini melts in seamlessly. The oven will do the rest, creating a gorgeous, slightly cracked top with a moist, chocolaty center. I always do this when I want a comforting dessert that’s quick but tastes fancy. The key is to keep an eye on your baking time—don’t overbake or it’ll dry out! Once out of the oven, let it cool a bit before drizzling with the glaze, which adds a glossy, fudgy finish. It’s honestly foolproof, and I promise, everyone will ask for this recipe once they taste it.
Ingredients
For the Main Batter:
– 2 cups grated zucchini (about 2 medium zucchinis, squeaked dry to remove excess moisture)
– 1 1/2 cups all-purpose flour (or half almond flour for a nutty twist)
– 3/4 cup unsweetened cocoa powder (use the good stuff for richer flavor)
– 1 teaspoon baking powder
– 1/2 teaspoon baking soda
– 1/4 teaspoon salt
– 1 cup granulated sugar (or coconut sugar for a healthier vibe)
– 1/2 cup vegetable oil or melted butter
– 3 large eggs
– 2 teaspoons vanilla extract
For the Filling (Optional):
– 1/2 cup chocolate chips or chopped nuts
– 1 teaspoon cinnamon (for a subtle spice note, optional)
For the Glaze:
– 1 cup powdered sugar
– 2-3 tablespoons milk or cream
– 1/2 teaspoon vanilla extract
– Optional: melted dark chocolate for extra richness
Step-by-Step Instructions
Step 1: Preheat & Prep Pan
Set your oven to 350°F (175°C). Grease a 9-inch round or square baking pan with butter or line it with parchment paper. I love lining it so I can lift the cake out easily — especially when I’m glazing! Make sure your zucchini is grated and dried thoroughly; I always squeeze out excess moisture with a clean kitchen towel or paper towels. That way, the cake won’t turn soggy.
Step 2: Mix Dry Ingredients
In a large bowl, whisk together the flour, cocoa powder, baking powder, baking soda, salt, and sugar. This ensures the dry ingredients are evenly distributed, which makes your batter smooth and fluffy. I’ve made the mistake of skipping this step once — the cocoa and baking soda didn’t mix evenly, and the texture was uneven. Trust me, take the extra minute for a perfect crumb.
Step 3: Mix Wet Ingredients
In a separate bowl, whisk the eggs, oil, vanilla, and a pinch of cinnamon if you’re using it. I like to do this by hand so I don’t overmix, which keeps the cake tender. Once combined, add the grated zucchini and stir until the mixture is uniform and bright green speckled throughout. You’ll notice it looks a little thick — that’s perfect! It’s almost like a brownie batter, and that’s exactly what you want.
Step 4: Combine
Gently fold the wet mixture into the dry ingredients, just until barely combined. Overmixing can develop gluten and make the cake dense, so I always use a light touch here. If you see a few streaks of flour, that’s fine — it’ll all come together during baking.
Step 5: Prepare Filling
If you want, fold in chocolate chips or chopped nuts now. I love adding semi-sweet chips — they melt slightly during baking, creating little pockets of gooey chocolate. For a cinnamon kick, a teaspoon stirred into the batter works beautifully. You can also leave it plain; the glaze will add plenty of sweetness.
Step 6: Layer & Swirl
Pour the batter into your prepared pan. If you’re adding filling or toppings, spread evenly. For a little artistic touch, I sometimes swirl in a little extra chocolate or a spoonful of jam for a marbled effect. Use a butter knife or a skewer to make gentle swirling patterns. It looks fancy, but it’s really just for fun and flavor!
Step 7: Bake
Pop it in the oven and bake for 30-35 minutes. You want a toothpick tested in the center to come out with a few moist crumbs, not wet batter. Every oven is different — my old one runs a bit cool, so I check a little earlier. The top should be cracked and slightly shiny with a delicate bounce when you gently press. Once done, let it cool in the pan for about 10 minutes before transferring to a wire rack.
Step 8: Cool & Glaze
Allow the cake to cool completely—this helps the glaze set perfectly. Mix your powdered sugar with milk and vanilla, stirring until smooth and pourable. If it’s too thick, add a tiny splash more milk; if too thin, sprinkle in a bit more powdered sugar. Drizzle over the cooled cake, letting it run down the sides for that lovely glossy finish. I usually wait at least 15 minutes for the glaze to set before slicing; otherwise, it’s a gooey mess.
Step 9: Slice & Serve
Use a sharp serrated knife for clean slices. Serve it slightly warm or at room temperature — either way, the fudgy texture shines. I love a dollop of whipped cream or a scoop of vanilla ice cream on the side, but honestly, a warm slice just as it is, with that shiny glaze, is enough to make anyone smile. Perfect for sharing, or keeping all to yourself — no judgment here.
What to Serve It With
This chocolate zucchini cake is incredibly versatile. For breakfast, I love serving it with a strong cup of coffee or a glass of cold milk — kind of like a chocolaty muffin, but better. It’s also lovely as a fancy brunch addition, paired with fresh berries and a dollop of whipped cream. As an after-dinner dessert, it pairs beautifully with a glass of red wine or a cup of herbal tea — the richness of the chocolate and the moist crumb make it feel indulgent but comforting. When I want a cozy snack, I cut thick slices and warm them up in the microwave, then drizzle with more glaze or a dusting of powdered sugar. It’s the kind of treat the family fights over — I always do this when I want to hide the last piece for myself! Trust me, this cake hits all the right notes — sweet, moist, chocolatey, and just a little healthy sneaking in from the zucchini. It’s a keeper for sure, and I love knowing I can whip it up in under an hour. My kids’ eyes light up as soon as they smell the cocoa wafting through the house; it’s pure happiness.
Top Tips for Perfecting Your Moist Chocolate Zucchini Cake
After making this dozens of times, I’ve picked up a few tricks that make each batch better than the last. First, zucchini prep is everything — grate it fine and squeeze out every last drop of moisture. Otherwise, your cake might turn out soggy or dense. I’ve tested this with both fresh and frozen zucchini — frozen works fine, just squeeze out the excess water once thawed. For mixing, be gentle when combining wet and dry ingredients: overmixing leads to a dense crumb, and nobody wants that! If your batter feels too thick, a splash of milk helps loosen it up — just enough so it pours easily but isn’t runny. Swirling chocolate or jam is a fun way to personalize each cake — try spreading a spoonful of raspberry jam for a fruity surprise. Ingredient swaps like coconut oil or almond flour work well, but the texture may shift slightly; I recommend experimenting in small batches first. When baking, oven heat can vary — check for doneness around the 30-minute mark, and use a toothpick test. I always bake on the middle rack, away from the top heat, for even baking. For the glaze, I prefer it thin enough to drizzle but thick enough to coat — I’ve found adding a touch of butter makes it extra glossy. Hockey puck thick? Warm it slightly to pour smoothly. These little tweaks make all the difference!
Storing and Reheating Tips
This cake tastes just as good on day two — I swear, it actually gets moister if stored properly! Keep leftovers in an airtight container at room temperature for up to two days, covered loosely with foil. If you’re making it ahead, pop it in the fridge wrapped tightly — it’ll stay fresh for up to five days. To serve chilled — which I sometimes do in the summer — just slice and enjoy straight from the fridge. If you want to warm it up, a quick 15-second zap in the microwave restores that freshly-baked warmth and gooey glaze. For longer storage, freeze slices individually wrapped in plastic wrap and foil for up to three months. Thaw overnight in the fridge or at room temperature for an hour before serving. If you add the glaze later, it stays glossy and luscious on thawed slices. I tested this with different storage methods, and the cake remains delicious and moist no matter what. The key is airtight wrapping and avoiding excess moisture loss. Honestly, this cake is one of those desserts that’s better after sitting for a day — the flavors meld beautifully and it becomes even more irresistible.
Frequently Asked Questions
Final Thoughts
Honestly, this moist chocolate zucchini cake has become one of those recipes I reach for when I want comfort on a busy day or a sweet surprise for friends. The fact that it’s secretly healthy (well, almost!) makes me feel better about indulging. It’s moist, fudgy, and bursting with rich chocolate flavor, yet it’s so simple that I can make it even on days when I’m running from one thing to another. I love how adaptable it is — toss in nuts, switch up the glaze, or add a splash of spice — it always turns out delicious. If you’re new to zucchini baking, give this a try. It’s a gentle introduction to how vegetables can be hidden in the most delightful ways. Plus, the smell alone will make your house feel warm and welcoming. My hope is that once you try this, it becomes a family favorite too — a recipe you’ll come back to over and over. Happy baking, and I can’t wait to hear how yours turns out! Don’t forget to share your tweaks and favorite toppings in the comments; I love swapping ideas with fellow food lovers.

Gingerbread Oatmeal
Ingredients
Method
- In a medium saucepan, combine the rolled oats, milk, ground ginger, cinnamon, nutmeg, cloves, and salt.
- Bring the mixture to a boil over medium-high heat, stirring occasionally.
- Reduce the heat to low, cover, and simmer for 5-7 minutes, or until the oatmeal has reached your desired consistency, stirring occasionally.
- Stir in the molasses and maple syrup until well combined.
- Serve hot, with your favorite toppings like extra maple syrup, whipped cream, or fresh fruit.