Simple Strawberry Cheesecake Delight
There’s something about waking up to the smell of fresh coffee and a slice of warm cake that instantly makes my house feel like home. This zucchini swirl coffee cake has been a family favorite for as long as I can remember — it’s like comfort food in cake form, but with a sneaky veggie twist that makes me feel a little better about indulging! I always do this when I want something cozy and sweet but don’t want to spend hours in the kitchen. Honestly, I’ve tested this with everything from almond milk to a splash of orange juice, and each variation somehow feels like a warm hug. My kids ask for this all the time—especially on weekends when I want to serve something special that isn’t too complicated. It’s incredible how easily this cake disappears in minutes at my house — the smell alone brings everyone to the kitchen like a magnet. Plus, it’s perfect when you’re craving something sweet at 10pm but don’t want to bake a whole cake from scratch. Trust me, once you make this, it’s going to be one of your go-to recipes, too!
What is Zucchini Swirl Coffee Cake?
This zucchini swirl coffee cake is basically a tender, moist loaf with a rich, cinnamon-spiced swirl running through it — think of it as a delightful cross between a quick bread and a coffee cake, but with a healthy-ish vegetable twist. The name might sound fancy, but it’s really just a clever way to use up those bounty of zucchinis from your garden or your CSA share. It’s essentially a mash-up of gentle sweetness and warm spices, layered with a generous swirl of cinnamon and sugar, and topped with a simple glaze. Think of it as the perfect brunch or breakfast cake that also makes an amazing afternoon snack. The best part? It’s super straightforward to make, with ingredients you probably already have tucked away in your pantry and fridge. My favorite thing about this recipe is how the zucchini keeps the cake incredibly moist without weighing it down — and the swirl keeps things interesting with every slice. This is one of those recipes that feels fancy enough for guest brunch but easy enough for a lazy weekend morning. Everyone’s always surprised when I tell them it’s secretly packed with veggies!
Why you’ll love this recipe?
What I love most about this zucchini swirl coffee cake is how it manages to be both cozy and healthy — a rare combo! The flavor is just divine — moist, with warm cinnamon notes that sort of hug your taste buds, and the sweetness is perfectly balanced, not overly sugary. If you’re anything like me, you’ll find yourself sneaking an extra slice (or two) before anyone else gets a chance. It’s incredibly simple to make, which makes it a lifesaver on busy nights or when I need something quick and impressive. Plus, it’s budget-friendly — most of the ingredients are pantry staples or things I always keep on hand, like zucchinis, flour, and a bit of sugar. And versatility? Oh, this cake is a chameleon! You can serve it for breakfast (with a dollop of yogurt), brunch (paired with fresh fruit), or as a delightful dessert with a scoop of vanilla ice cream. I’ve also experimented with almond flour or adding chopped nuts on top, which adds a lovely crunch. Honestly, what I love most is how nostalgic it feels — like a sweet reminder of grandmother’s baking, but with a little modern twist. This one’s a keeper for sure!
How do I make Zucchini Swirl Coffee Cake?
Quick Overview
This cake all begins with whisking together a simple, moist batter—think fluffy, not dense—by combining your dry ingredients with wet ones. The zucchini, grated and gently squeezed to release excess moisture, gets folded into the batter, giving it that unbeatable moistness. The cinnamon swirl is a quick cinnamon-sugar mixture that you swirl into the batter before baking, creating those beautiful marbled patterns in each slice. The finishing touch is a light glaze drizzled right on top while the cake is still warm, which sets perfectly as it cools. Honestly, I’ve made this cake countless times, and what makes it most special is how forgiving and adaptable it is. The batter comes together in about 10 minutes, and baking takes 40-45 minutes. It’s all about that beautiful swirl—trust me, patience in layering and swirling makes such a difference—it’s worth taking your time for that marbling magic. Once out of the oven, I let it cool just enough so the glaze doesn’t run off, then slice, serve, and watch it disappear!
Ingredients
For the Main Batter:
– 2 cups all-purpose flour (I like unbleached for a better flavor)
– 1 teaspoon baking powder
– ½ teaspoon baking soda
– ½ teaspoon salt
– 1 teaspoon ground cinnamon (smells amazing when you add it to batter!)
– 1 cup granulated sugar
– ½ cup light brown sugar (adds a subtle caramel note)
– ½ cup vegetable oil or melted butter (for richness)
– 3 large eggs (trust me on this—moisture and structure)
– 1 teaspoon vanilla extract
– 1 cup grated zucchini (squeeze out excess moisture—this step is key!)
– ¼ cup buttermilk or milk (I tested with almond milk — results were creamy and tender)
For the Filling:
– ¼ cup brown sugar
– 1 tablespoon ground cinnamon
– 1 tablespoon melted butter (to help it all stick together)
– Optional: chopped nuts or mini chocolate chips if you’re feeling indulgent
For the Glaze:
– ½ cup powdered sugar
– 1-2 teaspoons milk or lemon juice (add until you get that perfect drizzle consistency)
– A pinch of vanilla or almond extract for extra flavor
Step-by-Step Instructions
Step 1: Preheat & Prep Pan
Set your oven to 350°F (175°C). Grease a loaf pan or line it with parchment paper—I like using butter and a dusting of flour to prevent sticking. It’s easy to remove the cake without breaking it. While the oven heats, grate your zucchini, then squeeze out as much excess moisture as you can. This step keeps the cake moist without turning it into a soggy mess. Trust me, one careless squeeze and you’ll regret it during baking—less moisture equals fluffier texture!
Step 2: Mix Dry Ingredients
In a large bowl, whisk together the flour, baking powder, baking soda, salt, and cinnamon. These dry ingredients create the foundation for a light, tender crumb. Mixing them well ensures even distribution of leavening agents — no one wants uneven rising or dense spots, especially with the zucchini added in later.
Step 3: Mix Wet Ingredients
In another bowl, beat the eggs, then add in sugar, brown sugar, vanilla, and oil. Whisk until smooth and slightly frothy. I like to add the zucchini at this stage—fold it gently in so it’s evenly distributed. If you’re using milk or almond milk, include it here to keep things moist and add a touch of creaminess.
Step 4: Combine
Pour the wet mixture into the dry ingredients, folding gently just until combined. Be careful not to overmix, or you risk a dense, gummy texture. It’s okay if there are a few lumps—this keeps the batter tender. One of my mistakes early on was overmixing, which made the cake tougher than I wanted. Trust the gentle folding — it’s all about that tender crumb!
Step 5: Prepare Filling
Mix the brown sugar, cinnamon, and melted butter together in a small bowl. If you like, stir in chopped nuts or chocolate chips — my kids love this added texture. The filling should be crumbly but moist enough to spread evenly when layered. I sometimes double this for extra cinnamon goodness.
Step 6: Layer & Swirl
Pour about half of the batter into your prep pan, then sprinkle on the cinnamon-sugar mixture evenly over the surface. Dollop the rest of the batter on top, then use a butter knife or skewer to gently swirl through the layers, creating those beautiful marbled patterns. Take your time here — neat spirals make the cake look sophisticated, but even rustic swirls taste fantastic!
Step 7: Bake
Pop the cake into your preheated oven and bake for around 40-45 minutes. Check doneness by inserting a toothpick in the center — if it comes out clean, it’s ready! The edges should be golden, and your house will smell like heaven. Every oven is different, so start checking around 38 minutes if you’re a nervous baker. I learned this trick after a few overbaked disappointments. Let it cool in the pan on a wire rack for about 10 minutes before removing — patience rewards you with a pretty slice.
Step 8: Cool & Glaze
Let the cake cool slightly, then drizzle your glaze over the top while still warm. The glaze should be pourable but not runny—adjust with a splash more milk or powdered sugar as needed. The warmth helps it soak in a little and creates a shiny, irresistible top. If you prefer, you can skip the glaze altogether or sprinkle powdered sugar for a simpler finish. My favorite is a thin lemon glaze — it adds a fresh citrus kick!
Step 9: Slice & Serve
Once cooled completely, slice with a sharp knife. Wipe the blade after each cut for neat slices. Serve at room temperature with a hot cup of coffee or tea — it’s that perfect pairing. I like to serve it on a vintage plate, maybe with a sprig of fresh mint or a dusting of extra cinnamon. Trust me, this cake is just as good the next day — if it lasts that long!
What to Serve It With
Honestly, this zucchini swirl coffee cake is so versatile that the pairing options are endless. For breakfast, I love it with a dollop of Greek yogurt or a smear of butter—simple but divine. It’s also fantastic for brunch when paired with fresh fruit like berries or sliced peaches, and a strong cup of coffee or a latte. When it’s dessert time, I often warm a slice and serve it with vanilla ice cream or a drizzle of caramel sauce — decadence in every bite. On lazy weekends, I even serve slices as a casual snack, maybe alongside a glass of cold milk or a warm cup of tea. It’s become a real family tradition—my kids especially ask for it when they want something sweet but not overly indulgent. I’ve also made a gluten-free version using almond flour, which worked beautifully if you want to adapt it. Either way, it’s one of those recipes that just makes everyone smile!
Top Tips for Perfecting Your Zucchini Swirl Coffee Cake
After making this countless times, I’ve picked up a few tricks that really tip the scales toward perfection. First, zucchini prep is everything — squeeze out as much moisture as possible after grating; otherwise, you risk a soggy bottom. I’ve learned that gently folding the wet ingredients into the dry is key — don’t overmix or you’ll lose that tender crumb everyone loves. When swirling, take your time; a good spiral pattern not only looks pretty but also ensures that every slice has a generous dose of cinnamon goodness. Want to change things up? Try adding chopped walnuts or mini chocolate chips to the filling for variety. I tested substituting part of the flour with whole wheat, and while it added a bit more fiber, I noticed the texture was slightly denser — so I prefer half and half. Baking at the right temperature is another crucial tip — I always position my rack in the middle and keep an eye on it after about 35 minutes to prevent overbaking. The glaze is the final touch — if it’s too thick, warm it slightly and add a splash of milk; if it’s too thin, just add more powdered sugar until it’s just right. One thing I’ve learned? The best cakes are the ones that you tweak and make your own — don’t be afraid to experiment a little!
Storing and Reheating Tips
This cake keeps surprisingly well. I usually store it covered at room temperature for up to 2 days — just make sure it’s wrapped loosely or in an airtight container to keep it from drying out. If you want it to stay fresh longer, pop it into the fridge for up to 4 days. I prefer to let it come to room temp before slicing again — that really brings back the moistness and fragrance. Want to keep it even longer? Wrap it well and freeze for up to 2 months. When you’re ready to enjoy, let it thaw overnight in the fridge, then warm slices slightly in the microwave or oven. For best texture, add the glaze just before serving — it tends to soak in best right after baking. Trust me, this cake ages beautifully if stored properly, and I love pulling it out for a midweek treat or a quick brunch fix. The smell alone as it warms up again is totally worth it—kind of like comforting memories wrapped in cake!
Frequently Asked Questions
Final Thoughts
This zucchini swirl coffee cake is one of those recipes that feels like a warm hug from an old friend. It’s moist, fragrant, bursting with cozy cinnamon, and just sweet enough to satisfy that craving without overdoing it. I love how forgiving it is — I’ve mismeasured, tweaked ingredients, and it still turns out perfect every time. It reminds me of lazy weekend mornings spent baking with my kids, the smell filling the house and bringing everyone together. Plus, it’s an easy way to sneak a veggie into dessert — a little cleverness in the kitchen. If you’re looking to impress family or friends with minimal fuss, this cake will never disappoint. Once you try it, I bet it’ll become a regular in your rotation, too. Happy baking — I can’t wait to hear how yours turns out! And don’t forget to leave a comment or share your own twists — I love hearing new ideas and stories from fellow bakers.
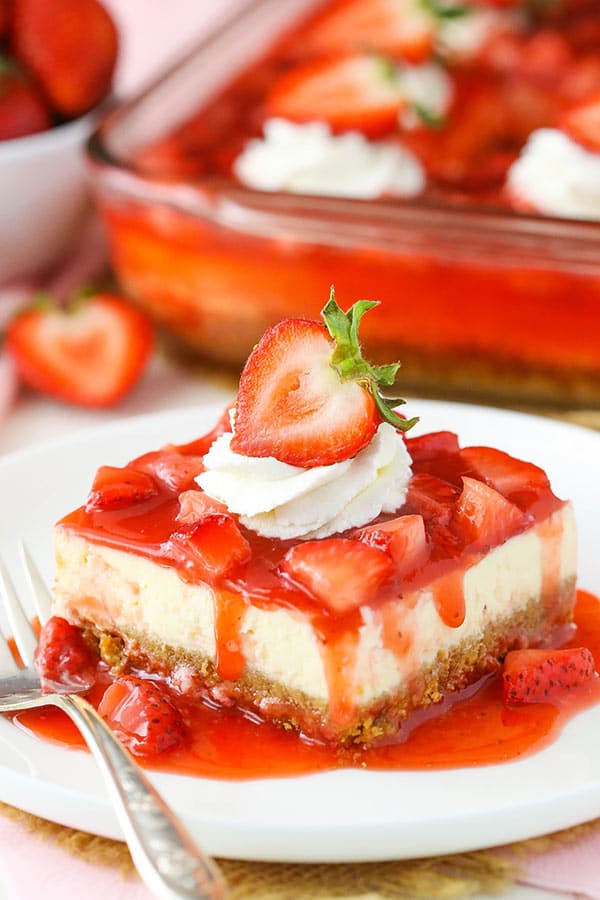
strawberry cheesecake
Ingredients
Method
- Preheat oven to 325°F. Grease a 9x13 inch pan. Mix graham cracker crumbs, sugar, and melted butter to form crust. Press into the bottom of the pan. Bake for 10 minutes and set aside to cool.
- Reduce oven temperature to 300°F. Beat cream cheese, sugar, and flour until smooth. Add sour cream and vanilla, mix well. Add eggs one at a time, mixing on low speed after each addition.
- Pour batter over crust. Bake for 30 minutes. Turn off oven and leave cheesecake inside for 20 minutes. Crack oven door and let cool for 15 minutes. Chill in fridge for 3-4 hours.
- Prepare topping: combine sugar and cornstarch, stir in strawberry puree. Cook until thickened, about 15-20 minutes. Remove from heat, stir in vanilla and chopped strawberries. Cool slightly.
- Spread strawberry topping over cooled cheesecake. For whipped cream, beat heavy cream, powdered sugar, and vanilla until stiff peaks form. Serve cheesecake with whipped cream if desired.