Simple Lunch Ideas for Busy Days
There’s nothing quite like the smell of this zucchini swirl breakfast cake wafting through my kitchen on a cool Sunday morning. It instantly takes me back to sitting at my grandma’s table, her humming as she baked her famous zucchini bread — this one’s a little different but just as comforting. Honestly, I love how it feels like a hug in every bite, especially when I want something sweet but don’t want to fuss over a complicated recipe. I always do this when I have a few zucchinis leftover or I want to surprise my family with something special. My kids ask for this all the time — they think it’s almost like cake for breakfast, and honestly, I’m not arguing. It’s incredibly easy to whip up, doesn’t make a huge mess, and the swirl of cinnamon and sugar makes it look almost too pretty to cut. Plus, it’s great for brunch or just a quick treat when you’re craving something warm and sweet. Trust me — once you’ve tried this, it’ll be a regular at your house too.
What is Zucchini Swirl Breakfast Cake?
Think of this as the lovechild of a quick loaf and a cinnamon roll, with a healthy dose of zucchini sneaked in to bump up the veggie count. It’s essentially a moist, tender cake made from simple pantry ingredients, topped with a rich cinnamon-sugar swirl that makes each bite explode with cozy flavor. The “swirl” part is what makes this special — you layer it like a cinnamon roll but bake it all in a loaf pan. The name might sound fancy, but honestly, this is a home-baker’s cheat code for busy mornings or lazy weekends. It’s like giving your breakfast a little makeover — a little healthier, super flavorful, and honestly, just a fun way to serve something that feels a bit indulgent without all the fuss. I love that it’s adaptable, too — you can swap in different spices or add nuts if you like, but the basic version is what I always come back to.
Why you’ll love this recipe?
What I love most about this zucchini swirl breakfast cake is how it combines simplicity with that wow factor. The flavor profile is warm, cozy, with hints of cinnamon and a touch of sweetness that’s balanced by the mild vegetal note of zucchini. It’s not overly sweet, which makes it perfect for breakfast or brunch — I’ve fed this to my neighbors, friends, even my picky kids, and everyone leaves asking for seconds. And trust me, I’ve made this countless times and it never fails. The batter comes together in just one bowl, which is a huge plus on busy mornings. Plus, it’s budget-friendly — not a single ingredient here feels fancy or out of reach. The versatility is a big win; you can jazz it up with some chopped nuts or a drizzle of honey on top if you like. This is one of those recipes I consider a true pantry treasure — it’s forgiving, delicious, and just the kind of comfort food I crave when the mornings start to feel hectic. If you’re like me and love a quick baking fix that feels cozy and homemade, this is your new go-to.
How do I make Zucchini Swirl Breakfast Cake?
Quick Overview
This cake is all about a few simple steps — grate your zucchini, mix your batter, swirl in the cinnamon sugar layer, and bake. It’s essentially a one-bowl wonder, making cleanup a breeze. The secret is in the swirl — you spread half the batter in the pan, layer the cinnamon-sugar mixture over it, then top with the remaining batter, creating a lovely marbled effect. The oven does the rest, filling your house with a warm, cinnamon-spiced aroma. In about 45 minutes, you’ll have a golden, moist cake that tastes like a cross between zucchini bread and a cinnamon roll, but with an effortless feel. The best part? It tastes just as good warm with a pat of butter as it does cooled and sliced. Trust me — once you make this, it’ll become a weekend staple, and I bet your family will ask for it on repeat.
Ingredients
For the Main Batter:
– 1 ½ cups all-purpose flour (or substitute with some almond or oat flour for a healthier touch)
– 1 teaspoon baking powder
– ½ teaspoon baking soda
– ½ teaspoon salt
– 1 teaspoon ground cinnamon
– ½ cup granulated sugar
– ½ cup packed brown sugar
– ½ cup vegetable oil (or melted coconut oil)
– 2 large eggs
– 1 teaspoon vanilla extract
– 1 ½ cups finely grated zucchini (squeeze out excess moisture — I always do this with a clean kitchen towel)
For the Filling:
– 3 tablespoons brown sugar
– 1 teaspoon ground cinnamon
– 1 tablespoon softened butter or coconut oil
For the Glaze (optional):
– ½ cup powdered sugar
– 1-2 teaspoons milk or cream
– A splash of vanilla or lemon zest for extra flavor
Step-by-Step Instructions
Step 1: Preheat & Prep Pan
I always start by heating my oven to 350°F (175°C), and I line a loaf pan with parchment paper, or lightly grease it with butter or spray. This cake loves a good non-stick surface because it can be a bit sticky if you don’t watch it. While the oven heats, I grate the zucchini and squeeze out as much moisture as I can. The dryer, the better — it prevents the batter from getting too wet and helps the cake hold its shape.
Step 2: Mix Dry Ingredients
In a big mixing bowl, whisk together the flour, baking powder, baking soda, salt, and cinnamon. This step ensures everything’s evenly distributed, so your cake bakes nice and evenly. I always double-check to make sure there are no clumps of baking soda or baking powder hiding in the mix — nothing worse than a bitter bite in the middle of a sweet cake!
Step 3: Mix Wet Ingredients
In a separate bowl, combine the sugars, oil, eggs, and vanilla. I beat them together until everything looks smooth and slightly fluffy — this takes just a minute. Then, fold in the grated zucchini. I’ve tested this with almond milk instead of regular milk, and honestly, it made the cake even creamier without losing that tender crumb.
Step 4: Combine
Pour the wet mixture into the dry ingredients and gently fold until just combined. Be careful not to overmix — a few lumps are fine because overmixing can make the cake dense. The batter should be thick but scoopable. If it feels too runny because of extra zucchini moisture, just sprinkle in a little more flour.
Step 5: Prepare Filling
Mix the brown sugar and cinnamon in a tiny bowl, then stir in the softened butter or coconut oil until crumbly. I like to add a pinch more cinnamon if I want a stronger flavor, but honestly, the simple combo is so good. You can also add chopped nuts or chocolate chips here if you’re feeling decadent.
Step 6: Layer & Swirl
Spread half of the batter into your prepared loaf pan. Then evenly sprinkle the cinnamon-sugar mixture all over that layer. Drop spoonfuls of the remaining batter on top, and gently swirl with a knife or a skewer — don’t overdo it, aim for a marbled effect rather than a perfect swirl. It’s all about that cozy, rustic look that makes everyone think you spent hours on it.
Step 7: Bake
Place the cake in the oven and bake for about 45-50 minutes. Check for doneness by inserting a toothpick into the center — it should come out clean, or with just a few crumbs. If it’s browning too fast on top, tent it with foil and keep baking. Every oven is slightly different, so trustworthy timing and the toothpick test are your friends here.
Step 8: Cool & Glaze
Once out of the oven, let the cake cool in the pan for about 10 minutes, then transfer to a wire rack. Drizzle your glaze (or just dust with powdered sugar if you’re feeling minimal) while the cake is still slightly warm. The glaze adds just a touch of sweetness and makes this feel extra special.
Step 9: Slice & Serve
I recommend waiting at least 15 minutes for the cake to cool completely so it slices neat and tidy. Use a serrated knife and slice with a gentle sawing motion. It’s fantastic warm or at room temperature. My favorite way is to serve it with a swipe of butter or a dollop of Greek yogurt, especially if you’re feeling indulgent.
What to Serve It With
Honestly, this cake is so versatile, it practically pairs itself. For breakfast, I love a good hot coffee or a chai latte on the side — the warm spices complement the beverage perfectly. My family enjoys it as part of a weekend brunch spread, maybe with fresh fruit and a simple green salad for a touch of freshness. It’s also exceptional as a dessert — think alongside a scoop of vanilla ice cream or topped with whipped cream and chopped nuts for a cozy vibe.
When I serve this as a casual snack, I like to cut thick slices and wrap them up for on-the-go treats or school lunches. The fact that it’s crunchy on the edges and tender inside always keeps everyone coming back for more. Plus, it’s a sneaky way to get some veg into kids who might turn their noses up at other veggies!
Top Tips for Perfecting Your Zucchini Swirl Breakfast Cake
Over the years, I’ve picked up a few tricks that make this cake turn out even better each time. First, make sure to squeeze out as much moisture as possible from the zucchini — I find that a clean kitchen towel or cheesecloth works best. The drier the zucchini, the fluffier and less dense your cake will be. Trust me, I’ve made the mistake of skipping that step and ended up with a slightly soggy bottom! Second, when mixing the wet and dry ingredients, be gentle. Overmixing is the sneakiest way to make this dense — aim for light folding rather than vigorous stirring.
If you want a more pronounced cinnamon swirl, just sprinkle a little extra cinnamon in the batter in addition to the filling. It looks pretty, and the flavor really pops. Also, don’t be shy about customizing your topping — add chopped walnuts, chocolate chips, or even a drizzle of honey once it’s cooled. Personal touches always make baking more fun!
I’ve also tested different baking times depending on my oven’s quirks. Some bake a bit hotter or colder. Always keep an eye on it after about 40 minutes. The toothpick test is your best friend — if it comes out with just a few moist crumbs, you’re golden. If not, give it a few more minutes, checking every 5 or so.
And a quick note about glaze variations: I’ve sometimes added a splash of lemon juice or a sprinkle of cardamom to make it extra special. Don’t be afraid to experiment — that’s how the best recipes are born. The key is taste and personal preference, so trust your palate and have fun!
Storing and Reheating Tips
This cake keeps surprisingly well. I usually store leftovers in an airtight container at room temperature for about 1-2 days. It’s best to cover it with a clean towel if you don’t have a container because it stays moist but not soggy. If you want to keep it longer, pop it into the fridge — wrapped tightly or in a sealed container — for up to 4 days. My favorite part? It reheats beautifully in the microwave — just about 20 seconds is enough to bring back the warm, gooey magic.
Thinking ahead? You can also freeze slices for later. Wrap them tightly in plastic wrap and then foil or pop into a freezer bag. When you’re ready to indulge, just thaw at room temperature or give it a quick zap in the microwave. The flavor stays vibrant, and the texture remains just right.
If you’re adding glaze or toppings, wait until you’re ready to serve so that everything stays fresh and shiny. I’ve found that glazing freshly reheated slices makes them look totally bakery-fresh.
Frequently Asked Questions
Final Thoughts
There’s something about this zucchini swirl breakfast cake that just feels like a warm hug on a hectic day. It’s easy, forgiving, and downright delicious — a true testament to how simple ingredients can come together to create something memorable. Over the years, I’ve made this for everything from quick neighborhood breakfasts to special family brunches, and it always gets rave reviews. It’s perfect for a lazy weekend, a last-minute gift, or even just when you’re craving something sweet without going overboard. I hope you enjoy making it as much as I do — trust me, it’s one of those recipes that turns into a household favorite in no time. Make sure to leave a comment below if you try it, and share your own tweaks — I love hearing how everyone puts their personal spin on it. Happy baking, friends — can’t wait to see how yours turns out!

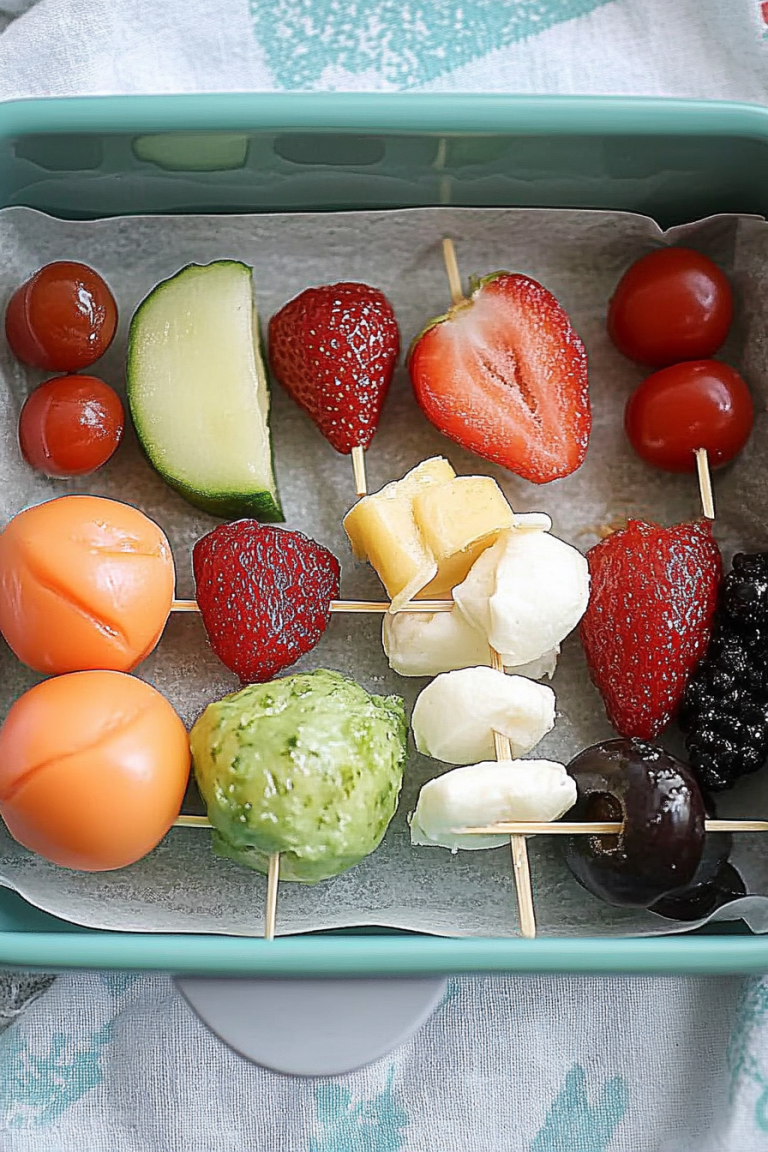
Easy Sandwich Sticks Lunch
Ingredients
Method
- For the Pizza Style Sandwich Sticks: Cut baguette slices, cheese sticks, pepperoni, cherry tomatoes, and olives into bite-sized pieces.
- For the Ham & Cheese Sandwich Sticks: Cut sandwich bread cubes, ham slices, and cheese sticks into bite-sized pieces. Chop lettuce.
- Assemble the skewers by alternating ingredients. For example, for pizza sticks: bread, cheese, pepperoni, tomato, olive, bread. For ham and cheese: bread, ham, cheese, lettuce, bread.
- Repeat for all three skewers per variety, ensuring you end with bread to create a stacked sandwich effect.
- Serve the pizza sandwich sticks with marinara sauce for dipping. Serve the ham and cheese sandwich sticks with a mix of mayonnaise and mustard for dipping.
- Place in a lunch box with ice packs if transporting.