Golden Fudge Recipe Simple & Sweet
There’s something about waking up on a lazy weekend morning and the smell of warm, freshly baked coffee cake drifting through the house. It instantly makes everything feel cozy, like wrapping yourself in a soft blanket. I’ve always loved those baking mornings from my childhood — my mom would pull out her big mixing bowls, and the whole kitchen would be filled with the sweet aroma of cinnamon and just-baked goodness. And let me tell you — this zucchini cinnamon swirl coffee cake has become my go-to recipe for those moments. It’s surprisingly simple, loaded with tender zucchini that keeps it moist, and swirled with cinnamon-spiced goodness that’s just the right amount of sweet. I love how it’s not overly heavy, and the best part? It tastes even better the next day—if it lasts that long! Trust me, this one’s a lifesaver on busy nights when I want something indulgent but don’t want to spend hours in the kitchen. My kids ask for this all the time, and honestly, I don’t blame them. It’s like a warm hug in every bite.
What is Zucchini cinnamon swirl coffee cake?
Think of this dish as a cozy, breakfast-meets-dessert kind of cake. It’s essentially a moist, tender coffee cake with a secret ingredient—zucchini—that makes it extra soft and a little sneaky nutritional boost. The name’s pretty straightforward: it’s a coffee cake layered with a cinnamon-sugar swirl, baked until golden and fragrant. The zucchini blend disappears into the batter, leaving behind only a slight moisture and a gentle sweetness that pairs wonderfully with the warm cinnamon swirl. It’s like those vintage bakery treats you find at a small-town shop, but homemade and with a personal twist. The best part? It’s super forgiving — perfect for those weekends when you want to bake something comforting without fussing over complicated steps. And honestly, it’s a hit with kids and grownups alike—I’ve even snuck some extra zucchini into it when I wanted to feel a little healthier about indulging!
Why you’ll love this recipe?
What I love most about this zucchini cinnamon swirl coffee cake is how it hits all the right notes—flavor, texture, and nostalgia, all wrapped into one. The moment it’s baking, your kitchen fills with an insanely inviting aroma, and it’s impossible to resist grabbing a slice as it cools just enough. The flavor profile? Oh, it’s heavenly—warm cinnamon, sweet hints of vanilla, and the subtle earthiness of zucchini that keeps the cake from feeling too heavy. It’s surprisingly simple to whip together, and I always do this when I want a cozy treat that feels a little indulgent but still wholesome. Plus, it’s budget-friendly—most of the ingredients are pantry staples or veggies I have on hand. I’ve played around with this recipe so many times, and I love how versatile it is. You can top it with a simple dusting of powdered sugar or go all out with a drizzle of cream cheese glaze. Either way, it’s a showstopper! What I love most about this is how it makes my house smell like a bakery—impossible to keep it under wraps when I bake this for friends or family. It’s honestly become a family favorite, and I want you to get hooked on it, too.
How do you make Zucchini Swirl Coffee Cake?
Quick Overview
This coffee cake is a breeze to make! You start by grating fresh zucchini, mixing it into a simple batter with flour, sugar, eggs, and a hint of vanilla. Then, you swirl in a cinnamon-sugar mixture, pour it into a prepared baking dish, and bake until golden. The batter is naturally moist thanks to the zucchini, and the cinnamon swirl adds those warm, aromatic layers. It’s basically a one-bowl wonder once you get the hang of mixing everything gently — no overmixing needed! I love how forgiving this recipe is, making it perfect for busy mornings or weekend baking adventures. Once baked, just cool it a bit, drizzle with a glaze if you like, and enjoy. It’s honestly that easy—and totally worth every second of effort.
Ingredients
For the Main Batter:
- 2 cups grated zucchini (squeeze out excess moisture—trust me on this!)
- 1 ½ cups all-purpose flour (I use regular unbleached flour for a richer flavor)
- 1 cup granulated sugar (we keep it slightly sweet, but you can cut back if preferred)
- ½ cup vegetable oil (or melted unsalted butter if you prefer a richer cake)
- 3 large eggs
- 1 teaspoon vanilla extract
- ½ teaspoon baking powder
- ½ teaspoon baking soda
- ¼ teaspoon salt
For the Filling:
- ½ cup brown sugar
- 2 teaspoons ground cinnamon
For the Glaze:
- ½ cup powdered sugar
- 1-2 teaspoons milk or cream (add more if you want a thinner glaze)
- ½ teaspoon vanilla (for extra flavor)
Step-by-Step Instructions
Step 1: Preheat & Prep Pan
Set your oven to 350°F (175°C). Grease your favorite baking dish—mine’s a 9-inch square pan—and line it with parchment paper if you want easy removal. I always do this to avoid sticking, especially since this cake can be a little delicate. Make sure your zucchini is grated and drained—no one wants a soggy cake. I find it’s easiest to squeeze out the excess moisture with a clean kitchen towel or paper towel so it doesn’t mess with the batter’s consistency.
Step 2: Mix Dry Ingredients
In a large mixing bowl, whisk together the flour, baking powder, baking soda, salt, and cinnamon if you’re using it in the batter. This step is key to ensuring even distribution of leavening agents, so your cake rises nicely and has the right texture. I always do this first — it just feels tidy and helps prevent clumping.
Step 3: Mix Wet Ingredients
In a separate bowl, beat the eggs with the sugar, vanilla, and oil until well combined. The mixture should be a bit frothy and smooth. Add the grated zucchini and mix gently. I’ve tested this with almond milk instead of oil, and it made the cake even creamier—so feel free to experiment if you’re dairy-free.
Step 4: Combine
Pour the wet mixture into the dry ingredients and fold gently with a spatula until just combined—don’t overmix! The batter will be a little thick but moist. Overmixing can make the cake dense, and nobody wants that.
Step 5: Prepare Filling
In a small bowl, mix the brown sugar and cinnamon together. This will be your irresistible cinnamon swirl, so make sure it’s well combined. You can swap out brown sugar for coconut sugar or maple sugar if you like, but I find the richness of brown sugar works beautifully here.
Step 6: Layer & Swirl
Pour half the batter into your prepared pan, then sprinkle half of the cinnamon-sugar mixture on top. Add the remaining batter and sprinkle the rest of the cinnamon-sugar. Use a knife or skewer to gently swirl through the layers—think of it as creating lovely marbling that makes each slice special. Don’t overdo it; a few swirls will do just fine.
Step 7: Bake
Place your pan in the oven and bake for about 35-40 minutes. The top should turn a beautiful golden brown, and a toothpick inserted into the center comes out clean. Every oven is different, so start checking around the 35-minute mark. If the toothpick has some moist crumbs but no wet batter, it’s ready.
Step 8: Cool & Glaze
Let the cake cool in the pan for about 15 minutes before transferring to a wire rack. This prevents it from falling apart. If you’re glazing, mix the powdered sugar with milk and vanilla until smooth, then drizzle over slightly warm cake. This enhances the sweetness and adds that beautiful gloss plus a little extra indulgence.
Step 9: Slice & Serve
Once cooled completely, slice with a serrated knife to keep the layers intact. Serve warm or at room temperature—either way, it’s delicious. I love pairing it with a cup of strong coffee or a glass of cold milk. Trust me, this disappears in minutes at my house!
What to Serve It With
This cake is so versatile that it fits just about any occasion. For breakfast or brunch, serve it alongside your favorite coffee blend or a hot chai latte—my kids especially love it next to a mug of warm cocoa on chilly mornings. It’s also a fantastic dessert—warm slices topped with a dollop of whipped cream or a scoop of vanilla ice cream make it extra special. When friends come over, I love cutting it into thick squares, arranging them beautifully on a plate, and drizzling with extra glaze or a dusting of powdered sugar for a pretty finish. And honestly, it makes a cozy snack on a lazy afternoon, maybe enjoyed with a handful of nuts or a side of fresh berries. I’ve even brought it to potlucks, and everyone always asks for the recipe. It’s truly one of those forgiving cakes that feel like a warm hug, no matter how many times you make it.
Top Tips for Perfecting Your Zucchini Cinnamon Swirl Coffee Cake
After making this countless times, I’ve learned a few little tricks to elevate your baking game. First off, squeezing out as much moisture as possible from the zucchini is key—moisture can cause sogginess or uneven baking. I grate, then wrap it in a paper towel and give it a good squeeze. Hollowing out excess water makes all the difference. When mixing the wet ingredients, don’t overbeat—just until everything is combined and smooth. Overmixing the batter can lead to a dense, heavy cake, and nobody has time for that! For the swirl, I prefer using a skewer or knife to create a gentle marbling; pushing too deep can make the layers muddy, and not deep enough won’t give enough visual flair. If you want to switch it up, try adding chopped nuts or a splash of orange zest to the batter for more flavor complexity. When baking, I always place the cake on the middle rack and keep an eye on it—ovens vary, and you want to avoid overbaking. I also recommend letting the cake cool completely before glazing; the glaze penetrates better, and the texture is just perfect. Lastly, I’ve adapted this with gluten-free flour blends, and while it’s a little denser, it still tastes fantastic—just don’t expect it to rise quite as high. The biggest lesson? Don’t rush the cooling process and enjoy every warm, cinnamon-scented bite!
Storing and Reheating Tips
This cake makes my life so much easier because it keeps surprisingly well. Store any leftovers in an airtight container at room temperature for up to two days—it’ll stay moist and fragrant. To keep it fresh longer, pop it into the refrigerator for about 3-4 days—just bring slices to room temperature before serving for the best texture. For freezing, I wrap individual slices tightly in plastic wrap, then pop them into a freezer bag. They’ll keep beautifully for up to three months. To reheat, microwave on low for 20-30 seconds or warm in a preheated oven at 350°F for about 10 minutes. If you’ve glazed it, I suggest adding the glaze after reheating to keep that shiny finish. For best results, reheat slices uncovered—covering can make the glaze soggy. When reheating, keep an eye on it—you don’t want it to dry out or burn. Honestly, even after freezing and reheating, it’s almost as good as fresh—another reason I love making this in advance for weekend brunches or special breakfasts.
Frequently Asked Questions
Final Thoughts
This zucchini cinnamon swirl coffee cake has truly become a staple in my home, and I think it will find a special place in yours too. It’s one of those recipes that feels like a warm hug on a hectic morning or a cozy weekend treat. The combination of moist zucchini, fragrant cinnamon, and a tender crumb makes each bite memorable—plus, it’s easy enough for a beginner but special enough for more experienced bakers. I love that I can customize it with nuts, citrus, or even chocolate chips if I’m feeling playful. The smell alone will draw everyone into the kitchen, and before you know it, it’s gone! I encourage you to experiment and make it your own—maybe add your favorite spices or switch up the glaze. Whatever variation you choose, I promise it’ll become a recipe you turn to again and again. Happy baking! And seriously, I’d love to hear how yours turns out—drop a comment or share your photos! Enjoy every warm, cinnamon-scented bite, my friend.
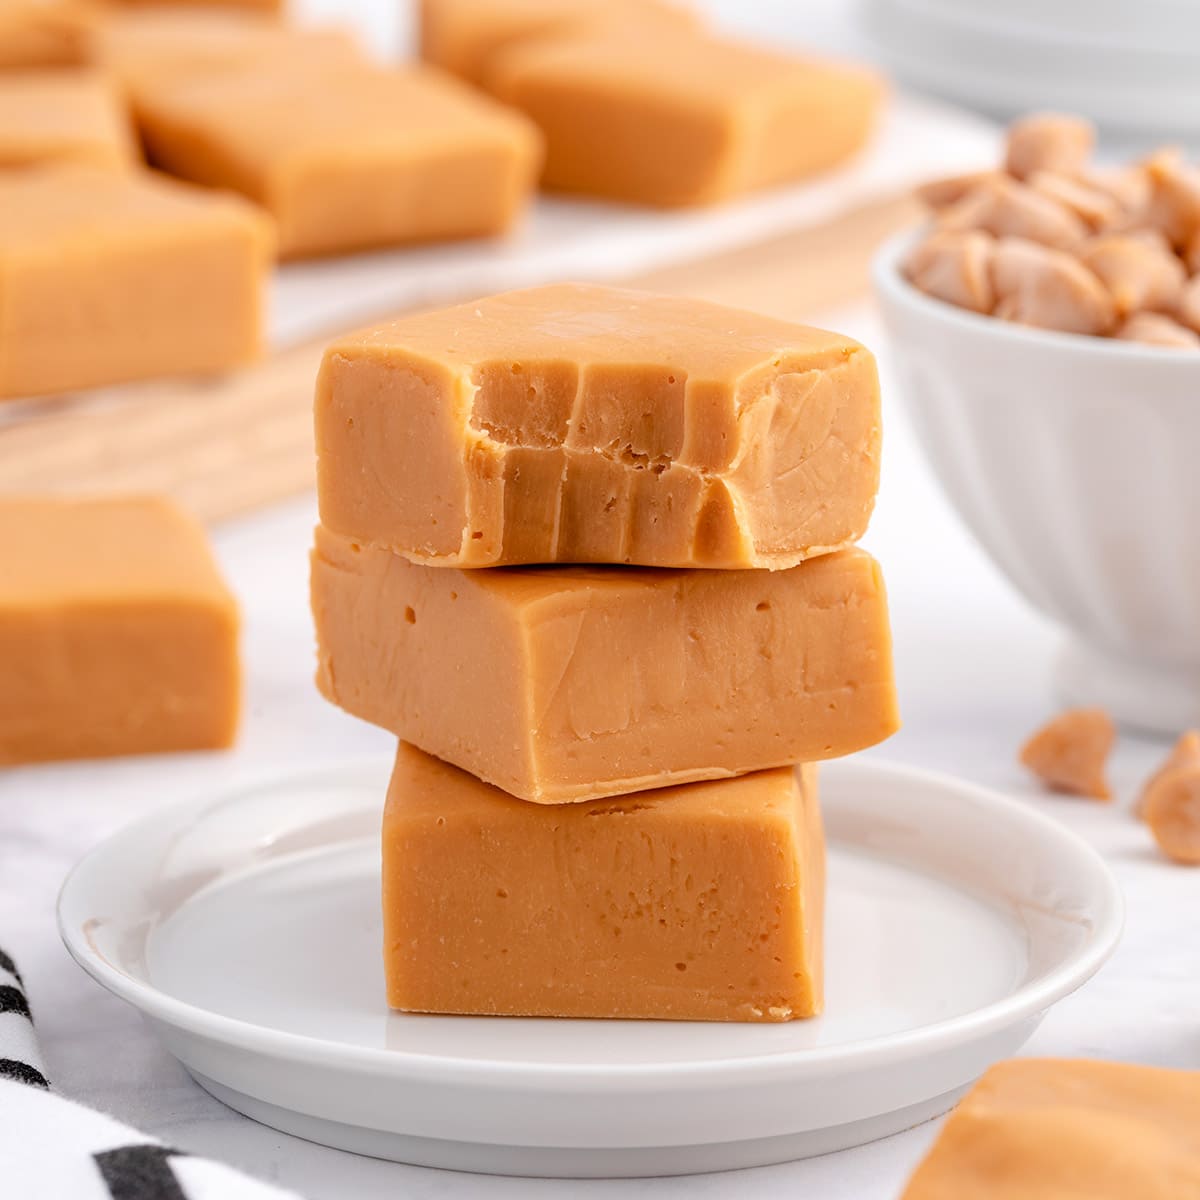
Butterscotch Fudge
Ingredients
Method
- Line an 8x8-inch baking dish with parchment paper and set it aside.
- Add the butterscotch morsels, sweetened condensed milk, and salt to a medium-sized heat-safe bowl.
- Microwave in 30-second intervals, stirring after each interval until completely melted and smooth.
- Evenly spread the butterscotch fudge into the prepared baking dish.
- Chill in the refrigerator for at least 2 hours until firm. Slice into 25 servings (5 x 5 slices) before serving.