Easy S’mores Deep Dish Bowls
Honestly, there’s nothing quite like coming home after a long day and finding the smell of freshly baked cake wafting through the house. It instantly turns any rough day into something brighter. This zucchini swirl cake has been my family’s secret weapon when I want something sweet yet unexpectedly healthy. I always do this when I need a quick dessert that feels fancy but is actually super simple—trust me, it’s like a warm hug in dessert form. My kids ask for it all the time, especially when zucchini makes its seasonal debut at the grocery store. And the best part? It disappears in minutes at my house! I’ve tried making this with dark chocolate chips, cinnamon, even a hint of lemon zest—pick your favorite additions—it’s that versatile. Plus, there’s a magic in the swirl pattern that just makes it Instagram-worthy but honestly, I love it even more because it’s homemade and imperfect, just like me. Grab your apron, and let’s dive into what makes this zucchini swirl cake a recipe I keep coming back to—no fancy skills needed, just a love for cozy baking.
What is Zucchini Swirl Cake?
Think of it as a cozy mash-up of a quick bread and a layered cake, with tender zucchini running through every bite. It’s essentially a moist, sweet cake that lets zucchini shine without turning it into something savory. The name “swirl” comes from how I layer the batter with a simple cinnamon-spiced filling, then swirl it all together with a toothpick or knife—creating beautiful marbled patterns that look fancy but are really easy to do. It’s a cake that whispers “comfort” but looks like you spent hours decorating. The idea actually came from my grandma’s classic zucchini bread—except I wanted something that feels a little more special for weekend mornings or casual get-togethers. You can imagine slicing into it, with the cinnamon and zucchini offering a perfect balance of sweetness and earthiness. It’s a little taste of nostalgia, with a modern twist, that really hits the spot when you’re craving something soft and sweet but also a little wholesome.
Why you’ll love this recipe?
What I love most about this zucchini swirl cake is how it hits all the right notes—flavor, ease, and practicality. For starters, the flavor profile is incredible: moist, tender cake with warm cinnamon notes dancing around the subtle sweetness of zucchini. It’s not overly sweet, which makes it perfect for breakfast or a mid-afternoon pick-me-up, but I won’t judge if you want to enjoy it after dinner too. Plus, it’s super simple to make. I’ve made this countless times, and it never fails—just mix, layer, swirl, and bake. No fancy equipment needed, just a whisk and a spatula. Budget-wise, it’s fantastic too—you probably have most of the ingredients in your pantry already. And versatility? Oh yes. Swap the cinnamon for nutmeg, add chopped nuts or chocolate chips, or dust it with powdered sugar for a lighter finish. I love that it’s a make-ahead treat and the flavors develop even more after a day or two. This one’s a lifesaver on busy nights, casual afternoons, or whenever zucchini’s in season. Honestly, it’s become a staple around here because it’s just so approachable, delicious, and comforting—like a warm invitation from your own kitchen.
How do I make Zucchini Swirl Cake?
Quick Overview
This cake starts with a simple batter made from basic pantry ingredients—flour, sugar, eggs, and a touch of oil. The zucchini keeps it super moist, so you don’t need any added butter or oil for richness. The filling is a sweet cinnamon mixture you layer in the middle, then swirl through the batter for a gorgeous marbled effect. Pop it in the oven, bake until golden and a toothpick comes out clean—easy! What makes this method special is how forgiving it is—if you overmix a little or forget to swirl perfectly, it still tastes amazing. It’s fundamentally about celebrating zucchini in a way that’s comforting, beautiful, and totally achievable for home bakers of any skill level.
Ingredients
For the Main Batter:
– 2 cups all-purpose flour (I’ve tried whole wheat and it works just fine!)
– 1 1/2 teaspoons baking powder
– 1/2 teaspoon baking soda
– 1/2 teaspoon salt
– 1 teaspoon ground cinnamon
– 1/2 cup sugar (feel free to reduce if you prefer less sweetness)
– 2 large eggs
– 1/2 cup vegetable oil or neutral oil like canola
– 1 teaspoon vanilla extract
– 1 1/2 cups grated zucchini (about 2 small zucchinis, squeezed dry)
For the Filling:
– 1/4 cup brown sugar (or coconut sugar)
– 1 teaspoon ground cinnamon
– Optional: chopped nuts, chocolate chips, or raisins for added texture and flavor
For the Glaze (optional but recommended):
– 1/2 cup powdered sugar
– 1-2 teaspoons milk or lemon juice
– A splash of vanilla (if you like)
Step-by-Step Instructions
Step 1: Preheat & Prep Pan
Preheat your oven to 350°F (175°C). Grease a 9-inch round or square baking pan with butter or non-stick spray. Line with parchment paper if you’re feeling fancy—that makes it easier to lift out the cake once baked. I always do this because I hate struggling with cracked edges. Set aside and get ready to pour some batter!
Step 2: Mix Dry Ingredients
In a large bowl, whisk together your flour, baking powder, baking soda, salt, and cinnamon. This ensures everything is evenly distributed, which matters for a uniform rise and flavor. I’ve made the mistake of skipping this step, and then I get pockets of baking soda—trust me, it’s worth the little extra whisking!
Step 3: Mix Wet Ingredients
In another bowl, beat the eggs and sugar until the mixture is slightly frothy—about 2 minutes. Then whisk in the oil and vanilla until smooth. I tested this with almond milk once—it made the batter even creamier! Add the grated zucchini—make sure to squeeze out excess moisture; otherwise, your cake may be a little wetter than you want. I’ve overdone it and ended up with a bit too much liquid, so just drain and pat dry.
Step 4: Combine
Pour the wet mixture into the dry ingredients and gently fold together with a spatula. The batter will be thick but stir just until combined—don’t overmix, or the cake can get dense. If you see streaks of flour, that’s okay—just keep folding gently. That’s the secret to a tender crumb.
Step 5: Prepare Filling
Mix together the brown sugar and cinnamon. If you’re adding nuts or chocolate chips, fold them into this mixture or sprinkle on top before layering. I love adding chopped walnuts or a handful of mini chocolate chips—makes it extra special.
Step 6: Layer & Swirl
Spread half of the batter into your prepared pan. Even it out with a spatula. Sprinkle the cinnamon-sugar mixture evenly over the batter. Then add the remaining batter on top in dollops. Using a butter knife or skewer, swirl through all the layers to create beautiful marbling—just zig-zag back and forth. Don’t worry if it’s not perfect—that’s part of the charm!
Step 7: Bake
Pop it into the oven on the middle rack and bake for about 35-40 minutes. Check for doneness by inserting a toothpick into the center—if it comes out clean, you’re golden. The top should be dome-shaped and a little golden brown. Every oven is different, so start checking around 35 minutes to avoid overbaking.
Step 8: Cool & Glaze
Allow the cake to cool in the pan for about 15 minutes before transferring to a wire rack. If you used parchment, gently lift it out. Once cooled slightly, drizzle with a quick glaze made from powdered sugar and milk—trust me, a touch of glaze makes it feel extra special. I sometimes add a squeeze of lemon juice to the glaze for a tangy kick.
Step 9: Slice & Serve
Use a sharp knife to cut into even slices. I like serving it slightly warm or at room temperature—hot slices can be a bit delicate. Pair it with a cup of coffee or tea, and watch everyone ask for seconds. This cake is pretty outstanding on its own, but a scoop of vanilla ice cream or a dollop of whipped cream takes it over the top.
What to Serve It With
Honestly, this cake is pretty versatile. For breakfast, I love pairing it with a strong black coffee or a cup of chai. It’s cozy enough to enjoy with a mug in hand and feels like a little treat to start the day. When I serve it at brunch, I’ll add fresh berries or a dusting of powdered sugar, and maybe a drizzle of honey. It’s also fantastic after dinner — warm from the oven with a scoop of vanilla ice cream or a side of Greek yogurt. And when I want a lazy afternoon snack, I’ll slice a piece, smear a little butter on it (because yes, I do that), and enjoy every bite. My kids ask for this all the time during lazy weekends, and I’ve even packed slices for school lunches—just make sure to wrap them tightly!
Top Tips for Perfecting Your Zucchini Swirl Cake
After making this dozens of times, I’ve picked up a few tricks that really elevate the final product—trust me, these tiny tips make a difference.
- Zucchini Prep: Always squeeze out excess moisture after grating. I use a clean dish towel or cheesecloth—gotta get rid of that watery zucchini or your batter will be too loose. Freshness counts, so try to grate just before mixing.
- Mixing Advice: Overmixing makes the cake dense—a common rookie mistake. Fold gently just until you see no streaks of flour. This keeps the crumb light and fluffy.
- Swirl Technique: Use a skewer or butter knife to zig-zag through the batter. Don’t be afraid to go deep into the center—those marbled swirls are what make it so pretty and fun to eat.
- Ingredient Swaps: If you want a richer flavor, swap half the oil for melted butter. Want a gluten-free version? Almond flour can work in a pinch, just reduce the flour slightly and add an extra egg for stability. Remember, gluten-free baked goods tend to be a little denser, but still delicious.
- Baking Tips: Always check around 35 minutes—your oven might be hotter or cooler. The edges should be just starting to pull away, and the top should be golden. Every oven is different, so a toothpick test is your best guide.
- Glaze Variations: For a fancy touch, stir in a splash of vanilla extract or lemon zest into the glaze. You can also sprinkle a little cinnamon or chopped nuts on top after glazing—you’ll love the crunch factor.
This recipe has been my comfort zone for years. I’ve tested it with different flours, sweeteners, and fillings. Sometimes, I add a handful of chocolate chips or dried cranberries. The key is to keep it simple because the zucchini really is the star, and I’ve learned that less is more for a tender, moist crumb. Trust me on this—once you nail the swirl, it becomes your go-to for any occasion. And I swear, it gets better the next day, if it lasts that long!
Storing and Reheating Tips
This cake stays fresh surprisingly well. If you’re eating it within a day or two, just store it covered at room temperature—an airtight container or tightly wrapped in plastic does the trick. If it’s going to be longer, pop it in the refrigerator; just be aware it might dry out a little. I like to let it sit out for about 30 minutes before slicing so it’s not too cold and crumbly.
For freezing, wrap slices tightly in plastic wrap and then put them in a freezer bag. They’ll last up to 3 months. When ready to eat, thaw at room temperature or warm in the microwave for about 20 seconds—perfect for that “just baked” feel. If you want to add the glaze, do it after reheating to keep the texture crisp and fresh.
And here’s a tip: if you prefer your cake glazed, wait until it’s completely cooled. Hot cake and glaze don’t always mix well—and who wants a soggy swirl? Trust me, patience in this step pays off. Once glazed, it’s best enjoyed within 2-3 days for maximum freshness, but honestly, it rarely lasts that long around here anyway!
Frequently Asked Questions
Final Thoughts
This zucchini swirl cake has truly become a beloved part of my baking repertoire. It’s the kind of recipe that makes you feel accomplished without all the fuss—and it always gets oohs and aahs from everyone around the table. Whether you’re looking for a quick snack, a special brunch treat, or a sneaky way to get more veggies into your kids’ diets, this cake delivers. I’ve lost count of how many times I’ve baked it to surprise friends, bring to potlucks, or enjoy on lazy Saturday mornings. It’s cozy, nostalgic, and honestly, just plain good. So go ahead, give it a try—tweak it to make it your own—and I can’t wait to hear how yours turns out. Happy baking! And don’t forget to share a slice with someone you love—because that’s what good recipes are really all about.
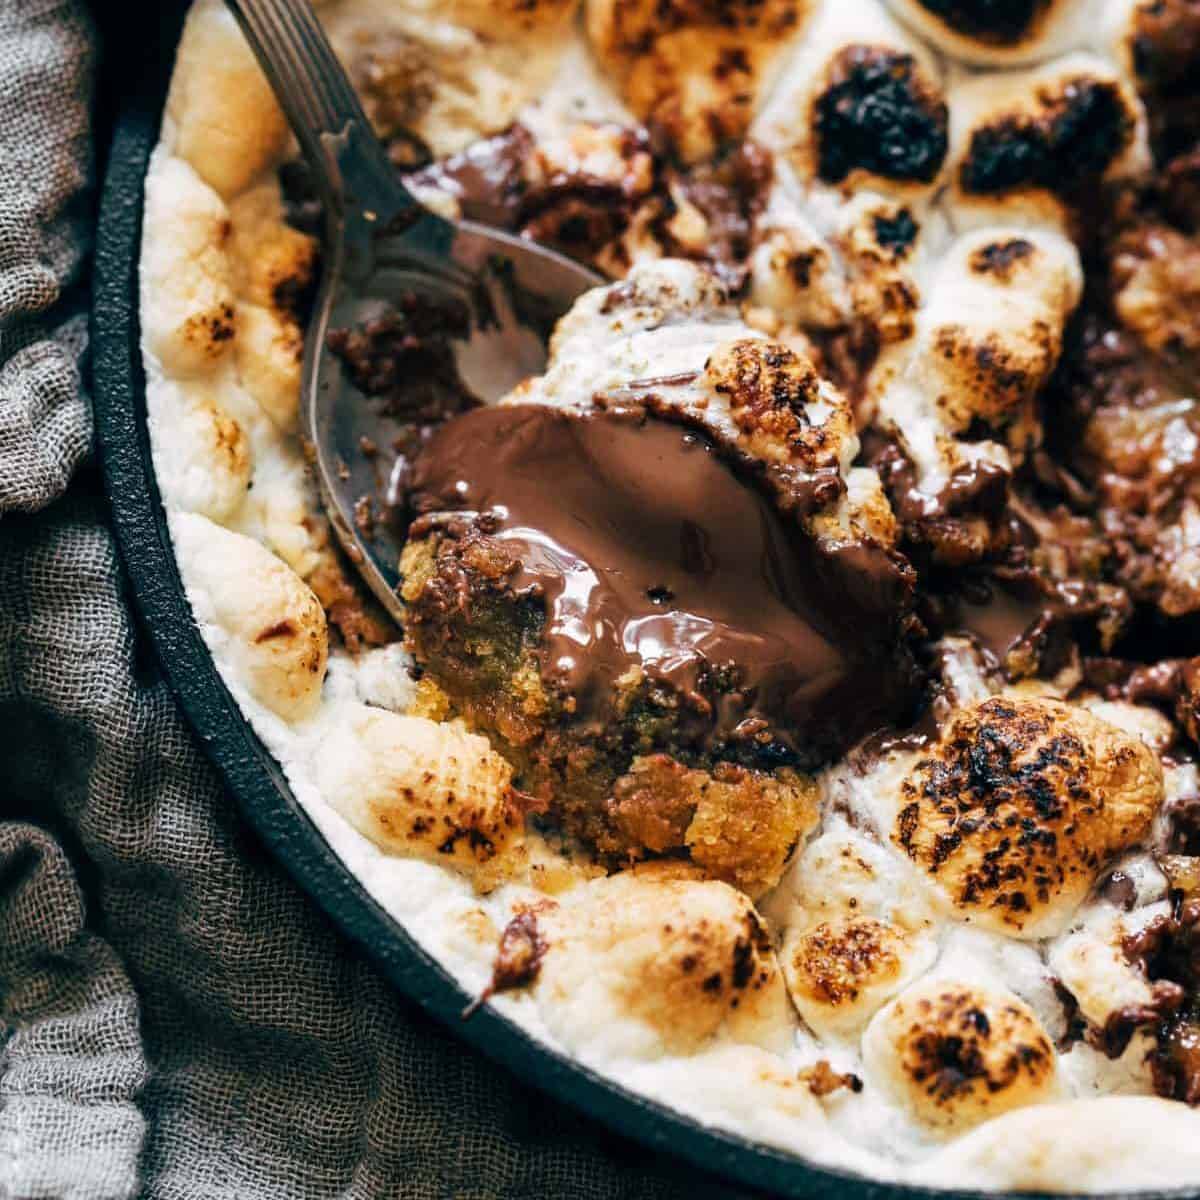
Smores
Ingredients
Method
- Preheat oven to 350°F (175°C). In a medium bowl, mix together the melted butter, brown sugar, and white sugar until well combined.
- Whisk in the egg yolk and vanilla extract. Add the baking powder, flour, salt, and crushed graham crackers. Stir until a dough forms.
- Divide the dough between two 4-ounce ramekins, pressing it into the bottom and up the sides to form a crust. If you prefer smaller portions, you can divide the dough among 3-4 ramekins.
- Top the dough in each ramekin with a layer of chocolate squares or chocolate chips. Finish by piling the mini marshmallows generously on top of the chocolate.
- Bake for 15 minutes, or until the marshmallows are lightly browned and crispy, and the edges of the cookie base are golden. Allow to cool slightly before serving.