Easy Chocolate Cookie Sandwiches with Nutella
If there’s one thing I’ve learned over years of baking with my family, it’s that a good muffin can turn a bad day around faster than anything. I remember my grandma’s kitchen, the smell of buttery batter wafting through the air, and the way my kids’ eyes lit up when I pulled out that warm batch of muffins, loaded with melting chocolate chips and tiny bits of zucchini sneaking in. Honestly, I think muffins are the secret to happiness — versatile, forgiving, and perfect for breakfast, snacks, or a sneaky dessert at 10 p.m. This particular recipe for chocolate chip zucchini muffins is a personal favorite because it’s kind of like a hug in muffin form — moist, flavorful, and just the right amount of indulgence. Plus, it’s one of those recipes that’s incredibly forgiving, even if you’re not a baking expert. Trust me, once you make this a couple of times, it’ll disappear in minutes at your house, I promise. And the best part? The zucchini keeps these muffins super moist and tender, without any weird vegetable aftertaste. It’s a little trick I always do when I want something sweet and cozy that I can feel good about feeding my family.
What is chocolate chip Zucchini Muffins?
Think of these muffins as a lovechild between a classic chocolate chip cookie and a hearty vegetable loaf — just kidding, but seriously, they’re that good. The name might sound fancy or like something only a seasoned baker could pull off, but don’t let it fool you. It’s essentially a quick bread baked in muffin tins, loaded with chocolate chips and grated zucchini. The zucchini’s there to add moisture and a tiny bit of sneaky nutrition without changing the flavor much. Because zucchini is so mild, you won’t even notice it—what you get is a tender, fluffy muffin with bursts of melty chocolate in every bite. Honestly, I first started making these when I had leftover zucchini from my garden, and I wanted something sweet that wouldn’t feel heavy or overly indulgent. They’re perfect for those mornings when you crave something chocolatey but also want to sneak in some vegetables for the kids. Think of it as a win-win: a treat you can indulge in guilt-free, and that’s everyone’s favorite quick breakfast or snack. They’re so versatile that I’ve even made mini versions for a cute brunch or froze extras for later—more on that later!
Why you’ll love this recipe?
What I love most about these chocolate chip zucchini muffins is that they’re a total crowd-pleaser, and honestly, I’ve made this recipe dozens of times, tweaking little things here and there. The flavor? Oh man, it’s just perfect. You get that warm, melt-in-your-mouth chocolate combined with the subtle sweetness of zucchini and a hint of vanilla. The zucchini keeps them so moist that you don’t need butter or oil in the batter, making these pretty budget-friendly and healthier than your average muffin. I always do this when I need something comforting—bake a batch, then pop them in the freezer for quick breakfasts or snacks. It’s a lifesaver on busy nights when everyone’s starving but I don’t want to fuss in the kitchen. Plus, the recipe is super simple. You don’t need fancy ingredients or a mixer—just some basic staples from your pantry. And let me tell you, they’re endlessly versatile. You could swap out the chocolate chips for berries or nuts, or add a pinch of cinnamon for a warm, spicy twist. I’ve tested this with almond milk too, and it actually made the muffins even creamier—trust me on that. These muffins are my go-to for sneaking veggies into the kids’ diet without them suspecting a thing. They ask for these all the time, and I don’t mind one bit — it’s like baking a little secret!
How do I make Zucchini Muffins?
Quick Overview
If I had to sum this up quickly, I’d say: grate the zucchini, mix your wet ingredients, stir in the dry, fold in the chocolate chips, and bake. That’s it! The best part is, you don’t need any special equipment. Just a mixing bowl, a grater, and muffin tins. The process is straightforward, and I promise, once you get into the rhythm, it’s a breeze. These muffins come together in under 30 minutes from start to finish, making them perfect for those days when you want a warm bake without a ton of fuss. They stay incredibly moist because of the zucchini, and the chocolate chips make every bite feel like a little celebration. Plus, they’re great to freeze individually so you can grab one anytime—perfect for when the kids are bugging you for a snack or when you want something sweet with your coffee.
Ingredients
For the Main Batter:
– 1 ½ cups all-purpose flour (or whole wheat for extra fiber)
– 1 teaspoon baking powder
– ½ teaspoon baking soda
– ¼ teaspoon salt
– ½ cup granulated sugar (or coconut sugar for healthier vibes)
– ½ teaspoon vanilla extract
– 2 large eggs
– ½ cup milk (dairy or almond milk works perfectly)
– ½ cup vegetable oil (or melted coconut oil)
– 1 cup grated zucchini (roughly one medium zucchini)
– ¾ cup chocolate chips (dark or semi-sweet, your choice)
For the Filling (optional):
– Cream cheese, nuts, or additional chocolate chips for extra flavor and texture
For the Glaze (if you want to add a little extra sweetness):
– ½ cup powdered sugar mixed with a teaspoon of milk or lemon juice until smooth
Step-by-Step Instructions
Step 1: Preheat & Prep Pan
I always start by preheating my oven to 350°F (175°C). Then, line a muffin tin with paper liners or grease it well—trust me, a little spray is your best friend here to avoid sticking. While your oven heats, grate the zucchini and toss it in a clean kitchen towel to squeeze out excess moisture—that’s a game changer for fluffy muffins. This step isn’t exact science; just make sure they’re not watery otherwise the muffins can turn out dense.
Step 2: Mix Dry Ingredients
In a big mixing bowl, sift together the flour, baking powder, baking soda, salt, and sugar. I like to do this first to get everything evenly distributed. It’s a small step that makes a big difference in how fluffy and even the muffins turn out.
Step 3: Mix Wet Ingredients
In another bowl, whisk together the eggs, milk, vanilla, and oil until smooth. I always do this by hand — it takes just a minute. If you want a slightly dairy-free version, almond milk works just as well here. When everything’s combined, add your grated zucchini and gently fold it in so it’s evenly dispersed.
Step 4: Combine
Pour the wet mixture into the dry ingredients. Now, here’s the key—stir just until combined. Don’t overmix, or your muffins might come out a little tough. I’ve learned this the hard way after a few dense batches — patience is everything. Gently fold in those chocolate chips, reserving a few to sprinkle on top if you like a little extra chocolate finish.
Step 5: Prepare Filling (if using)
If you’re using fillings like cream cheese, scoop a teaspoon into the center of each muffin just before baking, or swirl it gently into the batter for a marbled effect. But honestly, I love these best plain with extra chocolate chips because it’s easier and just as delicious.
Step 6: Layer & Swirl
If you want to go the extra mile with a marbled look, pour batter into the muffin cups about halfway, then add a spoonful of filling or extra chocolate, and top with more batter. Use a toothpick or skewer to swirl gently for a pretty marbling effect. This step is totally optional but makes the muffins look stunning if you’re serving guests or taking photos.
Step 7: Bake
Pop your muffins in the oven, and bake for about 20-22 minutes. They’re done when they turn golden on top and a toothpick inserted into the center comes out clean or with just a few moist crumbs. Every oven is different, so start checking at 20 minutes. If you’re using convection, you might want to reduce the temperature slightly—just keep an eye on them.
Step 8: Cool & Glaze
Let the muffins cool in the pan for about 5 minutes before transferring them to a wire rack. This prevents sogginess. If you’re glazing, wait until they’re completely cooled — a quick drizzle over the top gives them that bakery look, and it’s a nice touch if you’re serving these for a brunch or dessert.
Step 9: Slice & Serve
Serve warm or at room temperature. I like to cut them in half and spread a little butter or cream cheese if I’m feeling extra indulgent. Or just enjoy them plain with a cup of coffee. They’re perfect for grab-and-go mornings, and if you store extras in an airtight container, they stay fresh for 2-3 days. To reheat, a quick 10-second zap in the microwave does the trick, or you can freshen them up in the oven at 350°F for a few minutes. These muffins also freeze beautifully—just wrap individually and thaw at room temp or in the microwave when you need a quick treat.
What to Serve It With
These muffins are pretty much their own show, but I love serving them in different ways depending on the occasion. For breakfast, I like pairing them with a frothy cappuccino or a glass of cold milk — warm muffins fresh out of the oven are just the thing to kickstart a busy day. My kids actually ask for these all the time, especially when I add a handful of walnuts or a sprinkle of cinnamon on top before baking. Buffets or brunch gatherings look adorable when you present a basket of these with some fresh fruit, a little dollop of whipped cream, or dusted with powdered sugar. As a dessert, they’re fantastic with a scoop of vanilla ice cream or drizzled with caramel—trust me on this! When we just want cozy snacks, I warm them slightly and serve with a cup of tea or hot cocoa. They’re so adaptable that way, and honestly, I’ve made batch after batch, tweaking ingredients, and I still get excited every time.
Top Tips for Perfecting Your Chocolate Chip Zucchini Muffins
After making these countless times, I’ve learned a few tricks to make sure they turn out perfect every single time. First, always squeeze out excess moisture from the zucchini. I keep a clean kitchen towel handy and give it a good squeeze — it makes your muffins so much lighter and fluffier. Overmixing is my biggest rookie mistake; I used to stir until everything looked uniform, but that made the muffins dense. Now, I fold gently and stop as soon as it’s combined. For a more colorful swirl, I sometimes add a few drops of food coloring or swirl in peanut butter for a twist. If the batter feels too thick, a splash of milk loosens it right up; if it’s too runny, a tablespoon more flour fixes that. Baked on the middle rack, the muffins develop a nice golden top, but if they’re browning too quickly, tent them with foil for the last few minutes. As for the glaze, I prefer to keep it simple, but I’ve also experimented with a lemon glaze or even a cinnamon-sugar dusting. The goal is to add just a little extra shine and sweetness without overpowering the muffin’s cozy flavor. Honestly, I’ve learned to adapt to what I have in the pantry — a little cinnamon, a handful of nuts, or using coconut sugar instead of white — the key is to keep them moist and flavorful. These muffins are forgiving, which is why I keep making them over and over.
Storing and Reheating Tips
Oh, and this is a lifesaver: these muffins store really well if you do it right. I usually let them cool completely, then keep leftovers in an airtight container at room temperature for about two days. After that, I pop them into the refrigerator, which keeps them fresh for up to five days, though I do recommend reheating slightly for that fresh-out-of-the-oven feel. For longer storage, I wrap individual muffins tightly in plastic wrap, then stash them in a freezer-safe bag — these freeze beautifully for up to three months. To reheat, just microwave for 15-20 seconds or warm in the oven at 350°F for about 5 minutes. I find that the zucchini keeps the muffins moist even after freezing, so they’re still delicious. If you’re adding glaze or frosting, wait until they’re fully cooled before drizzling — fresh glaze makes them look pretty and taste better. Just note that if you freeze the muffins with the glaze, it might lose a little of its shine once thawed, so it’s better to add it fresh. No matter how you store them, these muffins are all about convenience and flavor — perfect for busy mornings or lazy weekends.
Frequently Asked Questions
Final Thoughts
If you’re looking for a muffin recipe that hits all the marks—moist, chocolatey, sneaky veggies, and easy to whip up on any busy day—this chocolate chip zucchini muffin is it. It’s the kind of treat that feels indulgent but secretly packs some good stuff, making it a staple in my house. I love how forgiving it is, perfect for bakers of all levels, and adaptable too. I always keep a batch in the freezer, and they’re gone within days. Every time I make these, I think about how baking really is a little act of love — I put a little extra care in, and it always comes back to me in the way my family lights up when they see these muffins on the table. Give it a try — I honestly can’t wait to hear how yours turn out! Feel free to share your own tweaks or stories in the comments — I love hearing from fellow muffin enthusiasts. Happy baking!
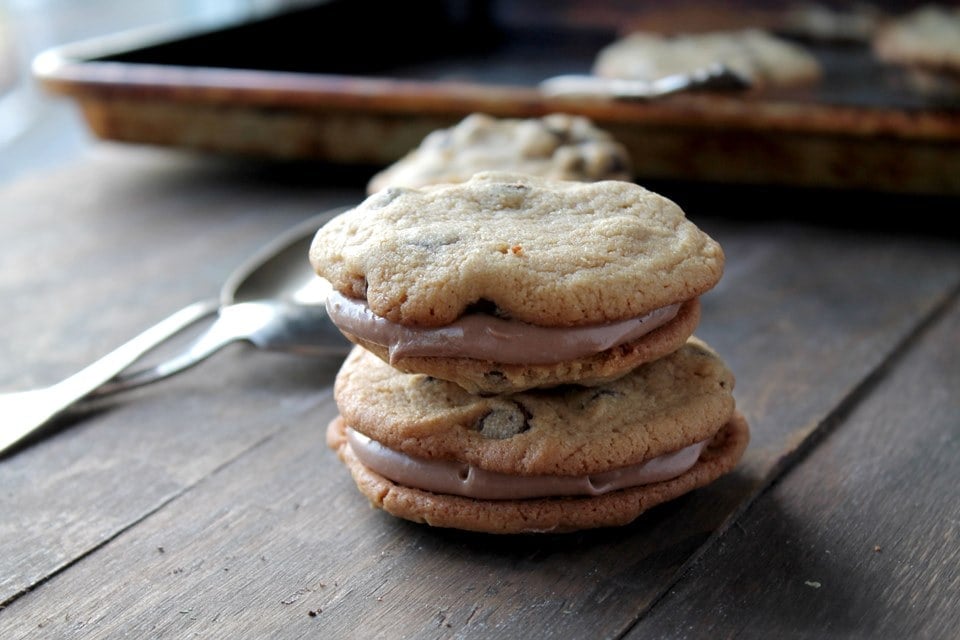
cookie sandwiches
Ingredients
Method
- Preheat oven to 350°F.
- Line baking sheets with parchment paper.
- Sift together flour and baking soda in a small bowl.
- In a large bowl, beat softened butter, sugar, and light brown sugar until fluffy.
- Add salt, vanilla, and eggs; beat until combined.
- Gradually mix in flour mixture.
- Stir in chocolate chips.
- Drop rounded tablespoons onto prepared baking sheets, 2 inches apart.
- Bake for 8-10 minutes until golden around edges.
- Cool on baking sheets for 2 minutes, then transfer to wire racks to cool completely.
- Prepare the filling by beating cream cheese and powdered sugar until smooth.
- Mix in melted white chocolate chips and Nutella until well combined.
- Refrigerate the filling for 10 minutes.
- Spread filling on flat side of half the cookies, then top with remaining cookies.
- Refrigerate for 20 minutes to set filling.
- Serve cookies at room temperature.