Easy Chicken Pesto Bake Recipe
There’s something about baking that feels like a warm hug, right? I remember growing up in a cozy little kitchen where my grandma used to make this incredible chocolate zucchini marble cake. The smell of it baking—that rich cocoa mingling with fresh zucchini—always brought everyone running to the kitchen, even before it was out of the oven. Honestly, I love how this cake combines the moist, sneaky goodness of zucchini with the indulgence of chocolate and the swirl of vanilla—kind of like a baked hug with a little twist. It’s one of those recipes that’s so simple, yet makes you feel like a baking hero. My kids ask for this all the time, especially when those zucchinis are threatening to take over the garden. It’s a lifesaver on busy nights, and I promise, no one ever guesses there’s zucchini inside until I tell them. If you’re craving something chocolatey and a little nostalgic, keep reading—I’ve got all the tips and tricks to perfect this magic layer cake.
What is chocolate Zucchini Marble Cake?
This chocolate zucchini marble cake is basically a tender, luscious loaf of chocolate and vanilla batter swirling together to create a stunning marbled effect. Think of it as a mix between a classic pound cake and a decadent chocolate loaf, but with an extra layer of moisture and nutrition from zucchini. The name says it all—‘marble’ because of those gorgeous streaks of dark and light batter weaving through each slice, making every piece a little piece of art. It’s essentially a way to get your veggies in without sacrificing flavor, and honestly, it’s so delicious that even the pickiest eaters at home can’t resist. The secret is in the texture—moist, slightly dense but ridiculously tender—and the flavor combo that’s just rich enough to feel indulgent without tipping into overly sweet territory. Perfect for breakfast, a snack, or a cozy dessert, it’s one of those recipes I always keep in my back pocket.
Why you’ll love this recipe?
What I love most about this chocolate zucchini marble cake is how it surprises everyone. You get that rich, chocolatey flavor that hits all the right spots, but then there’s this sneaky vegetable tucked inside that makes it feel somehow healthy—without sacrificing any indulgence. It’s like having your cake and eating your greens too, right? Plus, this recipe is so straightforward; it’s pretty much foolproof. I’ve tested it with different types of chocolate—dark, semi-sweet, even a bit of cacao nibs for crunch—and it always comes out beautifully. And budget-wise? Totally friendly. Most of the ingredients you probably already have in your pantry or fridge. I love how versatile it is, too. Serve it with a dollop of whipped cream or a drizzle of caramel for the kids, or simply dust it with powdered sugar for a quick coffee break treat. What’s even better is that this one’s a lifesaver when zucchinis are flooding the garden—trust me, I’ve made this for friends, and they keep asking for the recipe. Honestly, it’s become a staple around here—comforting, impressive, and slightly decadent, but with that little healthy boost from zucchini.
How do I make a chocolate Zucchini Marble Cake?
Quick Overview
Making this cake is easier than you might think. It’s mostly mixing and swirling—no complicated steps or fancy equipment needed. Start by preheating your oven and readying your loaf pan. Mix your dry ingredients first, then whisk together your wet. Combine carefully to keep the batter tender, then prepare your zucchini and chocolate batters separately. Pour a layer of vanilla into your pan, add dollops of chocolate batter, then swirl gently with a skewer or knife to create those beautiful marbled patterns. Bake until a toothpick comes out clean, then let it cool before glazing or dusting. That’s basically it! This process is forgiving, and I promise, once you get the hang of swirling, it’s all about being creative. The smell alone during baking makes your entire house smell like a dream.
Ingredients
For the Main Batter:
– 1 1/2 cups all-purpose flour (I love Bob’s Red Mill or King Arthur—trust me on this, it makes a difference)
– 1 teaspoon baking powder
– 1/2 teaspoon baking soda
– 1/4 teaspoon salt
– 3/4 cup granulated sugar
– 1/2 cup unsweetened cocoa powder (good quality, unsweetened is best)
– 1/2 cup vegetable oil or melted coconut oil
– 3 large eggs
– 1 teaspoon vanilla extract
– 1 cup grated zucchini (squeeze out excess moisture—trust me, this keeps your cake from getting soggy!)
For the Filling (Chocolate Batter):
– 1/2 cup semi-sweet chocolate chips or chopped chocolate (melted if you want a richer swirl)
– 2 tablespoons milk or cream (optional for a smoother swirl)
For the Glaze:
– 1/2 cup powdered sugar
– 1-2 teaspoons milk or lemon juice
– A sprinkle of cocoa powder or chopped nuts for garnish (optional)
Step-by-Step Instructions
Step 1: Preheat & Prep Pan
Heat your oven to 350°F (175°C). Grease a standard loaf pan with butter or non-stick spray, then dust lightly with flour or line with parchment paper. This is the easiest way to get clean slices later. Setting up everything before you start makes the process smooth—trust me, I’ve burnt my first batch more times than I can count when I was rushing!
Step 2: Mix Dry Ingredients
In a large bowl, whisk together the flour, baking powder, baking soda, salt, sugar, and cocoa powder. Stir until all the dry ingredients are evenly combined. This step is crucial for a uniform rise and balanced flavor. I always do this first—it helps prevent clumps and ensures the batter is smooth throughout.
Step 3: Mix Wet Ingredients
In a separate bowl, beat the eggs, then stir in the oil and vanilla. Grate the zucchini and squeeze out as much moisture as you can—this is the big trick for a moist cake that isn’t soggy. Incorporate the zucchini into your wet mixture, then gradually add the wet to the dry ingredients. Mix until just combined—don’t overdo it, or your batter might turn tough.
Step 4: Prepare the Chocolate Batter
This is my little secret—set aside about a cup of plain batter. Melt your chocolate chips with a splash of milk or cream until smooth, then fold them into this reserved batter. It creates that luscious, swirled effect. Now you have a vanilla base and a rich chocolate layer ready to be marbled.
Step 5: Prepare Filling
If you want a more intense chocolate swirl, fold melted chocolate into your reserved batter, but I like leaving some chunks for texture. If using chocolate chips, sprinkle or dollop some onto the surface of your vanilla batter as you layer. It adds little bursts of chocolate flavor with every bite.
Step 6: Layer & Swirl
Pour half of the vanilla batter into the prepared pan. Drop spoonfuls of the chocolate batter on top. Add the remaining vanilla and chocolate dollops. Using a skewer or butter knife, swirl gently through the batter—zig-zags, circles, whatever makes your heart happy. Don’t overdo this—less is more for that beautiful marbled pattern.
Step 7: Bake
Bake in your preheated oven for 50-55 minutes. Check doneness by inserting a toothpick in the center—if it comes out clean, you’re good! If the edges start to darken too quickly, tent loosely with foil. My oven varies a little, so I always start checking at 50 minutes.
Step 8: Cool & Glaze
Let the cake cool in the pan for about 15 minutes, then transfer to a wire rack. Mix your glaze ingredients, drizzle generously over the slightly warm cake—trust me, this step elevates it from good to unforgettable. If you prefer a dry look, dust with powdered sugar once completely cooled.
Step 9: Slice & Serve
Use a serrated knife for clean slices. This cake is best served slightly warmed or at room temperature. I love pairing it with a cup of coffee or a glass of milk. The kids like it with a scoop of vanilla ice cream; it’s just comfort in every slice.
What to Serve It With
This cake screams for a cozy moment, whether it’s breakfast, brunch, or dessert. For breakfast, serve a warm slice with a drizzle of honey or a dollop of Greek yogurt. It pairs beautifully with a steaming cup of coffee or chai—my personal favorite. Plus, the zucchini keeps it moist enough to enjoy with a mug in hand. For brunch, add fresh berries on the side—blueberries, strawberries, or raspberries—and maybe a splash of cream. It’s a beautiful centerpiece that’s as tempting visually as it is flavor-wise. At dinner parties, I like to dust slices with a little powdered sugar or cocoa and serve with a side of fresh fruit or a drizzle of caramel. For a casual snack, I’ve even cut it into squares and packed them in lunchboxes—trust me, it disappears fast! This cake’s versatility makes it a real go-to—delicious any time of day, easy to switch up for different occasions.
Top Tips for Perfecting Your Chocolate Zucchini Marble Cake
After making this countless times, I’ve learned a few tricks that take it from good to extraordinary. First, always squeeze out excess water from the zucchini—moisture is the enemy of a firm, tender crumb. I do this by pressing grated zucchini between paper towels or a clean dishcloth; it’s a game-changer. When mixing, don’t overbeat—the batter should be just combined so it stays tender and fluffy. Be gentle when swirling the chocolate batter into the vanilla—think of it as painting rather than mixing. A light touch creates those beautiful marbled patterns. If you want a richer chocolate flavor, add a splash more melted chocolate or cocoa powder to your chocolate batter, but be mindful of the moisture level. I’ve tested replacing half the sugar with natural sweeteners like honey or maple syrup—works well, but keep an eye on the moisture content or you might end up with a slightly denser cake. When baking, always test early—ovens vary! Start checking at around 50 minutes, and if the toothpick comes out moist but mostly clean, pull it out. Overbaking can dry it out, so keep that in mind. Finally, for the glaze: I love experimenting with flavors—adding a tiny pinch of sea salt or a splash of espresso enhances the chocolate. Trust me, a good glaze makes every slice feel extra special. This cake is forgiving, comforting, and full of tiny, delicious surprises—I think you’re going to love it as much as my family does.
Storing and Reheating Tips
This cake keeps surprisingly well—moist and flavorful for days if stored properly. At room temperature, I recommend wrapping it tightly in plastic wrap or placing it in an airtight container. It’s good for about 2 days this way; after that, the zucchini can start to lose its vibrancy. For longer storage, the fridge is your friend—just make sure to cover it well. It’s safe for about a week refrigerated, but I find it’s best within 3-4 days for optimal freshness. If I want to keep it even longer, I slice it and freeze individual portions—wrapped tightly in plastic and placed in a zip-top bag. Thaw overnight in the fridge or warm slices gently in the microwave for a quick treat. The glaze can get a little sticky in the fridge, so I recommend adding it just before serving if you like that glossy finish. I’ve also tested freezing the fully glazed cake—works great, but for the best presentation, I add the glaze after thawing. This way, the cake stays soft and moist, and the glaze stays shiny and fresh. Trust me, this cake’s even better the next day—it’s proof that good baking gets better with a little patience!
Frequently Asked Questions
Final Thoughts
This chocolate zucchini marble cake has become a favorite in my home because it’s so forgiving and versatile. It’s the kind of recipe that makes me feel cozy, proud, and a little bit like a baking wizard (which, honestly, I’m not always). The best part? It’s delicious enough to serve at a dinner party and simple enough to whip up on a weeknight when zucchinis are all over the place. Every time I bake it, I think of all those happy moments—my kids sneaking slices before dinner, friends asking for the recipe, and that warm, sweet smell that fills the house. If you love a good marbled look and rich, fudgy-chocolate flavor with a healthy twist, this one’s definitely a keeper. I hope you try it and love it as much as my family does. And hey—don’t forget to share your variations or little hacks in the comments. Happy baking, friend!
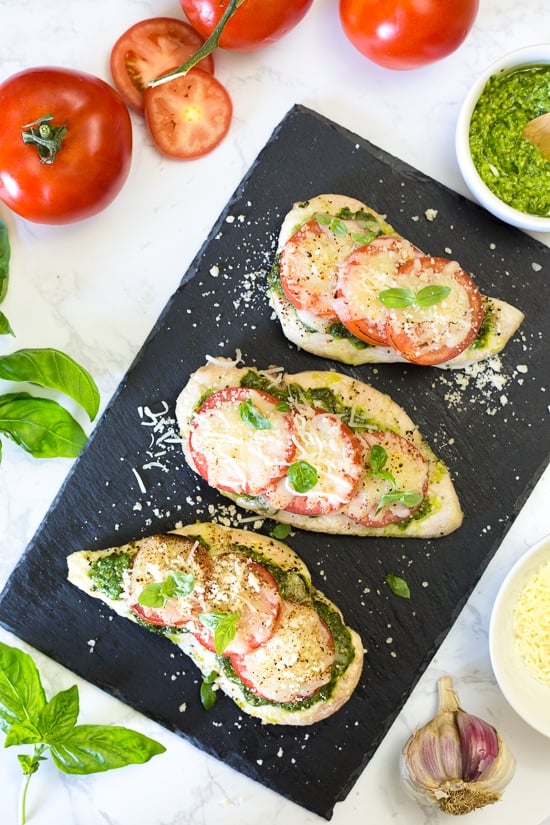
Chicken Pesto Bake
Ingredients
Method
- Wash chicken and dry with a paper towel. Slice chicken breast horizontally to create 4 thinner cutlets. Season lightly with salt and fresh pepper.
- Preheat the oven to 400°F. Line baking sheet with foil or parchment for easy clean-up.
- Place the chicken on prepared baking sheet. Spread about 1 teaspoon of pesto over each piece of chicken.
- Bake for 15 minutes or until chicken is no longer pink in the center. Remove from oven; top with sliced tomatoes, mozzarella, and parmesan cheese. Bake for an additional 3 to 5 minutes or until cheese is melted.
- To grill: Grill chicken over medium flame on both sides until cooked through. Lower flame, top with pesto, tomatoes, and cheese, then close grill until cheese melts.