Easy Campfire Apple Crisp in Foil Packets
There’s something about the smell of fresh baked goods wafting through the house that instantly makes me feel like everything’s right in the world. I remember helping my grandma in her cozy kitchen, eagerly waiting for that first slice of warm zucchini cake, the sweetness melting into every crumb, with a little tangy cream cheese swirl on top. This recipe is a spin-off of that warm childhood memory, but I’ve tweaked it to be so easy, so wholesome—yet totally indulgent—that you’ll want it for breakfast, brunch, or whenever you need a comforting pick-me-up. Honestly, I always do this when I have zucchini in the fridge and a craving for something sweet but not overly heavy. My kids ask for this all the time, and honestly, I keep making it because it’s just such a good way to sneak some veggies into their day without any fuss. Trust me, once you try it, it’s going to become a staple in your brunch lineup, too. Plus, the smell alone brings everyone to the kitchen—this one’s a lifesaver on busy mornings or lazy weekends alike.
What is Zucchini Breakfast Cake?
Think of this as a cozy, slightly crumbly cake—like a muffin but with a more tender crumb—and it’s loaded with shredded zucchini. The name might make you think it’s only for mornings, but really, it’s perfect any time of day. It’s essentially a cross between carrot cake and your favorite coffee cake, with just enough sweetness and spice to satisfy that craving for a treat. The star here is the zucchini—yes, that humble summer squash—which keeps the cake moist and tender without making it heavy. The cream cheese swirl swirled through the batter adds a lush, tangy contrast that’s just divine. You can serve this warm, topped with a drizzle of honey or a cup of hot coffee—it honestly just feels like a warm hug in edible form. It’s simple enough to whip up on a weekday, yet special enough to serve to guests, and I promise you, it gets better after a day or two stored in the fridge.
Why you’ll love this recipe?
What I love most about this is how versatile and forgiving it is—you really don’t need any fancy ingredients, just common pantry staples and some fresh zucchini. The flavor is subtly sweet with hints of cinnamon and nutmeg, making it cozy but not overwhelming, and the cream cheese swirl adds that little bit of tangy luxe that elevates it beyond a plain loaf. It’s super budget-friendly because it uses ingredients I almost always have on hand—flour, eggs, milk, sugar—and the zucchini is a great way to use up the ones lurking in your fridge after a trip to the farmers market. Trust me, this is one of those recipes that’s hard to mess up; you just mix everything, layer, and bake. And no, it’s not overly sweet—perfect for those mornings when I want a snack that feels more substantial than a muffin but lighter than a full cake. Plus, it keeps well, which means you can bake it on a Sunday and enjoy slices all week. The bread’s moist, fluffy, and beautifully textured, and I’ve tested it with a few variations—I always do this when I want to tweak the flavor or adapt it for different diets. It’s honestly one of my family’s favorites—my kids actually ask for seconds, which is saying a lot!
How do I make Zucchini Breakfast Cake?
Quick Overview
This recipe is straightforward and forgiving. You’ll start by shredding the zucchini (and squeezing out excess moisture—big tip!), then whisk together dry ingredients in one bowl and wet ingredients in another. Mix gently, layer the batter in a prepared pan with dollops of cream cheese mixture, swirl for a pretty marbled look, then bake. The whole process takes about 15 minutes of prep before the oven does its magic for around 40-45 minutes. The best part? The batter is so forgiving—you really can adapt it to your taste. I love how the zucchini keeps everything insanely moist and the cream cheese swirl makes each bite just a little richer and more indulgent, even for a breakfast treat.
Ingredients
For the Main Batter:
– 1 ½ cups of all-purpose flour (or your favorite gluten-free blend if needed)
– ¾ cup sugar (or honey/agave if you prefer natural sweeteners)
– 1 teaspoon baking powder
– ½ teaspoon baking soda
– 1 teaspoon cinnamon
– ½ teaspoon nutmeg
– Pinch of salt
– 2 large eggs
– ½ cup oil (I’ve tested this with coconut oil and vegetable oil—both work beautifully)
– ½ cup milk (dairy or plant-based like almond or oat—trust me, it makes it even creamier!)
– 1 teaspoon vanilla extract
– 1 ½ cups shredded zucchini (see tips below for moisture tricks)
For the Filling:
– 4 oz cream cheese, softened
– 2 tablespoons sugar
– ½ teaspoon vanilla extract
For the Glaze (optional but recommended):
– ½ cup powdered sugar
– 1-2 teaspoons lemon juice or milk (to adjust consistency)
– Sprinkles of lemon zest or cinnamon for extra flavor
Step-by-Step Instructions
Step 1: Preheat & Prep Pan
Heat your oven to 350°F (175°C). Line a 9×5-inch loaf pan with parchment paper or give it a good greasing with butter or spray. I always do this to prevent sticking, especially since this cake is super moist. You’ll want to prep ahead so the batter can go straight in once you mix everything.
Step 2: Mix Dry Ingredients
In a big bowl, whisk together the flour, sugar, baking powder, baking soda, cinnamon, nutmeg, and salt. This step helps distribute all those spices evenly—trust me, it makes a difference in flavor with every bite.
Step 3: Mix Wet Ingredients
In another bowl, whisk together the eggs, oil, milk, and vanilla until smooth. I sometimes use a warm milk to help everything blend more easily. I’ve tested this with almond milk—actually made it even creamier! The oil and milk give the batter that lovely richness, so don’t skip them.
Step 4: Combine
Pour the wet mixture into the dry and gently fold until just combined; don’t overmix or you risk a dense loaf. The batter will be thick and a little lumpy—perfect. If it feels a bit stiff, add a splash more milk, one teaspoon at a time.
Step 5: Prepare Filling
In a small bowl, beat together the softened cream cheese, sugar, and vanilla until smooth. Setting this aside, ready for layering later.
Step 6: Layer & Swirl
Pour half the batter into your prepared pan. Drop spoonfuls of the cream cheese mixture on top, then add the remaining batter over that. Use a toothpick or skewer to swirl the cream cheese through the batter—think gentle figure-eights, creating a marbled pattern, not a mess. This swirl is what makes this cake special!
Step 7: Bake
Bake for 40-45 minutes, or until a toothpick inserted in the center comes out clean. If it starts to brown too quickly, tent with foil; if you’re using a different oven, keep an eye on the color and doneness. I always check around 38 minutes because ovens vary!
Step 8: Cool & Glaze
Let the cake cool in the pan for about 10 minutes before transferring to a wire rack. Once fully cooled—no baking rage here—you can drizzle with the glaze or just dust with powdered sugar if you’re feeling simple. I like to add a squeeze of lemon to the glaze for extra brightness; it’s a little surprise in every bite.
Step 9: Slice & Serve
Cut with a serrated knife for neat slices. Best enjoyed warm or at room temperature, paired with your favorite coffee or tea. Honestly, warm with a pat of butter or a dollop of yogurt, it’s just divine.
What to Serve It With
This cake is so versatile—here are a few ideas to elevate your serving game:
- For Breakfast: Pair a slice with a strong brewed coffee or a frothy latte. Nothing beats starting the day with a sweet, veggie-packed treat that feels almost indulgent but isn’t. I like to add a handful of berries or a sprinkle of nuts for crunch.
- For Brunch: Serve it alongside a fresh fruit platter, some whipped cream, or even a dollop of Greek yogurt. It’s a hit for brunch potlucks because it’s pretty, filling, and kid-friendly. My sister loves it served with a side of scrambled eggs or roasted veggies.
- As Dessert: Drizzle with honey or maple syrup, and serve with a scoop of vanilla ice cream or whipped cream. It’s just sweet enough to satisfy that dessert craving without feeling over the top. I occasionally top slices with some candied ginger or toasted coconut for extra flair.
- For Cozy Snacks: Warm slices with a cup of herbal tea or milk. Cozy and nourishing, especially on chilly days. I always keep a batch in the fridge—just reheat a slice in the microwave for a quick comfort fix.
Honestly, this cake has become part of our family traditions—sometimes I make it on a lazy Sunday morning, sometimes as a quick grab-and-go snack during hectic weekdays. The kids fight over the last slice, and I keep sneaking that last crumb when no one’s looking. It’s cozy, simple, and heartwarming—a true ode to home baking. Plus, it’s a great way to use up zucchinis from your garden or farmers market, making it practically guilt-free.
Top Tips for Perfecting Your Zucchini Breakfast Cake
Over the years, I’ve picked up a few tricks that help this cake turn out perfectly, every single time:
- Zucchini Prep: Always shred and then squeeze out excess moisture with a clean dish towel or paper towels. If I skip this step, the cake can get a little dense or soggy. The moisture is what makes it so tender, but too much isn’t your friend.
- Mixing Advice: Gently fold the ingredients—overmixing is the enemy here, leading to a tougher crumb. Use a spatula, and remember, it’s okay if the batter is a little lumpy.
- Swirl Techniques: Be gentle when swirling the cream cheese—don’t overmix or you’ll lose the pretty marbled look. A light, swirling motion with a toothpick or skewer does the job beautifully.
- Ingredient Swaps: I’ve experimented with coconut sugar and almond flour, which work nicely but do change the texture slightly. If you’re gluten-free, use a good blend of gluten-free flour, but expect a slightly denser crumb.
- Baking Tips: Keep an eye on the cake as it nears the end of baking—ovens vary. Use a toothpick test—if it comes out clean, it’s done. I always check around 38 minutes just to be safe.
- Glaze Variations: If you want a richer glaze, mix in a little melted butter or cream cheese. Or dust the top with powdered sugar and cinnamon for a rustic look. I’ve also added lemon zest to the glaze for a fresh twist.
From learning to control the moisture in the zucchini to perfecting the swirl, every little tip adds up. The most important thing? Don’t rush. Trust your nose and your eyes—when it smells amazing and feels firm but springy, it’s ready. Playing around with different fillings, toppings, or even adding chopped nuts has made this recipe even more personal and special in our house. Every bake is a little love note—imperfect, always cozy, and totally delicious.
Storing and Reheating Tips
This cake keeps surprisingly well, and I love having slices ready for busy mornings or unexpected guests. Here’s how I store it:
- Room Temperature: If you plan to eat it within a day or two, keep it covered with a clean towel or in an airtight container. It’s moist enough that it stays fresh for 1-2 days, but don’t leave it out longer than that, especially in warmer weather.
- Refrigerator Storage: For longer freshness, wrap slices tightly in plastic wrap or store in an airtight container. It lasts about 4-5 days and the flavors, especially the cream cheese swirl, only get better.
- Freezer Instructions: Wrap individual slices well in plastic wrap, then place them in a freezer bag. They’ll stay good for up to 3 months. To reheat, pop a slice in the microwave for about 20 seconds, or warm gently in the oven. The moist texture might change a little after freezing, but it’s still tasty.
- Glaze Timing: I usually add the glaze after the cake has cooled completely. If you’re freezing slices, add the glaze once you’re ready to serve for a fresh, shiny finish.
Honestly, I’ve found that this cake freezes beautifully—perfect for making ahead on a weekend and enjoying during busy mornings. It’s one of those recipes that just gets better with time, tasting a little more developed and cozy as the days go by.
Frequently Asked Questions
Final Thoughts
This zucchini breakfast cake with cream cheese swirl has become my personal fallback when I want something comforting, wholesome, and secretly healthy. It’s moist, flavorful, and endlessly adaptable—plus, it’s almost impossible to mess up. Every time I bake it, I get a little nostalgic, remembering lazy weekend mornings with my family gathered around the table, passing slices and sipping coffee. It’s the kind of recipe that feels like a warm hug, no matter the season. I love how it balances the fresh vegetable with the cozy spices and the tang of cream cheese, making it suitable for breakfast or dessert without feeling overly indulgent. And honestly, once you get the hang of it, you’ll probably have your own special tweaks—I always do! If you try it, I’d love to hear how yours turns out. Happy baking—and don’t forget to share a slice with someone you love!
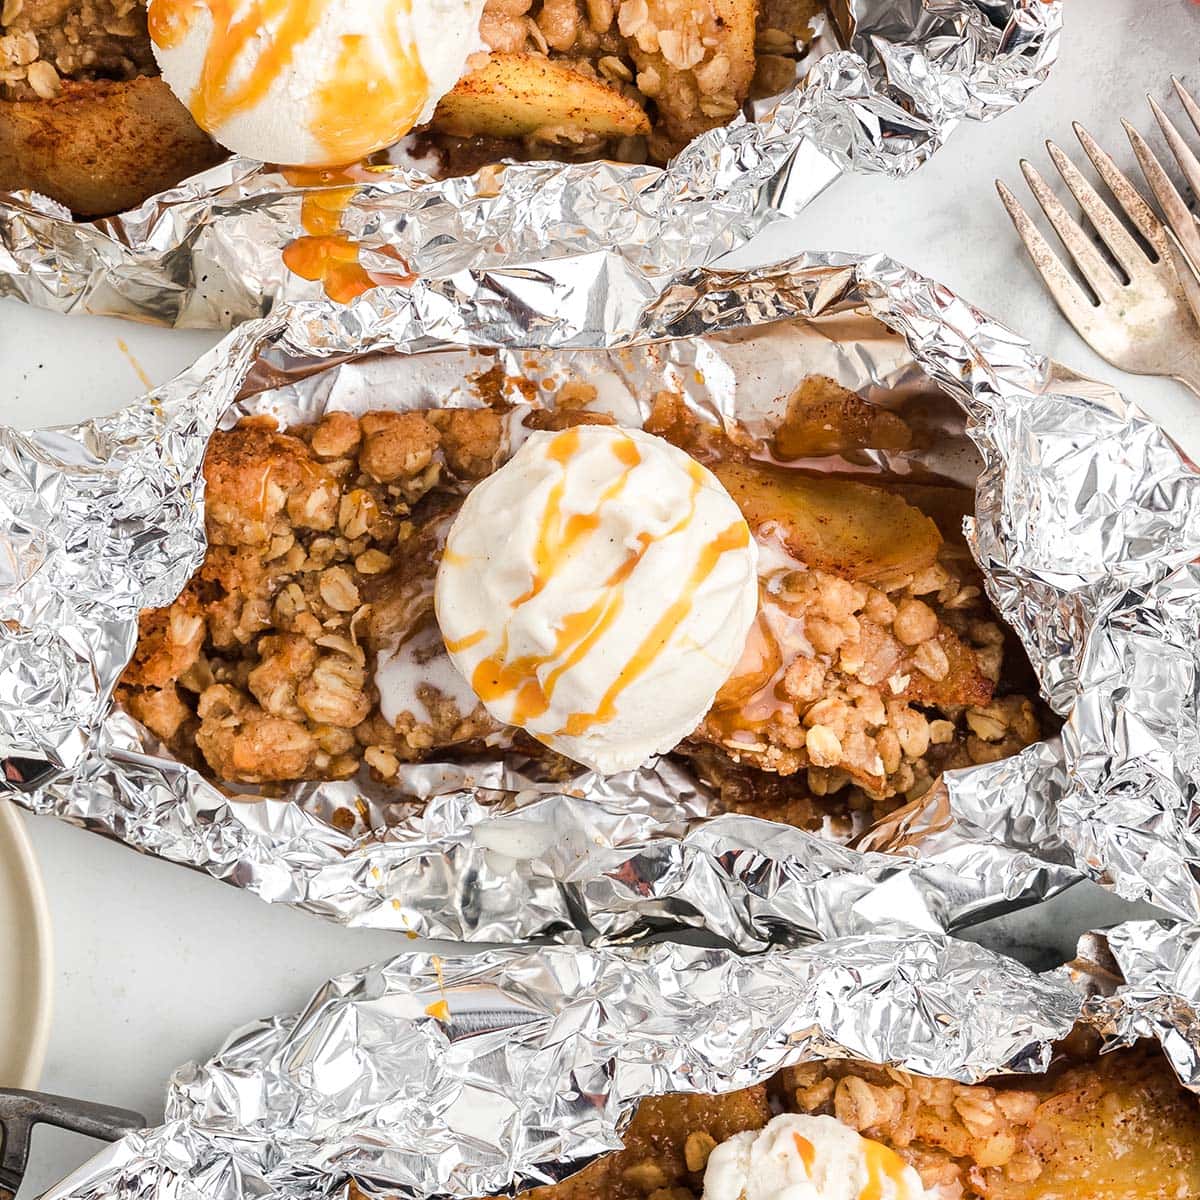
apple crisp
Ingredients
Method
- Preheat your oven or grill to 350 degrees F. Prepare apple slices and set aside.
- In a large bowl, toss sliced apples with brown sugar, granulated sugar, and apple pie spice.
- In a medium bowl, combine flour, brown sugar, oats, and melted butter to make the topping.
- Transfer apple mixture into a baking dish or foil packets.
- Sprinkle topping evenly over the apples.
- Bake in the oven or cook on grill for 30 minutes until bubbly and golden.
- Serve warm topped with vanilla ice cream and caramel sauce if desired.