Easy Black Bean Quinoa Southwest Bowl
I remember the first time I pulled this zucchini bread out of the oven. The aroma filled my entire kitchen, a warm, comforting hug that made even my pickiest eaters peek into the kitchen. It was a damp, chilly autumn afternoon, and the thought of something sweet and moist, packed with hidden veggies, felt like pure magic. My kids, who usually eye anything with “vegetable” in it with suspicion, were practically fighting over the first slices. And that’s when I knew. This wasn’t just *any* zucchini bread; this was *the* zucchini bread. The kind that makes you forget you’re even eating something healthy because it’s just *that* incredibly delicious. It’s so good, it even gives my famous chocolate chip cookies a run for their money, and that’s saying something!
What is Zucchini bread?
Okay, so what exactly is this magical thing we call zucchini bread? At its heart, it’s a quick bread, which means you don’t need yeast or any complicated rising techniques. Think of it as a muffin’s taller, more sophisticated cousin. The “zucchini” part isn’t about a strong vegetable flavor – far from it! It’s the secret ingredient that lends incredible moisture and a tender crumb. When baked, the zucchini practically disappears, leaving behind nothing but pure deliciousness. It’s like a little kitchen alchemy, transforming humble ingredients into something truly special. This isn’t your grandma’s dense, heavy loaf; this is light, fluffy, and packed with flavor that just gets better with every bite.
Why you’ll love this recipe?
Honestly, where do I even begin? This zucchini bread is a true all-rounder, and I’ve made it so many times I’ve lost count. First off, the flavor is out of this world. It’s perfectly sweet, with just the right hint of warm spices like cinnamon and nutmeg. The texture is just heavenly – incredibly moist and tender, with a lovely slightly crisp crust. What I love most, though, is how surprisingly simple it is to whip up. On a busy weeknight when I need a quick treat, or on a lazy Sunday morning, this recipe is my absolute lifesaver. You probably have most of the ingredients in your pantry already! Plus, it’s budget-friendly; zucchini is often inexpensive, especially when it’s in season. And the versatility? Oh my goodness. I’ll get to that later, but trust me, this bread can be a breakfast star, a brunch centerpiece, or a decadent dessert. It’s just that good. Compared to some other quick bread recipes I’ve tried, this one has a perfect balance of sweetness and moisture that never disappoints. It’s the kind of recipe that makes you feel like a baking pro, even if you’re just starting out.
How do you make Zucchini bread?
Quick Overview
The beauty of this recipe is its straightforward approach. You’ll simply whisk together your dry ingredients, mix your wet ingredients separately, and then combine them gently. The magic happens when you fold in the grated zucchini and any optional add-ins like chocolate chips or nuts. It bakes up into a golden-brown loaf that smells absolutely divine. Seriously, the hardest part is waiting for it to cool!
Ingredients
For the Main Batter:
2 cups all-purpose flour: I always use unbleached all-purpose flour. If you’re feeling adventurous, I’ve tried a blend of half all-purpose and half whole wheat, and it worked beautifully, just a touch denser and nuttier. Make sure your flour is fresh! Old flour can make baked goods a bit flat.
1 teaspoon baking soda: This is what gives the bread its lift and tenderness.
1/2 teaspoon salt: Balances out the sweetness and enhances all the other flavors.
1 1/2 teaspoons ground cinnamon: My go-to spice for warmth. You can adjust this to your liking.
1/2 teaspoon ground nutmeg: Just a pinch adds a lovely depth. Freshly grated is even better if you have it!
1/4 teaspoon ground cloves (optional): I love adding this for an extra cozy kick, but it’s totally fine if you skip it.
1 3/4 cups granulated sugar: Some recipes use less, but I find this amount gives it that perfect tender, moist crumb. You can try reducing it by about 1/4 cup if you prefer. I’ve also experimented with brown sugar, and it adds a lovely caramel note.
2 large eggs: At room temperature, please! They incorporate better into the batter.
3/4 cup vegetable oil (or other neutral oil): This is key for moisture. I’ve tested this with melted butter, and while tasty, it doesn’t give quite the same level of tenderness. Coconut oil works well too!
1 teaspoon vanilla extract: Never skip the vanilla! It just makes everything taste better.
2 cups grated zucchini, squeezed dry: This is the star! Use medium-sized zucchini, and make sure to squeeze out as much liquid as you can. I’ll explain how in the tips section. It’s crucial for texture!
For the Filling: (Totally optional, but SO good!)
1/2 cup chopped walnuts or pecans: For that satisfying crunch.
1/2 cup chocolate chips (semi-sweet or dark): My kids always beg for these, and who can blame them? Milk chocolate works too if that’s your jam.
For the Glaze:
1 cup powdered sugar: Sifted, so you don’t get any lumps.
2-3 tablespoons milk (or almond milk, or even orange juice for a citrusy twist!): Start with 2 tablespoons and add more until you reach your desired drizzling consistency.
1/2 teaspoon vanilla extract: For a touch of extra flavor.
Step-by-Step Instructions
Step 1: Preheat & Prep Pan
First things first, get your oven preheating to 350 degrees Fahrenheit (175 degrees Celsius). This is pretty standard for most quick breads. Then, grab a 9×5 inch loaf pan. I like to grease it really well with butter or non-stick spray, and then dust it with a little flour. This ensures your beautiful loaf slides out like a dream, no sticking whatsoever! Some people like to line it with parchment paper too, creating little sling handles, which is a great idea if you’re worried about it sticking. I’ve found a good greasing and flouring works for me every time.
Step 2: Mix Dry Ingredients
In a large bowl, go ahead and whisk together your flour, baking soda, salt, cinnamon, nutmeg, and cloves (if you’re using them). Whisking them together ensures that all the leavening agents and spices are evenly distributed. This step might seem small, but it really helps prevent pockets of baking soda or spice in your finished bread. I always give it a good 30 seconds of whisking to make sure everything is nicely combined.
Step 3: Mix Wet Ingredients
In a separate medium bowl, crack your eggs. Add the granulated sugar, vegetable oil, and vanilla extract. Now, whisk this all together until it’s well combined and the sugar has started to dissolve. You don’t need to go crazy here, just a good thorough whisking until everything is smooth and slightly lighter in color.
Step 4: Combine
Now it’s time to bring the wet and dry ingredients together. Pour the wet ingredients into the bowl with the dry ingredients. Using a spatula or a wooden spoon, gently fold them together until *just* combined. It’s really important not to overmix here! A few streaks of flour are okay. Overmixing develops the gluten too much, which can lead to a tough, dense loaf. We want tender and moist, remember?
Step 5: Prepare Filling
If you’re adding nuts or chocolate chips, now’s the time to prepare them. If you’re using nuts, give them a rough chop. If you’re using chocolate chips, just have them ready. I sometimes toss them with a tablespoon of the flour mixture before adding them to the batter; this helps prevent them from sinking to the bottom of the loaf. It’s a little trick I learned after one too many sunken chocolate chip loaves!
Step 6: Layer & Swirl
Now for the star of the show: the zucchini! Gently fold the grated, squeezed-dry zucchini into the batter. Add your optional nuts and chocolate chips now too. Again, fold gently until they are just incorporated. Don’t overmix! The batter will be thick, and that’s perfectly normal. The zucchini will be visible throughout the batter.
Step 7: Bake
Pour the batter into your prepared loaf pan and spread it out evenly. Now, pop it into your preheated oven. Bake for about 50 to 65 minutes. The exact time will depend on your oven, of course. You’ll know it’s done when a toothpick inserted into the center comes out clean, or with just a few moist crumbs attached. If the top starts to brown too quickly, you can loosely tent it with foil for the last 15-20 minutes of baking. My oven tends to run a little hot, so I usually start checking around the 50-minute mark.
Step 8: Cool & Glaze
Once it’s done baking, take the loaf pan out of the oven and let it cool in the pan for about 10-15 minutes. This allows the bread to set up a bit. Then, carefully invert the pan onto a wire rack to let the bread cool completely. Patience is key here! Don’t try to glaze a warm loaf, or the glaze will just melt right off. For the glaze, whisk together the powdered sugar, 2 tablespoons of milk, and vanilla extract until smooth. If it’s too thick, add a little more milk, a teaspoon at a time, until it’s pourable but not too runny. Once the bread is completely cool, drizzle that lovely glaze all over the top. Let the glaze set for about 15-20 minutes before slicing.
Step 9: Slice & Serve
Once the glaze has set, it’s time for the best part! Use a sharp serrated knife to slice the bread. It usually yields about 10-12 generous slices. Serve it at room temperature, and prepare for rave reviews. It’s delicious on its own, or you can serve it with a smear of butter if you like. Honestly, it’s perfect just as it is!
What to Serve It With
This zucchini bread is so versatile, it really shines in so many different settings! For a simple breakfast, I love it toasted lightly with a smear of cream cheese or a dab of butter. It’s also fantastic with a hot cup of coffee or a glass of cold milk – my kids devour it this way. If you’re hosting a brunch, this bread is a total crowd-pleaser. I like to serve it sliced on a pretty platter alongside fresh fruit, perhaps some yogurt or a light berry compote. For a slightly more elegant presentation, I’ll add a few fresh berries or a sprinkle of powdered sugar on top of the glaze. And as a dessert? Oh boy. This is where it really shines. A warm slice, perhaps with a dollop of whipped cream or a scoop of vanilla bean ice cream, is pure bliss. It’s perfect for satisfying that late-night sweet craving without feeling overly heavy. My family also loves it as a cozy afternoon snack with a glass of iced tea. I’ve even served small slices as part of a dessert board with some cheese and fruit, and it was a hit!
Top Tips for Perfecting Your Zucchini Bread
After making this countless times, I’ve picked up a few tricks that I think really make a difference. First, zucchini prep is key. You absolutely must squeeze out as much moisture as possible after grating. I find using a fine-mesh sieve and pressing down with a spoon, or wrapping the grated zucchini in a clean kitchen towel or cheesecloth and wringing it out, works best. Too much moisture and your bread can become gummy. For mixing, remember the mantra: gentle and don’t overmix! Seriously, just mix until the ingredients are combined. A few lumps in the batter are better than a tough loaf. When it comes to swirling in extras like chocolate chips or nuts, make sure they are evenly distributed. If they all sink to the bottom, you’ll have a dense base and a plain top. Tossing them in a bit of flour before adding them to the batter really helps. Ingredient swaps are fun! I’ve tried using applesauce instead of some of the oil for a healthier twist, and it works, but it does change the texture slightly, making it a bit more cake-like. For baking, know your oven. Ovens vary wildly! Start checking for doneness a bit earlier than the recipe states, especially if you know your oven runs hot. A toothpick test is your best friend here. For glaze variations, don’t feel confined to just milk! A little bit of lemon juice or orange juice in the glaze can add a lovely brightness that cuts through the sweetness. You can also make it thicker or thinner depending on your preference by adjusting the liquid.
Storing and Reheating Tips
This zucchini bread is so good, it rarely lasts long in my house, but when it does, here’s how I store it to keep it fresh. At room temperature, well-wrapped in plastic wrap or stored in an airtight container, it’ll stay delicious for about 2-3 days. I usually keep it on the counter. If it’s particularly warm where you live, or if you’ve added a glaze that might be a bit sticky, the refrigerator is a good option. It will last for about 4-5 days in an airtight container in the fridge. Just be aware that refrigeration can sometimes dry out baked goods slightly, so you might want to warm it up a bit before serving if that happens. For longer storage, freezing is your best bet. Let the loaf cool completely, then wrap it tightly in plastic wrap, followed by a layer of aluminum foil, or place it in a freezer-safe bag. It can stay frozen for up to 3 months! When you’re ready to enjoy it, you can thaw it overnight in the refrigerator or at room temperature. If you want to reheat a slice, a few seconds in the microwave or a few minutes in a toaster oven will bring it back to its warm, tender glory. I always wait until the bread is completely cool before glazing it. If you’re freezing the bread *with* the glaze, make sure the glaze is fully set first, and then wrap it very carefully to avoid smudging.
Frequently Asked Questions
Final Thoughts
There you have it – my absolute favorite zucchini bread recipe! It’s the kind of treat that feels like a hug in a slice. It’s packed with goodness, surprisingly easy to make, and delivers on flavor every single time. It’s the perfect way to use up that garden zucchini, or just to whip up something comforting and delicious for your family. I truly hope you give this a try; I have a feeling it’s going to become a staple in your kitchen, just like it has in mine. If you love this recipe, you might also enjoy my incredibly moist banana bread or my easy lemon poppy seed loaf. They share that same cozy, homemade goodness. I can’t wait to hear what you think! If you make this, please leave a comment below and let me know how it turned out, or share any fun variations you’ve tried. Happy baking, friends!
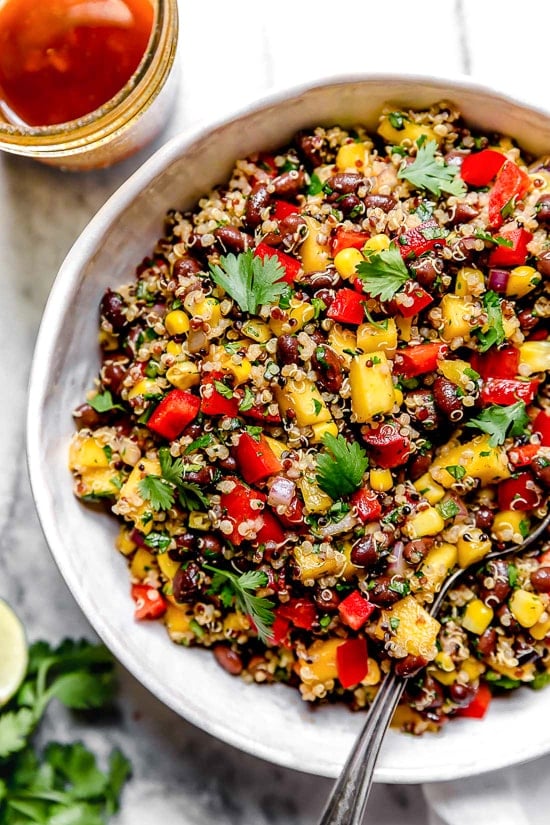
black bean quinoa southwest
Ingredients
Method
- Mix together the beans, quinoa, corn, bell pepper, mango, onion, cilantro, and jalapeño in a large mixing bowl.
- In a small bowl, whisk together the lemon or lime juice, olive oil, minced garlic, ground cumin, chili powder, and ground turmeric until well combined.
- Drizzle the dressing over the bean and quinoa mixture and toss gently to ensure everything is evenly coated.
- Refrigerate the salad for at least 30 minutes before serving to allow the flavors to meld. Serve chilled.