Easy Asparagus and Prosciutto Panini
There’s something about baking with zucchini that just makes everything feel a little more wholesome, a little more comforting. I’ve been making this zucchini swirl cake for years—literally since my kids were little—and it’s still one of my go-to recipes when I want something sweet but not overly indulgent. The smell alone—warm cinnamon, tender zucchini, a hint of vanilla—can turn any rough day into a cozy afternoon. Honestly, it’s kind of like your favorite blanket, but in cake form. And the best part? It’s so easy to throw together, especially when you’ve got that last zucchini sitting in the fridge and no idea what to do with it. Trust me on this one—this zucchini swirl cake has saved me on countless busy weeknights and Sunday afternoons alike. My kids ask for seconds, my friends always ask for the recipe, and I swear I could make it in my sleep now. It’s incredible how versatile and forgiving this one is—plus, it never fails to bring a little extra joy when you need a sugar boost. Let’s get baking! –>
What is Zucchini Swirl Cake?
Think of zucchini swirl cake as a tender, moist cake layered with a cinnamon-spiced cinnamon swirl—like a hybrid of your favorite coffee cake and a quick bread, but with a little more sass. The name is pretty straightforward: zucchini, grated and folded into the batter, adds moisture and subtle flavor, while the swirl runs through it, giving each slice a beautiful marbled look. It’s essentially a way to sneak in some veggies (hello, sneaky nutrition!) while still indulging in the comforting, sweet goodness of cake. The beauty of this recipe is how unassuming it is—no fancy equipment or complicated techniques—just good old-fashioned baking with a personal touch. I always do this when I want something sweet and satisfying, but don’t want to spend hours in the kitchen or have leftovers that’ll sit forever. It’s like that cozy Sunday morning classic, but made with everyday ingredients. Honestly, once you try it, you’ll see why I keep coming back to this recipe—it’s comforting, versatile, and just really, really good. Plus, it makes the house smell like a cinnamon dream! –>
Why you’ll love this recipe?
What I love most about this zucchini swirl cake is how it hits all the right notes for any occasion. First, the flavor—oh boy, that warm cinnamon mixed with the faintly sweet zucchini makes every bite feel like a hug. The zucchini itself is totally hidden once baked, so your kids (or partners) won’t even know they’re eating their veggies—trust me, I’ve tested this with my finicky eaters. It’s also super simple to make; I’ve tested this dozens of times, and I promise it’s almost impossible to mess up. Just mix, layer, swirl, and bake—no stressful techniques required. And then there’s the cost-efficiency: you probably already have everything you need in your pantry and fridge, which makes this one a real budget hero. Plus, you can tweak it in so many ways. Love adding walnuts? Dried cranberries? A splash of orange zest? Yes, please! What really makes this stand out, though, is how versatile it is. Serve it as a cozy breakfast with your coffee, a celebratory dessert after dinner, or just a quick snack on a lazy afternoon. Honestly, I have made variations of this for potlucks, brunches, and even picnics—everyone always raves about it. It’s one of those recipes that just feels like a little bit of magic—comforting but exciting at the same time.
How do I make Zucchini Swirl Cake?
Quick Overview
This cake is surprisingly straightforward. You start by grating fresh zucchini and mixing it into a simple, fluffy batter. Meanwhile, you prepare a cinnamon-sugar swirl that you layer carefully in the batter. The trick? Carefully swirling it to create those pretty marbled patterns before baking. With just about 10 minutes of prep and a simple oven bake, you get a loaf that’s moist, flavorful, and visually stunning. I love how effortless this is—no fancy machines, just good old spoons and patience. When you slice into it, you’re met with a tender crumb and gorgeous ribbon swirls. The smell alone will make everyone come running. It’s perfect for breakfast, snacks, or a sweet ending to a lazy Sunday—kind of like my secret weapon in the kitchen.
Ingredients
[Organize ingredients by purpose with detailed explanations:]
For the Main Batter:
• 2 cups all-purpose flour (I always do this with unbleached—it gives a nice tender crumb)
• 1 cup granulated sugar (settles just right—not too sweet, not too bland)
• 1 teaspoon baking powder
• ½ teaspoon baking soda (for lift)
• ¼ teaspoon salt
• 1 teaspoon ground cinnamon (because cinnamon makes everything better)
• ⅓ cup vegetable oil or melted unsalted butter (I’ve tested both, and honestly, butter adds more flavor)
• 1 cup buttermilk or regular milk with a splash of lemon juice (the acidity makes it extra tender)
• 2 large eggs (fresh is best here)
• 1 teaspoon vanilla extract (makes it smell like home)
For the Zucchini:
• 1 to 1½ cups grated zucchini (squeeze out excess moisture, or your cake might be a little dense!)
• I tested this with both fresh and frozen zucchini—frozen works, but fresh gives a more vibrant flavor
For the Filling (Swirl):
• ¼ cup dark brown sugar (adds warmth)
• 1 tablespoon ground cinnamon (don’t skip—this is critical for that authentic swirl)
• 2 tablespoons softened butter or coconut oil (for spreading)
For the Glaze (Optional but Recommended):
• ½ cup powdered sugar
• 1–2 teaspoons milk or lemon juice (to thin it out to drizzle consistency)
• A few drops vanilla or lemon extract (for extra flavor)
Step-by-Step Instructions
Step 1: Preheat & Prep Pan
Okay, first things first—set your oven to 350°F (180°C). Grease a standard loaf pan or line it with parchment paper. I like doing the parchment trick so I can lift the whole thing out easily; it’s less messy that way. Once the oven’s hot, we’re ready to start. I always do this early so the batter doesn’t sit out getting warm—hot oven, happy baking!
Step 2: Mix Dry Ingredients
In a large bowl, whisk together the flour, sugar, baking powder, baking soda, salt, and cinnamon. This step is important because it ensures everything is evenly distributed—no pockets of baking powder or salt showing up later. Plus, I always do this before adding liquids; it feels like the foundation of a good cake.
Step 3: Mix Wet Ingredients
In a separate bowl, whisk the eggs, then add in the oil, buttermilk, and vanilla. Mix well until smooth. I’ve tested this with almond milk, and while I don’t think it’s quite as rich, it actually made it even creamier! You want the wet mixture to be combined but not overmixed—just enough to get everything integrated.
Step 4: Combine
Pour the wet ingredients into the dry and gently fold together with a spatula. Resist the urge to overmix; a few lumps are totally fine. Overmixing can make the cake dense, and we want a light, airy crumb. When the batter is mostly homogeneous and just a little lumpy, you’re good.
Step 5: Prepare Filling
In a small bowl, mix together the brown sugar and cinnamon. Spread the softened butter over the top of the batter in the pan, then sprinkle the cinnamon-sugar mixture evenly over it. This will make that irresistible swirl that everyone loves, like a cinnamon roll hidden inside the cake.
Step 6: Layer & Swirl
Pour half of the batter into the pan, sprinkle over some of the cinnamon filling, then add the rest of the batter on top. Using a butter knife or skewer, gently swirl through the batter to create a marbled effect. Don’t overdo it—you want pretty ribbons, not a muddy mess. This is my favorite part; watching the swirl come to life is like a mini magic trick.
Step 7: Bake
Slide the pan into your preheated oven and bake for about 45-55 minutes. Start checking around the 45-minute mark—insert a toothpick in the center; if it comes out clean, you’re set. My oven can vary a bit, so keep an eye on it. The top should be golden brown, and your entire house will smell like heaven.
Step 8: Cool & Glaze
Leave the cake in the pan for about 15 minutes, then transfer it to a wire rack to cool completely. Once cooled, drizzle with that simple glaze I mentioned—powdered sugar mixed with a touch of milk and vanilla. I don’t like mine too thick; I want it to run beautifully down the sides. If I want extra zing, I sometimes add a squeeze of lemon or orange zest.
Step 9: Slice & Serve
Use a serrated bread knife to cut clean slices—you’re aiming for even, pretty pieces. This cake is best enjoyed when it’s just a little warm or at room temperature. My family loves it with a dollop of whipped cream or a scoop of vanilla ice cream—but honestly, it’s delicious enough to stand alone. Serve it to friends or save it for yourself—either way, it disappears fast!
What to Serve It With
This cake is a chameleon—perfect for breakfast, brunch, or dessert. For breakfast, serve a warm slice with a good cup of coffee or a chai latte—my personal favorite pairing. I always do that when I want a slow, cozy morning, especially on weekends. For brunch, I like adding fresh berries or a dusting of powdered sugar and maybe a side of yogurt or cottage cheese. It’s also amazing as a dessert—warm with a scoop of vanilla ice cream, or drizzled with caramel or chocolate sauce. My kids actually ask for this all the time after dinner, and honestly, it’s one of those recipes that just feels like a little celebration. When I’m feeling extra indulgent, I’ll layer some whipped mascarpone or cream cheese frosting on top. And don’t forget those quick snack moments—this slices beautifully and is great for taking on the go or packing in lunches. It’s that kind of recipe that just makes everyone happy, no matter the time of day.
Top Tips for Perfecting Your Zucchini Swirl Cake
After making this countless times, I’ve learned a few tricks that make it even better. First, always squeeze out as much moisture as you can from the zucchini—wet zucchini will make your batter runny and the cake heavy. A paper towel works great for this—just grate and toss the zucchini in, then give it a good squeeze. Second, when mixing the batter, don’t overmix; stop as soon as everything’s just combined. Overmixing introduces too much gluten, and that’s how you get dense, chewy cakes—nobody wants that! Third, for the swirl pattern, I’ve found using a skewer or toothpick to gently drag through the batter creates those gorgeous ribbons without ruining the marble effect. Personal tip: divide the cinnamon-sugar filling into two parts, and sprinkle one part over the first layer of batter, then swirl with half the batter before repeating. This layered approach creates a more striking pattern. You can also swap the cinnamon for cocoa powder mixed with sugar for a chocolate twist—my husband’s favorite! As for baking, I’ve learned that moving the oven rack a little lower helps the top not get too dark while the inside finishes baking. And finally, don’t skip the glaze—trust me—it adds just the right touch of sweetness and a beautiful glow. These little tweaks have made this recipe spot-on every time I make it.
Storing and Reheating Tips
This cake stores beautifully, and I often make a double batch to have on hand all week. Keep it covered in an airtight container at room temperature for up to 2 days. I’ve actually kept slices in a clean tea towel for a little extra softness—it’s surprisingly effective. For longer storage, pop it in the refrigerator—even the next day, it’s still moist and flavorful. Just wrap it tightly to prevent it from drying out. If you want to keep it for more than a couple of days, freezing is your friend: wrap slices individually in plastic wrap, then foil, and keep for up to 3 months. When you’re ready to enjoy, just thaw at room temperature or warm in the microwave for about 20 seconds. As for the glaze—wait to add that until just before serving if you’re storing in the fridge; heat it slightly and drizzle fresh for maximum impact. I’ve reheated slices in the oven at 300°F (150°C) wrapped in foil—like a little warm hug—and it works beautifully. With proper storage, this cake stays moist, flavorful, and just as delicious as the first day. A secret: the flavors seem to deepen after a day or two, so don’t be afraid to make it ahead!
Frequently Asked Questions
Final Thoughts
This zucchini swirl cake has become a staple in my kitchen—not just because it’s easy or because everyone loves it, but because it feels like home. Every time I make it, I remember those lazy weekend mornings when my kids would cheer from the kitchen table, asking for slices. It’s one of those recipes that you can tweak, customize, and still get perfect results—whether you’re a seasoned baker or just starting out. The secret is in the love (and a good squeeze of zucchini), and I promise, once you make it a few times, it’ll become yours, too. I hope you enjoy this as much as my family does. Don’t forget to share your photos and variations—I love hearing how you put your spin on it. Happy baking, friends—here’s to many cozy, sweet moments with your own zucchini swirl masterpiece!
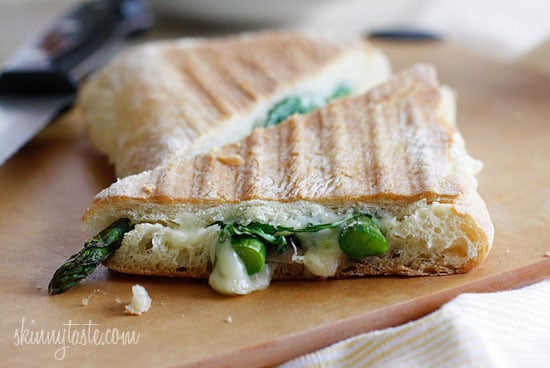
Asparagus and Prosciutto Panini
Ingredients
Method
- Preheat the panini grill.
- Lightly spritz the asparagus with olive oil and season with salt and pepper.
- Grill the asparagus for about 3-4 minutes until tender but still crisp.
- In a small bowl, combine mayonnaise and minced garlic.
- Spread the garlic mayonnaise inside the sliced ciabatta bread.
- Layer the cheese, prosciutto, grilled asparagus, and arugula on the bread.
- Close the sandwich and lightly spray the outside with olive oil.
- Place the sandwich in the panini press and cook until the bread is toasted and the cheese melts, about 5 minutes.
- Remove from the press, cut in half, and serve immediately.