Best Chewy Oatmeal Cookie Recipe
You know those recipes that just *feel* like home? The ones you pull out when you need a little comfort, or when unexpected guests pop by and you want to impress them without breaking a sweat? Well, for me, this zucchini bread is that recipe. It’s more than just a baked good; it’s a warm hug in cake form, a little bit of sunshine on a cloudy day. My Grandma Elsie used to make something similar, though hers was a bit more rustic. I’ve taken her basic idea and tweaked it over the years, adding my own little flourishes, and honestly, this current version is just *chef’s kiss*. It’s the kind of thing that smells incredible while it’s baking, filling your entire house with the most mouthwatering aroma. Forget those dry, bland loaves you might have encountered; this one is incredibly moist, tender, and has this subtle sweetness that’s just perfect. It’s like a hug for your taste buds, and it’s definitely one of my all-time favorites, right up there with my famous apple crumble.
What is Zucchini bread?
So, what exactly is zucchini bread? At its heart, it’s a quick bread, which means it uses baking soda or baking powder as a leavening agent instead of yeast. This makes it super fast to whip up – no waiting for dough to rise! The star ingredient, zucchini, might sound a little unusual in a sweet bread, but trust me, it’s a game-changer. When grated and baked, zucchini practically disappears into the batter, adding an incredible amount of moisture and a subtle, earthy sweetness without any overpowering vegetal flavor. Think of it as nature’s secret weapon for making baked goods incredibly tender and rich. The “secret swirl” part of my recipe is where I add a decadent cinnamon-sugar mixture right into the batter before baking, creating beautiful ribbons of flavor and texture. It’s essentially a humble loaf of bread that’s been elevated to dessert status, or at least a very, very satisfying snack.
Why you’ll love this recipe?
Oh, where do I even begin with why you’ll fall head over heels for this zucchini bread? First off, the flavor profile is just sublime. It’s not overly sweet, but perfectly balanced, with that hint of cinnamon from the swirl and a lovely warmth from the spices. The texture is probably what I love most – it’s unbelievably moist and tender, thanks to the zucchini. Seriously, you’d never guess there’s a vegetable in it! And the cost-efficiency? It’s a lifesaver! Zucchini is often super affordable, especially when it’s in season, and the rest of the ingredients are pantry staples. This recipe is also incredibly versatile. I love it as is, but you can easily add nuts, chocolate chips, or even a sprinkle of shredded coconut to the batter. What I love most about this recipe is how it uses simple, everyday ingredients to create something truly special. It feels decadent without being fussy, and it always gets rave reviews. It’s the perfect solution when you have a few zucchinis hanging around that need using up, and it’s a fantastic way to sneak a little extra goodness into your family’s diet without them even knowing!
How do you make Zucchini bread?
Quick Overview
The beauty of this zucchini bread is its simplicity. We’re talking about a straightforward mixing process where you combine your dry ingredients, then your wet ingredients, and then bring them all together. The real magic happens when we add that cinnamon-sugar swirl, creating those gorgeous ribbons throughout the loaf. It bakes up to a perfect golden brown, smelling absolutely divine. It’s one of those recipes that’s almost foolproof, and it truly comes together in under 15 minutes of active prep time. You’ll be amazed at how quickly you can go from raw ingredients to a warm, delicious loaf straight from the oven.
Ingredients
For the Main Batter:
This is where all the magic begins. I always try to use fresh, good-quality ingredients. For the flour, all-purpose works perfectly, but I’ve had good luck with a good quality gluten-free blend if you need it (more on that later!). Make sure your baking soda is fresh – it’s crucial for getting that nice lift. The oil is what keeps this bread so incredibly moist, so don’t skimp on it! I usually use a neutral oil like vegetable or canola, but melted coconut oil works beautifully too. And for the zucchini, make sure it’s finely grated. No one wants big chunks of zucchini in their bread, right?
- 3 cups all-purpose flour
- 1 teaspoon baking soda
- 1/2 teaspoon salt
- 1 teaspoon ground cinnamon
- 1/2 teaspoon ground nutmeg
- 1 cup granulated sugar
- 1/2 cup packed light brown sugar
- 3 large eggs, at room temperature
- 1 cup neutral vegetable oil (or melted coconut oil)
- 1 teaspoon vanilla extract
- 2 cups finely grated zucchini (about 2 medium zucchinis, squeezed of excess moisture)
For the Filling:
This is the secret to that amazing swirl! It’s so simple but adds so much depth of flavor. I like to use dark brown sugar here for a richer caramel note, but light brown sugar is fine too. And a generous amount of cinnamon, of course. If you’re feeling adventurous, a pinch of allspice or even a tiny bit of ground ginger can add another layer of warmth. I usually mix this up in a small bowl while my batter is coming together.
- 1/2 cup packed light brown sugar
- 2 tablespoons ground cinnamon
- 1/4 teaspoon ground nutmeg (optional)
For the Glaze:
This glaze is totally optional, but I highly recommend it if you want that extra touch of sweetness and visual appeal. It’s super simple – just powdered sugar and a liquid. Milk or a dairy-free alternative makes it creamy, while lemon juice adds a lovely tang that cuts through the sweetness beautifully. You can also just use water if you want something really simple. Aim for a consistency that’s pourable but not too thin. If it’s too thick, add a tiny bit more liquid; if it’s too thin, add a bit more powdered sugar.
- 1 cup powdered sugar
- 2-3 tablespoons milk (or dairy-free alternative, lemon juice, or water)
Step-by-Step Instructions
Step 1: Preheat & Prep Pan
First things first, get your oven preheated to 350°F (175°C). This is important because you want it nice and hot when the batter is ready. Next, grab a standard 9×5 inch loaf pan. I like to grease it really well with butter or cooking spray, and then lightly flour it. This extra step ensures your beautiful loaf won’t stick. You can also line it with parchment paper, leaving a little overhang on the sides so you can easily lift it out once it’s baked. That’s my secret to getting a perfect, unmolded loaf every single time!
Step 2: Mix Dry Ingredients
In a large bowl, whisk together your flour, baking soda, salt, cinnamon, and nutmeg. Give it a good whisk to make sure everything is evenly distributed. This might seem like a small thing, but it’s crucial for ensuring your leavening agents and spices are mixed throughout the batter. Nobody wants a bite that’s all baking soda or a pocket of intense cinnamon! You’re just looking for everything to be combined. No need to overthink it.
Step 3: Mix Wet Ingredients
In a separate medium bowl, whisk together the granulated sugar, brown sugar, eggs, oil, and vanilla extract until everything is smooth and well combined. You want to make sure the sugars are dissolved and there are no streaks of egg yolk. This mixture will form the base of our moist, tender bread. I always like to make sure my eggs are at room temperature; they incorporate better into the batter.
Step 4: Combine
Now, pour the wet ingredients into the bowl with the dry ingredients. Using a spatula or a wooden spoon, mix them together until *just* combined. It’s really important not to overmix here. A few streaks of flour are perfectly fine! Overmixing develops the gluten in the flour, which can lead to a tough, dense bread, and we definitely don’t want that. We’re aiming for a nice, thick batter that still has a bit of volume.
Next, gently fold in the grated zucchini. Make sure to squeeze out as much excess moisture as you can from the zucchini before adding it; this is key to preventing a soggy loaf. Just a few gentle folds until it’s evenly distributed through the batter.
Step 5: Prepare Filling
In a small bowl, combine the 1/2 cup of light brown sugar, 2 tablespoons of cinnamon, and the optional pinch of nutmeg. Mix it all together with a fork until it resembles coarse, damp sand. This is our gorgeous swirl mixture that will add so much flavor and visual appeal. I usually do this while the wet and dry ingredients are just starting to combine so it’s ready to go.
Step 6: Layer & Swirl
Now for the fun part! Pour about half of the zucchini batter into your prepared loaf pan. Sprinkle about half of the cinnamon-sugar mixture evenly over the batter. Then, pour the remaining batter on top, followed by the rest of the cinnamon-sugar mixture. Now, here’s the trick to getting those beautiful swirls: take a butter knife or a skewer and gently swirl it through the batter a few times. Don’t go too crazy; just a few passes will create lovely ribbons of cinnamon-sugar throughout the loaf. You want to see those distinct patterns, not just a homogenous mix.
Step 7: Bake
Pop that beautiful loaf into your preheated oven. Bake for 50-65 minutes. Now, ovens can be finicky, so you’ll want to check for doneness. The best way is to insert a toothpick or a thin knife into the center of the loaf. If it comes out clean, or with just a few moist crumbs attached, it’s ready! If there’s wet batter, give it another 5-10 minutes and check again. If the top is browning too quickly, you can loosely tent it with foil.
Step 8: Cool & Glaze
Once it’s baked, carefully remove the loaf pan from the oven. Let the bread cool in the pan for about 10-15 minutes. This is important because it allows the loaf to set up a bit and makes it easier to remove without breaking. After that initial cooling, invert the loaf onto a wire rack to cool completely. And *then*, if you’re doing the glaze, whisk together the powdered sugar and milk (or your liquid of choice) until smooth. Drizzle it over the completely cooled loaf. Waiting until it’s fully cooled prevents the glaze from melting into a puddle. You want those pretty streaks!
Step 9: Slice & Serve
Once the glaze is set (or if you skipped the glaze, once the bread is fully cool), it’s time to slice! I find a sharp serrated knife works best for clean cuts. Serve up a thick slice and enjoy! This bread is fantastic on its own, but it’s also delicious with a smear of butter or cream cheese. The aroma alone will have everyone flocking to the kitchen!
What to Serve It With
This zucchini bread is so versatile, it fits into almost any meal or occasion! For a simple breakfast, I love it toasted with a generous schmear of butter and a steaming mug of coffee. It’s satisfying without being too heavy. If you’re hosting brunch, a beautifully glazed loaf is always a showstopper. I like to serve it alongside fresh fruit salad, maybe some yogurt parfaits, or even a quiche. For dessert, it’s perfect! Serve a slice slightly warmed with a scoop of vanilla bean ice cream or a dollop of whipped cream. It’s a lighter alternative to a rich chocolate cake, but just as satisfying. And for those cozy evenings when you just need a little something sweet, this bread is a lifesaver. I’ll often just have a slice with a glass of milk while I’m curled up with a book. My kids also love it crumbled over yogurt or even as a base for French toast the next morning. It’s just one of those things that makes any meal feel a little bit more special.
Top Tips for Perfecting Your Zucchini Bread
I’ve made this zucchini bread more times than I can count, and I’ve learned a few tricks along the way that I think will really help you achieve perfection. Let’s dive into some of my best tips!
Zucchini Prep: This is probably the MOST important step. You absolutely *must* squeeze the excess moisture out of your grated zucchini. I usually grate it into a fine-mesh sieve set over a bowl and then press down on it with a spoon or my hands. If you skip this, your bread can turn out gummy and dense. Also, don’t peel the zucchini! The skin adds color and nutrients, and you won’t even notice it once it’s baked.
Mixing Advice: Remember what I said about not overmixing? It’s worth repeating. Mix the wet and dry ingredients only until *just* combined. A few flour streaks are okay. Overmixing develops gluten, which makes the bread tough. I’ve definitely made that mistake myself when I was first starting out, and the result was disappointing! Fold in the zucchini gently, too.
Swirl Customization: Don’t be afraid to get creative with the swirl! While cinnamon-sugar is my go-to, you can add a tablespoon of cocoa powder to the swirl mixture for a chocolatey twist, or even some chopped nuts like walnuts or pecans. For the swirling technique, a gentle zig-zag motion with a knife is usually best. You want distinct layers, not to fully incorporate it.
Ingredient Swaps: I’ve experimented a lot! For a dairy-free version, I’ve used almond milk or oat milk for the glaze, and it works wonderfully. You can also swap the vegetable oil for melted coconut oil for a subtle tropical note. If you’re out of brown sugar, granulated sugar can be used, but you’ll lose some of that depth of flavor and moisture. For a richer flavor, try using half butter and half oil.
Baking Tips: Always preheat your oven properly! An oven that isn’t at temperature can lead to uneven baking. When testing for doneness, insert the toothpick into the *center* of the loaf, not the edges, as they cook faster. If the top starts to get too dark before the center is cooked, loosely tent the loaf with aluminum foil. This is a lifesaver!
Glaze Variations: The glaze is completely optional, but it really takes this bread to the next level. If you want a tangier glaze, use lemon juice instead of milk. For a darker, richer glaze, use a little bit of maple syrup mixed with powdered sugar. You can also just dust the cooled loaf with a bit of powdered sugar for a simpler, elegant finish.
Storing and Reheating Tips
Storing this delicious zucchini bread is pretty straightforward, and it keeps remarkably well, which is one of the reasons I love it so much for meal prep.
Room Temperature: Once completely cooled, you can store the loaf wrapped tightly in plastic wrap or in an airtight container at room temperature. It should stay fresh and moist for about 3-4 days. I’ve found that wrapping it tightly is key to preventing it from drying out.
Refrigerator Storage: If you live in a very warm climate or want it to last a bit longer, you can store it in the refrigerator. Again, make sure it’s in an airtight container or well-wrapped. It will stay good in the fridge for about a week. The texture might be a little firmer straight from the fridge, but it softens up nicely.
Freezer Instructions: This bread freezes beautifully! Once it’s completely cooled, wrap the loaf (or individual slices) tightly in plastic wrap, and then in a layer of aluminum foil or a freezer bag. It will keep in the freezer for up to 2-3 months. To thaw, simply remove it from the freezer and let it come to room temperature on the counter for a few hours. For individual slices, you can even pop them in the toaster to warm them up directly from frozen!
Glaze Timing Advice: If you’ve applied the glaze, it’s best to store the bread at room temperature or in the refrigerator. The glaze can get a bit sticky in the freezer, although it’s not impossible. If freezing with glaze, ensure it’s fully set before wrapping, and consider a slightly thicker glaze. When reheating a slice, you might want to add a fresh drizzle of glaze after warming.
Frequently Asked Questions
Final Thoughts
So there you have it – my beloved zucchini bread recipe! I truly hope you give this one a try. It’s one of those recipes that just brings so much joy, from the simple act of making it to the sheer delight of enjoying a warm slice. It’s proof that a few humble ingredients can come together to create something truly magical. Whether you’re looking for a way to use up extra zucchini from the garden or just craving a comforting treat, this bread delivers every single time. It’s a recipe that I’ll be passing down, and I can’t wait to hear how it turns out for you! If you love this, you might also enjoy my recipe for moist banana bread or my easy lemon poppy seed muffins, which also use simple ingredients for maximum flavor. I’d love to know your thoughts, any variations you try, or any funny kitchen mishaps that happen along the way in the comments below! Happy baking, my friends!
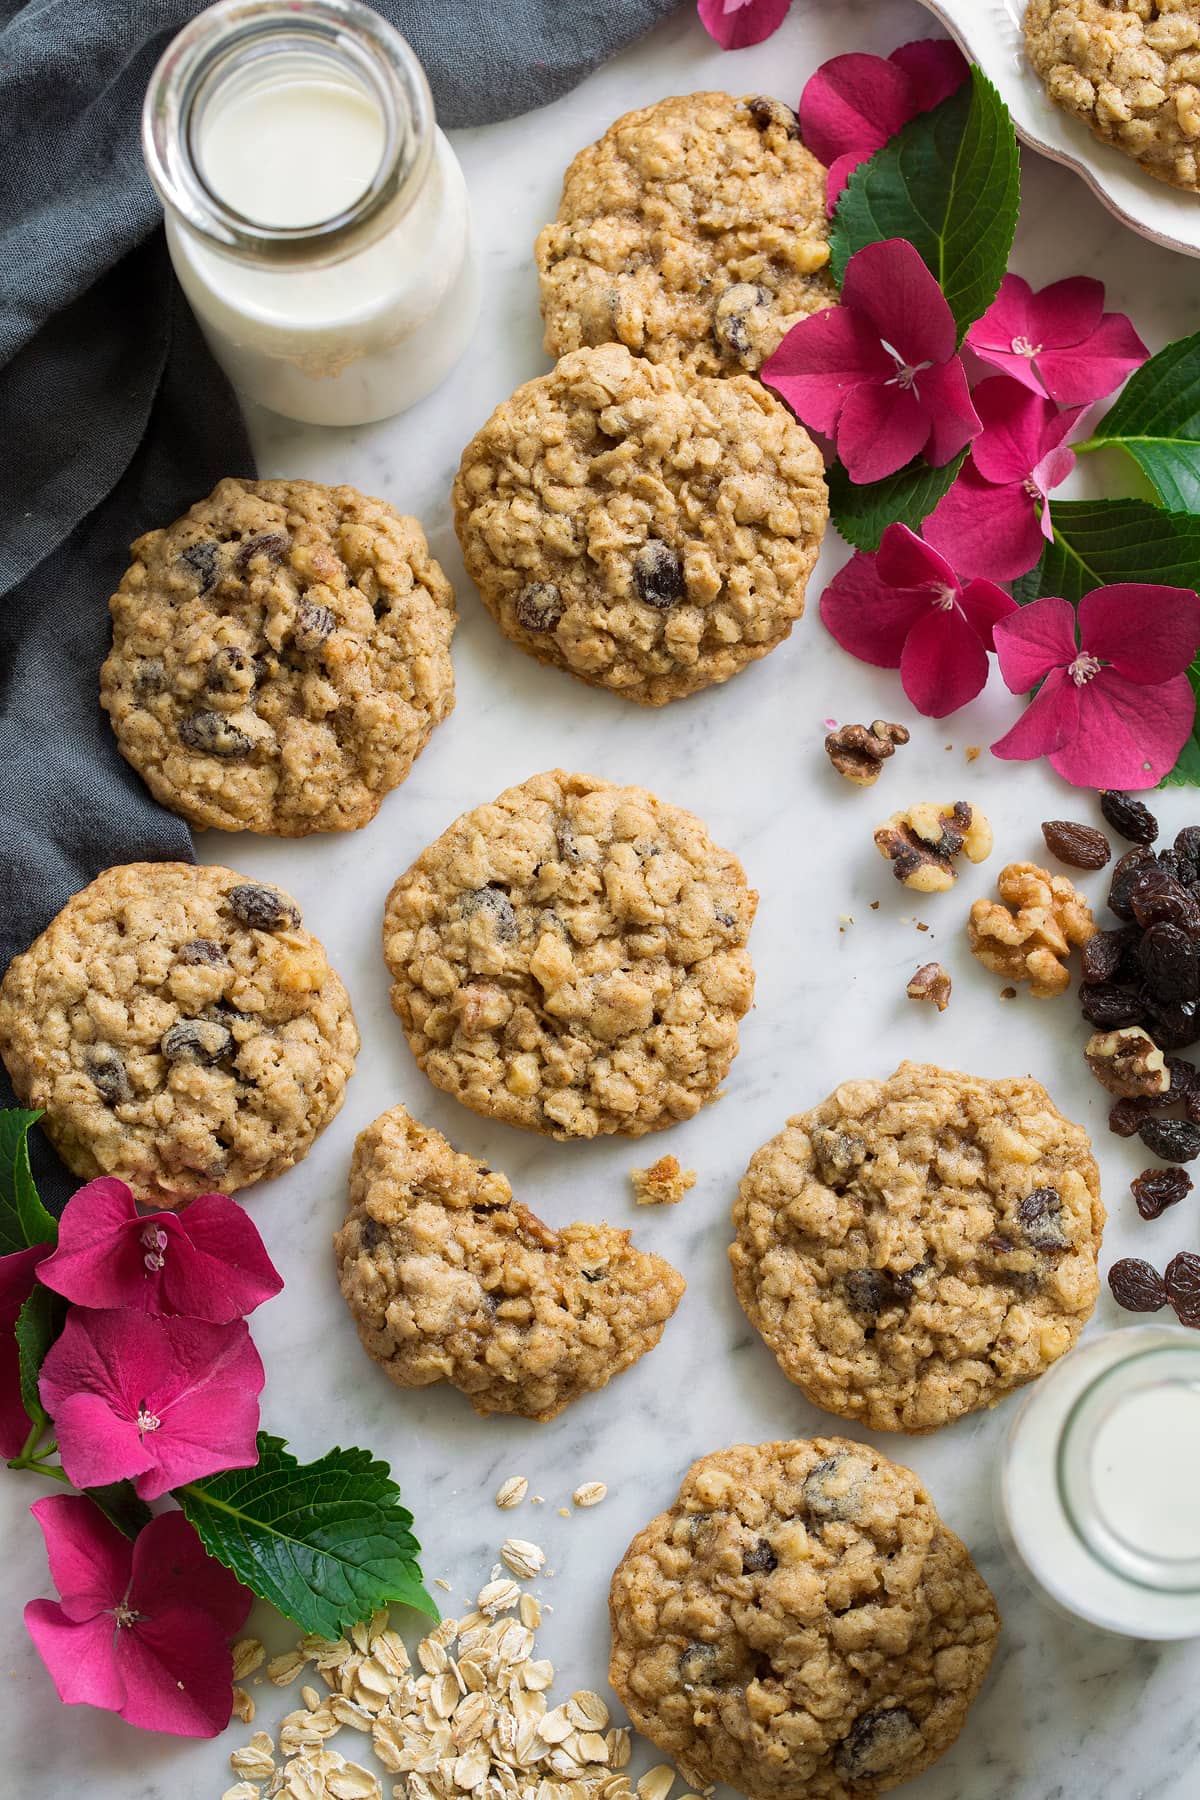
chewy oatmeal cookie recipe
Ingredients
Method
- Preheat oven to 350 degrees F (175 C). Line rimmed 18 by 13-inch baking sheets with parchment paper or silicone baking mats.
- In a mixing bowl whisk together flour, cinnamon, baking soda, baking powder and salt for 20 seconds, set aside.
- In the bowl of an electric stand mixer fitted with the paddle attachment cream together butter, brown sugar, and granulated sugar until combined.
- Mix in one egg, then blend in second egg and vanilla.
- Add flour mixture and mix just until combined then mix in oats, raisins and walnuts.
- Scoop dough out and shape into 1.5-inch balls (or 40 grams each), transfer to prepared baking sheet fitting 12 per sheet and spacing 2-inches apart.
- Bake in preheated oven until golden brown on edges and nearly set (center should look under-baked), about 12 - 14 minutes.
- Let cool on baking sheet for a few minutes then transfer to a wire rack to cool completely. Repeat with remaining dough.
- Store in an airtight container at room temperature.