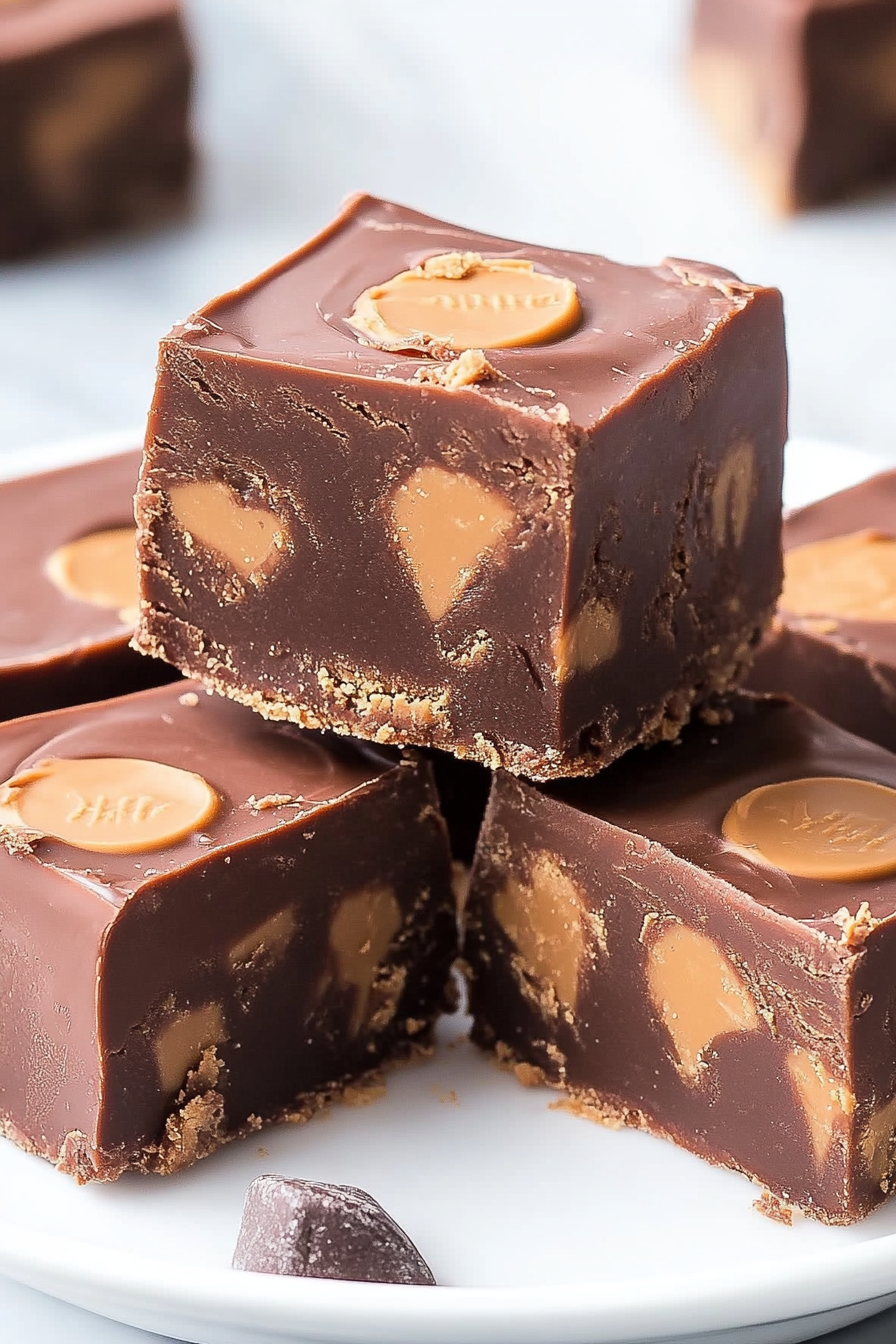
Reese’s Peanut Butter Fudge Easy Recipe
You know those recipes that just *feel* like home? The ones that smell incredible as they bake, that everyone devours in minutes, and that you can whip up even when you’re half-asleep? Well, this zucchini bread is exactly that for me. It’s not just a quick bread; it’s a hug in loaf form, and honestly, it’s one of my most requested recipes. I’ve tried a lot of zucchini bread recipes over the years, and while many are good, this one? This one hits different. It’s got that perfect balance of moistness, subtle sweetness, and a hint of spice that just makes you want a second slice. It’s even better than those fancy bakery muffins, and way simpler to make. If you’re looking for a guaranteed crowd-pleaser, something that feels both comforting and a little bit special, you’ve found it. Trust me, this is the one you’ll be making over and over again.
What is Zucchini bread?
So, what exactly *is* zucchini bread? At its heart, it’s a sweet quick bread where grated zucchini is the star ingredient. Now, don’t let the “zucchini” part fool you into thinking it tastes like a garden vegetable! The zucchini’s magic lies in its ability to add an incredible amount of moisture and a tender crumb to the bread without imparting any strong flavor. Think of it as nature’s secret weapon for baking. It’s essentially a cake-like loaf, often spiced with cinnamon and nutmeg, and sometimes loaded with nuts or chocolate chips. My version is somewhere in the middle – perfectly spiced, incredibly moist, and wonderfully forgiving. It’s not overly sweet, which is why it works for so many different occasions, from a morning pick-me-up with coffee to a delightful afternoon treat. It’s the kind of recipe that makes your kitchen smell like pure comfort.
Why you’ll love this recipe?
Oh, where do I even begin with why this zucchini bread is a total winner? First off, the flavor is just *divine*. It’s not one of those bland, dry breads. This one is deeply moist thanks to the zucchini, and the combination of warm spices like cinnamon and a pinch of nutmeg makes it smell like a cozy hug. Every bite is soft and tender, with a sweetness that’s just right – not too much, not too little. My kids, who can be notoriously picky eaters, actually ask for this by name, which is saying something! Second, the simplicity is a lifesaver. On busy weeknights or lazy weekend mornings, I can have this mixed and in the oven in under 15 minutes. It uses pantry staples you probably already have on hand, which means no last-minute dash to the grocery store. Third, it’s super cost-effective. Zucchini is usually pretty affordable, and the other ingredients are basic baking essentials. You get a fantastic, homemade treat without breaking the bank. And finally, its versatility is off the charts. I’ll talk more about this later, but you can serve it for breakfast, brunch, dessert, or just a snack. It’s the kind of recipe that adapts to your life. What I love most about this one is that it’s so foolproof. Even if you’re new to baking, you’re going to nail this. It’s far more forgiving than a delicate cake and always turns out wonderfully. It’s my go-to when I want to impress someone without stressing myself out!
How do you make Zucchini bread?
Quick Overview
The process is wonderfully straightforward: whisk together your dry ingredients, mix your wet ingredients, combine them gently, stir in the star of the show (zucchini!), and bake until golden and fragrant. The key to its success lies in not overmixing and ensuring your zucchini is properly prepared. It’s honestly one of the easiest quick breads you can tackle, and the payoff in taste and texture is huge. You’ll be amazed at how quickly you can go from a bowl of ingredients to a warm, delicious loaf.
Ingredients
For the Main Batter:
Here’s what you’ll need for the base of this goodness. I always try to use fresh, medium-sized zucchinis – they have the best moisture content without being too watery. You can usually find a couple of good ones at your local farmer’s market or grocery store for a dollar or two.
* 2 cups all-purpose flour
* 1 teaspoon baking soda
* 1/2 teaspoon salt
* 1 teaspoon ground cinnamon
* 1/4 teaspoon ground nutmeg (optional, but I love it!)
* 1/2 cup unsalted butter, softened
* 1 cup granulated sugar (you can go down to 3/4 cup if you prefer it less sweet)
* 2 large eggs
* 1 teaspoon vanilla extract
* 1 cup grated zucchini, squeezed dry (this is important!)
For the Filling (Optional, but highly recommended!):
This is where you can really have some fun and customize it to your liking. My family loves chocolate chips, but chopped walnuts or pecans are also fantastic. If you’re feeling adventurous, a swirl of cream cheese filling is amazing too!
* 1/2 cup chocolate chips (semi-sweet or dark work best)
* 1/2 cup chopped walnuts or pecans (optional)
For the Glaze:
This glaze is super simple and adds a lovely finishing touch. It’s not too thick, so it drizzles beautifully. If you’re not a fan of sweet glazes, you can totally skip this step or just dust with powdered sugar.
For the Glaze:
* 1 cup powdered sugar
* 2-3 tablespoons milk (or a dairy-free alternative like almond or oat milk)
* 1/2 teaspoon vanilla extract
Step-by-Step Instructions
Step 1: Preheat & Prep Pan
First things first, get your oven preheating to 350°F (175°C). I find that a standard 9×5 inch loaf pan is perfect for this recipe. Grease it really well with butter or non-stick spray, and then I like to lightly flour it too. This extra step helps ensure your beautiful loaf doesn’t stick. Sometimes I even line the bottom with parchment paper for super easy removal – a trick I learned after one too many “stuck loaf” incidents!
Step 2: Mix Dry Ingredients
In a medium bowl, whisk together the flour, baking soda, salt, cinnamon, and nutmeg (if you’re using it). Give it a good whisk to make sure everything is evenly distributed. This little step ensures your leavening agents and spices are perfectly mixed, leading to an even rise and flavor throughout. You don’t want a bite that’s only cinnamon, right?
Step 3: Mix Wet Ingredients
In a large bowl, cream together the softened butter and granulated sugar until light and fluffy. I usually use an electric mixer for this, but you can absolutely do it by hand if you’re feeling energetic! Then, beat in the eggs one at a time, making sure each is fully incorporated before adding the next. Stir in the vanilla extract. This is the base of our moist deliciousness!
Step 4: Combine
Now, gradually add the dry ingredients to the wet ingredients, mixing on low speed or by hand until just combined. Be careful not to overmix here! Overmixing can lead to a tough loaf, and we definitely don’t want that. Just mix until you don’t see any dry streaks of flour anymore. It’s okay if there are a few little lumps; that’s better than overmixing.
Step 5: Prepare Filling
This is the fun part if you’re adding mix-ins! Gently fold in your chocolate chips and/or nuts into the batter. I find that tossing them with a tablespoon of the flour mixture first can help prevent them from sinking to the bottom during baking. It’s a small trick, but it makes a difference!
Step 6: Layer & Swirl
Here’s where the zucchini comes in! Gently fold in the grated, *squeezed-dry* zucchini. This is super important – excess moisture from the zucchini can make the bread gummy. So, after grating, I wrap it in a clean kitchen towel or paper towels and give it a good squeeze. Once the zucchini is mixed in, pour about half the batter into your prepared loaf pan. If you’re doing a swirl, now’s the time. Dollop the remaining batter over the top and then gently swirl it with a knife or skewer. This creates beautiful patterns and ensures pockets of flavor throughout. If you’re not swirling, just spread the rest of the batter evenly.
Step 7: Bake
Bake for 50-65 minutes, or until a wooden skewer or toothpick inserted into the center comes out clean. Oven temperatures can vary, so keep an eye on it. If the top starts to brown too quickly, you can loosely tent it with aluminum foil for the last 15-20 minutes of baking. The aroma that fills your kitchen during this time is just heavenly – it’s one of my favorite parts!
Step 8: Cool & Glaze
Once it’s done, let the bread cool in the pan for about 10-15 minutes before inverting it onto a wire rack to cool completely. Trying to glaze a warm loaf is a recipe for a melted mess, so patience is key here! While the bread is cooling, whisk together the powdered sugar, milk, and vanilla extract for the glaze. Start with 2 tablespoons of milk and add more, a teaspoon at a time, until you reach your desired drizzling consistency. It should be thick enough to coat, but thin enough to flow.
Step 9: Slice & Serve
Once the bread is completely cool, drizzle that gorgeous glaze over the top. Let the glaze set for a few minutes, then slice and enjoy! I love serving this slightly warm, but it’s equally delicious at room temperature. The moist crumb, the hint of spice, and that sweet glaze – it’s pure bliss.
What to Serve It With
This zucchini bread is a chameleon in the best way possible. It’s so adaptable that it fits into almost any meal or occasion. For breakfast, it’s fantastic alongside a steaming mug of coffee or a glass of cold milk. I sometimes toast a slice and add a little smear of butter – simple perfection. For brunch, I like to present it a little more elegantly. I’ll slice it neatly and arrange it on a nice platter, maybe with a side of fresh berries or a dollop of Greek yogurt. It pairs wonderfully with other brunch favorites like scrambled eggs or a light salad. As a dessert, it’s a dream. Serve it slightly warm with a scoop of vanilla bean ice cream or a drizzle of caramel sauce. The warm spices in the bread complement the cold ice cream beautifully. And for those cozy afternoon snacks when you just need something comforting? This is it. Grab a slice, curl up with a book, and enjoy. My family also loves it as an after-school treat. It’s a healthier alternative to cookies and always a hit. I’ve even brought it to potlucks, and it’s always the first thing to disappear!
Top Tips for Perfecting Your Zucchini Bread
I’ve made this recipe more times than I can count, and along the way, I’ve picked up a few tricks that make it even better. These are the things I always do now, and they’ve made all the difference.
Zucchini Prep: The absolute most critical step is squeezing out the excess moisture from your grated zucchini. I can’t stress this enough! If you skip this, your bread can end up dense and gummy. Grate your zucchini, then wrap it in a clean kitchen towel or several layers of paper towels and give it a firm squeeze. You’ll be surprised how much liquid comes out. And don’t worry about peeling; the skin adds a nice color and nutrients.
Mixing Advice: Remember what I said about overmixing? It’s worth repeating. Mix the dry ingredients into the wet ingredients *just* until combined. A few small lumps are perfectly fine. Overworking the gluten in the flour will develop too much, resulting in a tough, chewy texture. We’re going for tender and moist here!
Swirl Customization: If you decide to add mix-ins like chocolate chips or nuts, don’t just dump them in. Toss them with a tablespoon of your dry flour mixture before adding them to the batter. This helps suspend them throughout the bread so they don’t all sink to the bottom. For the swirl, don’t over-swirl! Just a few gentle passes with a knife will create beautiful patterns without deflating the batter.
Ingredient Swaps: This recipe is pretty forgiving. If you don’t have all-purpose flour, a good quality 1-to-1 gluten-free baking blend usually works well (though I haven’t tested it extensively). For the sugar, you can reduce it slightly if you prefer a less sweet bread, but I wouldn’t go below 3/4 cup to maintain the right texture. If you want to make it dairy-free, use a plant-based butter and your favorite non-dairy milk for the glaze.
Baking Tips: Always bake in the center of the oven. If you notice the top is browning too quickly before the inside is cooked, gently tent the loaf with a piece of aluminum foil. This protects the top from burning while allowing the inside to finish baking. To check for doneness, a wooden skewer or toothpick inserted into the center should come out clean, with no wet batter clinging to it. A few moist crumbs are fine, but not liquid batter.
Glaze Variations: The simple powdered sugar glaze is my favorite, but you can get creative. Add a little lemon zest for a citrusy twist, or a teaspoon of espresso powder for a mocha flavor. If you want a thicker glaze, use less milk. For a thinner glaze that drips more, add more milk, a teaspoon at a time.
Storing and Reheating Tips
Proper storage is key to keeping this zucchini bread delicious for days. Thankfully, it holds up really well! If you’re planning to eat it within a day or two, simply store it at room temperature. Make sure it’s completely cooled first, then wrap it tightly in plastic wrap or place it in an airtight container. It will stay moist and flavorful for about 2-3 days this way.
If you want to keep it longer, the refrigerator is your best bet. Wrap the cooled loaf well in plastic wrap, then in aluminum foil, or store it in an airtight container. It should stay good in the fridge for up to a week. When you want a slice, you can eat it cold, or I like to gently warm a slice in a toaster oven or microwave for about 10-15 seconds to bring back that fresh-baked warmth and softness.
Freezing is a fantastic option if you want to make a batch ahead of time. Once the loaf is completely cooled, wrap it tightly in plastic wrap, then in a layer of aluminum foil, and finally place it in a freezer-safe bag or container. It can stay frozen for up to 3 months. To thaw, unwrap it and let it come to room temperature on the counter, or thaw it overnight in the refrigerator. If you plan to freeze it unfrosted, you can add the glaze after it’s thawed and warmed up.
Glaze Timing Advice: For the best results, I always recommend glazing the bread only when you plan to serve it or within a day of baking if it’s unfrosted. If you’re storing it at room temperature, glaze it just before serving. If refrigerating, you can glaze it before putting it in the fridge, but the glaze might become a bit firmer. For freezing, it’s best to freeze the bread plain and add the glaze after thawing.
Frequently Asked Questions
Final Thoughts
So there you have it – my absolute favorite zucchini bread recipe. It’s a recipe born from simple ingredients and a whole lot of love, and I truly believe it’s one of the best quick breads out there. It’s moist, it’s flavorful, and it’s incredibly forgiving, making it perfect for bakers of all levels. Whether you’re looking for a delicious breakfast treat, a comforting snack, or a simple dessert, this zucchini bread delivers every single time. It’s the kind of recipe that brings people together in the kitchen, filling your home with that incredible, warm aroma. If you enjoy this recipe, you might also love my {{a href=”YOUR_LINK_TO_A_SIMILAR_RECIPE”}}Moist Banana Bread{{/a}} or my {{a href=”YOUR_LINK_TO_ANOTHER_SIMILAR_RECIPE”}}Simple Lemon Poppy Seed Muffins{{/a}}. They share that same spirit of easy, comforting home baking. Give this zucchini bread a try, and I have a feeling it might just become your new go-to as well. I can’t wait to hear how yours turns out in the comments below! Happy baking!
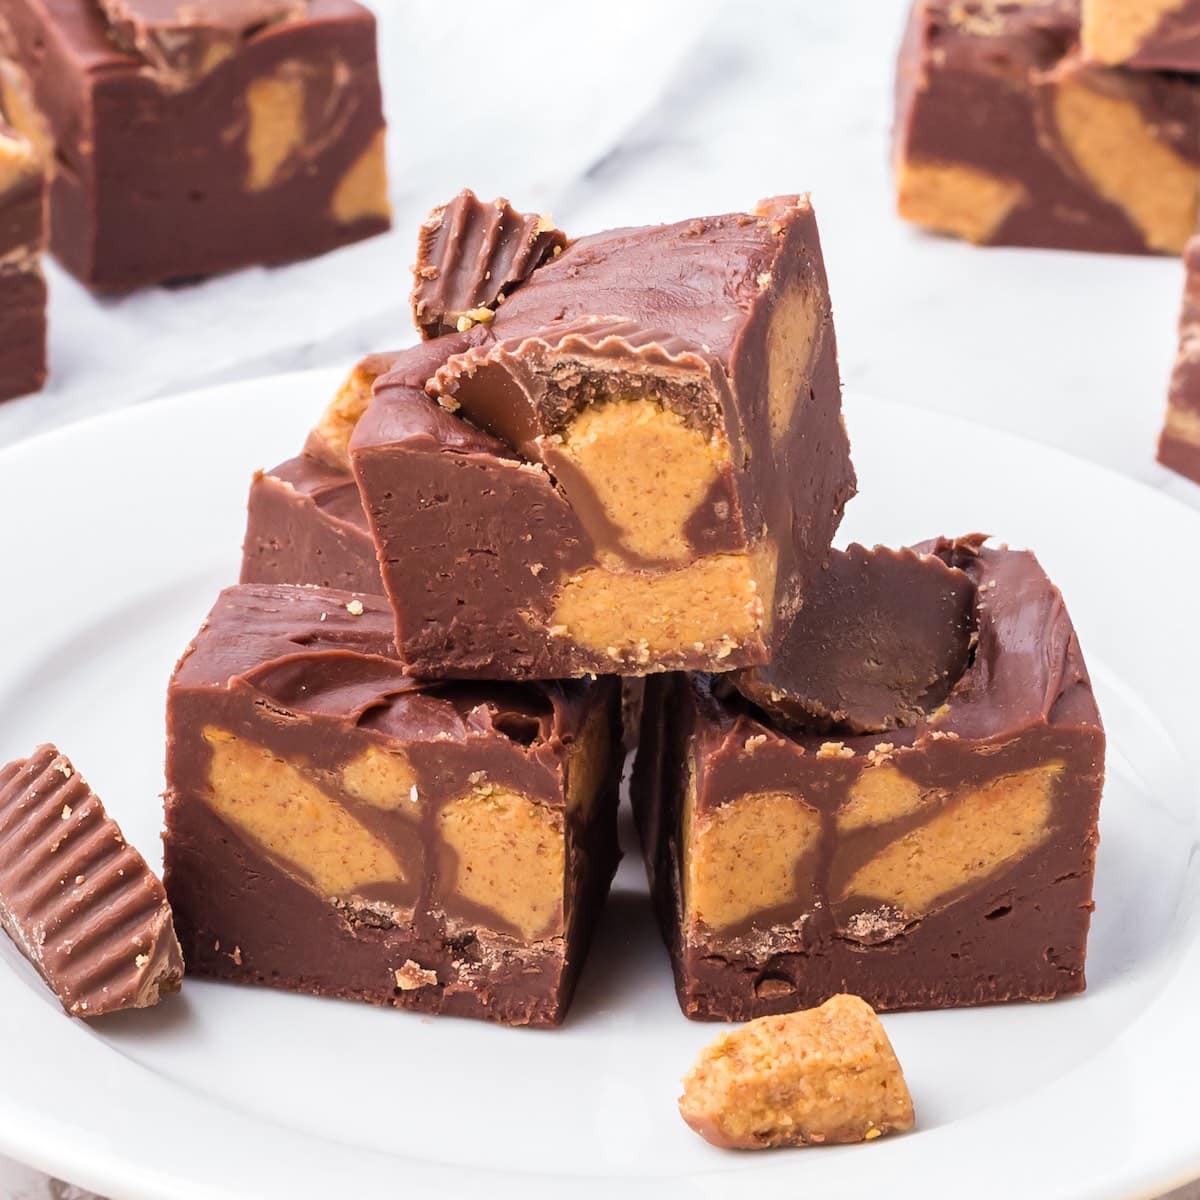
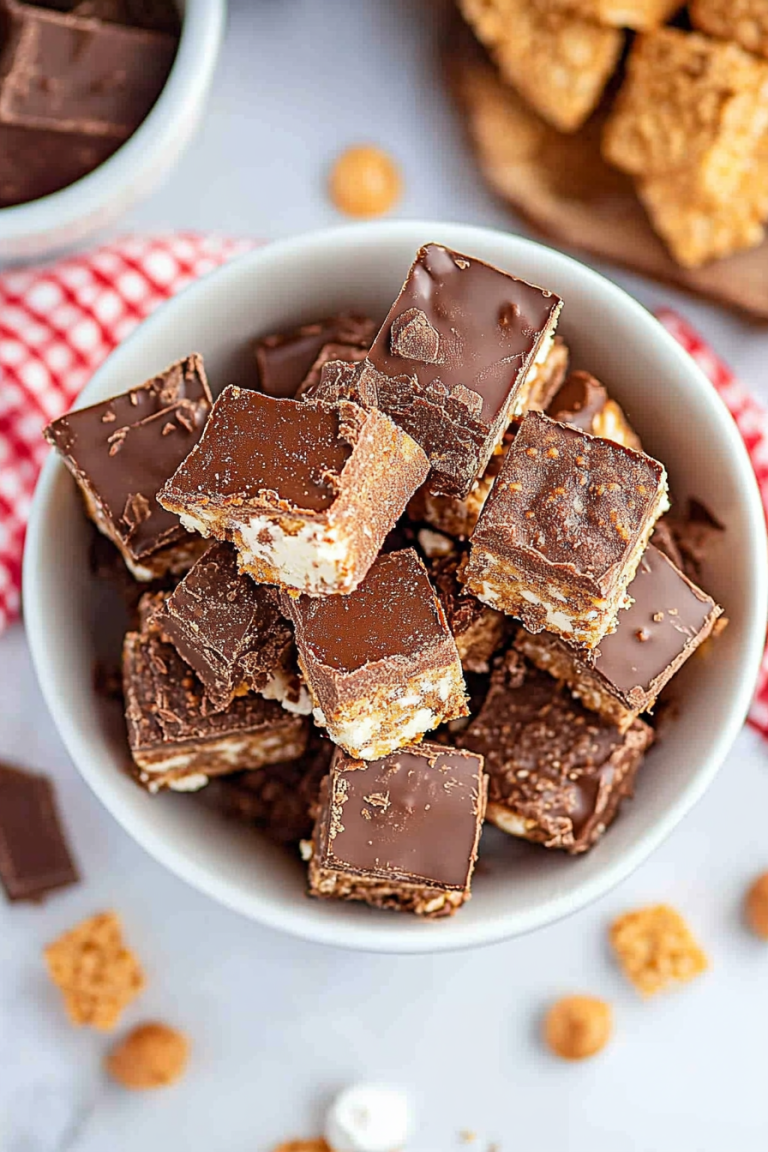
Reese's Peanut Butter Fudge
Ingredients
Method
- Line an 8 X 8-inch casserole dish or baking pan with parchment paper.
- Put the sweetened condensed milk into a large microwave-safe bowl and microwave for 1 minute. Mix in the chocolate chips and stir until melted and smooth. Microwave for another 30 seconds if it's not melting. Add in all but 4 chopped Reese’s Peanut Butter Cups and mix well. Work quickly, the fudge starts to set really quickly.
- Pour the chocolate mixture into the parchment-lined baking pan and smooth it out quickly before it starts to set. Top it with the remaining Reese’s Peanut Butter Cups.
- Allow the fudge to sit at room temperature for about 30 minutes or until set throughout. You can put it into a refrigerator for a quick set, but do not leave it in the refrigerator for more than 5 minutes.