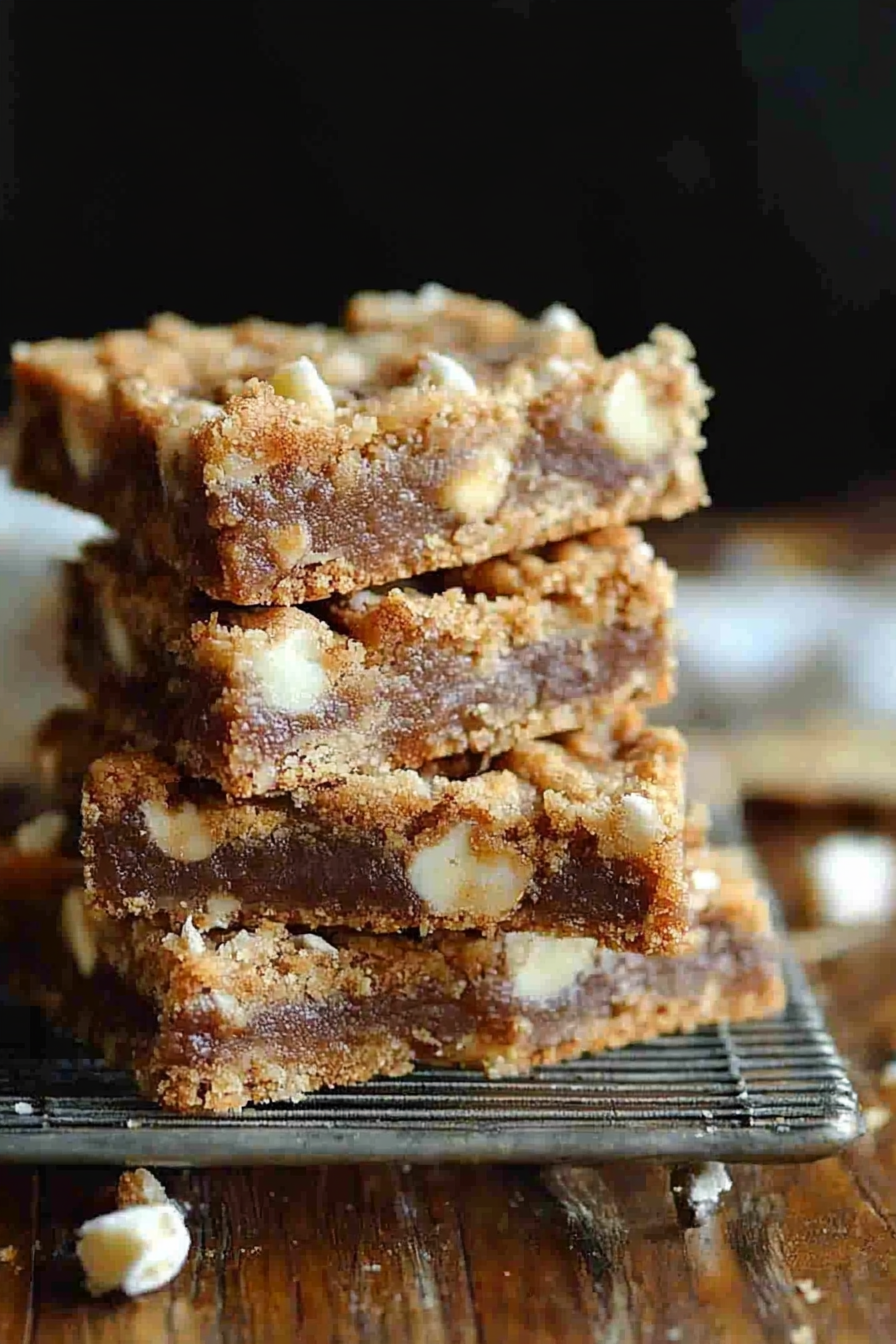
Magic Cookie Bar Recipe The Best Garbage Bars
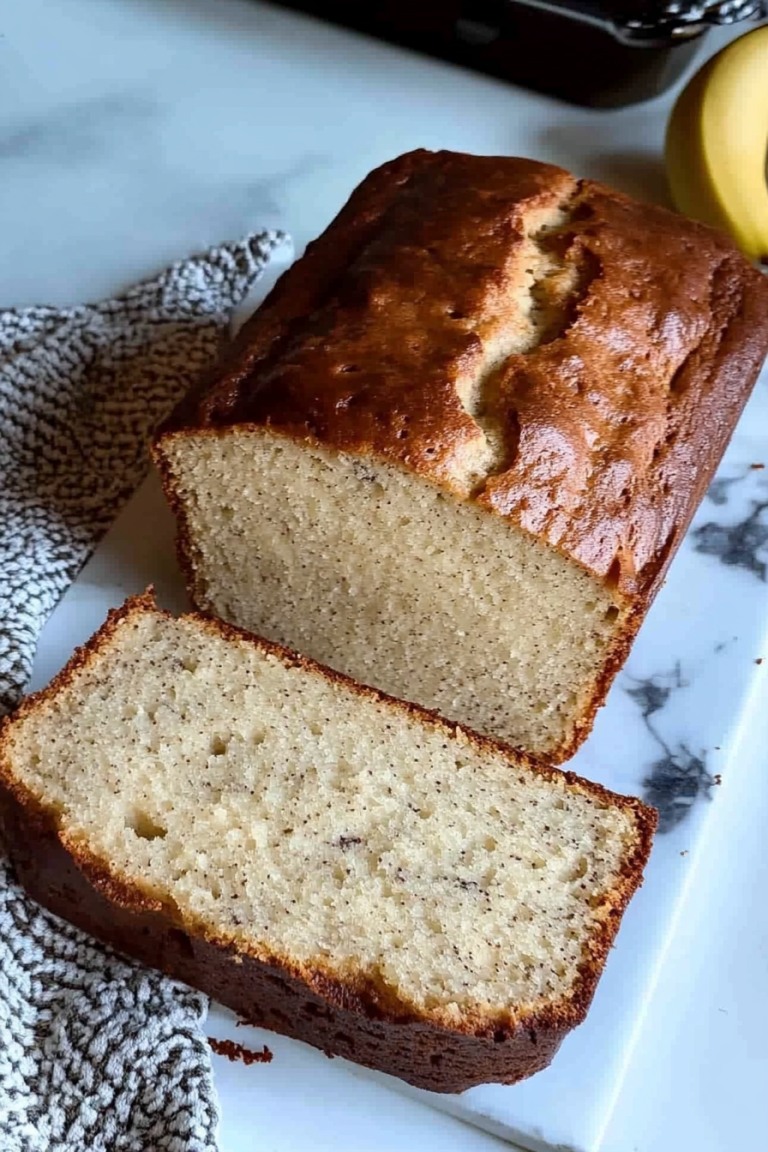
You know those days? The ones where you’re staring into the fridge, desperate for something homemade and comforting, but the thought of a full-blown baking project feels like scaling Mount Everest? Yeah, me too. And on those days, this zucchini bread is my absolute lifeline. Seriously, it’s the recipe I pull out when I need a guaranteed win, something that smells incredible while it bakes and disappears in minutes once it’s out of the oven. It’s almost like magic, but way better because it’s real and it’s delicious. My kids ask for this all the time, especially when they know I’ve got a few zucchini hanging around that need a good home. It’s not quite a cake, not quite a quick bread, but something wonderfully in-between that hits that sweet spot every single time. If you’ve ever tried those super-dense, overly sweet zucchini loaves, forget them. This one’s different. It’s light, it’s moist, and it’s got just the right amount of sweetness. I’ve made this more times than I can count, and it’s become a staple for a reason. It’s the kind of recipe you’ll want to keep tucked away and pull out for any occasion, or frankly, for no occasion at all.
What is Zucchini bread?
So, what exactly *is* this magical zucchini bread? At its heart, it’s a quick bread that uses grated zucchini as its star ingredient. Don’t let that “zucchini” part scare you off if you’re not a huge fan of the veggie on its own! The zucchini doesn’t make it taste like a salad, I promise. Instead, it lends an incredible moistness and tenderness to the final product that you just can’t get from other ingredients. Think of it as nature’s secret to the perfect crumb. It’s essentially a cake-like batter that’s baked in a loaf pan, often studded with things like nuts or chocolate chips, and usually topped with a simple, sweet glaze. The name itself is pretty straightforward, but the result? It’s anything but ordinary. It’s the kind of comforting, homey treat that smells like your grandma’s kitchen on a Sunday afternoon, even if you’ve never made it before. It’s simple, it’s honest, and it’s downright delicious.
Why you’ll love this recipe?
Okay, so why *this* zucchini bread recipe? I’m so glad you asked! Let me break it down, because there are a million zucchini bread recipes out there, but this one is special. First off, the flavor. Oh my goodness, the flavor! It’s perfectly spiced with a hint of cinnamon and nutmeg that just screams comfort. The zucchini makes it unbelievably moist, so you never have that dry, crumbly texture. And the sweetness? It’s spot on – sweet enough to be a treat, but not so sweet that it’s overwhelming. It’s the kind of flavor that makes you close your eyes with the first bite. Then there’s the simplicity. This is a lifesaver on busy weeknights or when company unexpectedly drops by. You probably have most of the ingredients in your pantry right now! It doesn’t require any fancy techniques or equipment. Seriously, if you can stir things together, you can make this. I’ve even made it with my nieces and nephews helping, and they loved it. Plus, it’s so budget-friendly! Zucchini is usually pretty inexpensive, especially when it’s in season, and the other ingredients are pantry staples. It feels like a decadent treat but costs next to nothing. And let’s talk versatility. While I love it plain with a simple glaze, you can totally jazz it up. Add chocolate chips for a dessert-like feel, walnuts or pecans for a bit of crunch, or even a swirl of cream cheese for an extra decadent touch. It’s perfect for breakfast, a snack, or even dessert. What I love most about this recipe, though, is how it always feels like a hug in a slice. It’s reliable, it’s delicious, and it brings a smile to everyone’s face. It’s way better than just a plain old muffin or a store-bought snack any day of the week.
How do you make Zucchini bread?
Quick Overview
Making this zucchini bread is ridiculously easy. You basically whisk your dry ingredients, stir your wet ingredients, combine them gently, fold in any add-ins, and bake until golden. The zucchini does all the heavy lifting to keep it super moist. The whole process, from start to finish (including baking!), takes under an hour, making it perfect for those times you need a quick treat. You don’t need a stand mixer or any special gadgets, just a couple of bowls and a whisk. It’s genuinely that simple.
Ingredients
For the Main Batter:
Here’s what you’ll need for the base. I always try to use fresh zucchini, but frozen and thawed (and squeezed dry!) can work in a pinch. Grating it on the larger holes of a box grater is usually best – you want those nice little shreds that melt into the batter. Don’t over-pack your measuring cup when measuring the flour; spoon it in and level it off. Baking soda and baking powder work together here to give it a nice lift, so don’t skip either!
- 2 cups all-purpose flour
- 1 teaspoon baking soda
- 1/2 teaspoon baking powder
- 1/2 teaspoon salt
- 1 teaspoon ground cinnamon
- 1/4 teaspoon ground nutmeg
- 1 1/2 cups granulated sugar
- 2 large eggs
- 1 cup vegetable oil (or melted coconut oil)
- 1/2 cup milk (any kind works, even almond milk made it extra creamy for me!)
- 1 teaspoon vanilla extract
- 2 cups grated zucchini (about 2 medium zucchini), excess moisture squeezed out
For the Filling (Optional, but highly recommended!):
This is where you can get a little creative. My absolute favorite is a simple cinnamon-sugar swirl, but chocolate chips are always a crowd-pleaser. If you’re going for the swirl, just mix these together in a small bowl. If using chocolate chips, just have them ready to fold in.
- 1/4 cup brown sugar
- 1 tablespoon ground cinnamon
- Optional: 1/2 cup chocolate chips, chopped nuts, or a combination
For the Glaze:
This glaze is super simple and takes this bread from delicious to divine. You want it to be pourable but not too thin. If it’s too thick, add a tiny bit more milk or lemon juice. If it’s too thin, add a little more powdered sugar.
- 1 cup powdered sugar
- 2-3 tablespoons milk or lemon juice
- 1/2 teaspoon vanilla extract (optional)
Step-by-Step Instructions
Step 1: Preheat & Prep Pan
First things first, let’s get your oven going. Preheat it to 350 degrees Fahrenheit (175 degrees Celsius). While that’s warming up, grab a standard loaf pan (about 9×5 inches). Grease it really well with butter or cooking spray, and then I like to lightly flour it too, tapping out any excess. This ensures your beautiful loaf slides out without any drama. Trust me, there’s nothing worse than a stuck-on loaf!
Step 2: Mix Dry Ingredients
In a large bowl, whisk together the flour, baking soda, baking powder, salt, cinnamon, and nutmeg. Give it a good whisk so everything is evenly distributed. You want to make sure your leavening agents and spices are nicely mixed in. This is also a good time to just get all your dry components acquainted.
Step 3: Mix Wet Ingredients
In a separate medium bowl, whisk together the granulated sugar, eggs, vegetable oil, milk, and vanilla extract until everything is well combined and smooth. It should look like a beautiful, emulsified mixture, ready to embrace the dry ingredients.
Step 4: Combine
Now, pour the wet ingredients into the bowl with the dry ingredients. Using a spatula or a wooden spoon, gently fold everything together until *just* combined. It’s really important not to overmix here! A few streaks of flour are okay. Overmixing can lead to a tough bread, and we definitely don’t want that. Then, gently fold in your grated zucchini. Make sure it’s evenly distributed throughout the batter.
Step 5: Prepare Filling
If you’re adding chocolate chips or nuts, this is the time to gently fold them into the batter now. If you’re doing the cinnamon-sugar swirl, mix the brown sugar and cinnamon together in a small bowl until it resembles coarse crumbs.
Step 6: Layer & Swirl
Pour about half of the batter into your prepared loaf pan. If you’re doing the swirl, sprinkle half of the cinnamon-sugar mixture over the batter. Then, add the remaining batter on top. Sprinkle the rest of the cinnamon-sugar mixture over the top. Now, take a butter knife or a skewer and gently swirl it through the batter a few times to create those pretty marble effects. Don’t overdo it; just a few gentle passes will do. You want distinct swirls, not a muddy mess.
Step 7: Bake
Pop the loaf pan into your preheated oven. Bake for 50-60 minutes, or until a wooden skewer or toothpick inserted into the center comes out clean. If you notice the top browning too quickly, you can loosely tent it with aluminum foil for the last 10-15 minutes of baking. Oven temperatures can vary, so keep an eye on it towards the end.
Step 8: Cool & Glaze
Once it’s baked, take the loaf out of the oven and let it cool in the pan on a wire rack for about 10-15 minutes. This allows it to set up a bit. Then, carefully invert the pan to release the loaf onto the wire rack to cool completely. While the bread is cooling, whisk together the powdered sugar, milk (or lemon juice), and vanilla extract until you have a smooth, drizzle-able glaze. Once the bread is completely cool – and I mean *completely* cool, otherwise the glaze will melt off – drizzle the glaze all over the top. Let the glaze set for a few minutes before slicing.
Step 9: Slice & Serve
Once the glaze is set, you’re ready to slice and enjoy! I like to use a serrated knife for a clean cut. Serve it at room temperature for the best flavor and texture. It’s absolutely delicious on its own!
What to Serve It With
This zucchini bread is so wonderfully versatile, it can be enjoyed any time of day and with almost anything! For a quick and easy breakfast, I love a slice toasted up with a smear of butter. It pairs beautifully with a hot cup of coffee or a glass of cold milk. If you’re hosting brunch, it’s a fantastic addition to the spread. I like to serve it alongside fresh fruit salad and maybe some scrambled eggs or yogurt parfaits. The sweetness of the bread is a lovely counterpoint to savory dishes. As a dessert, it’s just divine. Imagine serving a slice with a scoop of vanilla bean ice cream or a dollop of whipped cream – pure bliss! It’s also the perfect thing to have with your afternoon tea or as a cozy snack when you’re curling up with a good book. My family also loves it as a late-night treat when that sweet craving hits but I don’t want to bake anything elaborate. Just a slice, maybe warmed up slightly, is pure comfort. Honestly, it’s good with pretty much anything you’d serve with a sweet baked good!
Top Tips for Perfecting Your Zucchini Bread
I’ve made this bread more times than I can count, and I’ve picked up a few tricks along the way to ensure it turns out perfectly every single time. Zucchini prep is key! Make sure you squeeze out as much moisture as possible after grating. I usually use paper towels or a clean kitchen towel to really wring out the excess water. This is crucial for preventing a soggy bottom and ensuring the bread bakes up nicely. When it comes to mixing, remember that gentle is best. Overmixing the batter develops the gluten in the flour, which can make your bread tough. Just mix until you no longer see streaks of dry flour. For the swirl, don’t go crazy with the knife; you want distinct ribbons of cinnamon-sugar, not a uniform mixture. A few gentle passes are all you need for that beautiful visual appeal. If you don’t have vegetable oil, melted coconut oil works wonderfully and adds a subtle richness. I’ve also successfully tested this with almond milk, and it made the bread surprisingly even creamier! For ingredient swaps, if you’re not a fan of cinnamon or nutmeg, you can try a pinch of cardamom or even some orange zest for a brighter flavor. If you want to make it dairy-free, use a plant-based milk and ensure your chocolate chips are dairy-free. Baking is always a bit of an art, so if your oven tends to run hot, keep an eye on the bread and consider tenting it with foil earlier. A toothpick test is your best friend here – it should come out clean, with maybe just a few moist crumbs attached, not wet batter.
Storing and Reheating Tips
Proper storage is super important to keep this zucchini bread tasting its best. If you’re planning to eat it within a day or two, you can simply wrap it tightly in plastic wrap or store it in an airtight container at room temperature. It usually stays lovely and moist for about 2-3 days this way. If you think you’ll need it to last longer, or if your kitchen is on the warmer side, the refrigerator is your best bet. Wrap it well in plastic wrap and then place it in an airtight container. It should stay fresh in the fridge for up to a week, though I usually find it doesn’t last that long! For longer storage, freezing is a great option. You can freeze the entire loaf or individual slices. Wrap the cooled bread tightly in plastic wrap, then in aluminum foil or place it in a freezer-safe bag. It will keep well in the freezer for up to 3 months. To thaw, simply unwrap it and let it sit at room temperature for a few hours. If you like it warm, you can reheat individual slices in a toaster oven or a low-temperature oven (around 300°F or 150°C) for a few minutes until warmed through. I often wait to add the glaze until *after* the bread has been baked and cooled, especially if I plan to freeze portions of it. This way, the glaze stays nice and fresh when you’re ready to serve.
Frequently Asked Questions
Final Thoughts
Honestly, this zucchini bread is more than just a recipe to me; it’s a little slice of comfort that I can whip up anytime. It’s proof that sometimes the simplest things are the most satisfying. It’s easy, it’s forgiving, and it always delivers that “wow” factor with minimal effort. It’s the kind of treat that makes your home smell amazing and brings a smile to everyone’s face. If you’re looking for a reliable, delicious quick bread that’s perfect for any occasion, or just for those moments when you need a little something sweet, this is it. Give it a try, and I’m pretty sure it’ll become a favorite in your kitchen too. If you end up making it, I would absolutely love to hear how yours turned out in the comments below! And if you’ve got any fun variations or tips of your own, don’t be shy about sharing them. Happy baking!
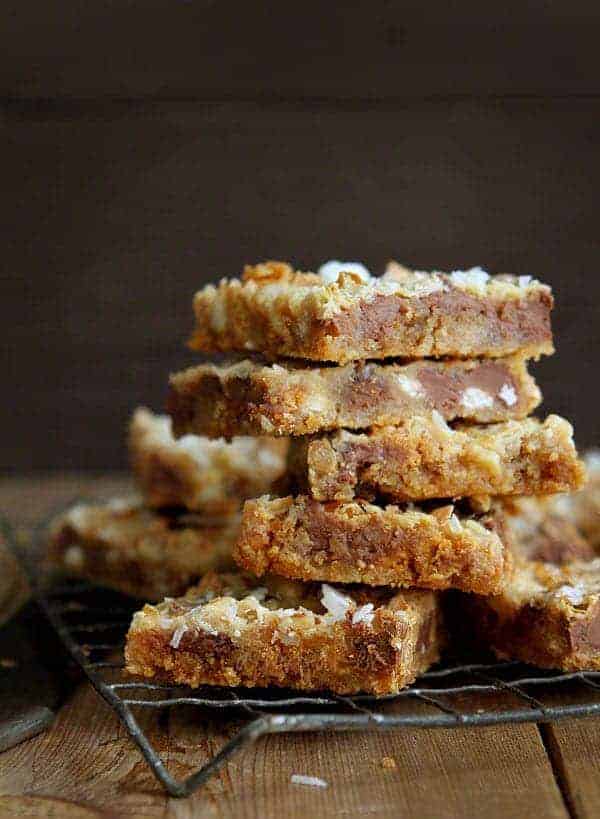
Magic Cookie Bar Recipe
Ingredients
Method
- Heat oven to 350°F (175°C).
- Melt butter in the microwave or a small saucepan over low heat. Sprinkle graham cracker crumbs over the bottom of a 9x13 inch pan, then pour butter evenly over the crumbs. Flatten out crumbs with a fork and make sure butter is evenly incorporated.
- Evenly pour two cups of morsels (peanut butter, milk chocolate, white chocolate, and butterscotch chips) over the graham cracker crust.
- Pour sweetened condensed milk evenly over the chips.
- Cover the top with coconut flakes (or shredded coconut).
- Bake for 25-30 minutes, or until edges are golden brown and the center does not jiggle. Let cool completely before cutting into bars.