Daily Greens How to Make Salad a Habit
You know those recipes that just… stick with you? The ones you find yourself making again and again, not just because they’re good, but because they feel like a warm hug on a plate? This zucchini bread is *that* recipe for me. Honestly, the first time I made it, I was a little skeptical. Zucchini? In a sweet bread? But oh, my friends, prepare to be amazed. It’s so ridiculously moist and flavorful, you’d never guess its secret ingredient. It’s like the best muffin meets the most decadent cake, but without all the fuss. This is the kind of treat that disappeared in minutes at my house the very first time I baked it, and since then, it’s become my go-to for potlucks, bake sales, or honestly, just when a sweet craving hits at 10 pm and I don’t want to deal with a whole cake. It’s almost embarrassing how easy it is, and the smell that fills the kitchen while it’s baking? Pure magic.
What is Zucchini bread?
So, what exactly *is* zucchini bread? At its heart, it’s a quick bread, meaning it uses chemical leaveners like baking soda and baking powder instead of yeast, so you don’t have to wait for dough to rise. Think of it as a super moist, slightly sweet loaf packed with shredded zucchini. The zucchini itself is a total game-changer; it doesn’t really add a distinct flavor, but it imparts this incredible tenderness and moisture that’s just heavenly. It’s similar to banana bread in its quick-bread nature and moist texture, but the zucchini makes it a bit lighter and less dense, if that makes sense. It’s the perfect vehicle for spices like cinnamon and nutmeg, and you can totally jazz it up with nuts or chocolate chips. It’s fundamentally a comforting, homey bake that’s incredibly forgiving, which is exactly why I adore it.
Why you’ll love this recipe?
What are some good reasons to make zucchini bread?flavor is just out of this world. It’s perfectly sweet, with a lovely warmth from the cinnamon and nutmeg that just screams comfort. It’s not overly sweet, so it feels a little more grown-up than some other quick breads, but it’s definitely satisfying for any sweet tooth. Then there’s the simplicity. Seriously, if you can stir things together, you can make this. There’s no fancy equipment needed, and it comes together in about 15 minutes from start to finish before it even hits the oven. I’ve made this countless times when I’ve only had an hour to spare, and it always delivers. Plus, it’s wonderfully cost-efficient. Zucchini is usually super affordable, and the other ingredients are pantry staples. You get a huge, delicious loaf (or two!) for pennies on the dollar compared to buying a fancy loaf from a bakery. And let’s talk versatility! I’ll get to more ideas later, but this bread is fantastic plain, toasted with butter, or even as a base for something more decadent. What I love most about this particular recipe is how consistently *perfect* it turns out. No dry, crumbly loaves here. It’s always moist, tender, and just melts in your mouth. It’s truly a lifesaver on busy nights when you need a quick dessert or a special breakfast treat.
How do I make Zucchini bread?
Quick Overview
This recipe is all about simple, straightforward steps that lead to maximum deliciousness. You’ll be whisking together some wet and dry ingredients, folding in that magical shredded zucchini, and then baking it into a gloriously golden loaf. The beauty is in its simplicity; there are no complex techniques, just honest-to-goodness baking. It’s designed to be fuss-free, ensuring even beginners can achieve bakery-worthy results. Trust me, the hardest part is waiting for it to bake!
Ingredients
For the Main Batter:
You’ll need about 2 cups of all-purpose flour. I always opt for a good quality one, but any standard AP flour works beautifully. Make sure it’s spooned and leveled, not scooped directly from the bag, to avoid packing too much in. Two teaspoons of baking soda will give it that lovely lift, and half a teaspoon of salt to balance out the sweetness. Then comes the warmth: one teaspoon of ground cinnamon and a quarter teaspoon of ground nutmeg. If you love spice, you can even nudge the cinnamon up to 1.5 teaspoons! Now, for the wet ingredients, we’ve got one cup of granulated sugar and half a cup of packed light brown sugar. Using both adds a depth of flavor and moisture that just plain sugar can’t replicate. Two large eggs, beaten, will bind it all together. Then, half a cup of neutral oil – vegetable, canola, or even a light olive oil works great. I’ve even experimented with melted coconut oil and it was divine! Finally, one teaspoon of pure vanilla extract is a must for that classic comforting flavor. Oh, and of course, the star of the show: 2 cups of finely shredded zucchini. Make sure to squeeze out as much excess moisture as you can – this is key for texture!
For Optional Mix-Ins (Highly Recommended!):
This is where you can really make it your own. My personal favorite addition is one cup of chopped walnuts or pecans for a delightful crunch. If chocolate is more your speed, half a cup to a cup of semi-sweet chocolate chips is absolutely divine. Sometimes, I’ll even do a mix of both! You could also try dried cranberries or even a swirl of cream cheese for an extra special treat.
For the Simple Vanilla Glaze:
This is totally optional, but it adds a lovely finishing touch. You just need one cup of powdered sugar, about 2 to 3 tablespoons of milk (or almond milk for extra creaminess!), and half a teaspoon of vanilla extract. We’ll make sure the consistency is just right.
Step-by-Step Instructions
Step 1: Preheat & Prep Pan
First things first, get your oven preheated to 350 degrees Fahrenheit (175 degrees Celsius). You’ll want to grease and flour a 9×5 inch loaf pan. I like to use butter for greasing and then dust it with a little extra flour, tapping out any excess. For extra insurance against sticking, you can also line the pan with parchment paper, leaving an overhang on the sides, which makes lifting the bread out a breeze.
Step 2: Mix Dry Ingredients
Grab a large mixing bowl. Add your flour, baking soda, salt, cinnamon, and nutmeg. Give it all a good whisk. This step is important because it ensures that your leaveners and spices are evenly distributed throughout the batter, so you don’t get any surprise pockets of baking soda or clumps of cinnamon. You want everything to be thoroughly combined.
Step 3: Mix Wet Ingredients
In a separate medium bowl, whisk together the granulated sugar, brown sugar, beaten eggs, oil, and vanilla extract. Whisk until everything is well combined and the sugar is mostly dissolved. The mixture should look smooth and a lovely light brown color.
Step 4: Combine
Now, pour the wet ingredients into the bowl with the dry ingredients. Gently fold them together with a spatula or wooden spoon until *just* combined. It’s super important not to overmix here. A few streaks of flour are okay; they’ll disappear as you add the zucchini. Overmixing develops the gluten too much, which can lead to a tougher loaf, and we definitely don’t want that. Then, gently fold in your squeezed shredded zucchini and any optional mix-ins like nuts or chocolate chips until they’re evenly distributed.
Step 5: Prepare Filling (for swirling if using)**
**This step is only if you’re adding a swirl, like cream cheese or a cinnamon-sugar mixture. For a simple cream cheese swirl, beat 4 ounces of softened cream cheese with 2 tablespoons of sugar and a splash of vanilla until smooth. If you’re doing a cinnamon-sugar swirl, mix about 2 tablespoons of sugar with 1 teaspoon of cinnamon in a small bowl.
Step 6: Layer & Swirl
Pour about half of the batter into your prepared loaf pan. If you’re swirling, dollop half of your cream cheese mixture or sprinkle half of your cinnamon-sugar mixture over the batter. Then, pour the remaining batter over the top. Dollop or sprinkle the rest of your swirl mixture. Now, take a knife or a skewer and gently swirl it through the batter. Don’t overdo it; you just want to create some beautiful ribbons of flavor and texture.
Step 7: Bake
Pop the loaf pan into your preheated oven. Bake for 50-60 minutes. The exact time can vary depending on your oven, so start checking around the 50-minute mark. The bread is done when a toothpick inserted into the center comes out clean, or with just a few moist crumbs attached (not wet batter!). If the top starts browning too quickly, you can loosely tent it with aluminum foil for the last 15-20 minutes.
Step 8: Cool & Glaze
Once baked, let the loaf cool in the pan on a wire rack for about 15-20 minutes. This helps it firm up a bit. Then, carefully invert it onto the wire rack to cool completely. Once it’s fully cooled – and this is important for the glaze to set properly – whisk together the powdered sugar, milk, and vanilla for the glaze until smooth. You want it to be thick enough to coat the back of a spoon but still pourable. Drizzle it over the cooled loaf, letting it drip down the sides. If it’s too thick, add a tiny bit more milk; if it’s too thin, add more powdered sugar.
Step 9: Slice & Serve
Once the glaze has set (about 30 minutes to an hour), slice your beautiful zucchini bread! A serrated knife works best for clean cuts. Enjoy it at room temperature for the best flavor and texture. I love it slightly warm with a generous smear of butter.
What to Serve It With
This zucchini bread is incredibly versatile and I’ve found it fits perfectly into so many different occasions. For a simple Breakfast, a slice warmed up with a cup of coffee is pure bliss. It’s hearty enough to keep you going but feels like a treat. I often just pop a slice in the toaster for a minute – it makes it extra delicious! For Brunch, it’s a showstopper. Serve it on a nice platter, maybe with some fresh berries on the side or a dollop of whipped cream. It’s a lovely sweet counterpoint to savory brunch dishes. As a Dessert, it’s perfect after a hearty meal. I love serving it with a scoop of vanilla bean ice cream or a drizzle of caramel sauce. It’s also fantastic with a warm mug of tea. And for those Cozy Snacks moments, well, that’s what it was made for! Just a slice with a glass of milk, or perhaps alongside a bowl of soup on a chilly evening. My family has a tradition of having this on the first day of school – it’s such a comforting welcome back after the summer break. It’s also fantastic at holiday gatherings; it’s a crowd-pleaser that’s a little different from the usual cookies and cakes.
Top Tips for Perfecting Your Zucchini Bread
I’ve learned a few things over the years of making this, and I want to share them with you so yours turns out absolutely perfect every single time! First, Zucchini Prep is crucial. You absolutely *must* squeeze out as much moisture as you can from the shredded zucchini. Use a clean kitchen towel or cheesecloth to really wring it out. Excess water will make your bread gummy. Grating it on the fine side of a box grater works best for a nice texture that integrates well. Fresh zucchini is always better, so avoid anything that’s been sitting in your fridge for too long. For Mixing Advice, remember: do NOT overmix! Seriously, this is the most common mistake people make with quick breads. Mix the wet and dry ingredients until *just* combined. A few small lumps are fine. Overmixing leads to a tough, dense loaf, and we want tender and moist. The batter should be thick but still pourable. When it comes to Swirl Customization, play around! Don’t over-swirl, or your beautiful patterns will disappear into the batter. Just a few gentle passes with a knife are enough to create lovely visual appeal and pockets of extra flavor. For Ingredient Swaps, if you’re out of brown sugar, you can use all granulated sugar, but you’ll lose a bit of that deep flavor and moisture. For nuts, any kind works – almonds, walnuts, pecans are all great. And yes, chocolate chips are always a winner! For Baking Tips, always use the center rack of your oven for even heat distribution. If your oven tends to run hot, you might need to reduce the temperature by about 10-15 degrees Fahrenheit or shorten the baking time slightly. A good doneness test is crucial; don’t be afraid to test in a few spots if you’re unsure. For Glaze Variations, if you want a thinner glaze, add milk a teaspoon at a time. For a thicker one, add more powdered sugar. You can also add a touch of lemon zest or orange zest to the glaze for a little brightness, or even a tiny pinch of espresso powder to enhance the chocolate if you’ve added chips!
Storing and Reheating Tips
This zucchini bread is wonderful for making ahead, which is why I often bake a double batch! For Room Temperature storage, once completely cooled, I store it wrapped tightly in plastic wrap, or in an airtight container. It stays fresh and moist for about 3-4 days. This is perfect for when you want a quick slice with your morning coffee. If you live in a very warm or humid climate, or if you won’t get to it within a few days, Refrigerator Storage is your best bet. Wrap it well to prevent it from drying out, and it should keep nicely for up to a week. When you want to eat it, I highly recommend letting it come to room temperature for about 30 minutes, or giving it a quick 10-15 second zap in the microwave to revive its tenderness. For longer storage, Freezer Instructions are your friend. Wrap the cooled loaf very tightly in plastic wrap, then in aluminum foil, or place it in a freezer-safe bag. It can be frozen for up to 3 months. To thaw, unwrap it and let it sit at room temperature for a few hours. If you plan to freeze it *with* the glaze, I often find it’s best to add the glaze after thawing for the freshest look. If freezing plain, you can glaze it once thawed.
Frequently Asked Questions
Final Thoughts
So there you have it – my cherished zucchini bread recipe. It’s more than just a quick bread; it’s a little piece of home, a guaranteed crowd-pleaser, and proof that sometimes the most surprising ingredients can lead to the most delicious results. I truly hope you give this a try, and I can’t wait to hear how much your family loves it. It’s the kind of recipe that makes you feel like a kitchen rockstar with minimal effort. If you enjoyed this recipe, you might also love my moist banana bread recipe or my easy blueberry muffin recipe. They share that same spirit of simple, comforting baking that I adore. Happy baking, and don’t be shy about leaving a comment below to tell me how yours turned out or if you have any fun variations!
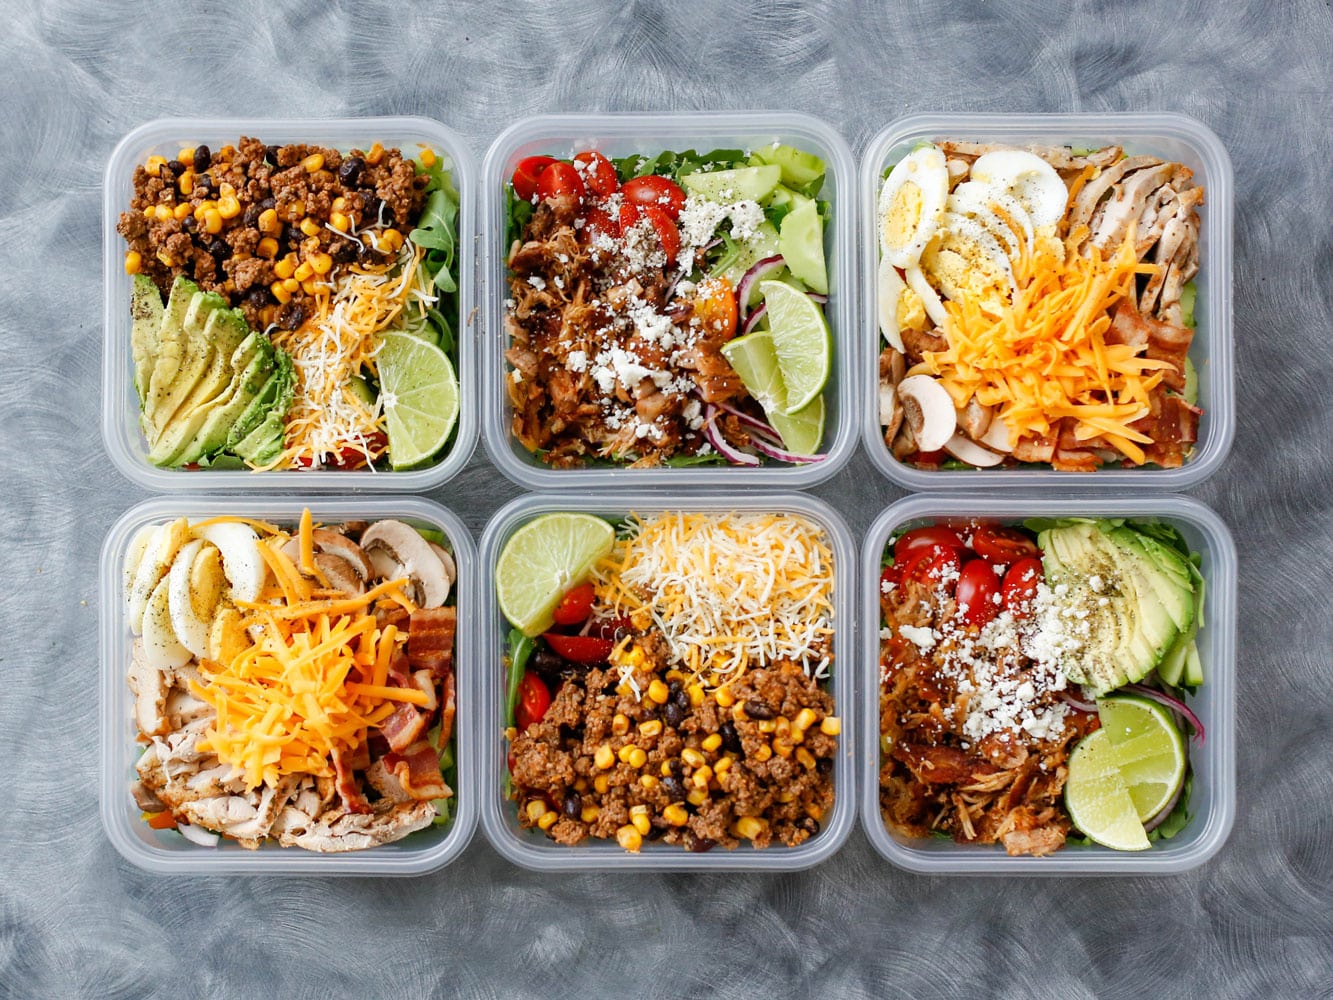
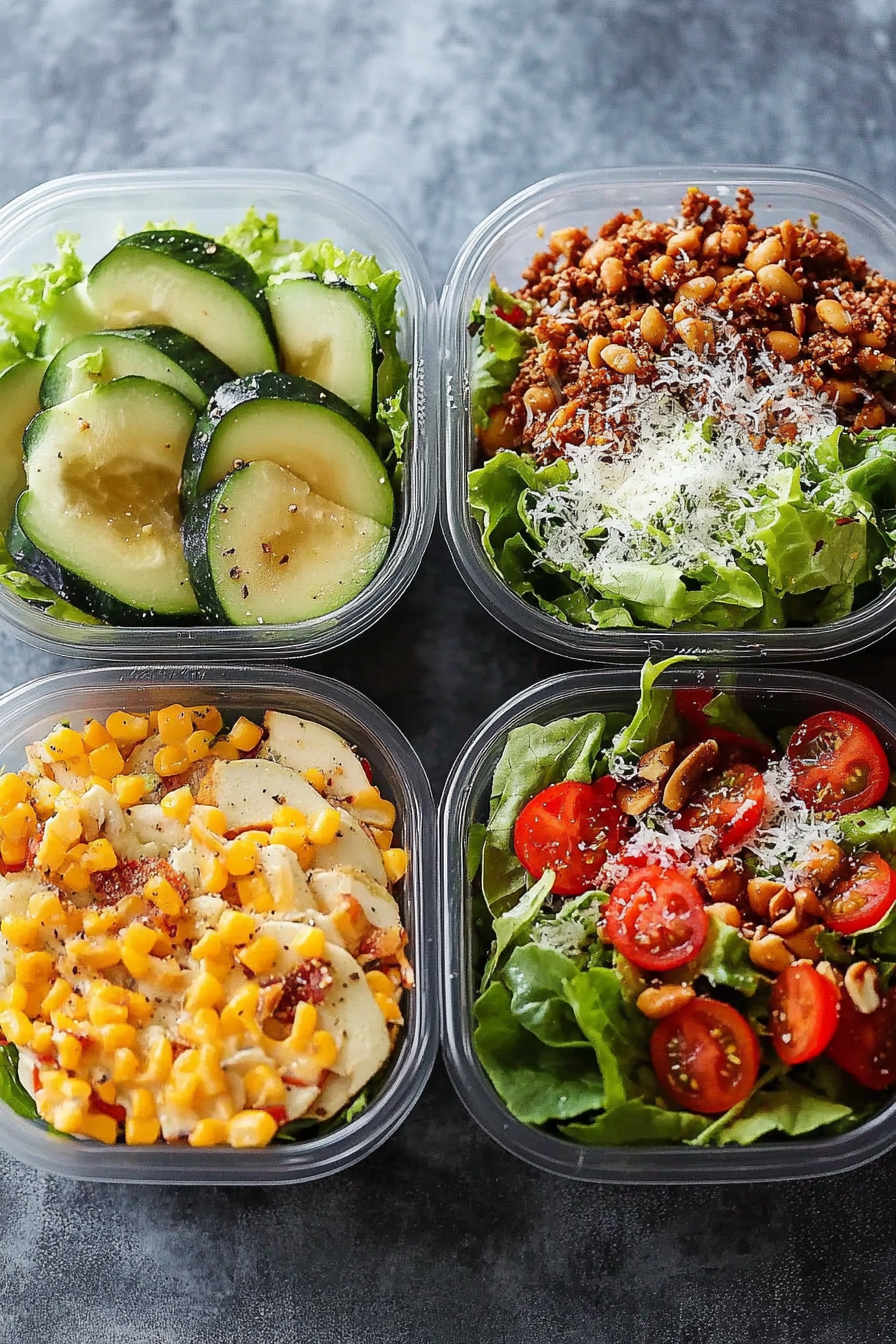
eat salad daily
Ingredients
Method
- Wash and chop all vegetables including greens, tomatoes, cucumber, bell pepper, and red onion. Divide them into individual serving containers. Place a paper towel in each container to absorb moisture and keep produce fresh. Store in the refrigerator.
- When ready to eat, warm your pre-cooked chicken if desired, then add it to your prepped salad container along with the diced avocado.
- Add Fritos corn chips for crunch. Squeeze fresh lime juice generously over the salad, then season with salt and black pepper to taste. Drizzle with Ranch dressing before serving.