Oh, hello there! Come on in, have a seat. I was just thinking about this absolutely incredible zucchini bread, and I knew I had to share it with you. It’s the kind of recipe that feels like a warm hug, you know? My grandma used to make something similar when I was little, and the smell of it baking would just fill our whole house. This version, though? It’s got this extra something, this perfect balance of moistness and spice that just makes your taste buds sing. Forget those dry, crumbly zucchini loaves you might have tried before; this one is a total game-changer. It’s so good, my kids actually ask for it for breakfast, which, let’s be honest, is basically a miracle in my house. If you’ve ever thought zucchini bread was just “okay,” prepare to have your mind (and your palate) completely changed. This is truly one of my favorite things to bake, especially when I want something comforting and delicious without a ton of fuss.
What is Zucchini bread?
So, what exactly is this magic loaf we’re talking about? Think of it as your favorite, most comforting quick bread, but with the secret ingredient of… you guessed it, zucchini! Now, before you get any ideas about it tasting like a garden salad, let me reassure you: it absolutely doesn’t. The zucchini in this recipe is the key to its unbelievable moisture and tenderness. It kind of just melts into the batter, making every bite incredibly soft and satisfying. It’s not a cake, and it’s not really a bread in the yeasty, sourdough sense. It’s its own wonderful thing. We add warm spices like cinnamon and nutmeg, and sometimes a little bit of vanilla, to give it that cozy, classic flavor profile. It’s the perfect way to use up that abundance of zucchini that seems to appear out of nowhere in the summer, and honestly, it’s a lifesaver when you need a quick breakfast, a sweet afternoon pick-me-up, or even a simple dessert. It’s a classic for a reason, and this recipe makes it shine.
Why you’ll love this recipe?
Let me tell you, there are a million reasons why this zucchini bread has become my absolute go-to, and I have a feeling it’s going to become yours too. First off, the FLAVOR is just out of this world. We’re talking about a perfectly spiced, super moist loaf that has just the right amount of sweetness. It’s not cloying at all, just wonderfully comforting. Then there’s the SIMPLICITY. Honestly, this is one of those recipes that even if you’re not a seasoned baker, you can whip this up with total confidence. All the steps are straightforward, and you probably have most of the ingredients in your pantry already. It takes way less time than baking a cake from scratch, but it gives you that same sense of accomplishment and delicious reward. And speaking of ingredients, this recipe is surprisingly COST-EFFECTIVE. Zucchini is usually pretty affordable, especially when it’s in season, and the other staples are things you likely use all the time. It’s a budget-friendly way to create something truly special. What I love most, though, is its VERSATILITY. You can add in chocolate chips (a family favorite in my house!), nuts, or even a little bit of lemon zest for a brighter flavor. It’s perfect with a cup of coffee in the morning, as a sweet treat with afternoon tea, or even warmed up with a dollop of whipped cream for dessert. It’s incredibly forgiving, too, which is a big plus in my busy kitchen. It really stands out from other quick breads because of that incredible texture – it’s just so perfectly tender, every single time.
How do I make [Recipe Name]?
Quick Overview
Here’s the super quick rundown: you’ll whisk together your dry stuff, mix your wet stuff separately, then gently combine them. While that’s happening, you’ll prepare a sweet, spiced filling. Then, it’s just a matter of layering the batter and the filling in your loaf pan, swirling them together for that gorgeous marbled effect, and baking until golden and fragrant. It’s honestly that easy! The key is not to overmix, and the swirling step is more fun than it is complicated. You end up with a loaf that looks and tastes like you spent hours on it, but in reality, it’s a breeze.
Ingredients
For the Main Batter:
* 2 cups all-purpose flour: I usually just grab my standard bag of AP flour. If you’re feeling adventurous, you could try a 1-to-1 gluten-free blend, but I haven’t personally tested it extensively. Make sure it’s spooned and leveled, not scooped directly from the bag, for the most accurate measurement.
* 1 teaspoon baking soda: This is what gives our bread its lovely rise. Make sure it’s fresh! Old baking soda won’t give you the lift you need.
* 1/2 teaspoon baking powder: A little insurance policy for an even fluffier loaf.
* 1/2 teaspoon salt: Crucial for balancing the sweetness and bringing out all those flavors. Don’t skip it!
* 1 teaspoon ground cinnamon: The star spice! I love a good, fragrant cinnamon.
* 1/4 teaspoon ground nutmeg: Just a whisper of nutmeg adds so much warmth. Freshly grated is amazing if you have it!
* 1/4 teaspoon ground cloves (optional, but highly recommended!): This adds a deeper, more complex spice note that I just adore. A little goes a long way.
* 1 and 1/2 cups granulated sugar: This is for sweetness, but it also helps with moisture. You can reduce it slightly if you prefer, but I find this amount is just perfect for that classic sweet bread flavor.
* 2 large eggs: At room temperature is best! They incorporate more smoothly. Just pop them in a bowl of warm water for 5-10 minutes if you forget to take them out early.
* 1 cup vegetable oil (or other neutral oil like canola or melted coconut oil): This is key for that super moist texture. I’ve experimented with other oils, and vegetable oil is my reliable go-to. Don’t use olive oil; the flavor is too strong here.
* 1 teaspoon vanilla extract: Pure vanilla extract, always! It makes such a difference.
* 2 cups finely grated zucchini (about 2 medium zucchini): The star ingredient! Make sure to squeeze out as much excess moisture as possible. I’ll explain how in the tips section. Don’t peel them; the skin adds nice flecks of color and nutrients.
For the Filling:
* 1/2 cup packed light brown sugar: This gives the filling a wonderful caramel-like depth.
* 1 teaspoon ground cinnamon: More cinnamon for that cozy flavor!
* 1/4 teaspoon ground nutmeg: To complement the cinnamon.
* 2 tablespoons all-purpose flour: This helps thicken the filling slightly so it doesn’t all sink to the bottom.
* 1/4 cup chopped pecans or walnuts (optional): If you love a little crunch! I always add them for my husband, who’s a big nut fan.
For the Glaze:
* 1 cup powdered sugar: Sifted, if you want to be extra fancy and avoid lumps.
* 2-3 tablespoons milk (or almond milk, or even a little orange juice for a twist!): Start with 2 tablespoons and add more until you get your desired drizzle consistency.
* 1/2 teaspoon vanilla extract: Just for a touch more flavor.
Step-by-Step Instructions
Step 1: Preheat & Prep Pan
First things first, preheat your oven to 350°F (175°C). It’s super important to get that oven nice and hot before your batter goes in. Then, grab a standard 9×5 inch loaf pan. You want to grease it really well – I like to use baking spray or butter and then flour it, making sure to get into all the nooks and crannies. You can also line it with parchment paper, leaving a little overhang on the sides to easily lift the loaf out later. This is a step I never skip, because there’s nothing worse than your beautiful bread sticking!
Step 2: Mix Dry Ingredients
In a large bowl, whisk together the flour, baking soda, baking powder, salt, cinnamon, nutmeg, and cloves (if using). Whisking them together ensures that all the leavening agents and spices are evenly distributed. This little step is why you don’t get pockets of baking soda or spice in your finished loaf. Give it a good whisk until everything looks uniform, like a light tan powder.
Step 3: Mix Wet Ingredients
In a separate, medium-sized bowl, whisk together the granulated sugar, eggs, vegetable oil, and vanilla extract until everything is well combined and smooth. It should look like a lovely golden mixture. Make sure there are no streaks of egg white left.
Step 4: Combine
Now, pour the wet ingredients into the bowl with the dry ingredients. Use a spatula or wooden spoon to mix them together *just until combined*. Seriously, do not overmix! A few small streaks of flour are perfectly fine. Overmixing develops the gluten too much, which can lead to a tough, dense loaf, and we want ours to be incredibly tender and moist. So, gentle is the key here.
Step 5: Prepare Filling
In a small bowl, mix together the brown sugar, cinnamon, nutmeg, flour, and chopped nuts (if using). Give it a quick stir to combine everything. This is what’s going to give you those delicious pockets of spiced sweetness throughout the bread.
Step 6: Layer & Swirl
Now for the fun part! Pour about half of the batter into your prepared loaf pan and spread it out evenly. Sprinkle about half of the brown sugar filling mixture over the top. Then, dollop the remaining batter over the filling, spreading it as best you can. Finally, sprinkle the rest of the filling mixture over the top. Now, take a knife or a skewer and gently swirl the filling into the batter. Don’t over-swirl; you just want ribbons of the spiced filling throughout the loaf. It makes for such a pretty presentation!
Step 7: Bake
Pop that loaf pan into your preheated oven. Bake for 50-65 minutes. The exact time will vary depending on your oven, so start checking around the 50-minute mark. You’ll know it’s done when a toothpick inserted into the center comes out clean, or with just a few moist crumbs attached. The top should be beautifully golden brown and it should smell absolutely divine.
Step 8: Cool & Glaze
Once it’s done, take the loaf out of the oven and let it cool in the pan for about 10-15 minutes. This is important so it holds its shape. Then, carefully invert it onto a wire rack to cool completely. Once it’s completely cool – and I mean *completely* cool, trust me on this one, otherwise the glaze will melt right off – you can make the glaze. Whisk together the powdered sugar, vanilla extract, and 2 tablespoons of milk. Add more milk, a teaspoon at a time, until it’s a drizzly consistency. Drizzle it all over the top of the cooled loaf. You can let it set for a bit, or just dive in!
Step 9: Slice & Serve
Once the glaze has set a little, slice your beautiful zucchini bread. I like to use a serrated knife for the cleanest slices. Serve it at room temperature. It’s perfect on its own, but if you want to get fancy, a little smear of cream cheese or butter is also amazing. Enjoy every single moist, delicious bite!
What to Serve It With
This zucchini bread is honestly a star all on its own, but I love pairing it with different things depending on the mood or the occasion. For a simple, cozy BREAKFAST, a thick slice alongside a steaming mug of coffee is just pure comfort. I sometimes toast it lightly and add a thin layer of butter. For BRUNCH, it feels a little more elegant. I’ll serve it on a nice platter with a side of fresh berries – maybe some raspberries or blueberries – and a glass of sparkling cider or mimosas. It’s a lovely addition to a buffet spread or a special weekend breakfast. As a simple DESSERT, especially if I’ve added chocolate chips to the batter, it’s fantastic warmed up slightly with a scoop of vanilla bean ice cream or a dollop of lightly sweetened whipped cream. The warm spices and the cool creaminess are just divine. And for COZY SNACKS? This is where it really shines for my family. It’s perfect after school with a glass of cold milk, or even a late-night treat when you’re craving something sweet but don’t want to fuss. My kids love it dunked in milk, and I confess, I’ve been known to sneak a slice with my evening tea more times than I’d like to admit! It’s just that good.
Top Tips for Perfecting Your [Recipe Name]
Okay, let’s talk about how to make this absolutely *perfect* every single time. These are the little things I’ve learned over the years that make a big difference.
Zucchini Prep: This is probably the MOST important step. After you grate your zucchini (I use the large holes on a box grater, by the way), you need to get as much moisture out as possible. I usually put the grated zucchini in a fine-mesh sieve set over a bowl and just let it sit for about 10-15 minutes. Then, I gently press down on it with a spoon. Some people even wrap it in a clean kitchen towel or cheesecloth and squeeze it hard. The more water you get out, the less likely your bread is to be dense or gummy. You want that flavor and moisture, but not excess water!
Mixing Advice: I cannot stress this enough: DO NOT OVERMIX. Once the wet and dry ingredients meet, mix *just* until they’re combined. A few lumps or tiny streaks of flour are your friends here. Overmixing develops gluten, which makes quick breads tough. So, resist the urge to keep stirring! Think gentle folding rather than vigorous beating.
Swirl Customization: The swirling is mostly for show, but it does look beautiful! Don’t get too caught up in making perfect patterns. Just dollop the filling and then run a knife or skewer through it a few times in an “S” or zig-zag motion. It creates lovely ribbons of flavor without disturbing the batter too much.
Ingredient Swaps: I’ve experimented a bit! For the oil, while vegetable oil is my favorite for its neutral flavor and moisture, melted coconut oil (refined, so it doesn’t taste like coconut) works well. For the nuts in the filling, you can swap them for seeds like sunflower or pumpkin seeds, or just leave them out entirely. If you’re adding chocolate chips, about 1 cup of semi-sweet or dark chocolate chips folded into the batter is divine. I tested this with almond milk for the glaze and it actually made it even creamier!
Baking Tips: Ovens can be so finicky! If you find your loaves tend to brown too quickly on top before the inside is cooked, loosely tent the loaf pan with aluminum foil for the last 15-20 minutes of baking. Also, make sure your oven rack is in the center of the oven for even heat distribution. Don’t rely solely on the timer; the toothpick test is your best friend for checking doneness.
Glaze Variations: For a thinner glaze, add a little more milk or even a touch of lemon juice for a zingy flavor. For a thicker glaze, use less liquid or sift in a bit more powdered sugar. If you’re not a fan of glaze, a simple dusting of powdered sugar once the loaf is cool is elegant, or you can even just leave it plain – it’s still delicious!
Storing and Reheating Tips
This zucchini bread is so forgiving when it comes to storage, which is another reason I love it. It stays moist and delicious for days!
Room Temperature: Once completely cooled and the glaze has set a bit, you can store the loaf tightly wrapped in plastic wrap or in an airtight container on the counter for up to 3 days. It generally stays perfectly fresh and moist. I like to keep it on the counter because it’s easy to grab a slice whenever the craving strikes!
Refrigerator Storage: If your kitchen is particularly warm or humid, or if you want it to last a little longer, you can store it in the refrigerator. Wrap it tightly in plastic wrap, and then place it in an airtight container. It will keep well for up to 5 days. The texture might be a little firmer when cold, but it’s still wonderfully moist.
Freezer Instructions: This bread freezes beautifully! Once completely cooled, wrap the entire loaf tightly in plastic wrap, then in a layer of aluminum foil, or place it in a freezer-safe bag. It can be frozen for up to 3 months. To thaw, unwrap it and let it sit at room temperature for a few hours, or slice it and thaw individual slices. You can also gently reheat slices in a toaster oven or microwave.
Glaze Timing Advice: If you plan to freeze the loaf, it’s best to freeze it *without* the glaze. Once it’s thawed and you’re ready to serve it, whip up a fresh batch of glaze and drizzle it over the top. If you’re storing it at room temperature or in the fridge, adding the glaze before storing is perfectly fine.
Frequently Asked Questions
Final Thoughts
So there you have it – my absolute favorite zucchini bread recipe! It’s more than just a recipe to me; it’s a memory, a comfort, and a guaranteed crowd-pleaser. What I love most is how it proves that simple ingredients, treated with a little care and love, can create something truly extraordinary. It’s that perfect balance of moistness, spice, and sweetness that just makes you feel good. If you enjoyed this recipe, you might also like my Spiced Apple Crumble Cake or my incredibly easy One-Bowl Banana Bread. They both have that same cozy, comforting vibe!
I really hope you give this zucchini bread a try. I’m so excited for you to experience that incredible aroma filling your kitchen and that first, perfectly tender bite. Please, if you make it, come back and let me know how it turned out in the comments below! I love hearing your stories and seeing your creations. Happy baking!
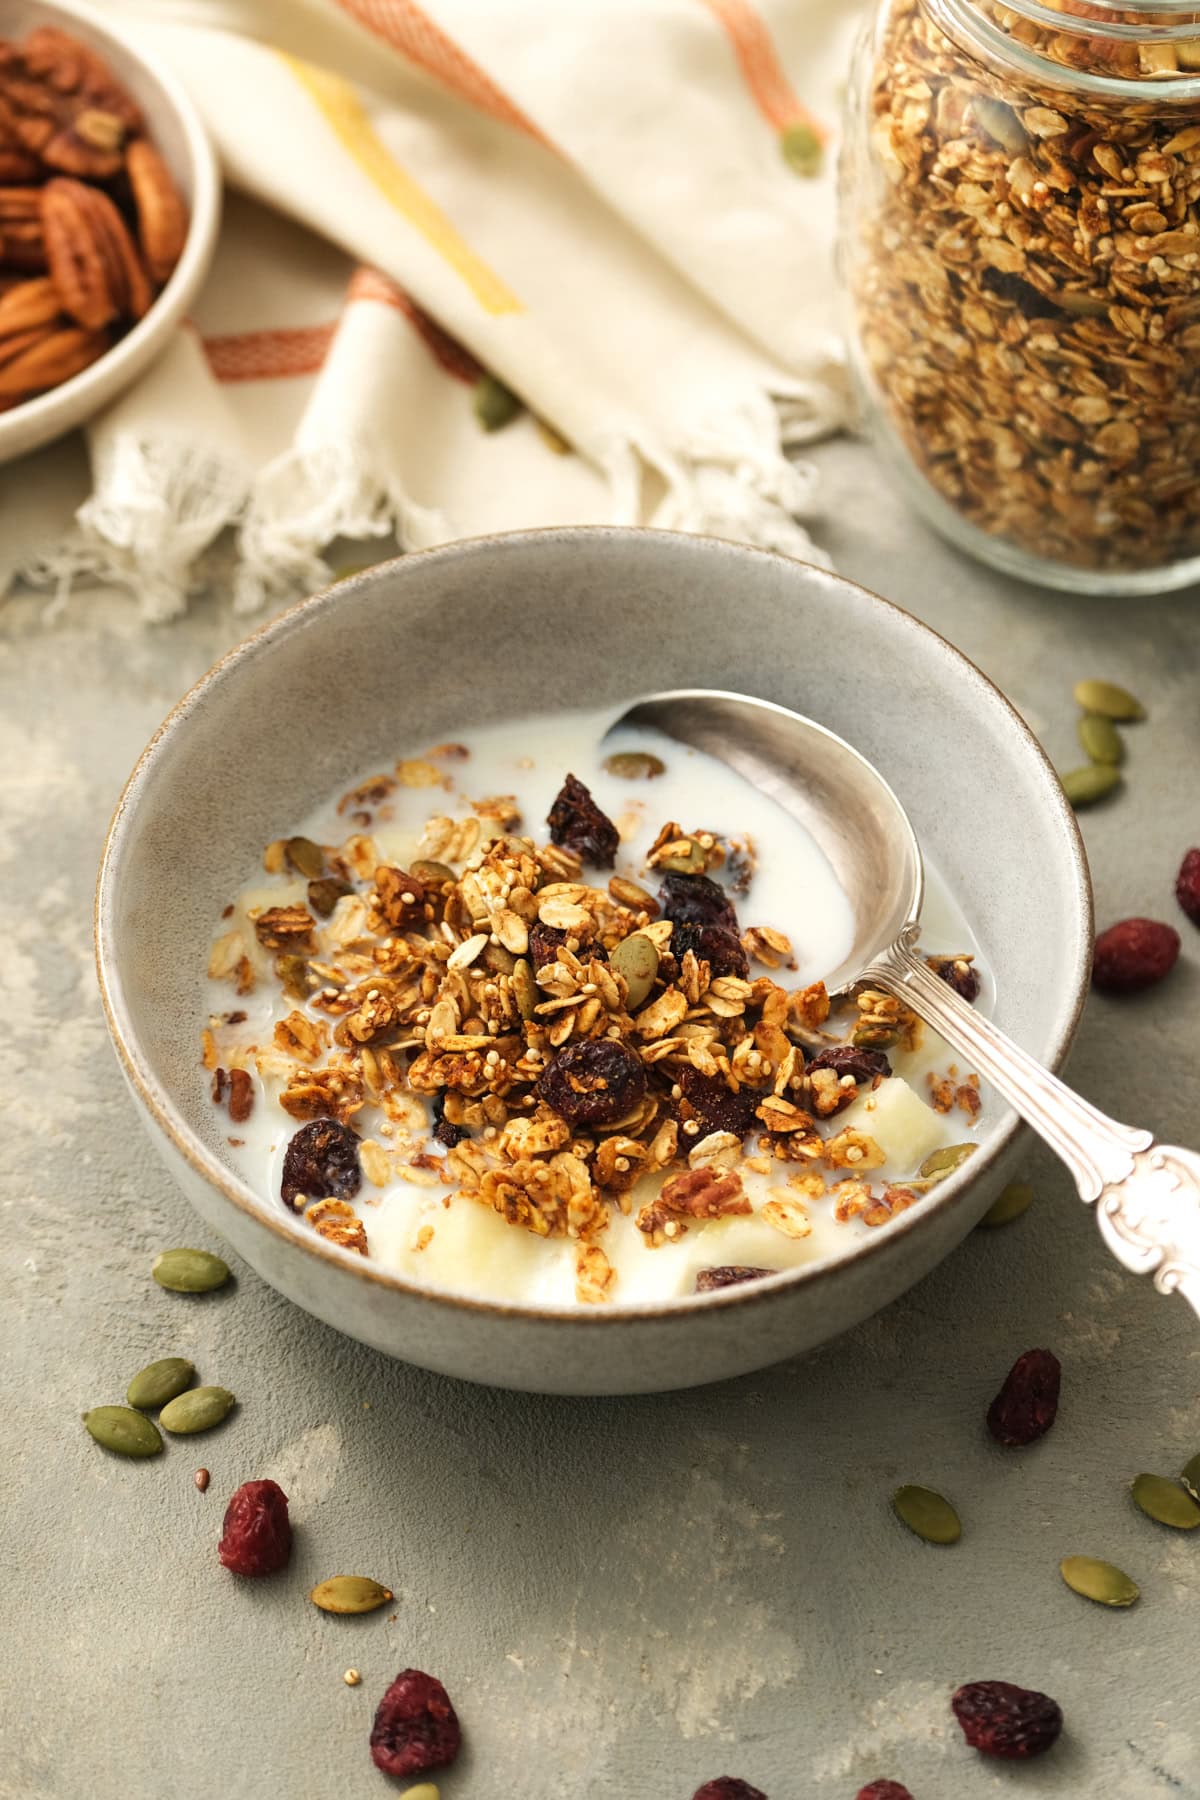
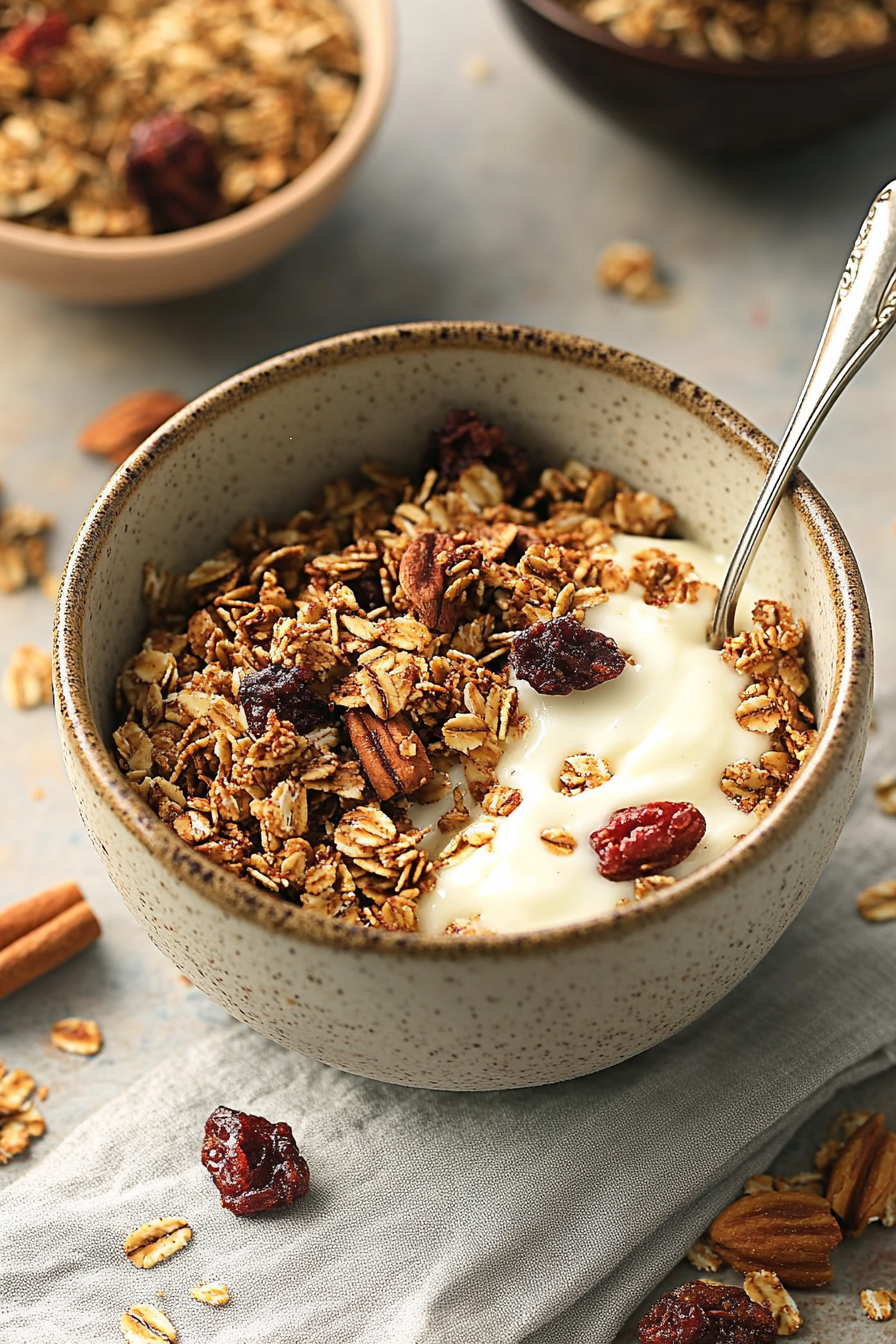
autumn spice granola
Ingredients
Method
- Preheat oven to 325F.
- Spread the oats and quinoa out on a parchment lined baking pan.
- Toast in the oven 10 minutes, stirring once.
- Remove the oats from the oven, pour the toasted oats into a medium bowl and add the ground flax seeds, pepitas, pecans and dried fruit.
- Reduce oven to 300F.
- In a second medium bowl, combine maple syrup, pumpkin puree, oil, pumpkin spice, cinnamon, salt and vanilla.
- Pour over oats and stir together with a spatula.
- Spread back onto a baking sheet and bake an additional 20 minutes, or until golden.