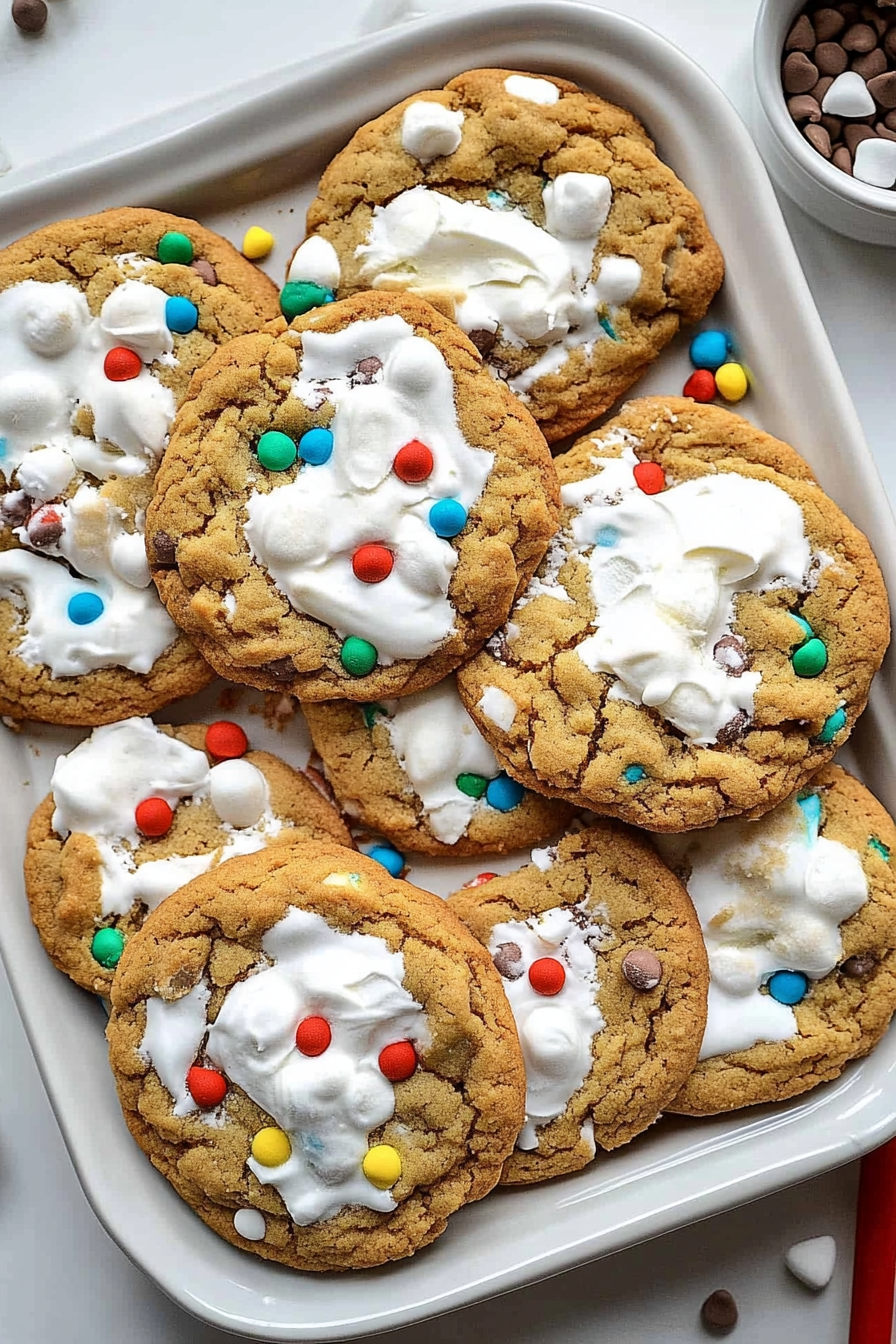
Sweet Gooey Monster Cookies Recipe
There’s something about a slice of coffee cake that just makes everything feel a little easier, a little warmer, especially on those busy weekday mornings or lazy weekend brunches. I remember when I first made this zucchini swirl coffee cake — I was looking for something that would satisfy my sweet tooth without feeling guilty, and it turned into this little baking miracle that my family just can’t get enough of. The aroma alone, as it bakes, fills the entire house with that inviting, cinnamony smell—and honestly, I always do this when I want a little bit of comfort: bake a treat that everyone asks for repeatedly. My kids ask for this all the time, and I swear, it disappears faster than I can say “slice!” This one’s a lifesaver on busy nights when I want something cozy but don’t feel like pulling out complicated ingredients. Plus, it’s so versatile—you can switch up the filling or glaze, making each batch just a tiny bit different, which keeps it exciting every time. Trust me, once you try this, it’ll become one of your go-to recipes that you turn to when you’re craving something sweet but not overly indulgent. Ready to get baking? Let’s dive into it, shall we?
What is Zucchini Swirl Coffee Cake?
This zucchini swirl coffee cake is like a sort of sneaky, veggie-enhanced version of your favorite cinnamon swirl cake—think moist, tender, with a lovely marbled pattern of cinnamon filling swirling through the batter. The magic here is the zucchini—it’s grated fresh and folded right into the batter, adding moisture and a subtle vegetable sweetness that pairs perfectly with the warm spices. It’s essentially a breakfast cake, a snack cake, or even a quick dessert—whatever suits your moment. The name ‘coffee cake’ is kind of a nod to its pairing potential; it’s the kind of thing you can slice and enjoy with a cup of coffee or tea, ideally in pajamas on a lazy Sunday morning. I love how the zucchini keeps everything so tender without making the cake heavy or greasy. When I say it’s simple enough for a weeknight and fancy enough to serve at brunch, I mean it. Think of it as a breakfast treat that feels like a hug in every bite—what’s not to love?
Why you’ll love this recipe?
Okay, I’ll be honest—what I love most about this zucchini swirl coffee cake is how forgiving and adaptable it is. It’s the kind of recipe that feels cozy, yet doesn’t require you to be a baking expert to pull off. Flavor-wise, it’s just right—a beautiful balance of sweet cinnamon, earthy zucchini, and buttery richness. The scent alone as it bakes makes your entire house smell like a bakery, and honestly, that scent draws everyone in. And the best part? It’s insanely simple to make. No complicated techniques or hard-to-source ingredients. I always keep a stash of zucchinis in the fridge just for this; I’ve tested this with almond milk instead of regular milk, and it actually made it even creamier! This one’s a lifesaver when you want a homemade treat in a pinch. Plus, it’s budget-friendly—each ingredient is common and inexpensive, making it perfect for feeding a crowd or just yourself. And talk about versatility: I love serving slices with a dollop of whipped cream, drizzling extra glaze, or just dusting with powdered sugar. It’s so adaptable, and honestly, the most fun is experimenting with the filling or toppings to make it just how you like. Trust me, this recipe has become a staple in my kitchen because it checks all the boxes—delicious, easy, comforting, and endlessly customizable.
How do I make Zucchini Swirl Coffee Cake?
Quick Overview
This cake is pretty straightforward—think of it as a one-bowl batter with a cinnamon-sugar swirl that gets layered carefully before baking. The trick is grating the zucchini really fine, squeezing out excess moisture, and blending it into the batter without overmixing (that’s how you get a tender crumb!). The filling is just a simple cinnamon sugar mixture, and the swirl creates that gorgeous marbled look. The baking takes about 40-45 minutes, and once out of the oven, a quick glaze and a cool-down period make it feel really special. What makes this process special is how foolproof it is—you won’t believe how easy it is to get stunning, bakery-worthy results using everyday ingredients. Plus, I like to bake this on lazy Sundays to fill the house with warmth and sweetness, but honestly, it’s perfect anytime you need a little cozy in your life.
Ingredients
For the Main Batter:
– 2 cups all-purpose flour (I usually opt for unbleached for a richer flavor)
– 1 cup granulated sugar
– 1/2 cup unsalted butter, melted (or melted coconut oil if you’re feeling extra tropical)
– 1 cup grated zucchini (squeeze out excess moisture so it isn’t watery)
– 2 large eggs (room temp, for better binding)
– 1/2 cup milk or almond milk (whole milk keeps it moist, but I tested with almond and loved how creamy it got)
– 1 teaspoon vanilla extract
– 1 teaspoon baking powder
– 1/2 teaspoon baking soda
– 1/4 teaspoon salt
For the Filling:
– 1/4 cup brown sugar
– 1 tablespoon ground cinnamon
– 2 tablespoons softened butter (to spread evenly)
– Optional: chopped nuts or a handful of mini chocolate chips for extra flavor
For the Glaze:
– 1 cup powdered sugar
– 1-2 tablespoons milk or lemon juice (for flavor and the right drizzle consistency)
– A splash of vanilla or almond extract if you’re feeling fancy
Step-by-Step Instructions
Step 1: Preheat & Prep Pan
Set your oven to 350°F (175°C). Grease a 9-inch round or square baking dish with butter or non-stick spray. I always line mine with parchment paper, just to make removal super easy. It’s the little tricks that help keep the cake from sticking, especially when you’re layering and swirling!
Step 2: Mix Dry Ingredients
In a large bowl, whisk together the flour, baking powder, baking soda, salt, and cinnamon if using. This step evenly disperses the leaveners and spices, which helps give your cake a consistent rise and flavor. I do this first to ensure everything’s well combined before adding the wet ingredients.
Step 3: Mix Wet Ingredients
In another bowl, combine the melted butter, sugar, eggs, milk, and vanilla. Whisk until smooth and slightly fluffy—this helps the batter come together nicely. I like to do this because it keeps the mixture uniform and prevents lumps. If the eggs are cold, I just let them sit at room temp for a few minutes to loosen up.
Step 4: Combine
Pour the wet mixture into the dry ingredients and gently fold with a spatula—don’t overmix! You want just until everything is combined; a few lumps are totally fine. Overmixing can make the cake dense, and we want that tender crumb. If you’re worried about lumps, it actually helps to let the batter rest for 5 minutes before pouring into the pan.
Step 5: Prepare Filling
In a small bowl, mix the brown sugar, cinnamon, and softened butter until crumbly but spreadable. If you want an extra layer of crunch or sweetness, sprinkle chopped nuts or mini chocolate chips on top before swirling. The filling’s simple but effective—it’s like a cinnamon hug in every bite.
Step 6: Layer & Swirl
Pour half of the batter into your prepared pan. Spread the cinnamon filling evenly over this layer. Then add the remaining batter on top. Using a knife or skewer, gently swirl through the batter to create beautiful marbled ribbons. Don’t overdo it—just a few gentle strokes to mix the filling into the batter without fully blending it all together. Watching the swirl develop always makes me smile!
Step 7: Bake
Pop it into your preheated oven and bake for about 40-45 minutes. Check doneness by inserting a toothpick in the center—it should come out clean. Ovens vary, so if you notice it’s browning too quickly, tent it with foil halfway through. When done, let it rest for about 15 minutes before glazing or slicing.
Step 8: Cool & Glaze
Place the cake on a wire rack and let it cool completely. Once cooled, whisk together your glaze ingredients. Drizzle generously over the top; the warmth of the cake helps it soak in just a little, but it’s also lovely with a prettier, tidier drizzle once it’s fully cool. I like to wait until the glaze is a little set before slicing—it makes for pretty, clean cuts.
Step 9: Slice & Serve
Use a sharp serrated knife to cut through cleanly, wiping it between slices if needed. Serve it with a dollop of whipped cream, a sprinkle of powdered sugar, or just plain with your morning coffee. A slice of this feels like a warm hug, and I promise, your house will smell divine. It’s a little piece of heaven that’s so easy to love.
What to Serve It With
This zucchini swirl coffee cake is incredibly versatile. For breakfast, I love serving it with a good robust coffee or a latte, and maybe a smear of cream cheese on the side if I’m feeling fancy. On weekends, my family enjoys it alongside fresh fruit and a glass of cold milk or a cup of tea. It’s perfect for brunch, too — try plating slices with a fresh berry compote or a drizzle of honey. For dessert, it becomes a cozy afternoon treat—pair it with vanilla ice cream or a cinnamon-spiked whipped cream to make it extra special. And if you’re just looking for a quick snack, it slices beautifully and travels well in a container. Honestly, I’ve made this for picnics, meet-ups, and even to give as hostess gifts—everyone loves the home-baked touch.
Top Tips for Perfecting Your Zucchini Swirl Coffee Cake
Zucchini Prep: Always grate your zucchini finely and squeeze out as much moisture as possible. Moisture is the enemy of a tender crumb, and a dry zucchini ensures your cake stays moist without being soggy. I learned this trick after my first rant-filled batch where the texture was all wrong! A clean kitchen towel and some good pressure go a long way.
Mixing Advice: Overmixing the batter is my number one mistake—trust me, I’ve learned the hard way. Work gently and stop just when everything’s incorporated. When the batter looks a little lumpy but combined, that’s perfect.
Swirl Customization: Don’t be afraid to play with the swirl pattern. I like doing gentle figure-eights or zigzags with the knife to get a more artistic, marbled look. Using different fillings like chopped nuts, mini chips, or even a fruit jam ripple can make each cake special. Just remember: less is more when layering the filling—don’t overload, or it’ll spill out during baking.
Ingredient Swaps: You can replace regular flour with almond or coconut flour, but expect adjustments in quantities and baking time. I’ve tested with half whole wheat and loved the slightly nuttier flavor. For a little extra flavor punch, try adding a splash of orange zest to the batter or the filling.
Baking Tips: Keep an eye on your cake the last 5 minutes. Ovens vary, and you don’t want it to overbake and dry out. An inserted toothpick should come out moist but clean. If you notice uneven browning, tent with foil to prevent burning.
Glaze Variations: Feel free to swap vanilla extract for lemon or almond for a different zing. Adjust the consistency by adding a splash more liquid if you want a drizzle or less for a thicker glaze you can spread. If you’re feeling adventurous, sprinkle some zest or spice into the glaze for extra flavor.
I’ve made dozens of batches, tweaking little things each time—like reducing sugar because I found it a touch too sweet, or adding a pinch more cinnamon for that warm burst. The key is taste-testing and trusting your senses. Once you hit that perfect batter and swirl, you’ll see—it’s a game-changer every single time.
Storing and Reheating Tips
If you’ve got leftovers (but honestly, when do you, in a house this good-smelling?), store the cake in an airtight container at room temperature for about 2 days. After that, it’s good in the fridge for up to 5 days. Wrap slices tightly in plastic or pop them into a container—this keeps the moisture just right. I actually like reheating slices in the microwave for about 10-15 seconds; it’s the quickest way to bring back that fresh-baked feel. For longer storage, freeze slices individually wrapped, and thaw at room temperature or warm gently in the microwave. A quick reheat makes it taste almost freshly baked again. As for the glaze—if you want that shiny finish on a stored cake, spoon it over just before serving. Trust me, it’s all about that fresh look! When reheating, I prefer adding fresh glaze afterward to keep that lovely glossy surface. The cake stays moist and delicious, and the cinnamon filling keeps its flavor even after a couple of days.
Frequently Asked Questions
Final Thoughts
This zucchini swirl coffee cake is one of those recipes that I keep coming back to, no matter how many fancy desserts I try. It’s simple, homey, and just so satisfying—like a secret hug from the oven. I’ve shared it with friends, brought it to family gatherings, and even snuck a piece for myself late at night because, honestly, it’s that good. I love experimenting with different fillings, toppings, and even swaps for healthier versions, and every time it turns out beautifully. If you’re looking for a way to add a little joy into your baking, this is it. Don’t be surprised if your house smells like heaven, and your family starts asking when you’re making it again. Happy baking! And please, let me know how yours turns out — I adore hearing your stories and seeing your photos. If you loved it, share it, comment below, or try your own twist. Everyone deserves a slice of happiness like this.
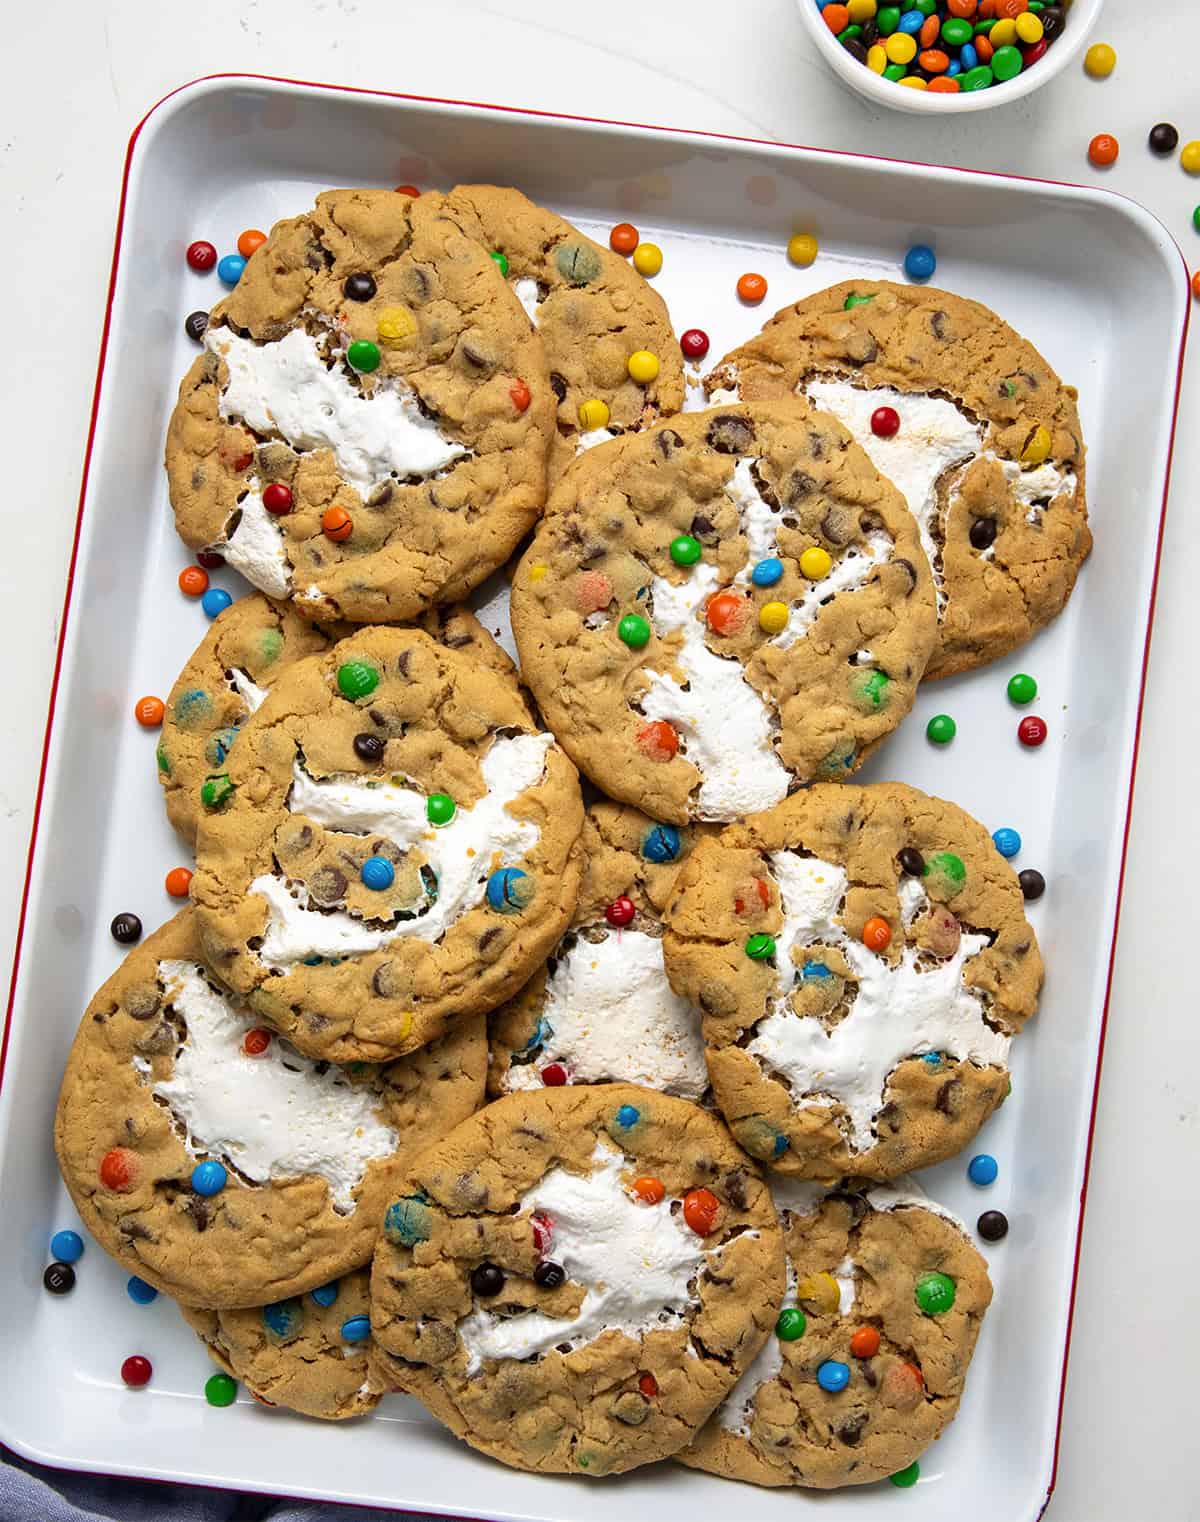
marshmallow cookies
Ingredients
Method
- Preheat oven to 350°F. Line baking sheets with parchment paper.
- In a bowl, beat butter and peanut butter until smooth.
- Add brown sugar and mix until combined.
- Add eggs one at a time, mixing well after each addition.
- In another bowl, whisk together flour, oats, baking soda, and salt.
- Gradually add dry ingredients to wet mixture. Mix until just combined.
- Stir in M&M candies and chocolate chips.
- Using a cookie scoop, place dough onto prepared baking sheets.
- Flatten each dough ball slightly and add marshmallow fluff in the center.
- Top with mini M&M candies, if desired.
- Bake for 15 minutes or until edges are golden.
- Cool on baking sheets before transferring to wire racks.