Retro Pistachio Delight A Simple Watergate Salad
If I’m honest, I’ve probably baked dozens of banana breads in my life, but this zucchini banana bread is the one I keep coming back to. There’s something about that secret veggie sneaking into the batter—it keeps it moist and tender, almost like a little surprise for everyone biting into it. I remember the day I came up with this recipe; I was staring at a ripe bunch of bananas and a big zucchini sitting on my counter, both begging to be used up. I wanted something that wasn’t just delicious but also a little sneaky—so my kids wouldn’t realize there was healthy stuff inside. Trust me on this one, they ask for seconds every single time, and you’d never guess there’s zucchini hidden in there! This one’s a lifesaver on busy nights when I want homemade, comforting goodness but don’t have hours to bake. Plus, the smell alone — nutty, banana-y, with a hint of zucchini freshness — always fills my kitchen with a cozy vibe. And I bet once you try it, it’ll become a staple at your house too.
What is Zucchini Banana Bread?
Think of zucchini banana bread as the cozy, moist hug of baked goods—like a classic banana bread but with a little twist. It’s essentially a fruity, veggie-infused loaf that’s just as sweet and satisfying as the original. The name might throw you off a bit if you’re new to sneaking vegetables into baked treats, but I promise, this bread is all about flavor and texture. The zucchini acts like a secret agent—adding moisture and a subtle earthiness—without overpowering the sweetness of the bananas and the richness of the batter. It’s called “banana bread” because, well, that’s what it is for all intents and purposes, but the zucchini packs in some extra nutrition and makes the loaf irresistibly tender. What I love most about this is that it’s versatile; you can enjoy it for breakfast, brunch, or just a cozy snack anytime. And honestly, it’s as good on day three as it is fresh out of the oven—if it lasts that long!
Why you’ll love this recipe?
Oh, where do I start? If you’re like me, you want something that’s easy, nourishing, and makes the house smell incredible. This zucchini banana bread checks all those boxes—and then some. First, the flavor. It’s got that perfect banana sweetness, but with an added depth from the zucchini, which keeps the crumb so tender and moist. My kids actually *ask* for this all the time, and I love that I can sneak in a little veggie without complaints. What I really love most about this is how straightforward it is to make—no fancy equipment, no complicated steps, just simple ingredients thrown together in one bowl. Plus, it’s budget-friendly—using mostly pantry staples and a swerve for the sweetener if I want to cut back a bit. It’s also incredibly versatile—you can add walnuts, chocolate chips, or even a dusting of cinnamon for extra flair. And this bread is perfect whether you’re serving it warm with butter or sliced up for a snack. Honestly, once I perfected this recipe, it became my go-to for everything from quick breakfasts to weekend brunches with friends. The best part? It disappears fast around here!
How do you make Zucchini Banana Bread?
Quick Overview
This zucchini banana bread is one of those recipes where everything comes together in one bowl—less mess, less stress. You start by mashing the bananas and shredding the zucchini—no fancy techniques needed. Just a box grater and a few minutes. Then, mix the wet ingredients with the sugar and oil, followed by adding the dry stuff. The batter comes together quickly, and it’s honestly forgiving—I’ve made this with overripe bananas and zucchini from the garden, and it still turns out delicious. Pour it into a loaf pan, swirl in your favorite extras if you like, and bake. That’s it. While it’s baking, your house fills with a warm, inviting aroma that’s almost impossible to resist. Once out of the oven, you want to cool it just a bit—trust me, this bread’s best when it’s not piping hot. Slice it up, enjoy, and prepare for a new family favorite.
Ingredients
For the Main Batter:
– 3 ripe bananas, mashed really well – I always do this with a fork, it’s my secret to super moist bread
– 1 cup shredded zucchini (about one small zucchini, grated and drained slightly)
– 1/3 cup vegetable oil or melted coconut oil
– 2/3 cup brown sugar (or coconut sugar for a healthier twist)
– 2 large eggs
– 1 teaspoon vanilla extract
– 1 1/2 cups all-purpose flour (or gluten-free flour blend if you prefer)
– 1 teaspoon baking soda
– 1/2 teaspoon baking powder
– 1/2 teaspoon cinnamon (it brings out that cozy flavor)
For the Filling (Optional):
– 1/2 cup chopped walnuts or chocolate chips (or both!)
– A pinch of sea salt for that perfect finishing touch
For the Glaze (Optional but highly recommend):
– 1/2 cup powdered sugar
– 1-2 teaspoons milk or cream
– A splash of vanilla or lemon juice for extra zing
Step-by-Step Instructions
Step 1: Preheat & Prep Pan
I always start by preheating my oven to 350°F (175°C). Grease a standard loaf pan with butter or non-stick spray and line it with parchment paper if you want to make removing the bread easier. Giving the pan a quick spray helps prevent sticky edges—that’s a trick I learned the hard way after a few baked-on messes. Set everything within reach because once you start mixing, you’ll want to move fast before the batter thickens.
Step 2: Mix Dry Ingredients
In a small bowl, whisk together the flour, baking soda, baking powder, and cinnamon. I do this first so I’m all set when I combine everything later. It helps distribute the leavening evenly, which means a nice, even rise. A little pinch of salt — I always do this last — balances out the sweetness and enhances flavor.
Step 3: Mix Wet Ingredients
In a large bowl, mash the bananas until smooth—trust me, the riper, the better! Then, whisk in the oil, sugar, eggs, and vanilla until everything looks smooth and glossy. I’ve tested this with almond milk sometimes, especially when I’m out of eggs, and it actually made the bread even creamier—just a tip if you’re looking to switch things up. The batter will smell amazing at this stage.
Step 4: Combine
Add the dry ingredients to the wet, gently folding with a spatula—don’t overmix! It’s okay if there are a few lumps; that’s what keeps it tender. Overmixing can lead to dense bread, and nobody wants that. Just fold until everything’s mostly combined.
Step 5: Prepare Filling
If you’re adding nuts or chocolate chips, stir them into the batter now. I love walnuts in this, but dark chocolate chunks are equally fabulous. Sometimes I sprinkle a little extra on top before baking—gives it that bakery look and extra crunch.
Step 6: Layer & Swirl
Pour half the batter into the loaf pan, then add your swirled fillings or just drop in spoonfuls of plain batter and swirl with a knife. I do a gentle zigzag pattern—it looks fancy but is super simple. Layer the rest on top, then add a few more chips or nuts for visual appeal. You want it to look rustic and inviting.
Step 7: Bake
Bake for about 50-60 minutes, or until a toothpick inserted in the center comes out clean. I start checking around 50 minutes because ovens vary—some run hot, some not so much. If the top browns too quickly, just tent it with foil and keep baking. The house will smell incredible, and I swear, I can’t resist sneaking a peek every five minutes!
Step 8: Cool & Glaze
Once it’s out of the oven, let it cool in the pan for about 10 minutes. Then, transfer to a wire rack and cool completely before glazing. The glaze is optional but adds a lovely sweetness; just whisk powdered sugar with a splash of milk and vanilla until smooth. Drizzle it over slightly warm or fully cooled bread — a little bit goes a long way!
Step 9: Slice & Serve
Use a serrated knife to slice gently—biting into that moist crumb with tender, banana goodness is a little slice of heaven. Serve it warm with a pat of butter, or let it cool completely and enjoy with a cup of coffee or tea. My kids love it toasted in the mornings and still ask for it on lazy weekends. Honestly, this bread always gets gobbled up before the day’s over!
What to Serve It With
This zucchini banana bread is so versatile—there’s a million ways to enjoy it. For breakfast, I love slicing it thick and toasting it with a little butter or cream cheese. It’s also a hit as part of my weekend brunch spread—pair it with fresh fruit, yogurt, or a drizzle of honey. When I want a cozy dessert after dinner, I serve slices warm with a scoop of vanilla ice cream or a dollop of whipped cream. My family’s favorite thing to do, though, is just to slice it up and have it as an afternoon snack—sometimes I hide a few extra walnuts or chips in the batter, and everyone’s surprised how good it is. It’s perfect alongside a cup of coffee or a glass of cold milk. Basically, this bread works anytime you need a hug in loaf form!
Top Tips for Perfecting Your Zucchini Banana Bread
Oh, over the years, I’ve learned a few tricks to make this bread even better. First, don’t skip draining the zucchini if it feels extra watery—just give it a gentle squeeze with a clean towel to remove excess moisture. Moisture is the enemy of fluffy bread, and drained zucchini keeps the crumb just right. When mixing, avoid overworking the batter; I’ve found that using a gentle folding motion preserves the tender crumb. For swirling, I like to use a skewer or the handle of my spoon to create pretty marbling—makes it look professional even if I’m just baking in my pajamas.
If you don’t have brown sugar, coconut sugar works beautifully and lends a caramel undertone. I’ve swapped out part of the flour for almond flour for a nutty flavor, and it’s still delicious—just watch the baking time because it can vary a little. When baking, I position my rack in the center; this helps the bread bake evenly and prevents the top from browning too fast. Trust me, avoid opening the oven door too often—patience is key! Finally, for the glaze, I like adding a splash of lemon juice for brightness or a hint of vanilla for extra richness.
If I’ve learned anything, it’s that each oven can be slightly different. So, testing with a toothpick is your best friend—when it comes out clean, you know it’s done. And don’t forget, the bread continues to set as it cools, so don’t overbake or it might turn dry. Since I’ve been baking this for years, I can honestly say that every batch gets better and better—sometimes with slight tweaks, sometimes just with love and patience. Anyway, I hope you have fun trying these tips. The reward of biting into that moist, flavorful slice makes all the little indulgences worth it.
Storing and Reheating Tips
This bread is best enjoyed fresh, but I get it—life gets busy. To keep it moist and delicious, store leftovers in an airtight container at room temperature for up to 2 days. I usually wrap slices tightly in plastic wrap or put them in a resealable bag—makes for quick grabbing. If you’re planning to keep it longer, refrigeration is the way to go; just make sure it’s well wrapped so it doesn’t dry out. It’ll stay fresh for about 4-5 days—just avoid overly humid spots or direct sunlight.
Want to keep it even longer? Freeze slices individually wrapped, and they’ll last for about 3 months. To reheat, I microwave for 15-20 seconds until warm, or pop the slice in a low oven (around 300°F) for a few minutes. A little warming brings back that fresh-baked aroma, making the bread taste just like it did on the day you baked it. If you’ve glazed the bread, just wait until it’s fully cooled before applying the glaze—this prevents the glaze from becoming soggy or melting off.
Overall, with proper storage, this zucchini banana bread stays moist, flavorful, and irresistible. It’s the type of treat that gets better with time, but honestly, it’s so good I’ve never had leftovers long enough to test that theory!
Frequently Asked Questions
Final Thoughts
Honestly, if I had to pick a favorite baked good in my entire recipe arsenal, this zucchini banana bread would be it. It’s moist, flavorful, and secretly healthy in the best way. Every time I bake a loaf, I get a little excited watching the batter come together and imagining how amazing it’ll smell while baking. Plus, knowing I can sneak in some extra veggies makes me feel good about serving comfort food that’s nourishing too. My family’s love for this is the main reason I keep making it—there’s something about that tender crumb and sweet banana warmth that just makes everyone smile. Whether it’s a quick breakfast or a cozy afternoon snack, this bread never disappoints. And honestly, I hope you find joy in making it as much as I do. Grab some ripe bananas, shred that zucchini, and get ready to fill your kitchen with the delicious aroma of homemade magic. I can’t wait to hear how yours turns out—don’t forget to leave a comment and share your own tweaks!
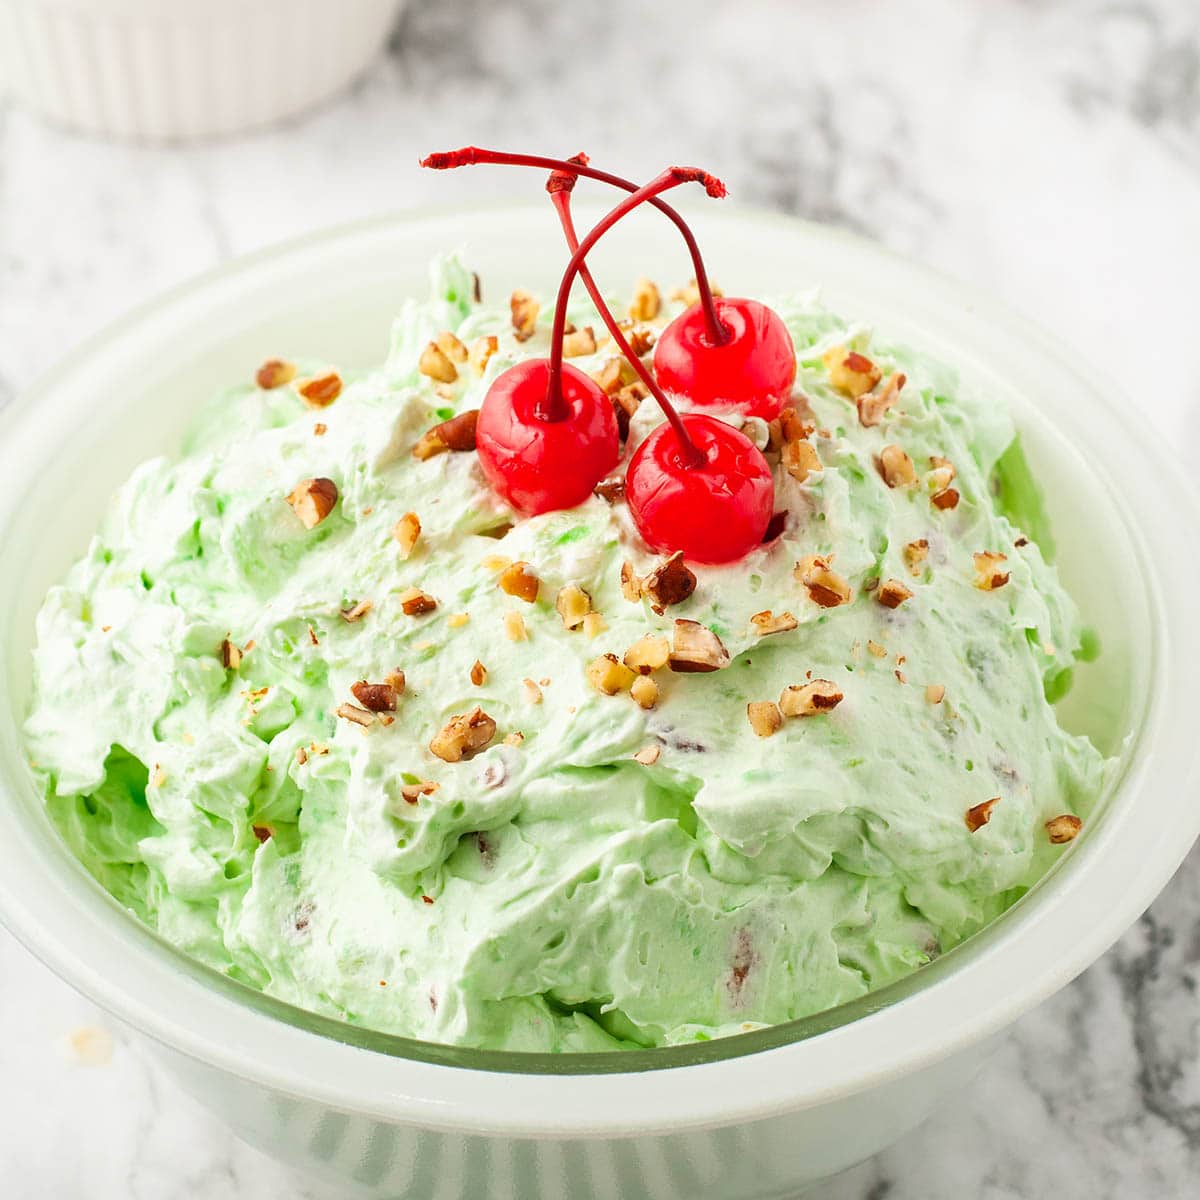
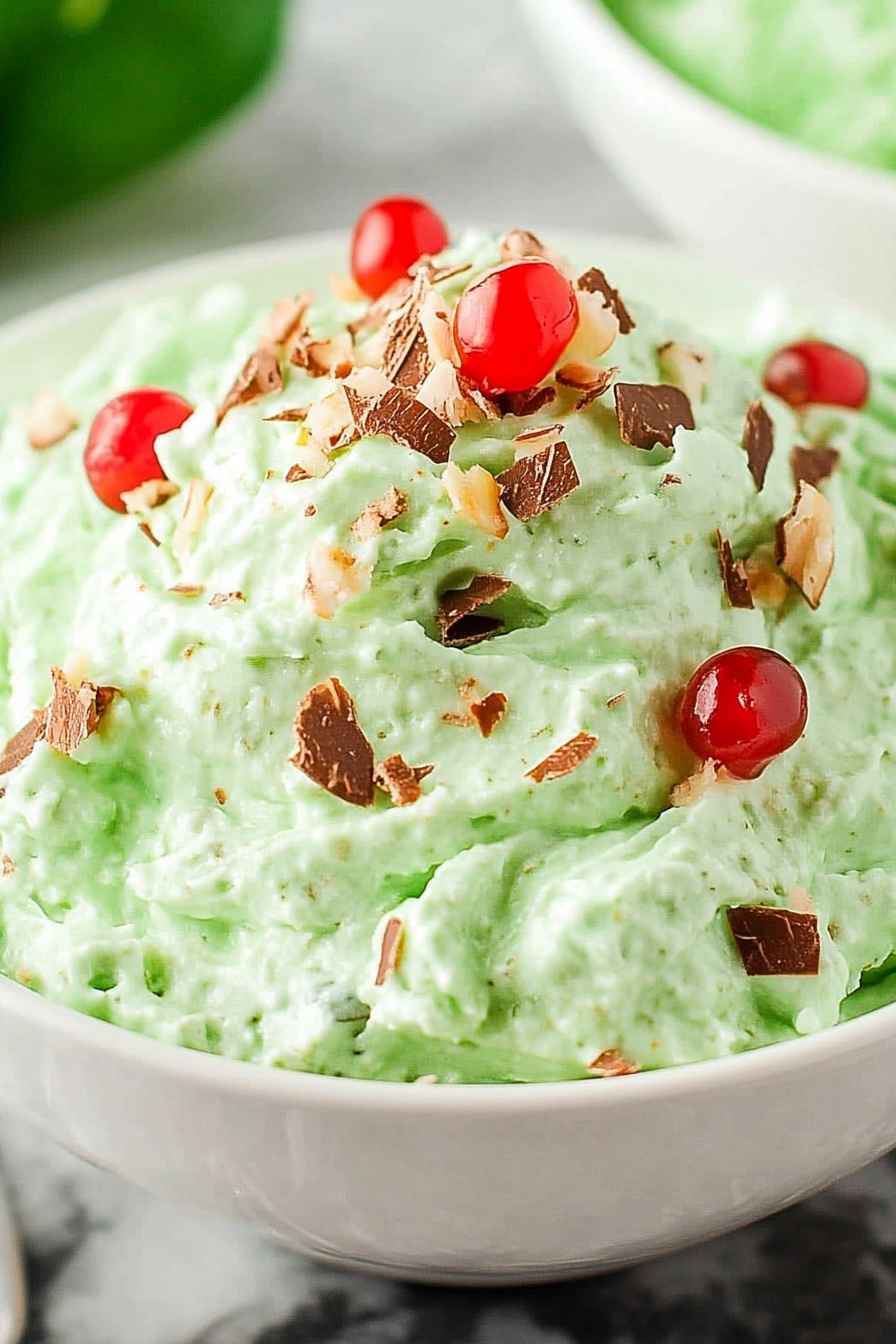
Watergate Salad
Ingredients
Method
- In a large bowl, mix crushed pineapple (undrained) and pistachio pudding mix until the pudding mix has completely dissolved and the mixture is thick.
- Stir in the chopped pecans, mini marshmallows, and shredded coconut (if using).
- Gently fold in the whipped topping until everything is well combined.
- Transfer the Watergate Salad to a serving bowl. Garnish with extra chopped pecans and maraschino cherries, if desired.