Shell-ebrate with Easy Turtle Ice Cream Cake
There’s just something about pulling a warm slice of marble cake out of the oven that instantly takes me back. Maybe it’s my grandma’s kitchen, her old metal pan, or the smell of cocoa mingling with fresh zucchini in the air. I always do this when I want something sweet but don’t want to fuss over a complicated dessert—because honestly, this is one of those recipes that feels cozy and impressive at the same time. Plus, the magic of hiding zucchini in a cake? It gets eaten before you even realize it’s sneaking in some greens! This chocolate zucchini marble cake is a real crowd-pleaser in my house. My kids ask for this all the time, and it’s my go-to when I want a little indulgence without the guilt. Trust me, the next time you’re craving chocolate and something a little wholesome, you’ll turn to this one. It’s soft, moist, and bursting with rich cocoa swirled perfectly with zucchini. And the best part? It’s surprisingly easy to make—no fancy equipment needed. Just a whisk, a good pan, and a big smile. Let’s get baking!
What is chocolate Zucchini Marble Cake?
Think of this as a harmonious dance between a classic marble cake and a lovely, sneaky vegetable upgrade. It’s essentially a tender vanilla base swirled with velvety chocolate batter, baked together to create mesmerizing marbling—those beautiful swirls you see when you slice into it. The “marble” aspect is what makes it so fun to serve; each piece is a little work of art. The zucchini, which is grated fine and incorporated into the batter, doesn’t overpower the flavor—far from it. Instead, it keeps the cake super moist and adds a subtle, earthy sweetness. I’ve made this for birthday parties, casual afternoons, or even as a thoughtful gift wrapped up with a ribbon. The name might sound fancy, but honestly, it’s just a happy marriage of simple ingredients transformed into something extraordinary. And because zucchini is mild and moist, it’s the perfect secret ingredient to make your cake stand out while sneaking in some veggies for the kids.
Why you’ll love this recipe?
What I love most about this chocolate zucchini marble cake is how it combines comfort and a little bit of surprise. The first bite is rich and fudgy, with just enough cocoa punch to satisfy any chocolate craving. It’s soft, yet somehow still feels almost luxurious without being overly sweet. It’s a go-to when I have those “I want dessert but don’t want to spend hours in the kitchen” moments, because trust me, this one’s a lifesaver on busy nights. The ingredients are budget-friendly and accessible—nothing fancy or hard to find—you probably already have most of them in your pantry. Plus, it’s incredibly versatile; you can tweak the amount of cocoa, or toss in some nuts or fresh berries if you’re feeling adventurous. And because it’s packed with zucchini, it feels a little healthier—though, honestly, I don’t think anyone in my house notices! This cake also lends itself beautifully to different occasions from a casual brunch to a fancy dinner dessert. The swirling pattern alone gets compliments every time, and the smell alone brings everyone to the kitchen. My friends often ask me for the recipe, and I always tell them, “It’s just one of those good, honest recipes that makes everyone happy.”
How do I make a chocolate Zucchini Marble Cake?
Quick Overview
This cake comes together quickly because it uses simple mixing and doesn’t require any fancy techniques. You start by preparing your zucchini and ingredients, then mix the vanilla and chocolate batters separately. The batter is poured into a loaf or bundt pan, and then I swirl the two together to create those beautiful marbling patterns. Baking is straightforward—just pop it in the oven and wait for that irresistible smell to fill the house. The whole process takes maybe an hour, from start to finish, making it perfect for a last-minute cozy treat or a planned weekend baking project. I love how forgiving this recipe is, too—if you overmix slightly, it stays moist and tender. The glaze is optional, but I always recommend it—it’s just a simple dusting of powdered sugar or a quick chocolate drizzle, and it really elevates the final look and flavor. This is one of those recipes that feels like a warm hug with every bite.
Ingredients
For the Main Batter:
- 1 ½ cups all-purpose flour (I always use unbleached for flavor and texture)
- 1 teaspoon baking powder
- ½ teaspoon baking soda
- ¼ teaspoon salt
- ½ cup granulated sugar
- ½ cup packed brown sugar (trust me, it makes it even moister!)
- ⅓ cup vegetable oil (or melted coconut oil for extra flavor)
- 2 large eggs (at room temperature)
- 1 teaspoon vanilla extract
- 1 cup finely grated zucchini (squeezed dry—I learned this trick after a few soggy cakes!)
- ½ cup buttermilk or almond milk (for extra creaminess)
For the Chocolate Batter:
- ½ cup unsweetened cocoa powder (use good quality for rich flavor)
- ¼ cup hot water
- ¼ teaspoon vanilla extract
For the Glaze:
- ½ cup powdered sugar
- 1-2 teaspoons milk or cream (adjust for desired consistency)
- Optional: a pinch of cinnamon or a drizzle of melted chocolate
Step-by-Step Instructions
Step 1: Preheat & Prep Pan
Preheat your oven to 350°F (175°C). Grease a loaf pan or bundt pan with butter or non-stick spray and lightly dust with flour—this helps it come out smoothly. Set aside while you prepare the batter. Trust me, this step saves a lot of frustration later!
Step 2: Mix Dry Ingredients
In a big bowl, whisk together the flour, baking powder, baking soda, salt, and sugars. Ensuring these are well combined helps everything bake evenly and prevents clumps, especially with the cocoa powder in the chocolate batter.
Step 3: Mix Wet Ingredients
In another bowl, whisk the eggs, oil, vanilla, and buttermilk until smooth. Stir in the grated zucchini until evenly coated. I always make sure the zucchini is well squeezed so it doesn’t make the batter too wet—less mess, less sogginess!
Step 4: Combine
Pour the wet mixture into the dry ingredients. Gently fold with a spatula just until combined—overmixing tends to make the cake dense. Divide the batter into two bowls: one plain (vanilla), and one with the cocoa mixed into the second bowl along with the hot water and vanilla to activate the cocoa’s flavor.
Step 5: Prepare Filling
Now, add the cocoa mixture to one bowl and stir until smooth. The batter will be a little thicker than usual, and that’s perfect. If it’s too runny, a tablespoon of flour can help; if it’s too thick, a splash more milk is fine.
Step 6: Layer & Swirl
Pour half of the vanilla batter into your prepared pan. Then, spread the chocolate batter on top in dollops. Use a butter knife or skewer to swirl the two batters randomly—this creates the beautiful marble pattern. I love doing big circles, but random zig-zags work just fine too.
Step 7: Bake
Pop it into the oven and bake for about 45-55 minutes. Check for doneness by inserting a toothpick into the center—if it comes out clean, you’re all set. Every oven is different, so start checking around the 45-minute mark. The top should be springy and slightly cracked.
Step 8: Cool & Glaze
Let the cake cool in the pan for 10-15 minutes before removing to a wire rack. If you’re glazing, do it once it’s cooled but still slightly warm—it helps the glaze spread smoothly and absorbs just enough sweetness to finish it off.
Step 9: Slice & Serve
Use a sharp serrated knife to cut clean slices. I love serving this with a cup of coffee or a glass of cold milk. It looks pretty with a dusting of powdered sugar or a drizzle of chocolate—kind of like a bakery treat. Trust me, you’ll probably sneak a second slice while still warm!
What to Serve It With
This cake is super versatile. In the mornings, I love pairing it with a strong coffee—it’s a comforting start to the day. For brunch, a dollop of whipped cream or a scoop of vanilla ice cream turns it into a fabulous dessert. My family enjoys it after dinner with a drizzle of extra chocolate or even a side of fresh berries. It’s also perfect for casual afternoons, served with herbal tea or milk. The moist crumb and rich flavor make it feel indulgent without going overboard. When I make this for guests, I usually set it on a pretty platter with some mint leaves or edible flowers for that bakery-quality look. It’s become our “special occasion” cake, even if it’s just a Tuesday. Honestly, I think everyone’s just happy to have something that tastes so luxury but is so easy to whip up. That’s the magic of this zucchini marble cake—simple ingredients, extraordinary results, and memories baked right into every slice.
Top Tips for Perfecting Your Chocolate Zucchini Marble Cake
Over the years, I’ve picked up some helpful tricks that make this cake turn out even better:
- Zucchini Prep: Always squeeze out excess moisture from the grated zucchini. I do this by pressing it into a clean kitchen towel or using a fine-mesh sieve. Moisture is the enemy of a tender crumb! Fresh zucchini works best, but frozen works too—just thaw and squeeze out the water.
- Mixing Advice: When combining wet and dry, don’t overstir! Gently fold until just combined. Overmixing brings out gluten and makes the cake dense, which nobody wants.
- Swirl Technique: Use a skewer or knife to swirl gently—don’t overdo it. The beauty is in the marbled look, not perfection. Sometimes I just zigzag it for more randomness.
- Ingredient Swaps: You can swap Greek yogurt for buttermilk or almond milk for dairy, with no big difference. For extra flavor, add a teaspoon of espresso powder to the cocoa batter—it intensifies the chocolate!
- Baking Tips: Check early if your oven runs hot or cold. Oven thermometers are cheap and worth every penny. Also, don’t open the oven door too early—the cake can sink!
- Glaze Variations: Try spreading a layer of cream cheese frosting instead of glaze or dusting with cocoa powder for a more rustic look. I’ve even sprinkled crushed nuts on top for crunch.
This cake is forgiving and adaptable. I learned that if I underbake it just a bit, it stays fudgier—perfect for those chocolate lovers. If it cracks on top, don’t worry—just add a little more glaze or dust with icing sugar for a pretty finish. Every time I tweak the recipe, I find little surprises that make it even better. That’s the beauty of baking from the heart, right?
Storing and Reheating Tips
This cake keeps wonderfully for a few days, which is a blessing because it’s so tempting, it disappears in minutes at my house. For best results:
- Room temperature: Wrap it tightly in plastic wrap or keep it in an airtight container—this keeps it moist for about 2 days. Honestly, it’s so good, it’s hard to resist the second day!
- Refrigerator storage: If you want it to last longer, store it in the fridge for up to 5 days. I recommend bringing slices to room temperature before serving—they taste even better that way.
- Freezer tips: Wrap leftovers tightly in plastic wrap, then foil, and freeze for up to 3 months. To reheat, let it thaw overnight in the fridge or warm slices in the microwave for about 15-20 seconds—perfect for a quick dessert fix.
- Glaze timing: I usually glaze the cake once it’s completely cooled. Adding glaze too early can make it slip off or make the top soggy. For stored cakes, I prefer adding a fresh dusting of powdered sugar or a drizzle of melted chocolate just before serving.
Overall, this cake ages gracefully and still tastes fantastic even after a few days—if it lasts that long! The moistness and flavor only deepen with time, making it even more irresistible.
Frequently Asked Questions
Final Thoughts
Honestly, I’ve made this cake countless times, and every single time it feels like a little celebration. The aroma alone draws everyone into the kitchen, and the swirling pattern makes it more special than a regular vanilla or chocolate loaf. The sneaky zucchini keeps it moist and also adds a gentle earthy sweetness that balances the richness of the cocoa. It’s one of those recipes that’s forgiving, flexible, and just plain delicious. Plus, I love how it’s a cake your kids can’t resist—who knew sneaking in vegetables could be so rewarding? If you’re looking for a dessert that feels cozy but looks impressive, this is it. I really hope you try it and make it your own—swap ingredients, add mixed nuts, or go all out with fancy toppings. I’d love to hear how yours turns out! Happy baking!
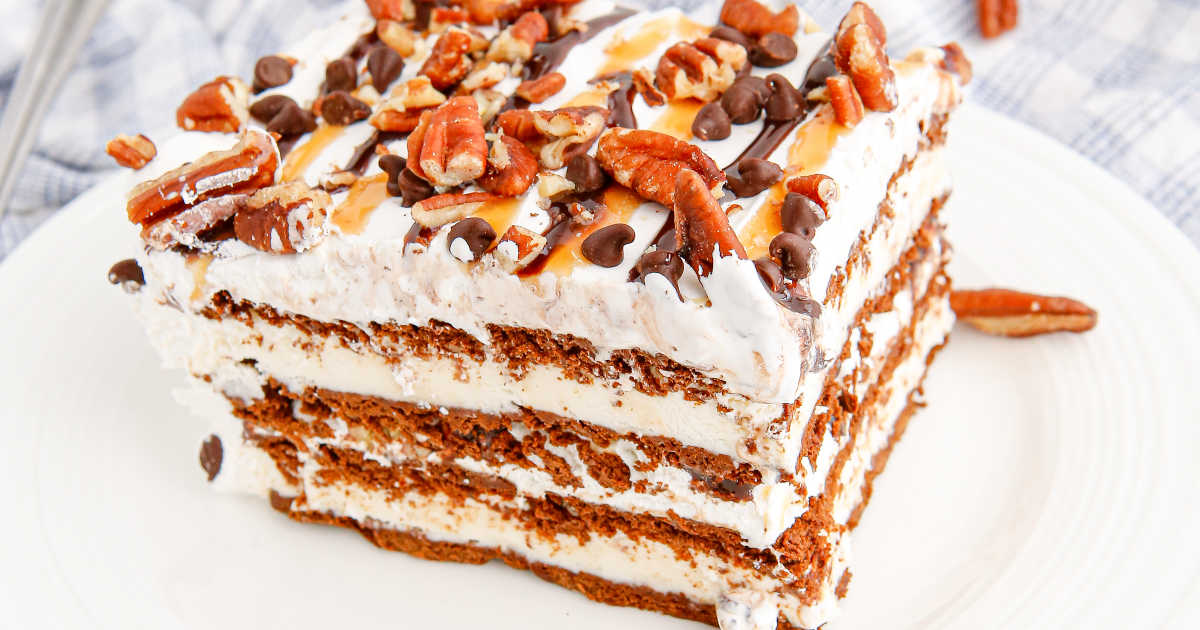
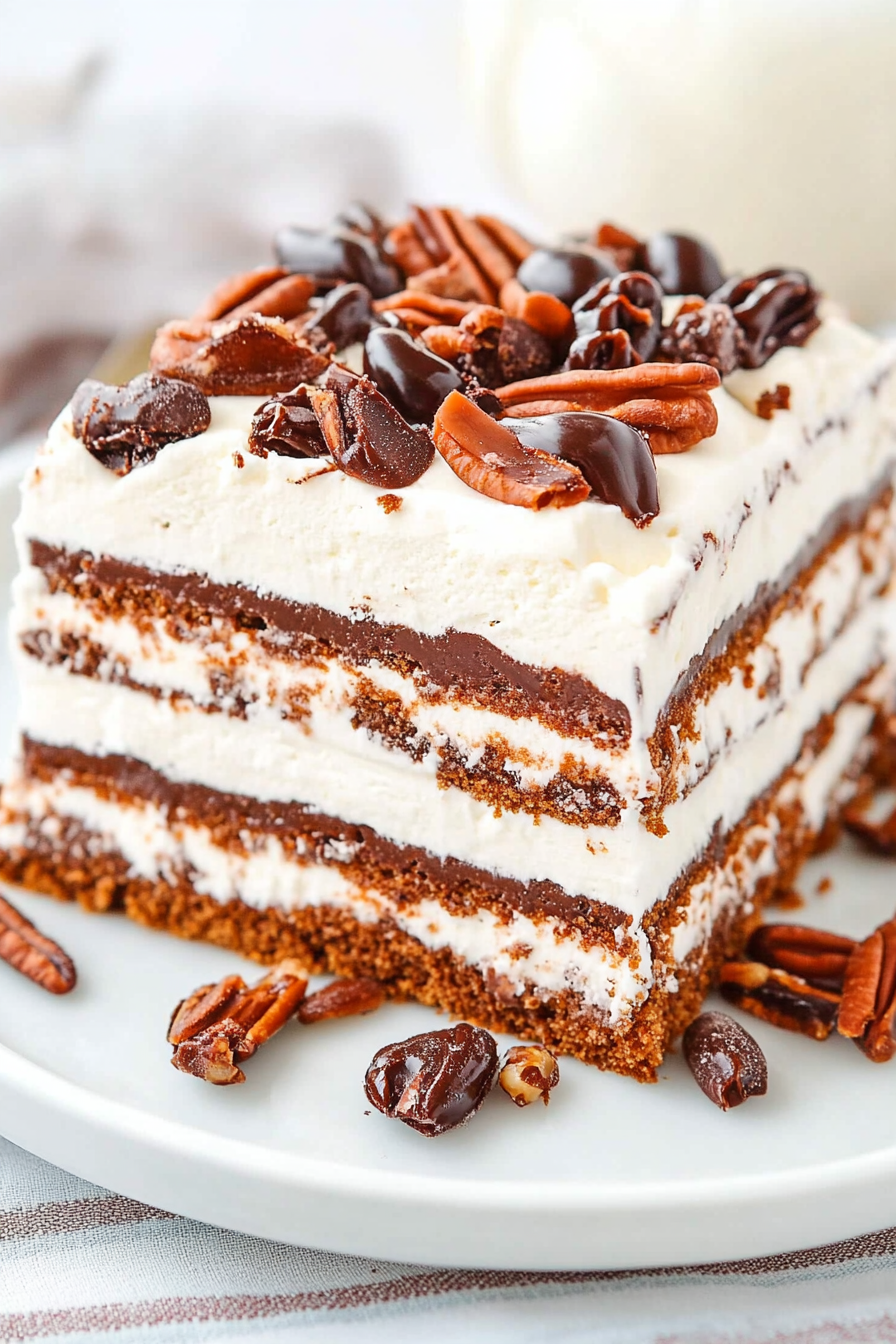
turtle ice cream sandwich cake
Ingredients
Method
- Line the bottom of a 9x13 inch pan with 12 ice cream sandwiches. You may need to slice one or two sandwiches to fit all into the pan.
- Spread half of the Cool Whip over the ice cream sandwich layer.
- Drizzle about 1/4 cup of the chocolate sauce over top of the Cool Whip followed by 1/4 cup of the caramel sauce. Sprinkle half of the pecans and half the chocolate chips over the top.
- Repeat the same steps with the remaining ingredients.
- Cover the baking dish loosely with aluminum foil and place in the freezer for 3 to 4 hours before serving. Slice into squares and enjoy.