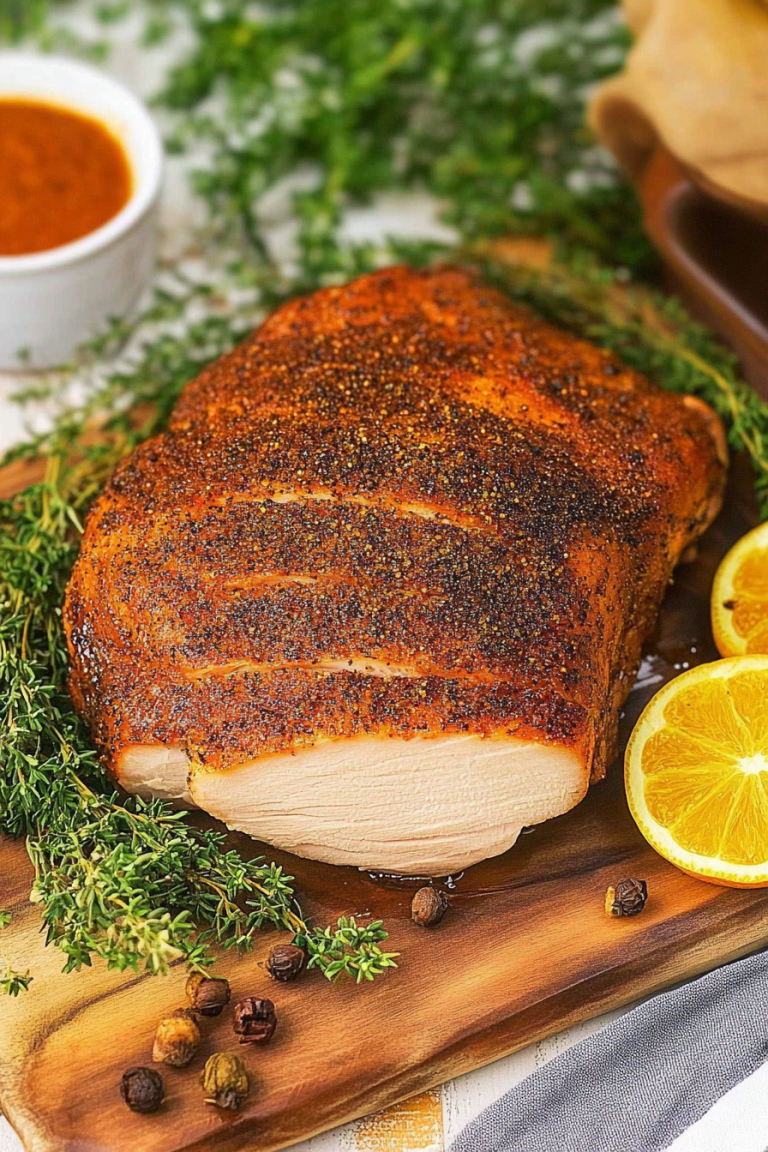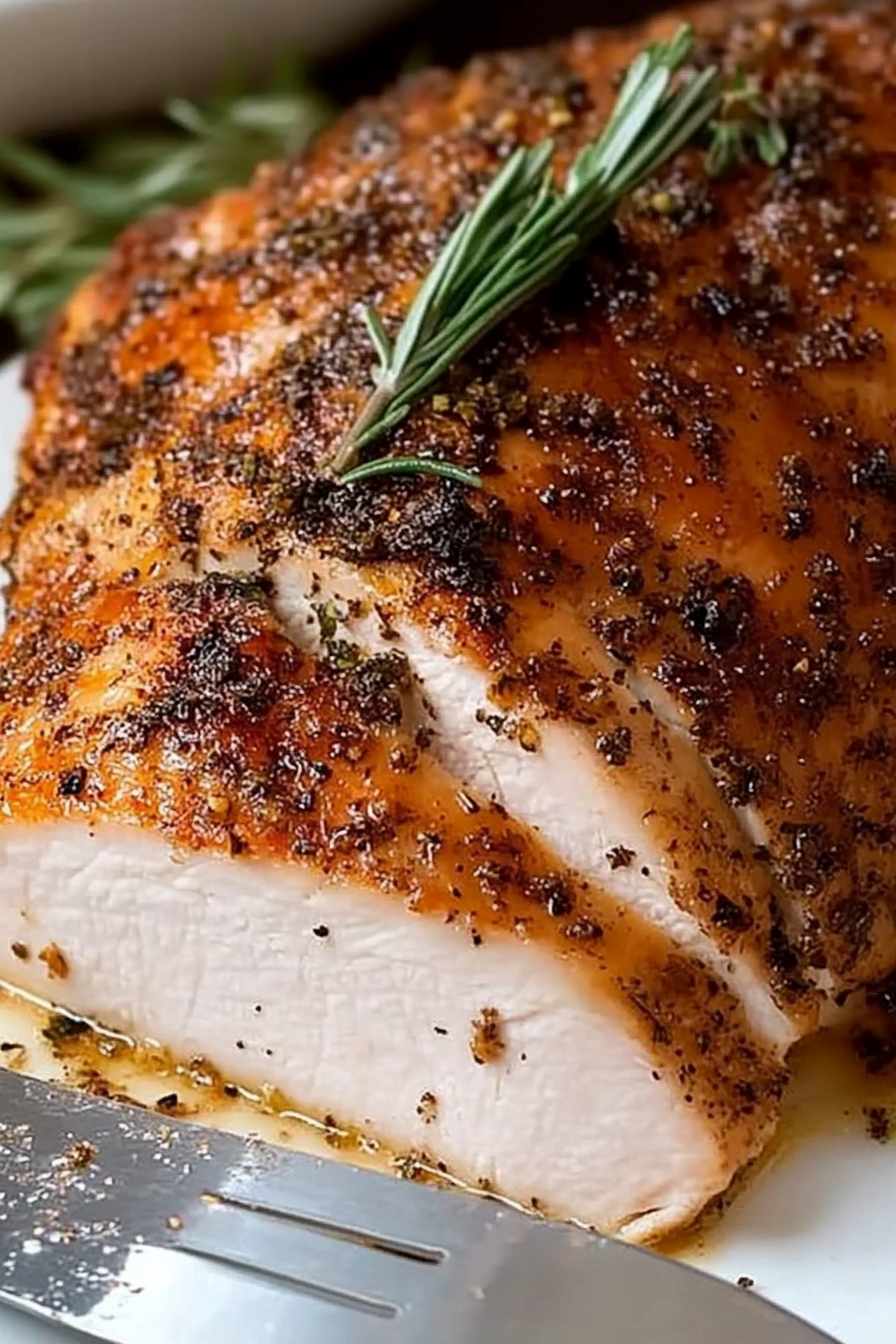
Effortless Air Fryer Turkey Breast
There’s something so hyggelig about pulling out a slice of warm, fragrant coffee cake. I still remember the first time I made this zucchini coffee cake—my grandma’s old recipe, adapted over the years and turned into a family favorite. It’s honestly become a bit of a legend around my house. The smell alone—warm cinnamon, sweet vanilla, that subtle hint of zucchini—fills the whole kitchen and seems to bring everyone together. What’s funny is, my kids actually ask for this all the time, even before I can get it to cool down. And honestly, I don’t blame them. It’s so irresistibly moist, with a tender crumb and that luscious cream cheese swirl that’s just *chef’s kiss*. best of all? It’s surprisingly easy to make, especially on busy mornings or when I’m craving something cozy—no fancy techniques, just simple ingredients and a whole lot of love. Trust me, once you try this, it’ll be your go-to weekend treat—and maybe even a weekday staple that you sneak a slice of at 10 PM when no one’s looking.
What is Zucchini Coffee Cake?
Think of this zucchini coffee cake as the lovechild of a classic crumb cake and a sneaky veggie upgrade. It’s essentially a moist, tender cake infused with shredded zucchini—yes, zucchini!—which adds moisture without making it heavy. The name “coffee cake” comes from its perfect pairing with a strong cup of coffee or tea, making it ideal for lazy Sunday mornings or afternoon chats. The cake has a beautiful swirl of sweetened cream cheese running through its center, giving each bite a creamy, tangy surprise. This dish is a way of sneaking in some extra veg without anyone noticing—my kids ask for seconds and thirds, and I always do my best to hide the zucchini until it’s baked! It’s, in essence, a cozy, nostalgic treat that’s equally good for breakfast, brunch, or late-night indulgence. And what I love most about this is how forgiving it is—it’s impossible to mess up, which is a relief for busy bees like me who need quick comfort food without fuss.
Why you’ll love this recipe?
Let me tell you, this zucchini coffee cake is a total win for so many reasons. First off, the flavor—oh my goodness, it’s like a warm hug. The cinnamon-spiced crumb, the slight tang of the cream cheese swirl, and that moist, tender crumb combine into something divine. What I love most about this is how effortless it is to make. No complicated techniques here—just a handful of pantry staples, a grater, and a little love. Plus, it’s super budget-friendly; you probably already have everything you need in your kitchen. And versatility? Check! You can serve this for breakfast with some extra fruit or yogurt, for brunch with a drizzle of honey, or as a comforting dessert after dinner. I’ve even made mini muffins with the same batter for busy mornings—trust me, these disappear in minutes at my house. If you’re tired of the same old banana bread or quick breads, this is a tasty twist that’s guaranteed to impress. It’s perfect for those days when you want something sweet but don’t want to spend hours in the kitchen.
How do I make Zucchini Coffee Cake?
Quick Overview
This cake is all about simple mixing and layering. First, you’ll shred the zucchini and squeeze out any excess moisture—this step keeps the cake from getting soggy. Then, you mix up a basic batter with flour, sugar, eggs, and melted butter or oil. While your oven preheats, you prepare the cream cheese swirl and cinnamon crumb topping. The batter gets poured into a greased pan, topped with swirls of cream cheese, and finished with a crunchy, cinnamon-spiced crumb. A quick bake later, and voila—you’ve got a cake that’s moist, flavorful, and pretty much foolproof. The best part? The smell while it’s baking is intoxicating, making your whole house smell like grandma’s kitchen. This one’s a lifesaver on busy nights or when you want to impress someone with minimal effort but maximum flavor.
Ingredients
For the Main Batter:
– 1 ½ cups all-purpose flour (actually, I’ve tested this with whole wheat and it’s still great!)
– ¾ cup granulated sugar (feel free to cut back if you like it less sweet)
– 1 teaspoon baking powder
– ½ teaspoon baking soda
– ½ teaspoon salt
– 2 teaspoons ground cinnamon (because that’s the magic spice)
– ⅓ cup vegetable oil or melted butter (I prefer butter for richer flavor)
– 2 large eggs (room temp, always helps with mixing)
– 1 teaspoon vanilla extract
– 1 cup shredded zucchini (about 1 medium zucchini, grated and excess moisture squeezed out)
For the Filling:
– 4 ounces cream cheese, softened
– ¼ cup powdered sugar
– ½ teaspoon vanilla extract
For the Crumb Topping:
– ½ cup all-purpose flour
– ¼ cup packed brown sugar
– ¼ teaspoon ground cinnamon
– ¼ cup cold butter, cubed (I use my fingers or a pastry cutter to mix this until crumbly)
Step-by-Step Instructions
Step 1: Preheat & Prep Pan
Set your oven to 350°F (175°C). Grease a 9-inch round or square baking pan with butter or non-stick spray. I like to line mine with parchment paper for easy removal, but that’s optional. While it preheats, shred the zucchini and squeeze out as much moisture as possible—this keeps your cake from turning into a soggy mess later. I always do this step in the sink, pressing the shredded zucchini with a paper towel or a clean dish towel. Trust me, moisture can be sneaky.
Step 2: Mix Dry Ingredients
In a large bowl, whisk together the flour, sugar, baking powder, baking soda, salt, and cinnamon. Mixing these well ensures your baking soda and powder are evenly distributed—no awkward, uneven rising here! This step is simple but crucial for a light, fluffy crumb.
Step 3: Mix Wet Ingredients
In a separate bowl, whisk together the eggs, oil (or melted butter), and vanilla. Once combined, add the shredded zucchini—no need to handle it delicately, just toss it in! The moisture from the zucchini will help keep the batter super moist. I’ve tested this with almond milk instead of regular milk (not that the recipe calls for milk, but just in case), and it actually made it even creamier! Bonus points if you add a pinch of nutmeg or a splash of orange zest for a flavor boost.
Step 4: Combine
Pour the wet ingredients into the dry and gently fold until just combined. Be careful not to overmix—this is where the magic of a tender crumb happens. It might look a little shaggy, but that’s totally fine. Overworking the batter can make your cake dense, and we don’t want that!
Step 5: Prepare Filling
In a small bowl, beat the softened cream cheese with powdered sugar and vanilla until smooth. You can also fold in a teaspoon of lemon zest if you want a little zing. Keep this ready to swirl into your batter later.
Step 6: Layer & Swirl
Pour half of the batter into your prepared pan. Dot with spoonfuls of cream cheese mixture across the surface, then add the remaining batter over the top. Using a toothpick or a skewer, swirl gently to create a marbled effect—don’t overdo it, or the swirl will blend too much. I love how each slice looks like a little piece of art when it comes out of the oven!
Step 7: Make & Add Crumb Topping
In a small bowl, mix together the flour, brown sugar, and cinnamon. Cut in the cold butter until the mixture resembles coarse crumbs. Sprinkle evenly over the batter. This crunchy topping is what makes the cake crave-able. I sometimes sprinkle chopped nuts or oats here if I want extra texture.
Step 8: Bake
Bake in your preheated oven for about 40-45 minutes. Start checking around the 38-minute mark—use a toothpick inserted in the center; if it comes out clean or with a few moist crumbs, you’re good. Ovens can vary, so don’t rely solely on time. The top should be golden and fragrant—you’ll know it’s ready when the kitchen smells like cinnamon and vanilla!
Step 9: Cool & Glaze
Let the cake cool in the pan for about 15 minutes, then transfer it to a wire rack. Once mostly cooled, you can drizzle on a simple glaze or dust with powdered sugar. I like to keep it semi-melted, runny enough to spread gently but not so runny that it drips everywhere. The glaze adds a little extra sweetness and shiny finish that makes it look even more inviting!
Step 10: Slice & Serve
When the cake is cool enough to handle, slice with a serrated knife. Serve warm or at room temperature—either way, it’s amazing. I love pairing it with a mug of hot coffee or a glass of cold milk. Leftovers keep well in an airtight container for a day or two, though honestly, it’s so good I doubt it’ll last that long. This makes a perfect snack, brunch treat, or even a dessert when you’re craving something comforting but not overly decadent.
What to Serve It With
This zucchini coffee cake is so versatile, I feel like it can adapt to any occasion. For breakfast, serve it warm with a dollop of whipped cream or a side of fresh berries. It pairs beautifully with a strong cup of coffee or a milky latte—you know, those cozy mornings where the world just slows down a bit. On brunch days, I like to add a drizzle of honey or a sprinkle of chopped nuts on top, along with a side of fresh fruit. It’s also fantastic as a dessert—warm slices topped with vanilla ice cream or a dusting of powdered sugar are my go-tos. When I have friends over, I like to cut it into little squares and serve it with herbal tea or a mimosa. Honestly, it feels like a special treat but is quick enough to whip up whenever the mood strikes. My family loves how it fills the house with that irresistible smell, and I secretly love how versatile it is for any time of day.
Top Tips for Perfecting Your Zucchini Coffee Cake
If you want to elevate your baking game or troubleshoot any issues, these tips are gold. First, always squeeze out the excess moisture from your shredded zucchini—wet zucchini is the enemy of a tender, moist cake. I’ve tested this with different zucchinis from my garden and store-bought—it makes a difference. Second, don’t overmix the batter once you combine the wet and dry ingredients. It’s tempting to beat it all together to smooth it out, but overmixing develops gluten, which can toughen the crumb. Instead, fold gently until just combined—trust me, the batter will look a little lumpy, and that’s exactly what you want.
For the swirl, I tend to add a little more cream cheese mixture, sometimes even dotted on top after layering. It looks prettier and tastes creamier! When it comes to baking, oven heat can vary—so keep an eye on the color of the top and test for doneness with a toothpick. If your cake is browning too quickly, tent it with foil and lower the temperature slightly. As for the crumb topping, I’ve experimented with adding chopped pecans or oats, which give a nice bite. If you’re feeling adventurous, a splash of maple syrup in the topping or glaze can add a deeper sweetness.
My biggest lesson? Let it cool completely before slicing. This allows the flavors to settle and prevents the slices from falling apart. And don’t skip the glaze! A simple glaze made with powdered sugar and milk or lemon juice adds a glossy finish and a flavor boost that really elevates the whole thing. This has become my go-to recipe for a reason—it’s super forgiving, insanely tasty, and smells like happiness in my kitchen.
Storing and Reheating Tips
Leftovers? There’s barely any! But if you do manage to save a piece, here’s what I do. Keep it tightly wrapped in plastic wrap or store in an airtight container at room temperature for up to two days—if it lasts that long! After that, I like to pop it in the fridge, where it stays fresh for about 4 days. Just keep an eye on it, as the zucchini can sometimes make it a little wetter over time. When you’re ready to enjoy, reheat in the microwave for about 15-20 seconds—it warms up nicely without drying out. If you prefer cold, slices are just as delicious straight from the fridge. For longer storage, I wrap individual slices in aluminum foil and freeze for up to a month. Thaw at room temp or reheat briefly in the microwave. I usually wait until serving to add the glaze—this keeps it shiny and fresh. The key is not to cover it when it’s still warm, so it doesn’t get soggy. With these tips, your zucchini coffee cake will stay moist, flavorful, and bringing smiles long after baking!
Frequently Asked Questions
Final Thoughts
This zucchini coffee cake has truly become my little kitchen secret—something that’s tasty, forgiving, and always makes my house smell like a baking dream. It’s a perfect way to sneak in a veggie, satisfy a sweet craving, or just indulge in a cozy moment with a cup of coffee. Over the years, I’ve made a few tweaks—more cinnamon here, less sugar there—and learned that letting it cool completely keeps the slices tidy and pretty. It’s incredible how something so simple can bring so much comfort to a family gathering or a lazy Sunday morning. I really hope you try it and find as much joy in making and eating it as I do. Please, come back and tell me how yours turns out—extra points if you send me a photo! Happy baking, friends, and don’t forget: the best recipes are the ones shared with love.
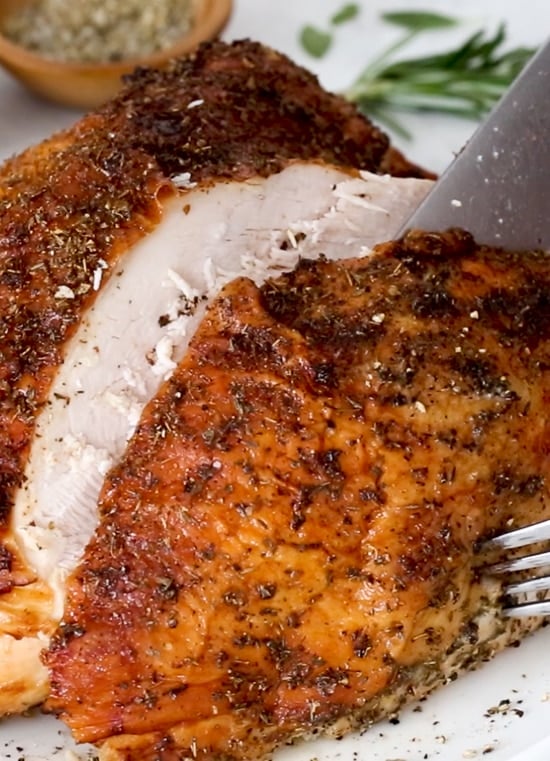
Air Fryer Turkey Breast
Ingredients
Method
- Rub 1/2 tablespoon of olive oil all over the turkey breast. Season both sides with salt and seasoning, then rub remaining oil over the skin.
- Preheat the air fryer to 350F. Place the turkey breast skin side down and cook for 20 minutes. Turn over and cook until internal temperature reaches 160F, approximately 30 to 40 minutes depending on size. Let rest for 10 minutes before slicing.