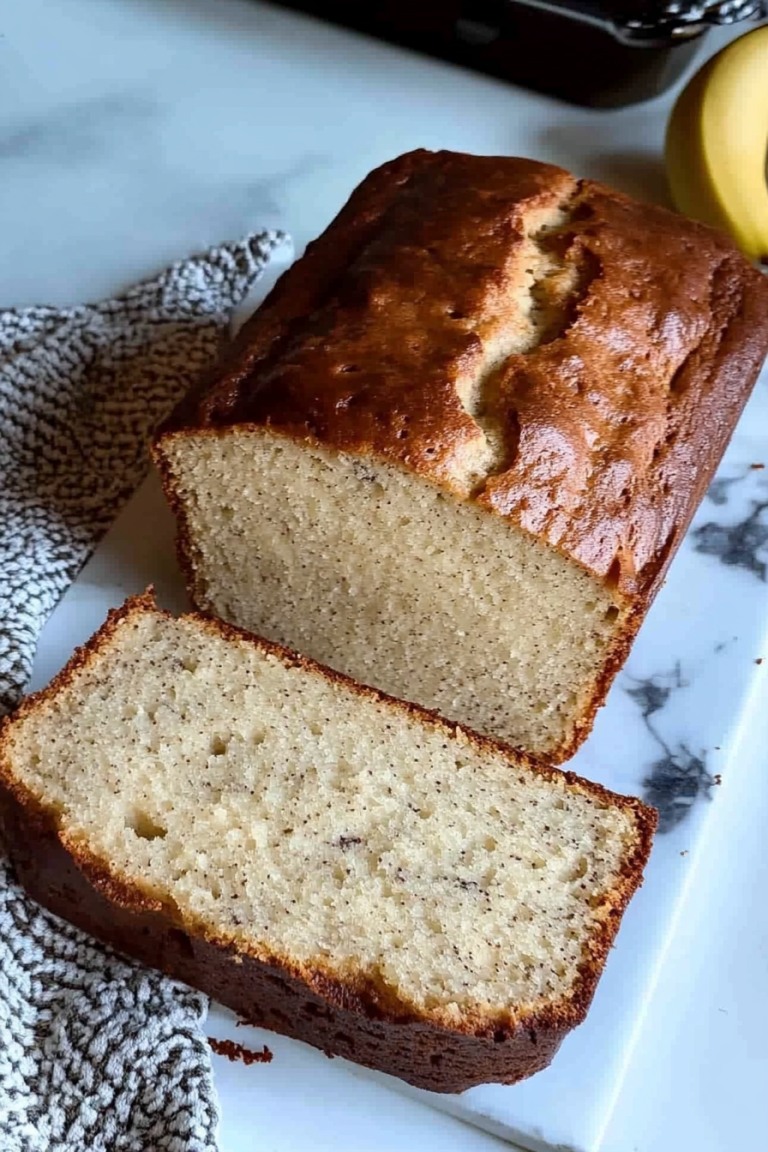
Easy Baked Strawberry Banana Bread
Honestly, one of my favorite memories is coming home after school to the smell of something sweet baking in the oven. My mom used to make this zucchini cinnamon swirl bread, and it’s become a real comfort food for me over the years. It’s kind of like a cozy hug—moist, flavorful, with just enough sweetness and a little swirl of cinnamon that hits all the right notes. I love how it’s not overly sweet but still feels like treat, and it’s so versatile! My kids ask for this all the time, especially when they want a snack that’s a little healthier but still totally indulgent. Plus, it’s a sneaky way to get some veggies in without anyone really noticing—think of it as the adult version of sneaking spinach into smoothies, but way tastier! This zucchini cinnamon swirl bread is a lifesaver on busy nights, and it’s perfect for weekend brunches or just quiet mornings with a huge mug of coffee. I tested this with almond milk, and honestly, it made it even creamier—trust me on this. If you love the smell of cinnamon and fresh baked bread, you’re in the right place—let’s get baking!
What is Zucchini cinnamon swirl bread?
This bread is basically a moist, tender loaf made from grated zucchini, wrapped in a warm cinnamon-sugar swirl, and baked to perfection. Think of it as a hybrid between quick bread and coffee cake, but with the added bonus of sneaky veggies. The name is pretty straightforward—it’s zucchini (the star ingredient that keeps the bread super moist), cinnamon (the aromatic spice that makes it smell just like fall), and a sweet swirl that’s almost like a cinnamon roll in bread form. It’s essentially a treat you can feel good about eating, whether for breakfast, a snack, or dessert. It’s the kind of recipe that gets better each time I make it, and the best part? It’s simple enough for beginner bakers, but impressive enough to serve to guests. You really don’t need fancy equipment—just a bowl, a spoon, and a loaf pan—and that makes it even more lovable.
Why you
What I love most about this zucchini cinnamon swirl bread is how incredibly forgiving it is. Even if you’re a bit of a kitchen clutz like me sometimes, it still turns out fantastic! The flavor? Absolutely incredible. The cinnamon and brown sugar swirl creates these beautiful, marbled patterns that make each slice look like a little piece of art. It smells like heaven—wafts of cinnamon, vanilla, and that signature baked bread aroma—my house always fills up when I bake this. And it’s so easy to make! You just mix the ingredients, pour, swirl, and bake. No fancy techniques required. Plus, it’s budget-friendly; most ingredients are pantry staples. My favorite part? The versatility. You can add nuts, tossed blueberries, or even a little orange zest for a different twist. It’s a cozy little loaf I keep coming back to—my kids practically ask for it by name, and I never get tired of the compliments. Honestly, once you make this, it’ll become a staple for your mornings and snack times too.
How do you make Zucchini Swirl Bread?
Quick Overview
This bread is so straightforward you’ll be amazed. You start by prepping your zucchini—grating it, then squeezing out excess moisture. Meanwhile, you mix your dry ingredients—flour, baking powder, cinnamon—and then whisk together wet ingredients like eggs, oil, and vanilla. The batter comes together quickly, and then you pour about half into your loaf pan. Next, you sprinkle a cinnamon sugar mixture across the batter and swirl it gently through the batter with a toothpick or skewer. Pour the rest of the batter on top, give it a final swirl, and bake until a toothpick inserted in the center comes out clean. The entire process takes about 15 minutes of prep and around 50 minutes in the oven, which sounds totally doable on a busy morning or lazy weekend afternoon!
Ingredients
For the Main Batter:
– 2 cups grated zucchini (about 2 medium zucchinis, finely shredded)
– 2 cups all-purpose flour (I like to use unbleached or organic if I can)
– 1 ½ teaspoons baking powder
– ½ teaspoon baking soda
– 1 teaspoon ground cinnamon
– ½ teaspoon salt
– ⅓ cup sugar (can use honey or maple syrup if you prefer natural sweeteners)
– ¼ cup vegetable oil (or melted coconut oil for extra flavor)
– 2 large eggs (or flax eggs for vegan version)
– 1 teaspoon vanilla extract
– ¼ cup milk (dairy or plant-based like almond, coconut, or oat)
For the Filling:
– ¼ cup brown sugar
– 1 tablespoon ground cinnamon
– 1 tablespoon melted butter or coconut oil (optional, for richness)
– Pinch of nutmeg (if you like an extra warm spice)
For the Glaze (optional, but highly recommended):
– ½ cup powdered sugar
– 1-2 tablespoons milk or cream
– A dash of vanilla
– Extra cinnamon for dusting
Step-by-Step Instructions
Step 1: Preheat & Prep Pan
Set your oven to 350°F (175°C) and grease a standard loaf pan or line it with parchment paper. This step is crucial so your bread comes out smoothly without sticking. I always do this right after I gather my ingredients—it makes the whole process so much easier. If you like, sprinkle a tiny bit of flour or baking spray into the pan for extra non-stick magic. Also, grate the zucchini and toss it into a clean kitchen towel to squeeze out excess moisture. The drier the zucchini, the better the bread will hold together and stay moist without getting mushy.
Step 2: Mix Dry Ingredients
In a large bowl, whisk together the flour, baking powder, baking soda, cinnamon, salt, and sugar. This is where the magic begins—ensuring your baking powder and soda are evenly distributed guarantees your bread will rise evenly. I’ve made the mistake of just mixing all at once and ending up with some dense spots, so I always do this step carefully.
Step 3: Mix Wet Ingredients
In a separate bowl, beat the eggs, then add the oil, vanilla, and milk. Whisk until smooth—you want everything well combined, but avoid overbeating, which can make the bread dense. I’ve tested this with almond milk, and honestly, it made it even creamier—give it a try if you want extra moisture and flavor complexity.
Step 4: Combine
Pour the wet into the dry ingredients and fold gently with a spatula until just combined. The batter might be a little thick but should come together easily. Do not overmix—this is key to keeping your bread tender and light. If you see lumps, that’s perfectly fine. Overworking the batter can make the texture tough, and nobody wants that.
Step 5: Prepare Filling
In a small bowl, mix together the brown sugar, cinnamon, and melted butter if using. That lovely cinnamon-sugar combo is what gives the swirl its signature flavor and appearance. Feel free to add a pinch of nutmeg or even some chopped nuts for an extra crunch—whatever suits your mood today!
Step 6: Layer & Swirl
Pour half of the batter into the prepared pan. Sprinkle half of your cinnamon-sugar mixture evenly over the batter. Using a toothpick or skewer, gently swirl the filling through the batter—think of it as creating a marbled effect. Pour the rest of the batter on top, then sprinkle with more cinnamon-sugar and do a final swirl. For that perfect look, I always try to keep the swirls somewhat uneven—that way, each slice is a surprise!
Step 7: Bake
Pop it into the oven and bake for 50-60 minutes. Start checking around the 50-minute mark—insert a toothpick in the center, and if it comes out clean, it’s ready. The smell alone will make your kitchen feel like a bakery! If your oven runs hot, lower the rack and keep an eye on the crust; you want it golden but not too dark.
Step 8: Cool & Glaze
Let the bread cool in the pan for about 15 minutes before transferring it to a wire rack. If you plan to add the glaze, wait until the bread is mostly cooled so it doesn’t melt off too quickly. Mix powdered sugar with milk and vanilla until smooth, then drizzle generously. I love adding a dash of cinnamon on top for that extra spice kick, plus it makes it look pretty!
Step 9: Slice & Serve
This bread is best enjoyed warm or at room temperature. Use a serrated knife for clean slices—trust me, it helps keep the beautiful swirl pattern intact. Serve it plain, with a pat of butter, or even a dollop of mascarpone or cream cheese for extra indulgence. It’s perfect alongside a cup of coffee or tea—really, I can’t think of a better way to start or end the day.
What to Serve It With
This zucchini cinnamon swirl bread is truly versatile. For breakfast, I love pairing it with a strong dark roast or a caramel latte. A slice toasted with a smear of butter or cream cheese is my personal weakness—how about you? On weekends, I serve it at brunch alongside fresh fruit and maybe a handful of crunchy nuts. It also makes a lovely dessert—warm slices topped with a scoop of vanilla ice cream or a drizzle of caramel sauce. Honestly, this bread can be breakfast, snack, or dessert, and it always disappears quickly. When I make it for my family, I save a couple of slices to go with afternoon tea—perfect for a cozy, relaxing moment. My kids ask for this all the time after school, and I love seeing their faces light up the moment they smell it baking.
Top Tips for Perfecting Your Zucchini Cinnamon Swirl Bread
After making this countless times, I’ve learned some helpful tricks. First, don’t skip squeezing out excess moisture from the zucchini—otherwise, your bread could turn out a little too dense or soggy. To do this, I grate the zucchini, then place it in a clean kitchen towel and squeeze out all the juice—trust me, it makes a world of difference. When mixing the batter, fold gently—overmixing is the enemy of fluffy bread, so use a light hand and stop as soon as everything looks combined. For the swirl, I like to sprinkle the cinnamon-sugar mixture evenly over the batter, then swirl in different directions—this creates a beautiful marbled effect, and every slice looks like a masterpiece. Want to change things up? Swap in blueberries or chopped nuts—just reduce the liquid slightly if you add extra moist ingredients. When baking, keep an eye on the crust; if it gets too dark before fully cooked, cover loosely with foil. For the glaze, I find that a thick but pourable consistency works best—if it’s too runny, it’ll slide right off, but if it’s too thick, it won’t spread easily. Lastly, store leftovers properly—see below—so this fresh-baked bliss stays as tasty as when it just came out of the oven.
Storing and Reheating Tips
This bread stays good for a couple of days at room temperature, tucked in an airtight container or wrapped tightly in plastic wrap. I do recommend enjoying it within 2 days for that freshly baked taste. If you want to keep it longer, pop it in the refrigerator—just make sure it’s well wrapped so it doesn’t dry out. It’ll stay fresh for up to 5 days refrigerated. Want to enjoy it later? This bread freezes beautifully—wrap it tightly in plastic wrap and then foil, and it’ll keep for up to 3 months. Thaw at room temperature or warm it up in the oven for a few minutes. For reheating, I love slicing it and toasting it lightly—adds that crispy edge which pairs fantastically with the soft, moist crumb. If you’ve added glaze, I recommend waiting to glaze until just before serving so it stays glossy and fresh. Whenever I reheat slices, I sprinkle a tiny bit of extra cinnamon or sugar on top—makes it taste just like fresh out of the oven.
Frequently Asked Questions
Final Thoughts
Seriously, this zucchini cinnamon swirl bread has become a cornerstone in my home. It’s moist, fragrant, and wholesome, but still indulgent enough to feel like a treat. Over the years, I’ve tweaked the recipe, added my own touches, and learned how to get that perfect swirl every time. It’s a baking project that’s almost foolproof—great for whenever you want to impress with minimal effort. Plus, it makes your entire house smell like fall, no matter the season. Whether you’re looking for a cozy breakfast, an afternoon snack, or a delightful dessert, this bread covers all the bases. I hope you give it a try and find as much joy in baking it as I do. And hey, don’t forget to come back and tell me how yours turned out or share your own twists! Happy baking, my friend—this one’s going to become a family favorite for sure!
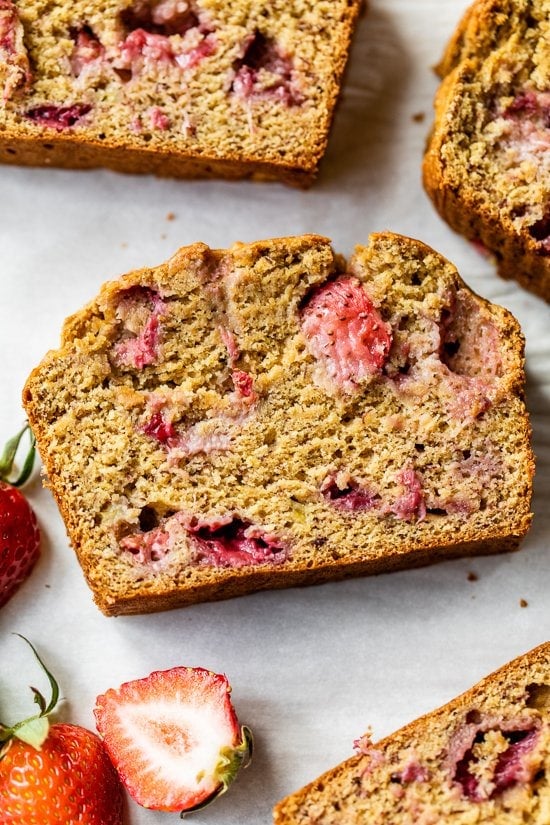
Strawberry Banana Bread
Ingredients
Method
- Preheat oven to 350°F. Lightly spray a loaf pan with baking spray.
- Place the strawberries on a baking sheet and roast for 25 minutes, remove and set aside.
- In a medium bowl, combine flour, baking soda and salt with a wire whisk. Set aside.
- In a large bowl cream butter and sugar with an electric mixer.
- Add egg whites, bananas, apple sauce and vanilla, and beat at medium speed until thick. Scrape down sides of the bowl.
- Add flour mixture and blend at low speed until combined, do not over mix.
- Fold in strawberries and pour batter into the prepared loaf pan; bake in the center rack for about 50 minutes, or until a toothpick inserted in the center comes out clean.
- Let the pan cool at least 20 minutes, bread should be room temperature before slicing.