Zesty Lemon Cupcakes How to Bake Them
There’s something about the smell of freshly baked cake wafting through the house that instantly makes me feel like everything’s right in the world. I remember my grandma’s kitchen when she was baking her famous zucchini bread—those warm, spicy smells, and the way everyone crowded around, waiting for a slice. Over the years, I’ve tweaked that recipe a bit, turning it into this super moist zucchini cake with a tangy lemon glaze that’s practically addictive. Honestly, it’s become a family favorite—you’ve probably seen my kids sneaking seconds before I even get the chance to plate it. And here’s the best part: it’s crazy easy to whip up, even on busy weeknights when I just want something sweet but don’t want to spend ages in the kitchen. Plus, it’s a sneaky way to get some veggies into the kids’ diet without a fuss. Trust me, once you try this, it’ll become a staple in your dessert lineup, I promise!
What is a Moist Zucchini Cake?
This moist zucchini cake is basically a tender, flavorful crumb of goodness packed with shredded zucchini. Think of it as a cross between a fluffy sponge and a carrot cake—only it’s got this vibrant green sneakily hiding inside. The magic is in the moisture: zucchini, when grated and properly drained, adds an incredible soft, chewy texture without making the cake heavy. It’s essentially a simple, no-fail recipe that celebrates how humble vegetables can transform into something decadent. The lemon glaze adds a bright tartness that cuts through the sweetness, making each bite perfectly balanced. I love calling it “vegetable cake” because it sounds so healthy, but honestly, it’s just downright delicious. My friends always ask for the recipe after trying it—this one’s a lifesaver on busy nights or rainy weekends when just a cozy slice really hits the spot.
Why you’ll love this recipe?
What I love most about this moist zucchini cake is how versatile and forgiving it is. The flavor is unexpectedly complex—the sweetness from the sugar, the tender crumb, and that hint of earthy zucchini make each bite feel like a little celebration. It’s not overly sweet, so the lemon glaze really elevates it with a fresh, zesty punch. Plus, it’s super easy to make; I’ve tested this with various flours and even almond milk, and it still turns out perfectly every single time. Budget-wise, it’s great because zucchini is usually really affordable, especially if you’ve got a garden or find a good deal at the market. And the best part? It’s kid-friendly—my kids ask for this all the time, and I love how I can sneak in some healthy veggies without any fuss. You can also switch up the glaze with berries or a drizzle of honey, making this adaptable for any mood or occasion. Honestly, what I love most about this is how cozy it makes my house smell—like pure comfort in every slice.
How do I make Zucchini cake?
Quick Overview
This cake comes together in just a few simple steps. You start by grating the zucchini and squeezing out excess moisture—this step is key for that tender crumb. Then, you mix your dry ingredients and wet ingredients separately before gently bringing them together. The batter is poured into a loaf or round pan, layered with a spoonful of the prepared filling (think: hints of cinnamon, maybe a dash of nutmeg for warmth), and swirled for that pretty marbled look. After baking until golden and a skewer comes out clean, you let it cool before drizzling with a bright lemon glaze. It’s honestly the kind of treat that makes your kitchen smell like a bakery, and once it’s cool enough, the glaze adds that perfect zing!
Ingredients
For the Main Batter:
– 2 cups grated zucchini (about 2 medium zucchinis; I always use fresh, but frozen works if drained well)
– 1 ½ cups all-purpose flour (or a gluten-free blend if you like)
– 1 cup sugar (white or brown, your call)
– ½ teaspoon baking powder
– ½ teaspoon baking soda
– 1 teaspoon cinnamon
– ½ teaspoon salt
– ½ cup vegetable oil or melted coconut oil
– 3 large eggs (trust me, they add richness)
– 1 teaspoon vanilla extract
For the Filling:
– ½ cup cream cheese, softened (optional but so good)
– 2 tablespoons honey or maple syrup
– 1 teaspoon lemon zest
– Optional: a handful of chopped nuts or dried berries for extra texture
For the Glaze:
– 1 cup powdered sugar
– 2-3 tablespoons fresh lemon juice
– ½ teaspoon vanilla extract (for depth)
– A splash of milk or water to reach your desired consistency
Step-by-Step Instructions
Step 1: Preheat & Prep Pan
Set your oven to 350°F (175°C). Grease your favorite baking pan—either a loaf tin or round cake pan—and line it with parchment paper for easy removal. I always do this because it prevents sticking and makes slicing way easier.
Step 2: Mix Dry Ingredients
In a large bowl, whisk together the flour, sugar, baking powder, baking soda, cinnamon, and salt. Doing this first ensures everything’s evenly distributed, which leads to a perfect rise and texture.
Step 3: Mix Wet Ingredients
In another bowl, combine the eggs, oil, vanilla, and lemon zest. Beat until smooth—this is the fun part where everything starts smelling amazing. I’ve tested it with almond milk and it made the cake even creamier, so feel free to experiment!
Step 4: Combine
Add the wet mixture into the dry ingredients and gently fold together. Don’t overmix! That’s where tough, dense cakes happen. Just stir until the batter is combined—lumps are okay, really.
Step 5: Prepare Filling
If using cream cheese filling, mix it with honey and lemon zest until creamy. Set aside. You can also skip this step if you want a simple cake, or add other flavors like cocoa or chopped nuts.
Step 6: Layer & Swirl
Pour half the batter into your pan, dollop spoonfuls of the filling on top, then spoon the remaining batter over it. Use a knife to swirl gently—think of making marble art. This creates those beautiful streaks inside and adds flavor with every bite.
Step 7: Bake
Bake for about 40-50 minutes, or until the top is golden and a toothpick inserted in the center comes out clean. Every oven is different—I’ve learned to start checking around 40 minutes. Let it cool for at least 15 minutes before removing from the pan.
Step 8: Cool & Glaze
Once cooled, whisk together your glaze ingredients. The glaze should be smooth but pourable. Drizzle generously over the top while it’s still a little warm—this helps it seep into those cracks and makes the whole cake extra moist and flavorful.
Step 9: Slice & Serve
Use a sharp knife to cut neat slices. I love serving this with a cup of coffee or a glass of bubbly—I swear it tastes even better when shared. The lemon glaze adds a lively punch, and the moist crumb makes each bite satisfyingly wholesome.
What to Serve It With
This zucchini cake is so versatile—think of it as a little chameleon to whatever occasion you’re celebrating or craving. For breakfast, pair it with a strong cup of coffee or a glass of cold milk—it’s the perfect start to a slow weekend morning. My kids love eating it still warm, with a pat of butter melting on top—it just screams cozy comfort. On brunch days, I like to serve slices on pretty plates with fresh berries and a dollop of whipped cream, making it feel a bit fancy.
As a dessert, this cake pairs beautifully with a drizzle of extra lemon glaze, a scoop of vanilla ice cream, or even a dusting of powdered sugar. It’s also wonderful as an afternoon snack—nothing beats that sweet, tender crumb when you’re curled up with a book or catching up with friends. I’ve even taken slices to potlucks and watched everyone get seconds—trust me, this one disappears fast!
Top Tips for Perfecting Your Moist Zucchini Cake
Having baked this many times, I’ve picked up a few tricks I swear by. First, squeezing out as much moisture as possible from the zucchini is game-changing. I always grate, then toss the zucchini in a clean kitchen towel and firmly squeeze out the excess water—this keeps the cake from turning soggy. Honestly, if the zucchini is too watery, your batter might leak or the crumb will be denser than you want. I’ve learned to do this every time.
When mixing the dry and wet ingredients, fold gently—overmixing can lead to a tougher texture, and nobody wants that. The swirl technique is also worth mastering; a few gentle moves with the knife creates the most beautiful marble pattern while evenly distributing the filling. Feel free to play with the filling flavors—cinnamon, chopped nuts, dried cranberries—whatever makes your family happy.
If you want a gluten-free version, swapping the all-purpose flour for a cup-for-cup blend works pretty well, though I’d add an extra teaspoon of baking powder for lift. For a dairy-free version, use coconut yogurt or almond cream cheese in the filling. The bake time might vary a little—start checking around the 35-minute mark. And don’t forget, the glaze is easily customizable—add a splash of berry juice or swap lemon for orange zest for different flavor profiles. It’s all about making it your own.
This recipe has been a real winner in my house because it strikes that perfect balance: cozy, wholesome, and just fancy enough to wow guests. Plus, I always feel good serving up something that sneaks in vegetables—because, really, what’s better than dessert with a secret health boost?
Storing and Reheating Tips
This zucchini cake keeps surprisingly well—like, I’ve had slices sit happily at room temp for a day without drying out, covered loosely with foil or a linen towel. For longer storage, pop it into an airtight container in the fridge—up to 3 days. If you want to keep it fresh longer, slice it, wrap individual pieces tightly in plastic wrap, and freeze for up to a month. Thaw at room temperature or briefly warm in the microwave.
Be mindful of how you add the glaze—if it’s been refrigerated, let the cake come to room temp before adding the glaze to prevent smudging or sagging. I find that glazing just before serving keeps it looking shiny and adds that fresh zing. When reheating, a quick 10-15 seconds in the microwave makes a warm, comforting treat, but honestly, it’s best enjoyed slightly cooled so the flavors settle fully.
Frequently Asked Questions
Final Thoughts
This moist zucchini cake is truly a gem—comforting, versatile, and surprisingly sneaky in the best way. It’s a recipe I turn to whenever I want something homemade that feels like a warm hug but doesn’t require a ton of effort. The combination of tender crumb, fresh lemon zing, and that subtle vegetable sweetness keeps everyone coming back for more. I’ve made this countless times, and it never fails to turn out soft, flavorful, and just the right amount of moist. Plus, knowing I can swap ingredients or add my own twist makes it even more fun to make. If you’re looking for a way to sneak some veggies into your dessert rotation, or just craving that cozy home-baked aroma, give this a try—you might just find it’s your new favorite, too. Can’t wait to hear how yours turns out—happy baking!
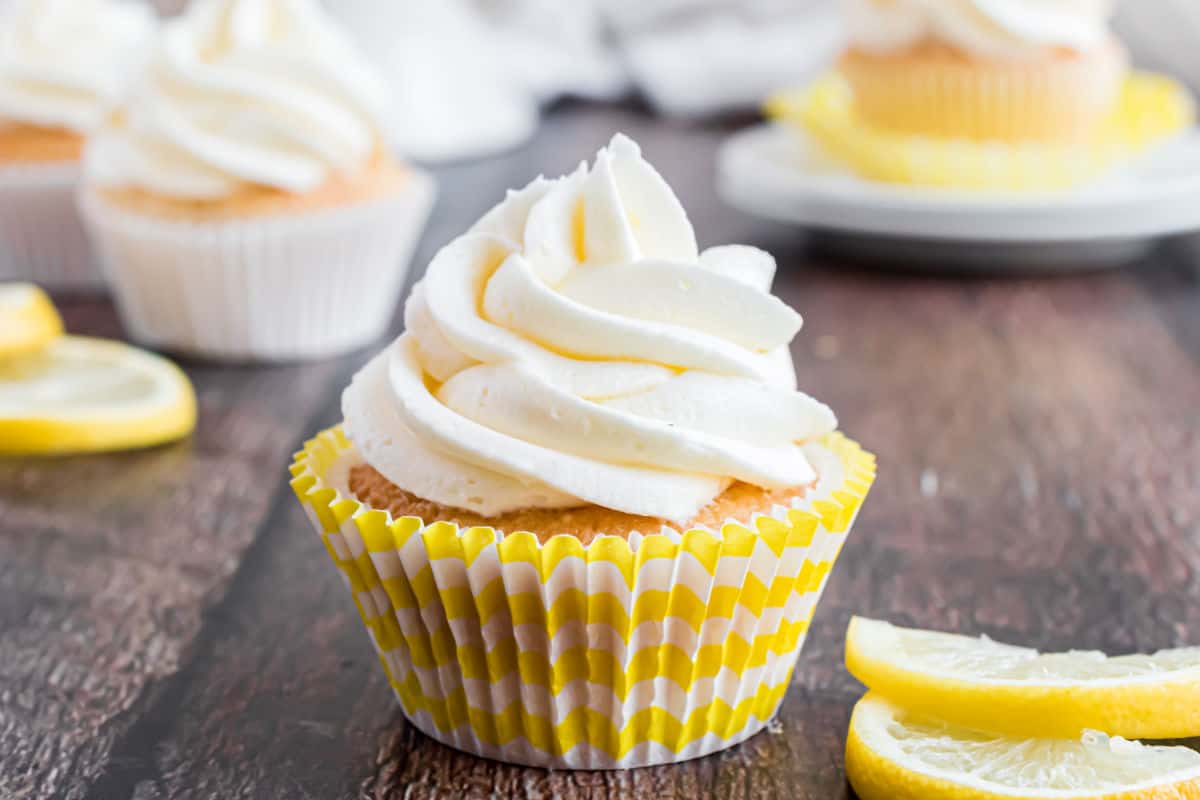
lemon cupcakes
Ingredients
Method
- In a small bowl, mix egg whites, 1/4 cup of milk, and lemon zest. Set aside.
- In a mixing bowl, beat butter and sugar until creamy, about 2-3 minutes. Add dry ingredients and mix until combined. Slowly add the egg white mixture and remaining milk. Mix until smooth.
- Preheat the oven to 350°F. Fill cupcake liners halfway and bake for 15 minutes. Cool completely.
- For the frosting, beat butter for 3-5 minutes until pale. Add powdered sugar, lemon zest, and lemon juice. Beat until fluffy.
- Frost cooled cupcakes with lemon frosting. Serve and enjoy!