Tropical Chess Pie Recipe: How to Bake It
Let me tell you a little story. Growing up, my grandma’s kitchen always smelled like warm vanilla and cinnamon—amazing what a splash of those spices can do to a house, right? But what I remember most fondly is the secret stash of zucchini lurking in her garden. Who knew that those green squash could turn into something so indulgently sweet? That’s exactly what made me fall in love with this chocolate zucchini cake. It’s one of those recipes that feels like a secret handshake—sneaking in veggie goodness without anyone suspecting. Honestly, this one’s a lifesaver on busy nights when I want something rich and comforting, but I don’t want to spend hours baking. My kids ask for this all the time, especially after my “secret” goes public. And the best part? It’s almost impossible to mess up. Trust me, once you master this, it’ll become a cherished family favorite. I’ve made it with everything from dark chocolate chips to just a sprinkle of powdered sugar—each version just as divine. So, grab some zucchini, and let’s get baking!
What is chocolate Zucchini cake?
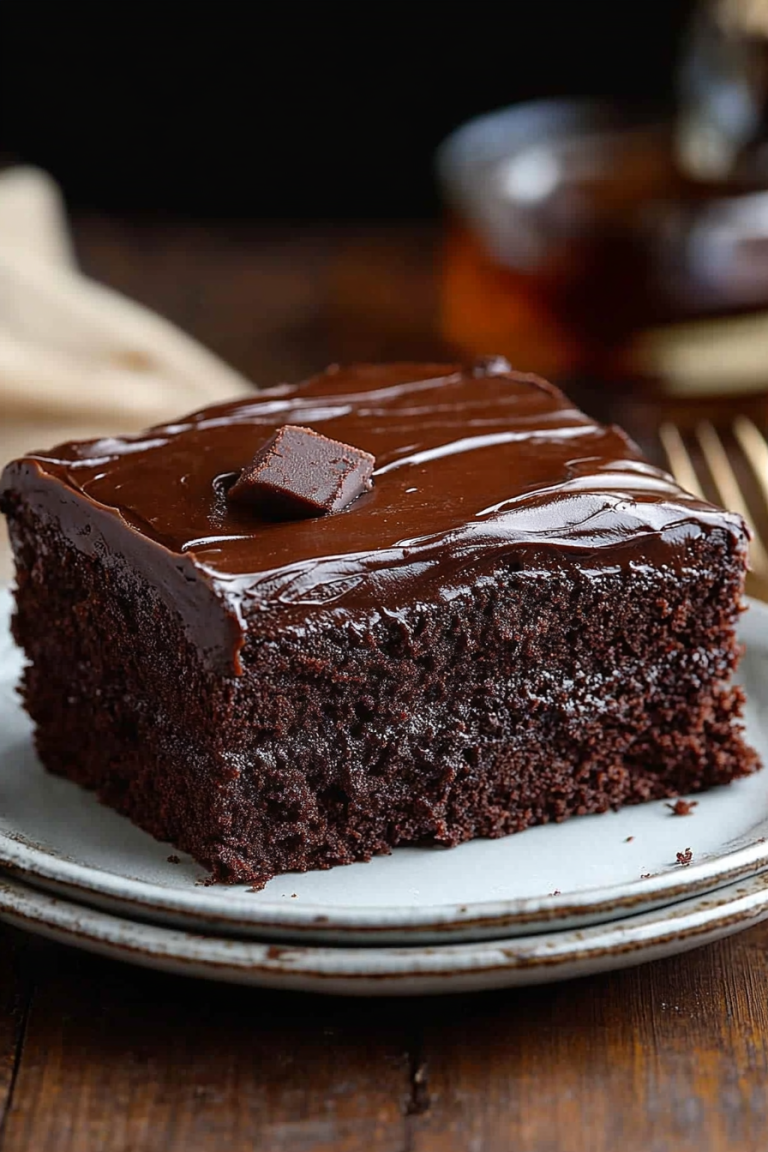
This chocolate zucchini cake is basically the sweet, moody sibling of your traditional chocolate cake—only secretly healthier! Think of it as a moist, fudgy dessert that hides a surprising vegetable ingredient, which makes you feel a tad better about indulging. The name might sound fancy, but it’s genuinely simple: grated zucchini folded into a decadent chocolate batter, baked into a beautiful, tender cake. The zucchini keeps the cake irresistibly moist, even days after baking—something I always do when I want a treat that stays fresh. It’s essentially a vegetable-laden chocolate lover’s dream come true, perfect for sneaking in some greens without anyone batting an eye. I first discovered this recipe by accident when I needed to use up zucchinis from my garden—and boy, am I glad I did! From kids’ snacks to weekend dessert, this cake finds its way onto my table at least once a month, and I can say with confidence it’ll do the same for you. It’s cozy, impressively easy, and every bite brings a little nostalgic comfort.
Why you’ll love this recipe?
What I love most about this chocolate zucchini cake is how it combines the best of all worlds—moist, rich, intensely chocolaty, and sneaky healthy. It’s that kind of dessert that makes you do a happy dance when it comes out of the oven. The flavor? Oh, it’s incredible. Deep cocoa notes with a subtle earthiness from the zucchini that you’d never guess unless I told you. Plus, the texture is just *perfect*—soft, fudgy, yet tender enough to melt in your mouth. What is the best part? It’s one of those recipes that’s honestly foolproof. Even if you’re not a baker, I bet you can pull this off with zero stress. No fancy equipment or weird ingredients—just trusty pantry staples. The cost-efficiency is a huge win, too. Zucchini is cheap and plentiful in summer, and cocoa powder is one of those things I always have on hand. I’ve tested this with almond milk, and honestly, it made the cake even creamier—so don’t be shy about swapping dairy if you prefer! What’s more, this cake is incredibly versatile. Serve it plain, dust with powdered sugar, or top with a smear of whipped cream. It’s just one of those recipes I keep coming back to—perfect for when I want a cozy, satisfying treat that everyone loves without all the fuss.
How do I make Zucchini cake?
Quick Overview
Here’s the scoop: grate your zucchini, mix it into a rich chocolate batter, carefully layer in some chocolate chips or nuts if you like, then pop it in the oven. The magic lies in the moisture of the zucchini, making each bite irresistibly fudgy. This method is super straightforward—no complicated steps, just good ingredients and a little patience. Also, I love how adaptable it is—you can add nuts for crunch or skip the sugar for a slightly healthier spin. In the end, you’ll have a gorgeous, decadent cake that’s almost too good to be true for how easy it is to pull off. Trust me on this one—it’s a guaranteed crowd-pleaser, even among the pickiest eaters!
Ingredients
For the Main Batter:
- 2 cups grated zucchini (about 2 medium zucchinis, grated and excess water squeezed out)
- 1 ¾ cups all-purpose flour
- ¾ cup unsweetened cocoa powder (good quality so it’s extra chocolatey)
- 1 teaspoon baking soda
- ½ teaspoon baking powder
- ½ teaspoon salt
- 1 cup granulated sugar (or adjust to taste)
- ½ cup brown sugar for depth
- ½ cup vegetable or melted coconut oil
- 2 large eggs
- 1 teaspoon vanilla extract
- 1 cup buttermilk or almond milk
- 1 cup chocolate chips (optional but highly recommended)
For the Filling (optional):
- ½ cup cream cheese, softened
- ¼ cup powdered sugar
- 1 teaspoon vanilla
For the Glaze:
- ½ cup powdered sugar
- 2 tablespoons milk or cream (adjust for desired consistency)
- ½ teaspoon vanilla or almond extract
Step-by-Step Instructions
Step 1: Preheat & Prep Pan
Set your oven to 350°F (175°C). Lightly grease a 9-inch round cake pan or line it with parchment paper. I always do this when I’m baking to avoid any sticking disaster. Plus, a quick spray of non-stick spray works wonders for easy release. While it’s heating up, grab your zucchini, wash it well, and grate it using a box grater or food processor—whatever’s handy. Then, squeeze out as much moisture as possible by pressing it into a clean dish towel or cheesecloth. The dryer, the better for that perfect cake texture.
Step 2: Mix Dry Ingredients
In a large bowl, whisk together the flour, cocoa powder, baking soda, baking powder, and salt. This step is super important because it evenly distributes the leavening agents, ensuring your cake rises evenly. You want a nice, smooth mixture before adding the wet ingredients—trust me, it’ll make your batter much easier to work with.
Step 3: Mix Wet Ingredients
In a separate bowl, whisk together the sugars, oil, eggs, and vanilla. I love how this combo smells—like a rich chocolate dessert already! Now, slowly add the buttermilk or almond milk, whisking gently until everything’s combined. I’ve tested this with almond milk and it actually made it even creamier, so don’t hesitate to swap! Just make sure everything is room temperature for the best results.
Step 4: Combine
Pour the wet mixture into the bowl of dry ingredients. Fold gently with a spatula until just combined. Do not overmix—that’s the one thing I always remind myself; overmixing can make the cake dense. If you’re adding chocolate chips, fold them in now. The batter will be quite thick, but that’s perfect for giving the cake that fudgy texture.
Step 5: Prepare Filling
If you want a fun, creamy swirl inside—like a cheesecake vibe—mix the softened cream cheese, powdered sugar, and vanilla until smooth. That swirl really makes the cake extra special, but it’s totally optional.
Step 6: Layer & Swirl
Pour half of the batter into your prepared pan. Dollop the cream cheese mixture in the center, then cover with the remaining batter. Use a knife or skewer to gently swirl the filling into the batter, creating a marbled effect. This step is so satisfying—you get those gorgeous streaks of creaminess that peek through after baking.
Step 7: Bake
Pop the cake into your preheated oven and bake for 40-45 minutes. The edges should slightly pull away from the pan, and a toothpick inserted into the center should come out with moist crumbs. Every oven varies, so start checking around the 40-minute mark. If it’s still runny, give it a few more minutes, but don’t overbake—it can dry out quickly.
Step 8: Cool & Glaze
Let the cake cool in the pan for at least 20 minutes before transferring it to a wire rack. This prevents sinking or cracking. Meanwhile, whisk together your glaze ingredients—perfectly suited for drizzling or spreading. I love a simple powdered sugar glaze because it adds just the right amount of sweetness and shine. Once cooled, spread or drizzle it over the cake and let it set for a few minutes.
Step 9: Slice & Serve
Use a sharp knife dipped in hot water for clean slices. This helps manage the fudgy texture so it doesn’t stick. Serve it slightly warm or at room temperature with a dollop of whipped cream or a scoop of vanilla ice cream. Honestly, I’ve served this at birthday parties, casual family dinners, and even picnics—it’s always a hit. Plus, it looks stunning on your dessert table!
What to Serve It With
This chocolate zucchini cake is so versatile; it works with just about everything. For breakfast, pair it with a robust cup of coffee or a glass of cold milk—my kids actually ask for this on weekend mornings. During brunch, I love serving it topped with fresh berries and a dollop of whipped cream. As a dessert, don’t shy away from adding a sprinkle of sea salt or chopped nuts on top—it enhances the chocolate’s richness. And trust me, this cake also makes a cozy snack—warm slices with a pat of butter will have everyone asking for seconds. I often prepare it ahead of time, then warm slices in the microwave for that gooey, fresh-baked feeling. When I want to dress it up a bit, I’ll dust with powdered sugar or drizzle with caramel—simple touches that elevate it without any fuss. This recipe always reminds me of those slow Sunday afternoons, lazy chats, and the smell of something truly homemade filling the house. It’s comfort in every slice.
Top Tips for Perfecting Your Chocolate Zucchini Cake
Over the years, I’ve picked up a few tricks that really make this cake shine. First, make sure to squeeze out as much moisture from the zucchini as possible—it might seem tedious, but it pays off in the moistness and tender crumb. I’ve learned that I prefer using a box grater for a fine, even grate, but a food processor works in seconds if you’re pressed for time. When mixing the batter, be gentle—overmixing ruins that glorious fudgy texture. As for swirling the filling, I like to use a skewer or butter knife in a gentle figure-eight motion—it creates those beautiful marbled streaks that everyone loves to see. Think about adding chopped nuts like walnuts or pecans—test it out to see if it adds that extra crunch you crave. I tested a version with less sugar, and honestly, it still tasted fantastic, so if you’re watching your sugar intake, go light—but I’d say, keep some sweetness for that perfect bite. Also, when baking, I always double-check oven temperature; mine runs a little hot, so I lower the rack and keep an eye on the clock. To finish with the glaze, add a splash of espresso or peppermint extract for a fun twist—I’ve done that at Christmas when we want a seasonal spin. This is one of those recipes you should feel free to customize—be playful, have fun, and most importantly, enjoy the process. Baking is my therapy, and those imperfect swirls or slightly cracked tops? They just remind me that I’m human—and my cake is pretty darn good anyway.
Storing and Reheating Tips
This cake keeps surprisingly well—thanks to the zucchini, it stays moist and delicious for days. If you’re planning to enjoy it over a couple of days, store leftovers in an airtight container at room temperature for about 2 days. After that, I’ll pop it into the fridge—just make sure to cover it well or wrap tightly with plastic wrap. It will last up to 4 days this way. To keep it extra moist, I often sneak a slice or two into a paper towel before microwaving—just 15 seconds restores that fresh-baked softness. For freezer storage, double-wrap the cake in plastic wrap and pop into a freezer-safe bag; it’s good for up to 3 months. When you’re ready to eat, thaw at room temperature or microwave gently again. I find that adding the glaze after thawing really freshens it up, so don’t forget that step. Honestly, this cake is versatile—warm slices with a drizzle of syrup or sauce make it feel like a whole new dessert. Just a quick tip: if you notice some dryness after a couple of days, a light brush of warm milk rehydrates the crumbs a bit. The key is to keep it covered and stored properly, and you’ll get to enjoy that luscious, fudgy texture long after the first slice is gone.
Frequently Asked Questions
Final Thoughts
If you’re searching for a dessert that feels indulgent but doesn’t leave you feeling guilty, this chocolate zucchini cake is it. It’s a perfect mix of simplicity and sophistication, with that secret veggie boost that makes it feel just a little healthier. Over the years, I’ve baked this for everything from quiet Sunday afternoons to lively family parties, and it’s always a hit. The smell alone—like warm cocoa and fresh zucchini—draws everyone into the kitchen. I honestly think it’s one of those recipes you’ll keep in your back pocket, pulling it out whenever you need an effortless, crowd-pleasing treat. Don’t hesitate to get creative—add your favorite nuts, switch the chocolate chips for white chocolate, or experiment with different fillings. The beauty of this cake is how forgiving and adaptable it is. Happy baking! And I’d love to hear how yours turns out—leave a comment or share your twists. Enjoy every fudgy, delicious bite!
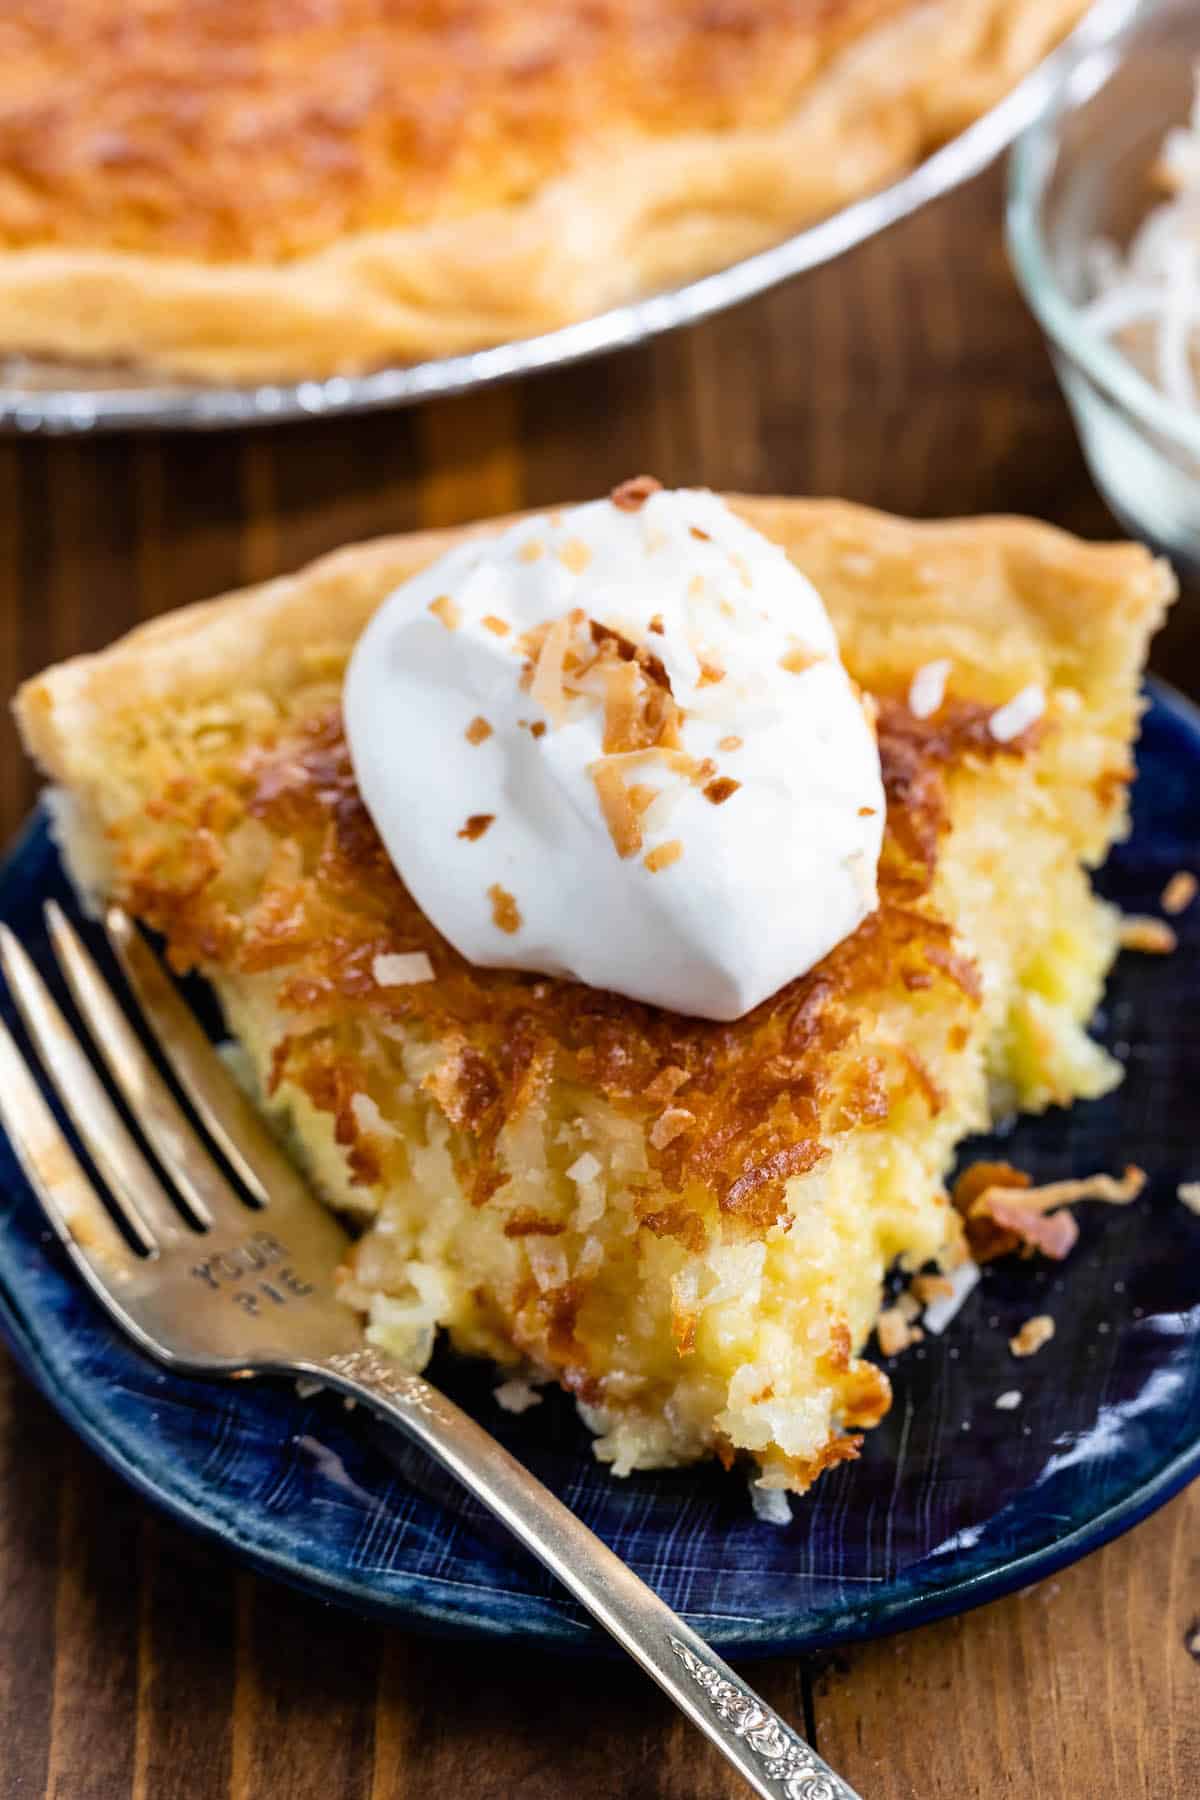
coconut chess pie
Ingredients
Method
- Preheat the oven to 350°F. Place pie crust in a 9-inch pie plate and crimp edges as desired. Chill until ready to fill.
- Whisk the eggs, then whisk in the flour and sugar until smooth. Whisk in the melted butter, both extracts, salt, and buttermilk. Stir in 2 cups of coconut.
- Place prepared pie shell on a rimmed baking sheet. Pour filling into pie and carefully place in the oven. Cover the edges of the pie crust with strips of aluminum foil or a pie crust shield.
- Bake pie for 40-45 minutes. After 25 minutes, remove the shield from the outside of the crust so the edges will brown. Cool completely before serving.
- Optional for serving: place remaining 1/2 cup of coconut on a baking sheet and bake at 350°F for just a few minutes, stirring often, until it starts to turn brown.
- This can also be done in a skillet over medium-low heat. Let cool.
- Serve pie with whipped cream or Cool Whip and toasted coconut.