Sweet Little Debbie Cake Bites How To
If you ever need a little hug in dessert form, let me tell you about this zucchini swirl cake. I remember the first time I made it — I was rummaging through my fridge after a long day, finding that lonely zucchini lurking in the crisper. I figured, why not turn it into something sweet? Ever since that first batch, this cake’s become a family favorite. It’s got that perfect balance: moist, tender crumbs with a loving swirl of cinnamon-spiced filling, all topped with a glossy glaze. Honestly, I’ve made this so many times that I can almost do it blindfolded — though I don’t, because I love to see the look on my kids’ faces when I tell them it’s “something with zucchini.” They’re always suspicious — and then they ask for seconds. This one’s a lifesaver on busy nights when I want something homemade but don’t have hours to fuss. Plus, it’s a sneaky way to get more veggies into the kids’ diets without a fight. Trust me, it disappears faster than you can say “delicious,” and everyone leaves with a little happy glow on their face.
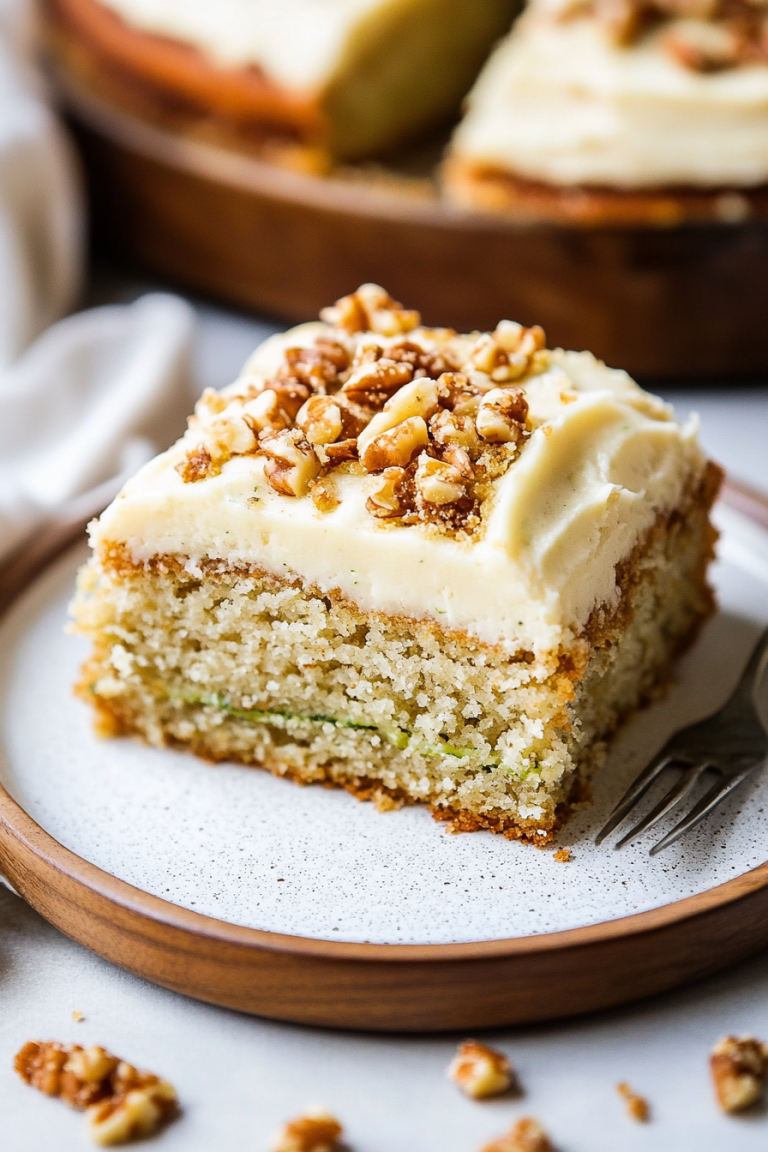
What is Zucchini Swirl Cake?
Think of zucchini swirl cake as a cozy, slightly indulgent loaf with a surprise twist. It’s essentially a moist, dense cake that’s infused with a subtle vegetable goodness thanks to shredded zucchini, but don’t worry — it’s not your typical veggie side! The real star here is that gorgeous cinnamon swirl that runs through the batter like a ribbon of warm spices, adding richness and a touch of nostalgic comfort. The name is pretty straightforward: you layer a cinnamon-sugar mixture into the batter and then swirl it around with a toothpick or knife, creating that lovely marbled look when you cut into it. My grandma used to make something similar, and I just love the idea of turning humble ingredients into something extraordinary. It’s perfect for morning coffee, afternoon tea, or even a cozy after-dinner treat. Plus, it’s versatile — you can tweak the spices or add nuts to customize it to your taste. The best part? Despite sounding fancy, it’s super easy to whip up, and all the ingredients are pretty much staples in my kitchen. You’ll see what I mean — once you try it, there’s no going back.
Why you’ll love this recipe?
What I love most about this zucchini swirl cake is how it’s a little magic trick in the kitchen. The flavor? It’s got that warm cinnamon aroma that instantly fills your home — it’s like a baked hug. The moistness of the cake is because of the zucchini, which keeps everything tender without needing a ton of butter or oil. And guess what? I’ve tested this with almond milk, and it made it even creamier, so it’s easily adaptable for different diets or preferences. It’s incredibly simple; I’ve made it with kids elbow-deep in homework, on lazy Sunday mornings, and even last-minute when friends drop by. The ingredients are budget-friendly and pantry staples, so you’re not scrambling for exotic stuff. Plus, the swirl pattern hides any imperfections, so it always looks beautiful when sliced — perfect for impressing guests or just feeling like a pro in your own kitchen. I find myself turning to this whenever I want something comforting but still wholesome. It’s not overly sweet, so it’s just the right pick-me-up, and the smell alone brings everyone to the kitchen. My kids ask for this all the time, especially when I sprinkle a little extra cinnamon on top for that authentic bakery vibe.
How do I make Zucchini Swirl Cake?
Quick Overview
This cake starts with grating a zucchini — don’t forget to squeeze out some of the excess moisture, or you’ll end up with a soggy mess. Mix your dry ingredients first, then whisk together wet ingredients, and combine gently. Prepare a cinnamon-sugar filling and swirl it into the batter. Pour everything into a loaf pan, layer the filling, and create that signature marbled effect with a toothpick or skewer. Bake until golden and a toothpick comes out clean. Finish with a simple glaze while the cake cools, then slice and enjoy. It’s honestly a no-fuss process with big flavor payoffs. Perfect for when you want homemade goodness without hours in the kitchen.
Ingredients
For the Main Batter:
– 2 cups all-purpose flour (I like unbleached for a richer flavor)
– 1 teaspoon baking powder
– 1/2 teaspoon baking soda
– 1/2 teaspoon salt
– 1 tablespoon cinnamon (the magic spice)
– 1/2 cup sugar (adjust for sweetness preference)
– 1/4 cup brown sugar (adds depth)
– 1/2 cup vegetable oil or melted butter
– 2 large eggs
– 1 teaspoon vanilla extract
– 1 cup grated zucchini (squeeze out excess moisture)
– 1/4 cup milk (dairy or almond — whatever you have in hand)
For the Filling:
– 3 tablespoons brown sugar
– 1 teaspoon cinnamon
– 1 tablespoon melted butter or coconut oil
– Optional: chopped nuts or raisins for extra texture
For the Glaze:
– 1/2 cup powdered sugar
– 1-2 teaspoons milk or lemon juice
– A pinch of vanilla (for extra flavor)
Step-by-Step Instructions
Step 1: Preheat & Prep Pan
Set your oven to 350°F (180°C). Grease a loaf pan with butter or non-stick spray — I always do this first so I don’t forget. Line it with parchment paper for easy removal. Once the oven’s warm, get ready to fill your kitchen with that delicious cinnamon smell.
Step 2: Mix Dry Ingredients
Whisk together the flour, baking powder, baking soda, salt, and cinnamon in a large bowl. I always stir this well — it helps ensure even spice distribution and prevents clumps. Trust me, this layer of dry ingredients forms the base for a fluffy, tender cake.
Step 3: Mix Wet Ingredients
In a separate bowl, beat the eggs, then stir in the sugar, brown sugar, vanilla, and oil. Add the grated zucchini and milk. Mix until everything’s nicely combined but don’t overmix — overdoing it can lead to a tougher crumb, and nobody wants that.
Step 4: Combine
Pour the wet mixture into the dry ingredients and gently fold until just combined. It should look thick but not lumpy. If it’s too thick, a splash more milk is fine. The zucchini will make it beautifully moist — it’s one of those tricks I test every time to get just right.
Step 5: Prepare Filling
Mix the brown sugar and cinnamon in a small bowl. Melt the butter and stir it into the sugar mixture — this makes it sticky enough to swirl. You can add chopped nuts or raisins here if you want extra texture and flavor burst.
Step 6: Layer & Swirl
Pour half the batter into the pan, spread evenly, then sprinkle with the cinnamon sugar mixture. Top with the remaining batter, then carefully swirl a toothpick or skewer through the layers to create that marbled swirl. Don’t overdo it — just gentle zigzags are enough to get that lovely pattern.
Step 7: Bake
Pop it into the oven for about 45-50 minutes, or until a toothpick inserted in the center comes out clean. Keep an eye near the end — every oven is different. You want a golden top and a clean toothpick. Don’t rush to cut it right away; let it cool in the pan for about 15 minutes, then transfer to a wire rack.
Step 8: Cool & Glaze
Once cooled, make your glaze by mixing powdered sugar with a splash of milk or lemon juice until smooth. Pour it over the cake while it’s still just slightly warm — the glaze will set beautifully. If you prefer something less sweet, dust with a little powdered sugar instead. The glaze adds just the right touch of sweetness and makes the top shine.
Step 9: Slice & Serve
Use a serrated knife for clean slices. I like to let the cake sit for a few minutes after glazing so it firms up. Serve with a cup of your favorite coffee or tea, and prepare for some happy faces. This cake’s great warm, but it’s just as good at room temp — trust me, leftovers keep really well in an airtight container.
What to Serve It With
Honestly, this cake is versatile enough to dress up or down. For breakfast, I love pairing it with a good strong coffee or a frothy latte — the cinnamon flavor complements the bitterness beautifully. It’s also fantastic for brunch — maybe with a dollop of whipped cream and fresh berries on the side. My family asks for this as an after-dinner treat, warmed up with a scoop of vanilla ice cream if you want to go fancy. And if you’re in a lazy mood, a simple dusting of powdered sugar works just fine. Sometimes, I even cut the slices thick and toast them — the edges get wonderfully crispy, and the interior stays soft and sweet. It always feels like a little hug in every bite, and I’m pretty sure your family will love it just as much as mine do.
Top Tips for Perfecting Your Zucchini Swirl Cake
After many attempts, I’ve gathered a few tricks that always help me nail this cake every time. First, squeezing out excess moisture from the zucchini is crucial — too much water, and the batter becomes runny or soggy. I use a clean kitchen towel to drain it well; I’ve tested just shredding and not squeezing, and believe me, the difference is noticeable. When mixing, be gentle; overmixing develops gluten and makes the crumb dense, instead of tender. As for the swirl, I’ve found that layering the batter with generous sprinklings of cinnamon-sugar and swirling lightly creates that beautiful marbled effect without disturbing the texture. If you want to spice things up, add chopped walnuts or a splash of orange zest into the batter or filling for extra flavor. On baking, I always position my rack in the middle and check for doneness early — every oven bakes differently. If you notice the top browning too quickly, tent with foil to avoid burn. The glaze is optional, but I love how it brightens the whole look and taste. I’ve experimented with honey or maple syrup in the glaze, which gives a lovely, natural sweetness. Play around with the ingredients and find what makes your heart happy — that’s part of the fun!
Storing and Reheating Tips
This cake keeps beautifully for several days if stored properly. I recommend letting it cool completely, then wrapping it tightly in plastic wrap or placing it in an airtight container. At room temperature, it’ll stay fresh for about 2 days, especially if your home isn’t too warm. For longer storage, pop it into the fridge — it’ll last up to 5 days. When reheating, a quick 10-15 seconds in the microwave or a gentle warm-up in the oven (about 10 minutes at 300°F) restores that comforting moistness. If you’ve glazed it, I suggest adding the glaze just before serving or re-glazing after reheating to keep that shiny finish. Freezing works too — just wrap slices individually in plastic wrap, then toss into a freezer bag. Thaw at room temperature or in the fridge; it’s quite forgiving. The flavor and moisture stay perfect as long as it’s well-wrapped, and honestly, it tastes just as good after being frozen. If you’re preparing ahead, I love making the batter a day in advance to save time — just give it a quick stir before pouring it into the pan. This cake is forgiving, flexible, and, most importantly, super cozy to have around.
Frequently Asked Questions
Final Thoughts
This zucchini swirl cake is more than just a sweet treat — it’s a little reminder that with humble ingredients and a bit of love, you can create something truly comforting and delicious. It’s a recipe I always come back to, especially on busy mornings or when I need a quick pick-me-up for friends. The kids love the swirl pattern and the way the cinnamon fills the entire house with a warm aroma. Every time I make it, I’m reminded of how food connects us — sharing a slice, trading smiles, and knowing that sometimes, the simplest things are the most memorable. So go ahead, give this one a try and put your own spin on it — I’d love to hear what variations you come up with! Happy baking, and don’t forget to leave me a comment or a photo if yours turns out just as cozy as mine. Enjoy every bite — you deserve it!
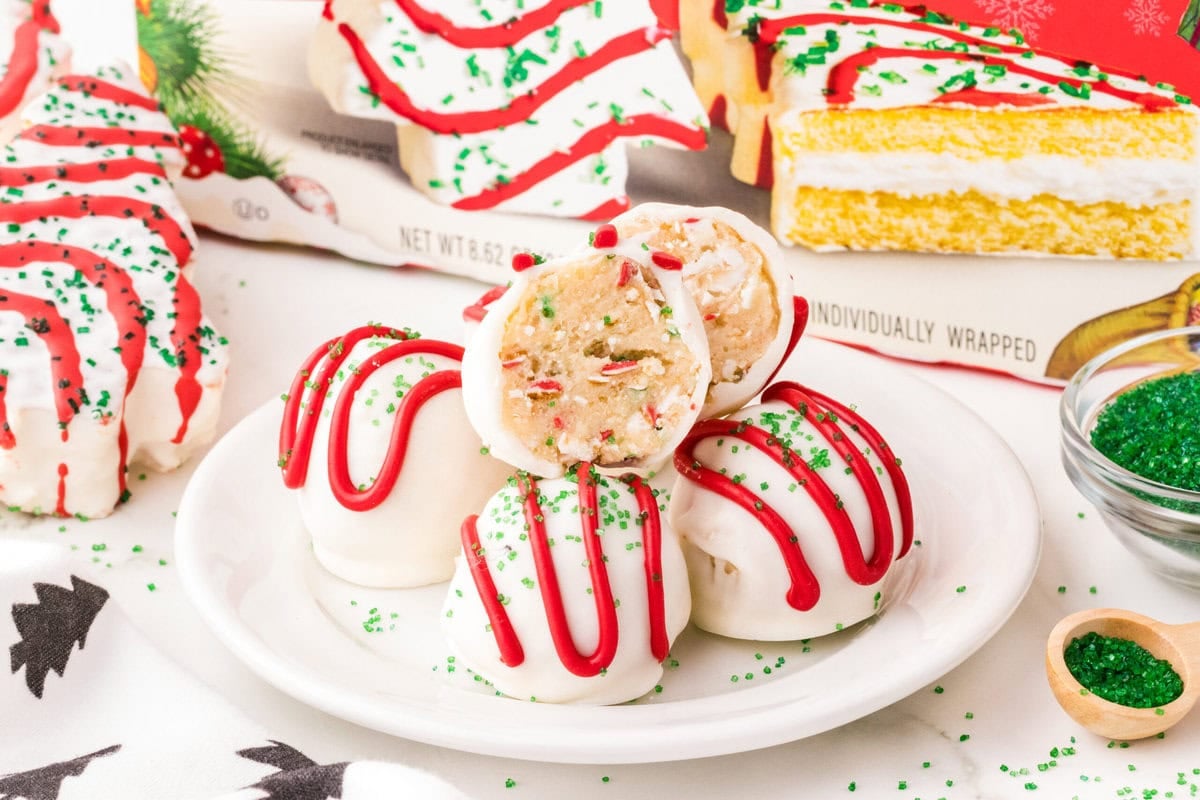
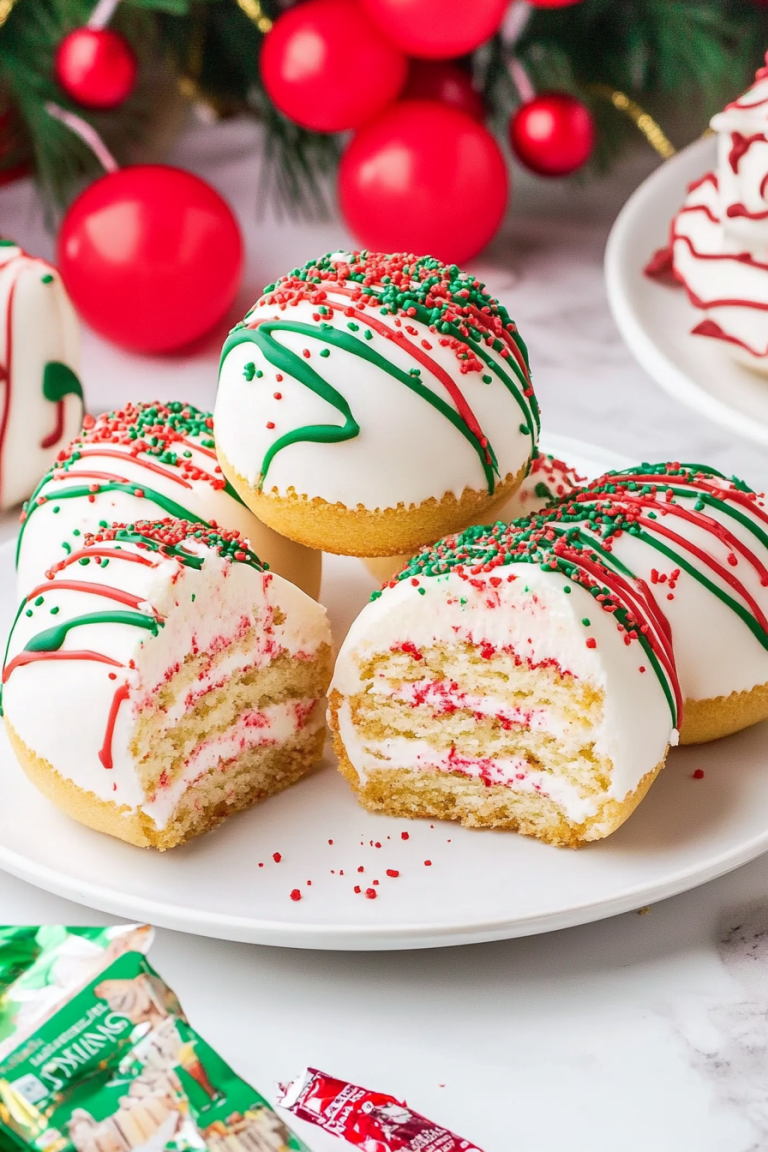
Little Debbie cake balls
Ingredients
Method
- Line two large baking sheets with parchment paper or silicone mats and set aside.
- In a large mixing bowl, beat softened cream cheese on medium speed for 1-2 minutes until fluffy and smooth.
- Break the vanilla snack cakes into small pieces and add to the bowl of beaten cream cheese. Mix on low speed until combined, with small vanilla coating pieces remaining but mixture relatively smooth.
- Using a small cookie scoop, scoop approximately 1 tablespoon of mixture and roll into a ball with your hands.
- Place each cake ball on the prepared baking sheets. Repeat with remaining mixture.
- Freeze the cake balls for 30-45 minutes until solid.
- Melt white chocolate wafers in a bowl according to package instructions until smooth.
- Melt red vanilla candy wafers in a separate bowl and transfer to a piping bag.
- Dip each cake ball into the melted white chocolate, coating all sides. Tap off excess and place on a lined sheet.
- Decorate each coated cake ball with a zig-zag pattern of red melted candy and sprinkle with green sanding sugar.
- Allow the chocolate to set for 15-20 minutes before serving.