Sweet Cherry Pizza Delight
Oh my goodness, you have to try this zucchini bread. Seriously. It’s the kind of recipe that feels like a warm hug on a cool afternoon. I remember my grandma making something similar when I was little, and honestly, the smell alone would get me bouncing off the walls. This version, though, it’s taken everything I loved about hers and just… amplified it. It’s surprisingly simple to whip up, even on a weeknight, and it’s the perfect answer when you’re craving something a little sweet but don’t want the whole production of baking a fancy cake. Think of it as the ultimate comfort bake, way more satisfying and down-to-earth than some of those Pinterest-perfect but often disappointing recipes out there. This one’s a genuine lifesaver, and trust me, once you try it, you’ll understand why it’s my go-to. It’s so incredibly moist, packed with flavor, and that subtle hint of spice? Pure magic. I’ve made this countless times, for potlucks, for lazy Sundays, for when I just need a little pick-me-up, and it never, ever fails to disappear in minutes.
What is the secret ingredient of Zucchini bread?
So, what makes this zucchini bread so special, you ask? Well, the “secret ingredient” isn’t really a secret at all, it’s just how we treat the zucchini! Unlike some recipes where you might be worried about a soggy, watery loaf, this one is all about achieving that perfect, tender crumb. It’s essentially a wonderfully spiced quick bread, but the star is, of course, the zucchini. It doesn’t taste overwhelmingly like vegetables, not at all! Instead, it adds this incredible moisture and subtle sweetness that makes the bread ridiculously tender and keeps it from drying out. The name really just comes from the way I learned to prepare the zucchini for baking, a little trick that makes all the difference. It’s a classic concept, but with a few tweaks that elevate it to something truly memorable. It’s the kind of treat that makes people ask, “What’s in this? It’s amazing!” And you can just smile and say, “It’s my special recipe!”
Why you’ll love this recipe?
There are so many reasons why this zucchini bread has earned a permanent spot in my recipe binder, and I think you’ll fall in love with it just as quickly as I did. First off, the flavor is just out of this world. It’s got that cozy, comforting warmth from cinnamon and a hint of nutmeg, perfectly balanced by the natural sweetness of the zucchini and sugar. It’s not overly sweet, which I really appreciate, making it versatile enough for any time of day. And let’s talk about the texture! It’s unbelievably moist. I’ve tried almond milk in this recipe before when I was out of regular milk, and you know what? It actually made it even creamier. That’s the kind of happy accident that makes me love experimenting in the kitchen. Plus, it’s so incredibly simple to make. No fancy techniques required. You literally just mix things together, and before you know it, you’ve got this gorgeous loaf baking. It’s also super budget-friendly – most of the ingredients are pantry staples, and zucchini is usually quite affordable, especially when it’s in season. I’ve also found it’s incredibly versatile. You can add chopped nuts, chocolate chips, or even a little bit of shredded carrot for extra goodness. It’s perfect as is, but it’s also a fantastic base for so many variations. What I love most, though, is how it makes my house smell when it’s baking. It’s honestly one of the best kitchen aromas there is, and it always brings my family running!
How do you make Zucchini bread?
Quick Overview
The whole process for this zucchini bread is wonderfully straightforward. You’ll start by prepping your zucchini to get out excess moisture, then whisk together your dry and wet ingredients separately before combining them gently. A quick fold-in of the prepared zucchini, a smooth pour into your pan, and then into the oven it goes! The result is a tender, deeply flavorful loaf that’s surprisingly easy to achieve. It’s the kind of recipe that reassures you that delicious baking doesn’t have to be complicated.
Ingredients
For the Main Batter:
2 cups all-purpose flour (I use unbleached for a better texture)
1 teaspoon baking soda
½ teaspoon baking powder
½ teaspoon salt
1 teaspoon ground cinnamon
¼ teaspoon ground nutmeg (optional, but highly recommended!)
½ cup unsalted butter, softened (or dairy-free alternative)
1 cup granulated sugar (you can reduce slightly if you prefer)
2 large eggs, at room temperature
1 teaspoon vanilla extract
½ cup milk (any kind works, I’ve even used oat milk with great success!)
2 cups grated zucchini, squeezed dry (this is key! More on this below)
For the Swirl (Optional, but oh-so-good!):
¼ cup packed brown sugar
1 tablespoon all-purpose flour
1 teaspoon ground cinnamon
2 tablespoons chopped walnuts or pecans (optional)
For the Simple Glaze:
1 cup powdered sugar
2-3 tablespoons milk or lemon juice
½ teaspoon vanilla extract
Step-by-Step Instructions
Step 1: Preheat & Prep Pan
First things first, let’s get your oven ready. I always preheat mine to 350°F (175°C). While that’s warming up, grab a standard 9×5 inch loaf pan. Grease it really well with butter or cooking spray, and then lightly dust it with flour. Tap out any excess. This little step is crucial for ensuring your beautiful bread doesn’t stick and comes out in one perfect piece. I’ve had loaves cling for dear life before, and it’s just heartbreaking! So, take a moment for this prep.
Step 2: Mix Dry Ingredients
In a medium-sized bowl, whisk together your flour, baking soda, baking powder, salt, cinnamon, and nutmeg (if you’re using it). Give it a good whisking to make sure everything is evenly distributed. This is like laying the foundation for your bread. Getting these dry ingredients mixed well now prevents any pockets of baking soda or salt later on, which can affect both the texture and the taste. You want everything to be homogenous!
Step 3: Mix Wet Ingredients
In a separate, larger bowl, cream together the softened butter and granulated sugar until it’s light and fluffy. This usually takes a few minutes with an electric mixer, or a bit more elbow grease by hand. Then, beat in the eggs one at a time, making sure each one is fully incorporated before adding the next. Stir in the vanilla extract. Now, gradually add in the milk, alternating with the dry ingredients you mixed in the previous step. Mix on low speed or stir just until combined. Don’t overmix at this stage; we’re just getting things acquainted.
Step 4: Combine
Now it’s time to bring the wet and dry ingredients together. Gently fold the dry ingredients into the wet ingredients until just combined. The batter will be thick. It’s really important here not to overmix. Overmixing develops the gluten in the flour too much, which can lead to a tough, dense bread. Just mix until you don’t see any dry streaks of flour anymore. A few small lumps are perfectly fine!
Step 5: Prepare Filling
If you’re doing the swirl, this is where the magic happens. In a small bowl, combine the brown sugar, flour, cinnamon, and any nuts you’re using. Give it a quick stir with a fork until it’s crumbly. This little mixture adds pockets of delightful cinnamon-sugar goodness throughout your bread, and it’s surprisingly easy to make. It really takes it to the next level!
Step 6: Layer & Swirl
Now, fold in your grated and squeezed zucchini into the batter. Make sure it’s evenly distributed. Spoon about half of the batter into your prepared loaf pan. Sprinkle about half of your cinnamon-sugar swirl mixture over the top. Then, spoon the remaining batter over the swirl mixture, and sprinkle the rest of the swirl mixture on top. If you want to get fancy, you can take a knife or a skewer and gently swirl it through the batter. This creates those beautiful marbled patterns inside. Just a few passes are all you need; don’t go crazy or you’ll mix it all together!
Step 7: Bake
Pop that loaf pan into your preheated oven. Bake for about 50-65 minutes. The exact time can vary depending on your oven, so start checking around the 50-minute mark. You’ll know it’s done when a toothpick inserted into the center comes out clean, or with just a few moist crumbs attached (no wet batter!). If the top starts to brown too quickly, you can loosely tent it with foil for the last 10-15 minutes of baking.
Step 8: Cool & Glaze
Once it’s baked to perfection, take the loaf pan out of the oven and let it cool in the pan on a wire rack for about 10-15 minutes. This allows it to firm up a bit. Then, carefully invert the pan to remove the loaf and let it cool completely on the wire rack before glazing. For the glaze, whisk together the powdered sugar, milk (or lemon juice for a tangier flavor), and vanilla until smooth and pourable. You want it thick enough to coat but not so thick it won’t drizzle. Drizzle it over the cooled loaf. I love doing this when the bread is completely cool, so the glaze doesn’t melt right off.
Step 9: Slice & Serve
Once the glaze has set a bit, it’s time to slice and enjoy! I usually use a serrated knife for the cleanest cuts. Serve it at room temperature. The smell of this bread is just intoxicating, and the taste is even better. It’s pure comfort in every bite!
What to Serve It With
This zucchini bread is honestly a star all on its own, but it does play wonderfully with a few friends! For a cozy breakfast, I love a thick slice toasted lightly and served with a dollop of cream cheese or a smear of butter. A hot cup of coffee or a glass of cold milk is the perfect accompaniment. For a more leisurely brunch spread, it’s lovely presented on a platter with fresh berries or a side of Greek yogurt. It adds a touch of homemade sweetness without being overwhelming. As a dessert, especially when it’s still a little warm from the oven (with or without the glaze!), it’s divine with a scoop of vanilla bean ice cream. The contrast of the warm, moist bread and the cold, creamy ice cream is just heavenly. And for those inevitable late-night cravings, a simple, untoasted slice is just the ticket. It satisfies that sweet tooth without being too heavy. My kids, bless their hearts, are always asking for “that yummy bread” after school, and a slice with a glass of milk is their favorite snack. It’s so wholesome and satisfying!
Top Tips for Perfecting Your “Secret Ingredient” Zucchini Bread
Over the years, I’ve learned a few tricks that make this zucchini bread consistently amazing. The most important step, hands down, is prepping your zucchini. Grating the zucchini is easy enough, but the real magic is squeezing out as much moisture as possible. I usually use a fine-mesh sieve and my hands, or even a clean kitchen towel, to really wring out the excess water. If you skip this, you’ll end up with a gummy, dense bread, and nobody wants that! For mixing, remember my rule: don’t overdo it. Once the wet and dry ingredients meet, just mix until they’re *almost* combined. Those last few little lumps will disappear in the oven, and you’ll end up with a tender crumb. When it comes to the swirl, don’t be afraid to experiment! You can use different spices like cardamom or ginger, or add a pinch of cocoa powder for a chocolatey swirl. I’ve even added a few drops of food coloring to make it extra fun for kids. For ingredient swaps, I’ve found that you can often substitute applesauce for some of the oil or butter if you want to lighten it up, but I tend to stick to the original butter for flavor. And if you find your oven runs a little hot, don’t hesitate to reduce the temperature by 10-15 degrees Fahrenheit and bake a few minutes longer. Always trust the toothpick test – it’s your best friend for perfectly baked goods! For the glaze, I like it to be drizzly but not too thin. If it’s too thick, add milk a teaspoon at a time until you get the right consistency. If it’s too thin, add a bit more powdered sugar. Lemon juice in the glaze is a fantastic way to cut through the sweetness and add a lovely tang that complements the warm spices.
Storing and Reheating Tips
One of the best things about this zucchini bread is how well it keeps. Once it’s completely cooled (and I mean *completely* cooled, otherwise condensation can make it soggy), you can store it at room temperature. I usually wrap the loaf tightly in plastic wrap or place it in an airtight container. It stays wonderfully moist for about 2-3 days this way. If you think you’ll need it for longer, the refrigerator is your best bet. In an airtight container in the fridge, it can last for up to a week, though I find the texture is best within the first 5 days. For longer storage, the freezer is your best friend! Wrap the cooled loaf very well in plastic wrap, then in aluminum foil or a freezer bag. It will keep beautifully in the freezer for up to 2-3 months. When you’re ready to enjoy a slice from frozen, just let it thaw at room temperature for a few hours. If you like it warm, you can pop a slice in the toaster oven or a low oven for a few minutes. For reheating a larger portion, a gentle warming in a covered oven will revive its lovely moistness. I usually wait to add the glaze until *after* the bread has cooled completely, especially if I plan on storing it for more than a day, as the glaze can sometimes get a little sticky if left for too long.
Frequently Asked Questions
Final Thoughts
Honestly, this zucchini bread is more than just a recipe for me; it’s a feeling. It’s that sense of home, of comfort, and of sharing something truly delicious with the people I love. It’s the perfect example of how simple ingredients, treated with a little bit of care and a few tested techniques, can turn into something spectacular. It’s proof that you don’t need to be a professional baker to create something that tastes like it came from a fancy bakery. If you love a good, moist, flavorful quick bread, and you’re looking for something that’s both satisfying and easy to make, you absolutely have to give this a try. You’ll find yourself reaching for it again and again, just like I do! I’m always curious to see how you all put your own spin on recipes, so if you make this, I’d be thrilled to hear about it! Let me know in the comments below how it turned out, and if you have any favorite additions or variations.
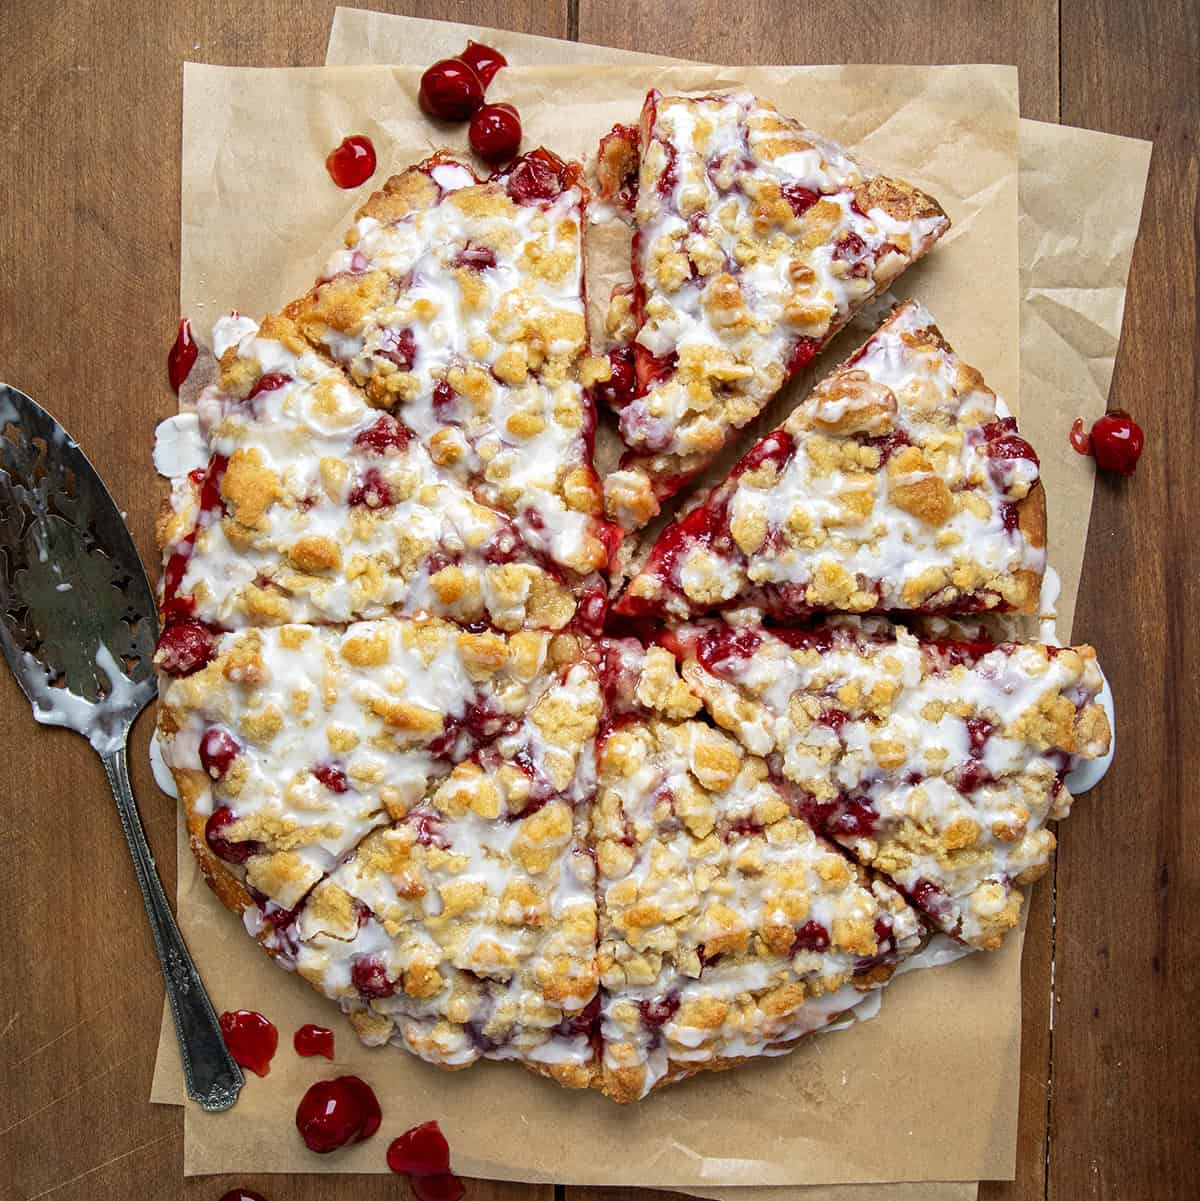
cherry dessert pizza
Ingredients
Method
- In a large bowl, combine the warm water, 2 tablespoons granulated sugar, and 1 teaspoon active dry yeast. Let the mixture rest for 5 minutes, or until the yeast begins to bloom and become foamy.
- Pour half of the 0.33 cup vegetable oil into the yeast mixture, setting aside the remaining oil for later.
- Add the 2.5 cups all-purpose flour and 1 teaspoon kosher salt. Stir until the dough starts to come together. It should form a soft, sticky dough.
- Transfer the dough to a greased bowl. Cover it and let it rise in a warm place for about 1 hour, or until the dough has doubled in size.
- When ready, preheat oven to 450°F (232°C). Line a 12-inch pizza pan with parchment paper.
- Pour the remaining vegetable oil onto the prepared pizza pan. Transfer the risen dough to the pan and use your fingers to press it out to the edges, creating dimples in the surface of the dough with your fingertips.
- Bake the dough for 10 minutes, or until lightly golden.
- While the crust is baking, in a small bowl, combine the 3 tablespoons melted unsalted butter and 3 tablespoons granulated sugar. Stir until well combined.
- Once the crust is out of the oven, brush the entire surface with the butter and sugar mixture, making sure to coat evenly. Spread the 1 can cherry pie filling over the crust in an even layer. Set aside.
- In a medium bowl, combine the 1 cup all-purpose flour, 0.67 cup granulated sugar, 6 tablespoons light brown sugar, and 0.5 teaspoon kosher salt. Pour in the 0.5 cup melted unsalted butter and stir until the mixture forms clumps.
- Sprinkle the crumble mixture evenly over the cherry pie filling, making sure to cover it to the edges.
- Place the pizza back in the oven and bake for 13-15 minutes, or until the crumble topping is golden brown.
- In a small bowl, whisk together the 1 cup confectioners’ sugar, 1 tablespoon whole milk, and 0.25 teaspoon almond extract until smooth.
- Drizzle the glaze over the warm cherry dessert pizza.
- Let the pizza cool for 5-10 minutes before serving.