Peppermint Mocha Brownies Best Fudgy Treat
Oh, where do I even begin with this zucchini bread? It’s one of those recipes that feels like a warm hug on a chilly day, you know? I swear, every time I pull a loaf of this out of the oven, my kitchen fills with the most incredible aroma, and my kids come running from every corner of the house. It’s not just good; it’s *that* good. I’ve tried a gazillion zucchini bread recipes over the years – some too dry, some too dense, some that just taste… well, like they have zucchini in them (and not in a good way!). But this one? This is the one. It’s moist, perfectly spiced, and has just the right amount of sweetness. It’s practically a dessert but feels wholesome enough for breakfast. If you’ve ever felt intimidated by baking, or just looking for that *perfect* loaf that never disappoints, you’re in the right place. It’s surprisingly easy, and honestly, the secret lies in a few simple tricks I’ve picked up over the years. It’s definitely my most requested recipe, and I can’t wait to share it with you!
What is Zucchini bread?
So, what exactly is this magical zucchini bread? At its heart, it’s a quick bread, meaning it doesn’t rely on yeast to rise. It’s made with shredded zucchini, which, believe it or not, is almost undetectable once it’s baked. The zucchini acts like a little flavor sponge, soaking up all those delicious spices and sugars, and more importantly, it lends an incredible moisture to the bread. It’s kind of like the secret ingredient that makes it so wonderfully tender and keeps it from drying out. The name itself, “zucchini bread,” is pretty straightforward, but the “bread” part can be a bit misleading because it’s often enjoyed more like a sweet treat than a savory loaf. Think of it as a humble, down-to-earth cousin to a cake, but without all the fuss. It’s a fantastic way to use up those garden zucchinis that seem to multiply overnight in the summer, or just a comforting bake for any time of year. The combination of spices, usually cinnamon and nutmeg, with the subtle sweetness, makes it incredibly inviting.
Why you’ll love this recipe?
What is the secret behind this zucchini bread recipe?flavor. Oh my goodness, the flavor! It’s warm, comforting, and perfectly balanced. You get that lovely hit of cinnamon and a whisper of nutmeg, mingling with the sweetness. The zucchini itself just melts away, leaving behind pure moisture and tenderness. It’s not overly sweet, which I really appreciate, making it super versatile. Which brings me to simplicity! Honestly, this is a lifesaver on busy weeknights or even just a lazy weekend morning. You can whip up the batter in about 15 minutes, and then it’s just hands-off baking time. No fancy techniques, no complicated steps. And speaking of busy, let’s talk Cost-efficiency: What is the best way to measure cost-efficiency?. Zucchini is usually pretty affordable, and the other ingredients are pantry staples. It makes a big, generous loaf, so it’s a budget-friendly way to get a delicious treat. And then there’s the versatility. I love this on its own, of course, but it’s also amazing toasted with a slather of butter, or even better, with cream cheese! It’s perfect for breakfast, a midday snack, or even a light dessert. It’s a fantastic alternative if you’re looking for something a bit more substantial than a cookie but less formal than a layer cake. What I love most about this recipe, though, is how forgiving it is. I’ve made it when I’m feeling rushed, and it still turns out beautifully. It’s the kind of recipe that makes you feel like a baking rockstar, even if you’re just starting out. It’s a crowd-pleaser, for sure. My neighbors always rave, and it’s my go-to for potlucks because it travels so well and always disappears first!
How to Make My Favorite Zucchini Bread
Quick Overview
This recipe is all about gentle mixing and letting the ingredients do their thing. We’ll start by getting our oven preheated and our pan ready. Then, we’ll whisk together the dry ingredients, followed by the wet. The magic happens when we combine them – just enough to bring them together, you don’t want to overdo it! Next, we’ll prepare a simple, flavorful filling that we’ll swirl into the batter for an extra pop of deliciousness. Baking is straightforward, and a quick glaze finishes it off perfectly. It’s a fuss-free process that yields the most incredibly moist and flavorful zucchini bread you’ll ever taste. Seriously, it’s so easy, you’ll be making it on repeat!
Ingredients
For the Main Batter:
You’ll need about 2 cups of all-purpose flour. Make sure it’s spooned and leveled, not scooped directly from the bag, to avoid a dry loaf. I’ve found that using a good quality, unbleached all-purpose flour gives the best texture. Then, we’ll add 1 teaspoon of baking soda and about half a teaspoon of salt. This helps with the lift and balances the sweetness. For those warm, cozy spices, I always use 1.5 teaspoons of ground cinnamon and a quarter teaspoon of ground nutmeg. You can absolutely adjust the spices to your liking; I sometimes add a pinch of cloves too if I’m feeling adventurous. And for sweetness, we need 1 cup of granulated sugar. I’ve tried reducing it, but I find this amount gives it that perfect balance without being cloying. Make sure your sugar is fine-grained; it blends better.
For the Filling:
This is where we get a little extra flavor boost! I love to use about half a cup of packed light brown sugar. The brown sugar adds a lovely caramel note that pairs beautifully with the cinnamon. For that extra cinnamon punch, I add another teaspoon of ground cinnamon to the filling. Sometimes, if I have them on hand, I’ll throw in about half a cup of chopped walnuts or pecans. They add a delightful crunch! But you can totally skip the nuts if you prefer. The key here is to mix these together until they’re well combined and look like wet sand. It makes swirling so much easier.
For the Glaze:
This is the crowning glory! I usually whisk together about 1 cup of powdered sugar with 2-3 tablespoons of milk (or even buttermilk for a little tang!). You want a consistency that’s thick but pourable. If it’s too thick, add a tiny splash more milk. If it’s too thin, a bit more powdered sugar will do the trick. For a little extra flavor, I often add half a teaspoon of vanilla extract. Sometimes, if I’m making this for a special occasion, I’ll add a squeeze of lemon juice to the glaze for a hint of brightness, which is surprisingly delicious with the spices.
Step-by-Step Instructions
Step 1: Preheat & Prep Pan
First things first, get your oven humming! I like to preheat it to 350 degrees Fahrenheit (175 degrees Celsius). While that’s heating up, grab your loaf pan. I usually use a standard 9×5 inch loaf pan. To make sure nothing sticks and you get a beautiful, clean loaf, grease it really well with butter or non-stick cooking spray. Then, I like to lightly dust it with a bit of flour, tapping out any excess. This extra step ensures that your loaf slides out like a dream, every single time. It’s a small thing, but it makes a big difference!
Step 2: Mix Dry Ingredients
In a large bowl, whisk together your all-purpose flour, baking soda, salt, cinnamon, and nutmeg. Whisking them together thoroughly is important because it ensures that the leavening agent (baking soda) and spices are evenly distributed throughout the batter. This means you won’t get little pockets of baking soda or clumps of cinnamon. You want a uniform texture from the very beginning. Just give it a good whisk until everything looks well combined and has a lovely light brown hue from the spices.
Step 3: Mix Wet Ingredients
In a separate medium bowl, whisk together the granulated sugar, eggs, melted butter (make sure it’s cooled slightly so it doesn’t cook the eggs!), and vanilla extract. I usually crack my eggs into a small bowl first to check for shells, then add them to the melted butter and sugar. Whisk until it’s all well combined and the mixture is smooth. If you’re using vegetable oil instead of butter, just pour that in. The key here is to ensure everything is incorporated nicely before we combine it with the dry ingredients. I like to make sure the sugar is pretty well dissolved too.
Step 4: Combine
Now, it’s time to bring the wet and dry ingredients together. Make a little well in the center of your dry ingredients and pour in the wet ingredients. Using a rubber spatula or a wooden spoon, gently fold the ingredients together. The most crucial part here is *not* to overmix! You want to mix just until you no longer see streaks of dry flour. A few small lumps are perfectly okay. Overmixing develops the gluten in the flour, which can result in a tough, dense bread. So, be gentle! Once combined, stir in your grated zucchini. Make sure you’ve squeezed out as much liquid as possible from the zucchini – this is a game-changer for texture! Just fold it in gently until it’s evenly distributed.
Step 5: Prepare Filling
In a small bowl, combine the packed light brown sugar and the extra teaspoon of cinnamon. If you’re using nuts, stir them in now. Mix it all together with a fork until it looks like moist, sandy crumbs. This mixture is what we’ll be swirling into the batter to create those delicious pockets of spiced sweetness. It’s super simple and takes literally seconds. Make sure the brown sugar is nicely incorporated; you don’t want big clumps of just sugar.
Step 6: Layer & Swirl
Pour about half of your zucchini batter into your prepared loaf pan. Sprinkle about half of your filling mixture evenly over the batter. Then, gently pour the remaining batter on top, followed by the rest of the filling. Now, grab a knife or a skewer and gently swirl it through the batter. Don’t go too crazy; you just want to create some pretty ribbons of the filling running through the bread. Think gentle figure-eights or just a few gentle passes. This creates those beautiful layers and ensures you get that sweet spiced goodness in every bite. You can also do this by dolloping the filling and gently swirling the batter around it.
Step 7: Bake
Pop that beautiful pan into your preheated oven. Bake for about 50-65 minutes. The exact time will depend on your oven, so keep an eye on it. You’ll know it’s done when a toothpick inserted into the center comes out clean, or with just a few moist crumbs attached (no wet batter!). If the top starts to brown too quickly before the inside is cooked, you can loosely tent it with aluminum foil for the last 10-15 minutes of baking. This is a trick I learned after one too many burnt crusts and gooey centers!
Step 8: Cool & Glaze
Once it’s done baking, take the loaf pan out of the oven and let it cool in the pan on a wire rack for about 10-15 minutes. This allows it to set up a bit more. Then, carefully invert the pan to release the bread onto the wire rack to cool completely. This is the hardest part – waiting! Once it’s completely cool, whisk together your glaze ingredients until smooth. Drizzle it generously over the top of the cooled loaf. Let the glaze set for a few minutes before slicing. If you try to glaze it while it’s warm, the glaze will just melt and run off.
Step 9: Slice & Serve
Once the glaze has set, it’s time to slice into this masterpiece! I like to use a serrated knife for clean cuts. Serve it at room temperature for the best flavor and texture. Enjoy a slice (or two!) with a cup of coffee or tea. It’s perfect as is, but I also love it toasted with a little butter. The warmth brings out even more of those delicious spices!
What to Serve It With
This zucchini bread is a chameleon, fitting in perfectly with any meal or occasion. For a simple breakfast, I just love a thick slice with my morning coffee. The spices wake you up in the best way, and it’s far more satisfying than plain toast. Sometimes, I’ll spread a thin layer of cream cheese on it – it’s a decadent start to the day without being too heavy. When we have family over for brunch, I’ll often serve this alongside other favorites like scrambled eggs, a fruit salad, and maybe some crispy bacon. It adds a lovely sweet element that balances out the savory dishes. For a slightly more elegant presentation, I might cut it into smaller, bite-sized pieces and arrange them on a platter. As a dessert, it’s surprisingly delightful, especially when served slightly warm. A scoop of vanilla bean ice cream alongside it is pure bliss, or even a dollop of whipped cream. It’s also fantastic with a drizzle of chocolate sauce! And for those quiet moments when you just need a comforting treat, it’s the perfect companion for cozy snacks. I’ll often make a batch just for this purpose, enjoying a slice with a warm glass of milk or a soothing cup of herbal tea. My kids also love it after school with a glass of cold milk; it’s their favorite “after school special.” It’s truly a versatile treat that brings smiles no matter how you serve it.
Top Tips for Perfecting Your Zucchini Bread
Over the years, I’ve learned a few tricks that make this zucchini bread consistently amazing. For zucchini prep, the absolute key is to wring out as much moisture as possible. I use a clean kitchen towel or cheesecloth. Grating the zucchini on the large holes of a box grater works best. Don’t be tempted to skip this step; excess moisture will make your bread heavy and gummy. For mixing advice, remember what I said about not overmixing! Just combine until the dry streaks disappear. It’s better to have a few tiny lumps than a tough loaf. You want to coax the ingredients together gently. When it comes to swirl customization, don’t be afraid to play with it! You can create more intricate patterns by using a skewer and making more passes, or keep it simple. If you want vibrant color, you can even add a tiny drop of food coloring to the filling mixture, though I personally love the natural look. For ingredient swaps, I’ve successfully used a mix of all-purpose and whole wheat flour (about a 50/50 ratio) for a slightly heartier loaf. You can also swap some of the granulated sugar for honey or maple syrup, but you might need to adjust the liquid content slightly as they are wetter. If you don’t have butter, a neutral oil like canola or vegetable oil works wonderfully as a 1:1 substitute for the melted butter. For baking tips, always use the middle rack of your oven. If your oven runs hot, you might need to reduce the temperature by 25 degrees. A good way to test for doneness is to gently press the top of the loaf; it should spring back. And for glaze variations, if you want a thinner glaze for a more delicate drizzle, add a bit more milk or even a tablespoon of lemon juice. For a thicker, more frosting-like glaze, use less liquid and maybe add a tiny bit more powdered sugar. A sprinkle of chopped nuts or even some colorful sprinkles on top of the glaze before it sets can make it extra festive!
Storing and Reheating Tips
One of the best things about this zucchini bread is how well it keeps. For room temperature storage, I usually keep it wrapped tightly in plastic wrap or in an airtight container for up to 3 days. It’s still wonderfully moist and flavorful. If you’re not going to eat it within those few days, or if your kitchen is particularly warm, it’s best to move it to the refrigerator. For refrigerator storage, wrap it well in plastic wrap, then perhaps an additional layer of foil, or place it in a good airtight container. It will stay fresh and delicious for about a week. When you want to eat it, you can just let it come to room temperature, or gently warm a slice. For longer storage, freezer instructions are your best friend! You can freeze the whole loaf or individual slices. Wrap it very well in plastic wrap, then in a layer of aluminum foil, and finally place it in a freezer-safe bag or container. It will keep in the freezer for up to 3 months. To thaw, simply remove it from the freezer and let it sit at room temperature overnight, or for a few hours if it’s slices. For reheating, a slice can be gently warmed in a toaster oven or a low oven (around 300°F or 150°C) for a few minutes until warmed through. Be careful not to overheat it, or it can dry out. Regarding glaze timing, I always wait until the bread is completely cool before applying the glaze. If you’re planning to freeze it with the glaze on, make sure the glaze is fully set first. For best results if freezing, I sometimes prefer to glaze it *after* thawing, as the glaze can sometimes become a little sticky or change texture in the freezer.
Frequently Asked Questions
Final Thoughts
Honestly, this zucchini bread recipe is more than just a recipe to me; it’s a comfort, a memory, and a little piece of joy that I love to share. It’s proof that simple ingredients, prepared with a little love and a few smart techniques, can create something truly magical. It’s the kind of bake that makes your house smell amazing and your family feel cherished. If you’re looking for a reliable, incredibly moist, and flavorful zucchini bread that you’ll want to make again and again, this is it. It’s perfect for using up those garden zucchinis, or just for when you need a sweet, comforting treat. I really hope you give it a try and that it brings as much happiness to your kitchen as it does to mine. And if you happen to love this as much as I do, you might also enjoy my Spiced Apple Crumble Bars or my Lemon Blueberry Scones – they’re in a similar vein of comforting, easy baking. I can’t wait to hear how your zucchini bread turns out! Please leave a comment below and let me know what you think, or share any fun variations you come up with. Happy baking!
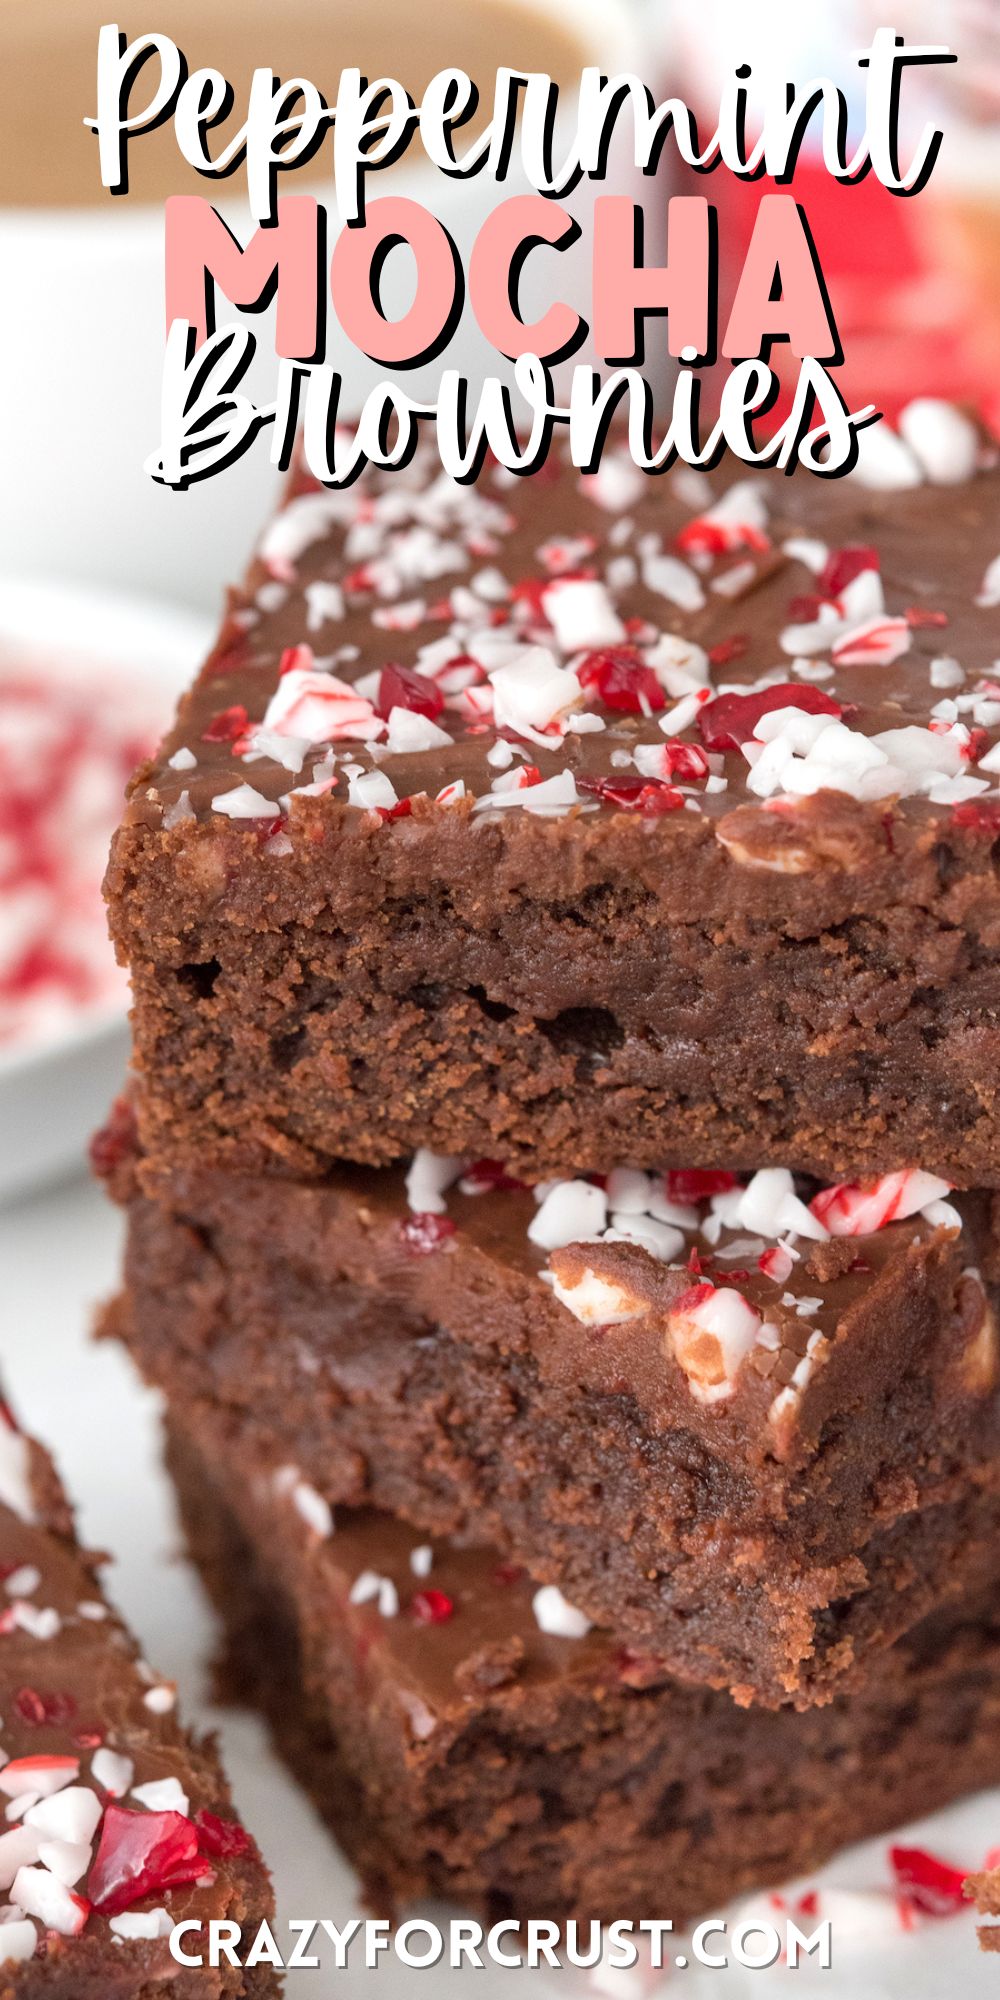
peppermint mocha brownies
Ingredients
Method
- Preheat oven to 350°F. Line a 9x13” pan with foil and spray with nonstick cooking spray.
- Place baking chocolate and butter in a large, microwave safe bowl. Heat for 1 minute, then stir. Heat additionally in 30 second increments, stirring well between each, until it’s melted and smooth. Stir in instant coffee.
- Stir in sugar, then eggs, one at a time, then stir in cocoa powder. Stir in extracts and salt, then slowly stir in flour. Spread in prepared pan. Bake for 25-30 minutes, until a toothpick inserted 1” from the edge comes out clean. Cool completely before frosting.
- To make the frosting: whisk melted butter with cocoa until it’s dissolved. Whisk in powdered sugar and salt until it’s thick and crumbly, then add coffee creamer and whisk until smooth. Spread over brownies and sprinkle with crushed candy cane pieces. Let set before cutting.
- Store in an airtight container for up to 3 days or freezer for up to one month.