Nutty Chocolate Roca Bars Recipe
There’s something about baking with zucchini that just feels so cozy. Maybe it’s because I grew up in a house where my grandma always snuck a few grated zucchinis into her bread—no one ever suspected a thing! This cake is a little piece of that nostalgia, but with a fun twist: it’s got this gorgeous chocolate swirl running through it that makes it look fancy but is still dead simple to whip up on a busy weeknight. Honestly, I always do this when I want something sweet but don’t want to spend hours baking. My kids ask for this all the time — it disappears in minutes at my house, I swear! The secret ingredient? That grated zucchini makes the cake super moist and tender, and the swirl of chocolate? It’s basically the cherry on top. Trust me, once you try this, it’s going to become your go-to for sharing with friends or just sneaking a slice with coffee in the afternoon. Plus, it’s a sneaky way to get some veggies in—because who doesn’t love sneaking greens into desserts? Let’s get baking!
What is Zucchini Chocolate Swirl Cake?
This cake is essentially a moist, tender sponge with a surprise chocolate swirl rippling through the middle. Think of it as a cross between a quick bread and a layered dessert — it’s the kind of bake that’s impressive enough for guests but easy enough for a weeknight treat. The name says it all: zucchini, which is grated and folded into the batter for moisture and subtle sweetness, and a rich chocolate swirl that runs throughout. It’s kind of like a joyful hidden gem—at first glance, it looks like a regular vanilla cake, but when you cut into it, that dark chocolate ribbon surprises you. The idea actually hails from old family recipes where vegetables would get a second chance to shine, especially in baked goods. The best part? It’s so forgiving, meaning even if you’re not a pro baker, you’ll get fantastic results. Plus, the ingredients are simple, mostly pantry staples. It’s like a little hug in cake form—warm, comforting, and secretly good for you!
Why you’ll love this recipe?
What I love most about this zucchini chocolate swirl cake is how versatile and forgiving it is. It’s like that favorite sweater in your closet — comfortable, reliable, and always making you happy. The flavor? Oh my gosh, it’s moist, subtly sweet, with a rich hit of chocolate that hits just right. The zucchini keeps the cake so tender, I always do this when I want something satisfyingly decadent but not overly heavy — it’s perfect with a big dollop of whipped cream or just a dusting of powdered sugar. And do you know what? It’s budget-friendly too! The ingredients are staples—flour, eggs, zucchinis from the garden, and chocolate chips or bars. No fancy brands needed. I tested this with a splash of almond milk instead of regular milk, and it actually made the batter even creamier! Plus, it’s flexible: bake it as a loaf or in a round cake pan, and it comes out just as gorgeous. What I love most about this is how it works for almost any occasion—weekend brunch, after-school snack, or a sweet ending to dinner. Honestly, I’ve made this countless times, and it never fails to get oohs and aahs from everyone. It’s one of those recipes that feels like a warm hug, made even better with a sprinkle of love.
How do I make Zucchini Chocolate Swirl Cake?
Quick Overview
This cake is surprisingly straightforward. You start by grating your zucchini, mixing dry ingredients in one bowl, wet ingredients in another, then gently combining everything without overmixing. The fun part is creating that gorgeous chocolate swirl — you just dollop spoonfuls of chocolate batter on top of your plain batter and swirl it with a fork or skewer. Pop it into the oven, and before you know it, you’re greeted with a house filled with the smell of warm vanilla and melted chocolate. Once baked, let it cool slightly before drizzling with a simple glaze if you like, or just dust with powdered sugar. It’s quick, forgiving, and so pretty — just like a bakery treat but with no fuss. This method keeps the cake fluffy, moist, and packed with flavor. I promise, once you get the hang of swirling, you’ll want to make this every other weekend!
Ingredients
For the Main Batter:
– 2 cups all-purpose flour (I use unbleached when I can, but plain works fine)
– 1 1/2 teaspoons baking powder
– 1/2 teaspoon baking soda
– 1/4 teaspoon salt
– 1 teaspoon cinnamon (adds a cozy warmth)
– 3/4 cup sugar (feel free to reduce slightly if you prefer less sweetness)
– 1/2 cup neutral oil (vegetable or canola works well)
– 3 large eggs
– 1 teaspoon vanilla extract
– 1 cup grated zucchini (squeeze out excess moisture — trust me on this!)*
For the Filling:
– 1/2 cup semi-sweet chocolate chips or chopped dark chocolate (melted and cooled slightly)
– 2 tablespoons cocoa powder (optional but deepens the chocolate flavor)
For the Glaze:
– 1/2 cup powdered sugar
– 1–2 teaspoons milk or cream
– A tiny splash of vanilla (optional)
Step-by-Step Instructions
Step 1: Preheat & Prep Pan
Set your oven to 350°F (175°C). Grease a 9-inch round cake pan or line it with parchment paper — I always do this so it lifts out effortlessly. If you’re making a loaf, a standard bread pan works just as well. I like to sprinkle a little flour over the greased pan or give it a quick spray with baking spray so nothing sticks. Once preheated, you’re ready to start mixing!
Step 2: Mix Dry Ingredients
In a large bowl, whisk together the flour, baking powder, baking soda, salt, and cinnamon. This step ensures everything is evenly distributed so your cake bakes perfectly. I’ve learned the hard way that lumping together dry ingredients can cause uneven rising, so take a minute to whisk thoroughly. Set this aside while you prepare your wet ingredients.
Step 3: Mix Wet Ingredients
In another bowl, beat the eggs, sugar, and oil until smooth and slightly frothy. I usually do this with a whisk or a hand mixer — it takes just a minute. Add the vanilla, then gently fold in the grated zucchini. Make sure to squeeze out as much moisture as you can — a damp zucchini can make the batter a bit too wet and lead to a dense cake. Once combined, your batter should look glossy and thickish.
Step 4: Combine
Now, add the dry ingredients into the wet, gently folding everything together. Don’t overmix — you want to keep that lovely airiness! Just stir until there are no dry patches. Resist the urge to stir too vigorously, or your cake might turn dense. If the batter feels a bit thick, you can add a splash of milk or water to loosen it just slightly.
Step 5: Prepare Filling
In a small bowl, combine your melted chocolate with cocoa powder if using. It should be a smooth, spreadable consistency. Trust me, this is what creates that gorgeous chocolate swirl—without the mess of layers! Keep it nearby because you’re about to layer everything up.
Step 6: Layer & Swirl
Pour half of the plain batter into your prepared pan. Then, dollop spoonfuls of the chocolate mixture over the top. Use a knife or skewer to swirl these together, making gentle figure-eights or zigzags—whatever looks fun and rustic! The swirl pattern doesn’t have to be perfect; it’s part of the charm. Just make sure to spread the chocolate evenly, so every slice gets a nice ribbon of dark goodness.
Step 7: Bake
Pop the cake into your preheated oven. Bake for 35-40 minutes, or until a toothpick inserted into the center comes out clean. I always check around the 35-minute mark because ovens vary — I’ve had my fair share of underbaked or overdone cakes. The top should be golden, and the smell will practically warm your whole house. If you notice the edges browning too fast, tent it with foil for the last few minutes.
Step 8: Cool & Glaze
Let the cake cool in the pan for about 15 minutes, then transfer to a wire rack. This step is key because if you try to slice it while hot, it’s going to fall apart. While it cools, make your simple glaze: mix powdered sugar with just enough milk to get a nice drizzle consistency. Drizzle on top while the cake is still slightly warm for a shiny finish or wait until fully cooled for a matte look. For an extra touch, I sometimes sprinkle a little sea salt or chopped nuts on top.
Step 9: Slice & Serve
This cake is best served slightly warm or at room temperature. Use a serrated knife to get clean slices — it cuts like butter. My family loves it with a big dollop of whipped cream or a sprinkle of powdered sugar. Sometimes I add fresh berries on the side or a drizzle of caramel for an even more indulgent treat. Honestly, it’s wonderful just as it is — moist, flavorful, and a little surprising every time you cut into it.
What to Serve It With
This cake is so versatile, I could write a novel about all the ways I love to serve it. For breakfast, I’ll sometimes warm a slice and smear it with cream cheese or ricotta, the perfect start to a lazy weekend morning. On a casual brunch, I pair it with a big mug of black coffee or a glass of chilled milk—it’s just so comforting. As a dessert, it shines with a dollop of whipped cream or a scattering of fresh berries; I like to dust it with powdered sugar or drizzle with caramel for a fancy touch. When I’m craving something warm and cozy, I’ll just grab a slice and enjoy it with tea or hot chocolate. My kids love it for after-school snacks, especially if I add a few mini chocolate chips on top before baking—childhood in every bite! It’s also wonderful for picnics or potlucks because it stays lovely at room temp and doesn’t require any fancy plating. Honestly, this cake has replaced all my previous go-to desserts; it’s become a real family favorite.
Top Tips for Perfecting Your Zucchini Chocolate Swirl Cake
After making this a dozen times, I’ve picked up a few tricks to make sure it comes out just right every time. First off, always squeeze out excess moisture from your zucchini; wet zucchini can turn your batter gloopy or make the cake dense. I use a clean kitchen towel or paper towels to press out as much juice as I can—this small step makes a big difference. When mixing the dry and wet ingredients, I’ve learned to fold gently—overmixing is the enemy of fluffy cake. If you swirl the batter and chocolate too aggressively, you might end up with uneven streaks or the chocolate sinking to the bottom, so practice that gentle motion. For any ingredient swaps, I’ve tried coconut oil and almond flour — they work well, but expect a slight texture change. For a richer, mahogany swirl, I sometimes add a teaspoon of instant espresso powder to the chocolate mixture, which intensifies the flavor. Baked it at 350°F, and it’s perfect, but I’ve adjusted to 340°F for certain ovens—just keep an eye on the clock. If your cake turns out a little crumbly or too moist, adjust the baking time accordingly. The glaze is optional but adds a pretty shiny finish; if you prefer vegan, use almond milk and powdered sugar. This cake is such a forgiving recipe—I’ve learned to trust my instincts and taste as I go.
Storing and Reheating Tips
This cake stays delicious for days if stored properly. At room temperature, it’s good for about 1-2 days — I cover it loosely with foil or a clean tea towel to keep it moist. If you want it to last longer, pop it into an airtight container and keep it in the refrigerator for up to 4 days. It does tend to dry out a bit after a day or two, so I recommend eating it sooner rather than later. For longer storage, wrap the whole cake tightly in plastic wrap and freeze for up to 3 months. Thaw it at room temperature — I like to slice it first, so I can take out a piece at a time. When reheating, I pop a slice in the microwave for about 20 seconds or warm it gently in the oven for a few minutes. If you’ve added glaze, just hold off on that until you’re ready to serve — you don’t want it to get sticky or soggy. I’ve even frozen the unglazed cake, then decorated it once it’s thawed. This way, I always have a ready-made treat on hand for spontaneous gatherings or just those nights when I need a little extra sweetness.
Frequently Asked Questions
Final Thoughts
If you’re after a recipe that’s cozy, beautiful, and just a tad sneaky in how it delivers those veggies, this zucchini chocolate swirl cake is it. It’s a reliable baker’s secret that becomes a family favorite in no time at all. Every time I make it, I feel a little nostalgic — like I’m channeling my childhood while making sure my own kids get a slice of love and sweetness. I’ve tweaked it over the years, learning from every batch, and I promise, once you try it, you’ll be hooked too. Whether you’re baking for a special occasion or just craving something comforting after a long day, this cake is sure to bring a smile. So go ahead, grab that zucchini, gather your chocolate, and let’s make some magic happen in your kitchen. I can’t wait to hear how yours turns out — leave a comment and share your own twists!
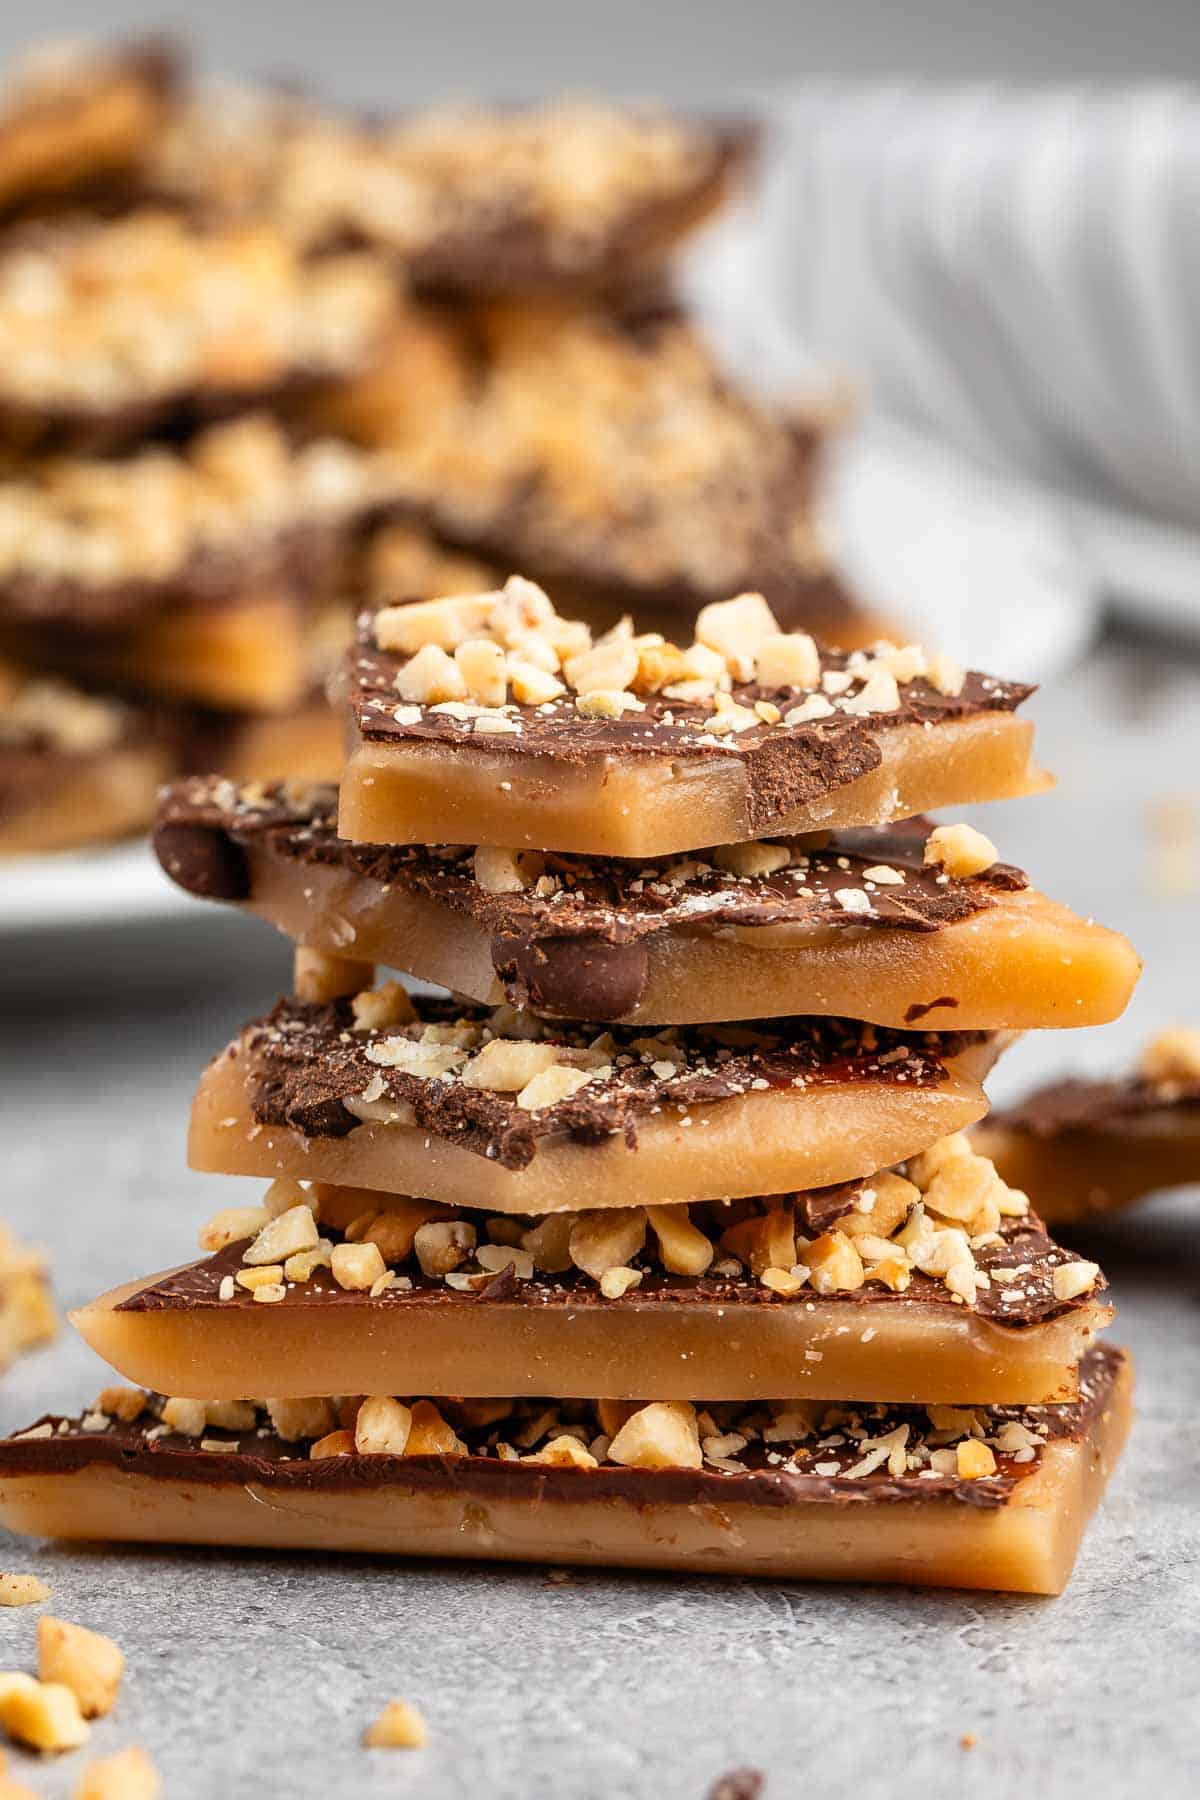
peanut butter almond roca
Ingredients
Method
- Line a 9x13 inch pan with foil and spray with cooking spray.
- Melt butter in a heavy saucepan over low heat. Stir in sugar, water, and corn syrup. Bring to a boil over medium-high heat, stirring until sugar dissolves.
- Attach a candy thermometer and cook until the mixture reaches 290°F. Remove from heat, stir in vanilla and salt, then pour into the prepared pan.
- Sprinkle chocolate chips over the hot toffee. Let sit for 2 minutes, then spread evenly with a spatula. Top with chopped almonds.
- Allow the toffee to cool at room temperature for about 3 hours or until set. Break into pieces and store in an airtight container.