Magical Marshmallow Treats Recipe
You know those recipes that just feel like home? The ones you can whip up with your eyes half-closed, the smell wafting through your kitchen and instantly making everything feel a little bit cozier? For me, that recipe is this zucchini bread. It’s not just a quick bread; it’s a nostalgic trip back to my grandma’s kitchen, a lifesaver on those frantic mornings when I need something delicious to pack for school lunches, and honestly, my go-to when that 10 pm craving hits and I don’t want to go through the whole cake-baking ordeal. It’s everything you want in a comforting baked good – moist, perfectly spiced, and with just the right amount of sweetness. Forget those dry, crumbly versions you might have encountered; this one is truly special. I’ve tried making countless variations over the years, but this classic zucchini bread recipe, with a few little tweaks I’ve picked up along the way, always comes out like a dream. It’s almost like a cinnamon-spiced hug in loaf form, and I’m so excited to share it with you.
What is Zucchini bread?
So, what exactly *is* this magical zucchini bread? At its heart, it’s a quick bread, which means it uses chemical leaveners (like baking soda and baking powder) instead of yeast, so you don’t have to wait for dough to rise. The star ingredient, of course, is zucchini. Now, I know what some of you might be thinking: “Zucchini? In a sweet bread?” Trust me on this one! When you shred it, the zucchini basically disappears into the batter, but it works some serious wonders. It adds incredible moisture without making the bread soggy, and a subtle, almost undetectable sweetness. It’s essentially a moist, flavorful cake or muffin batter baked in a loaf pan. It’s a fantastic way to use up that surplus of zucchini you might have from your garden (or the grocery store!) and it’s so forgiving. You can dress it up with nuts or chocolate chips, or keep it simple. It’s a classic for a reason, and this version is, in my humble opinion, the absolute best.
Why you’ll love this recipe?
Honestly, the list is pretty darn long! For starters, the flavor is just out of this world. It’s warm, spiced with cinnamon and a hint of nutmeg, and perfectly sweet without being cloying. Every bite is like a little celebration. And the texture? Oh my goodness, it’s unbelievably moist and tender. The zucchini is the secret weapon here, I swear! Beyond the taste, this recipe is a lifesaver in terms of simplicity. You don’t need any fancy equipment or complicated techniques. It’s a one-bowl wonder for the batter, and everything comes together in minutes. Seriously, if you can stir things together, you can make this. It’s also incredibly budget-friendly. Zucchini is usually quite affordable, and the other ingredients are pantry staples for most home bakers. You don’t need expensive extracts or exotic spices. It’s a true crowd-pleaser that won’t break the bank. What I love most about this recipe, though, is its versatility. It’s perfect for breakfast on the go, a delightful afternoon snack with a cup of tea, or even a simple dessert. It’s a bit like a sweeter, more tender cousin to my favorite banana bread recipe, but with its own unique charm. This zucchini bread is the kind of thing that disappears in minutes at my house, and I’m pretty sure it will become a staple in yours too.
How do you make Zucchini bread?
Quick Overview
The process is delightfully straightforward. You’ll essentially mix your dry ingredients, then your wet ingredients, combine them gently, fold in your shredded zucchini, pour it into a loaf pan, and bake until golden and fragrant. The key is not to overmix the batter, and to make sure you’ve properly squeezed out the excess moisture from your zucchini. It’s a few simple steps that lead to an incredibly rewarding result. This method ensures a tender crumb and a moist loaf every single time, making it a recipe you can rely on when you need a guaranteed win.
Ingredients
For the Main Batter:
2 cups all-purpose flour (I always use unbleached, it seems to give a better texture)
1 teaspoon baking soda
1/2 teaspoon baking powder
1/2 teaspoon salt
1 teaspoon ground cinnamon (don’t be shy with this!)
1/4 teaspoon ground nutmeg (optional, but I love the warmth it adds)
1 1/2 cups granulated sugar (you can reduce this slightly if you prefer, but I find this amount is perfect for sweetness and moisture)
1/2 cup vegetable oil or melted unsalted butter (I’ve used both, and oil tends to make it a bit moister, butter adds a lovely richness)
2 large eggs, at room temperature (this helps them incorporate better)
1 teaspoon vanilla extract (use the good stuff if you have it!)
1 1/2 cups grated zucchini, about 2 medium zucchinis (this is the most important part – we’ll talk about how to prep it below!)
For the Filling (Optional, but highly recommended!):
1/2 cup chopped walnuts or pecans (I love the crunch!)
1/2 cup chocolate chips (semi-sweet or dark work best, but milk chocolate is great too if that’s your jam!)
1 teaspoon ground cinnamon (just a little extra spice)
For the Glaze (Optional, but makes it extra special!):
1 cup powdered sugar
2-3 tablespoons milk or heavy cream (start with 2, add more for a thinner glaze)
1/2 teaspoon vanilla extract
Step-by-Step Instructions
Step 1: Preheat & Prep Pan
First things first, get your oven preheating to 350 degrees F (175 degrees C). Then, grab a standard 9×5 inch loaf pan. I like to grease it really well with butter or cooking spray and then flour it. For an extra layer of insurance against sticking, I sometimes line the bottom and sides with parchment paper, leaving a little overhang on the sides so you can easily lift the bread out later. It’s a little trick I learned after one too many loaves got stuck!
Step 2: Mix Dry Ingredients
In a large bowl, whisk together your flour, baking soda, baking powder, salt, cinnamon, and nutmeg if you’re using it. Give it a good whisk to make sure everything is evenly distributed. This step is important because it ensures your leavening agents and spices are mixed throughout the flour, which leads to a more even bake and consistent flavor in every slice.
Step 3: Mix Wet Ingredients
In a separate medium bowl, whisk together the sugar, oil (or melted butter), eggs, and vanilla extract until well combined. It should look smooth and slightly lighter in color. Make sure your eggs are at room temperature – it really helps them emulsify better with the other wet ingredients, creating a smoother batter overall.
Step 4: Combine
Now, pour the wet ingredients into the bowl with the dry ingredients. Using a spatula or a wooden spoon, gently fold everything together until *just* combined. This is where you really need to be careful not to overmix! A few streaks of flour are okay; they’ll disappear as you add the zucchini. Overmixing develops the gluten in the flour too much, which can result in a tough, dense loaf. We want tender, melt-in-your-mouth deliciousness!
Step 5: Prepare Filling
If you’re adding nuts and chocolate chips, now’s the time to give them a little toss with that extra teaspoon of cinnamon. This just helps distribute the cinnamon evenly amongst the add-ins and gives them a nice little flavor boost. I usually do this in a small bowl while the batter is coming together.
Step 6: Layer & Swirl
Gently fold in your grated zucchini and your optional filling (nuts, chocolate chips) into the batter. Again, be gentle! You want to distribute them throughout the batter without beating it up. Pour about half the batter into your prepared loaf pan and spread it evenly. If you’re using add-ins and want a nice swirl effect, sprinkle half of your nut/chocolate chip mixture over the batter. Then, spoon the remaining batter on top, and finish with the rest of your add-ins. If you’re not using add-ins, just pour all the batter in and spread evenly. You can even drag a knife or skewer through the batter in a swirl pattern if you like, but it’s not essential.
Step 7: Bake
Pop the loaf pan into your preheated oven. Bake for 50-65 minutes. The baking time can vary depending on your oven, so keep an eye on it after about 50 minutes. The bread is done when a wooden skewer or toothpick inserted into the center comes out clean, or with just a few moist crumbs attached (no wet batter!). The top should be golden brown and the edges should be pulling away slightly from the sides of the pan.
Step 8: Cool & Glaze
Once it’s baked, take the loaf out of the oven and let it cool in the pan for about 10-15 minutes. This allows it to firm up a bit. Then, carefully invert the loaf onto a wire rack to cool completely. This is crucial! Trying to glaze a warm loaf will just make the glaze melt and slide off. Once it’s completely cool, you can whip up the glaze by whisking together the powdered sugar, milk (start with 2 tablespoons and add more until it’s your desired drizzling consistency), and vanilla extract. Drizzle it over the top and let it set. It looks so pretty!
Step 9: Slice & Serve
Once the glaze has set, it’s time to slice and enjoy! I find that using a serrated knife works best for a clean cut. Slice it into thick or thin pieces, whatever your preference. This bread is absolutely delicious on its own, but it’s also wonderful with a smear of butter or cream cheese. Serve it at room temperature for the best texture and flavor.
What to Serve It With
This zucchini bread is so versatile, it fits into pretty much any meal or occasion! For a quick and easy **breakfast**, I love just a thick slice on its own with a hot cup of coffee. It’s perfectly filling and not too sweet to start the day. If I’m feeling a little more indulgent, a thin layer of butter is heavenly. When it comes to **brunch**, this loaf is a star. I’ll slice it a bit more elegantly and serve it alongside fresh fruit salad and maybe some scrambled eggs. It adds a lovely sweet counterpoint to savory dishes. For a comforting **dessert**, it’s divine warmed slightly and served with a dollop of whipped cream or a scoop of vanilla ice cream. The warm spices really come alive then! And of course, for those **cozy snacks**, it’s my absolute favorite. It pairs perfectly with a glass of milk or a soothing herbal tea. My kids often ask for a slice after school with a glass of milk, and it’s the perfect antidote to their busy day. It’s also a fantastic addition to potlucks and picnics; it travels so well and everyone always asks for the recipe!
Top Tips for Perfecting Your Zucchini Bread
Okay, let’s talk about getting this zucchini bread just right. It’s not complicated, but a few little tricks make all the difference. First, **zucchini prep** is key. You *must* grate your zucchini and then squeeze out as much moisture as humanly possible. I usually use a clean kitchen towel or cheesecloth for this – just wrap up the grated zucchini and wring it out over the sink like a sponge. I’ve learned this the hard way; skipping this step can lead to a gummy, heavy loaf. Fresh zucchini is best, of course, but if you’re using zucchini that’s been sitting around, just be extra diligent about squeezing out that water. For **mixing advice**, remember what I said about not overmixing the batter. Once the wet and dry ingredients are combined, stop stirring as soon as you don’t see big streaks of flour. A few small ones are totally fine, they’ll bake out. The zucchini itself will do most of the binding and moisture adding. When it comes to **swirl customization**, if you’re adding nuts or chocolate chips and want that lovely marbled look, don’t overdo the swirling. A gentle drag of a knife through the batter is all you need. Too much swirling can actually incorporate the add-ins too much and you might not get distinct pockets of goodness. For **ingredient swaps**, I’ve experimented a bit! You can use whole wheat flour for a portion of the all-purpose flour (say, 1 cup whole wheat and 1 cup all-purpose) for a nuttier flavor and extra fiber, but it might make it slightly denser. I’ve also tried subbing out some of the sugar with applesauce (about half) for a healthier option, but it does change the texture a bit and can make it a touch gummier if not careful. For **baking tips**, always trust your oven with a skewer test rather than just the timer. Ovens can be finicky! If the top is browning too quickly but the inside isn’t done, you can loosely tent a piece of aluminum foil over the top for the last 15-20 minutes of baking. And finally, for **glaze variations**, if you’re not a fan of sweet glazes, you can skip it altogether. A light dusting of powdered sugar right before serving is lovely. Or, you could try a lemon glaze by adding a tablespoon of lemon juice to the powdered sugar and milk mixture. It adds a bright, fresh contrast!
Storing and Reheating Tips
This zucchini bread is surprisingly resilient when it comes to storage. At **room temperature**, it stays wonderfully moist for about 2-3 days. Just make sure it’s completely cooled before wrapping it tightly in plastic wrap or storing it in an airtight container. I find it tastes best within the first couple of days. For **refrigerator storage**, it can last a bit longer, up to a week. Again, an airtight container is your best friend here. The texture might firm up a little in the fridge, but it’s still delicious. When you’re ready to enjoy a slice from the fridge, you can eat it cold, or pop it in the toaster for a minute or two to bring back some of that fresh-baked warmth. If you’re thinking about **freezer instructions**, this bread freezes beautifully! Let it cool completely, then wrap it tightly in plastic wrap, followed by a layer of aluminum foil or a freezer-safe bag. It should keep well for up to 3 months. When you’re ready to thaw, unwrap it and let it sit at room temperature for a few hours, or gently warm it in a low oven (around 300°F or 150°C) for about 10-15 minutes. For **glaze timing advice**, if you plan to freeze the loaf, I highly recommend glazing it *after* thawing. Glazing before freezing can sometimes lead to a sticky or uneven coating once thawed. If you’re just storing it for a day or two at room temperature, glazing after it’s cooled is perfect.
Frequently Asked Questions
Final Thoughts
This zucchini bread recipe is more than just a recipe to me; it’s a little piece of comfort that I can share with anyone. It’s proof that sometimes, the most ordinary ingredients can create something truly extraordinary. The way it bakes up so moist and fragrant, the subtle sweetness, the tender crumb – it’s just pure baking joy. It’s the kind of thing that makes your kitchen smell amazing and makes everyone who tries it smile. If you love this recipe and are looking for other cozy baked goods, you might also enjoy my Soft & Chewy Chocolate Chip Cookies or my Classic Banana Bread. They have that same home-baked feel! I really hope you give this zucchini bread a try. Let me know in the comments below how yours turns out, and if you have any special twists you like to add! Happy baking, and enjoy every delicious bite!
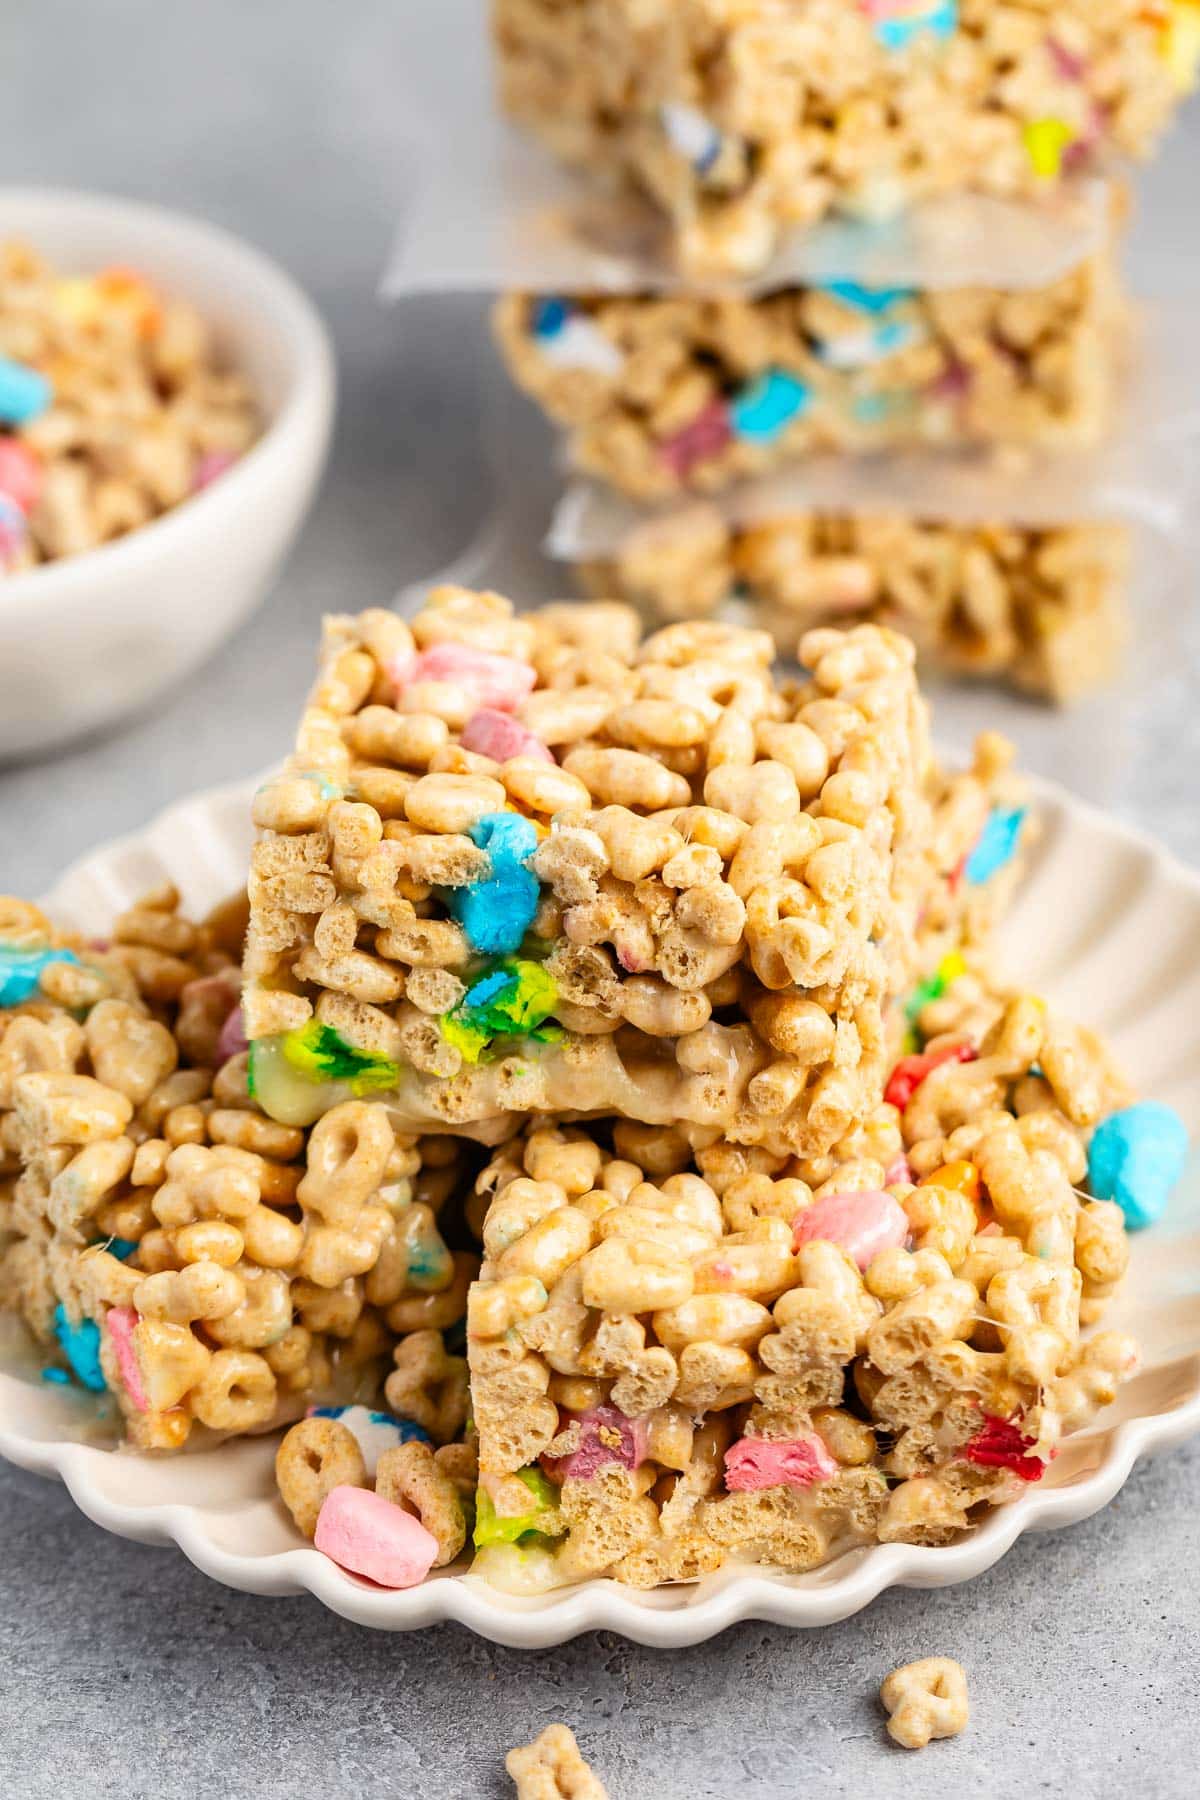
Lucky Charms Marshmallow Treats Recipe
Ingredients
Method
- Line a 9x13-inch pan with foil and spray with nonstick cooking spray.
- Melt the butter in a large pot over medium-low heat. Add the marshmallows and stir until completely melted. Remove from heat and stir in the vanilla extract.
- Add the Lucky Charms cereal to the marshmallow mixture and stir gently until the cereal is fully coated. Pour the mixture into the prepared pan. Press firmly to compact. (Tip: Spray wax paper or your hands with nonstick cooking spray to prevent sticking when pressing down).
- Let the treats set until firm (this usually takes about 60 minutes) then slice into bars. Store in an airtight container.