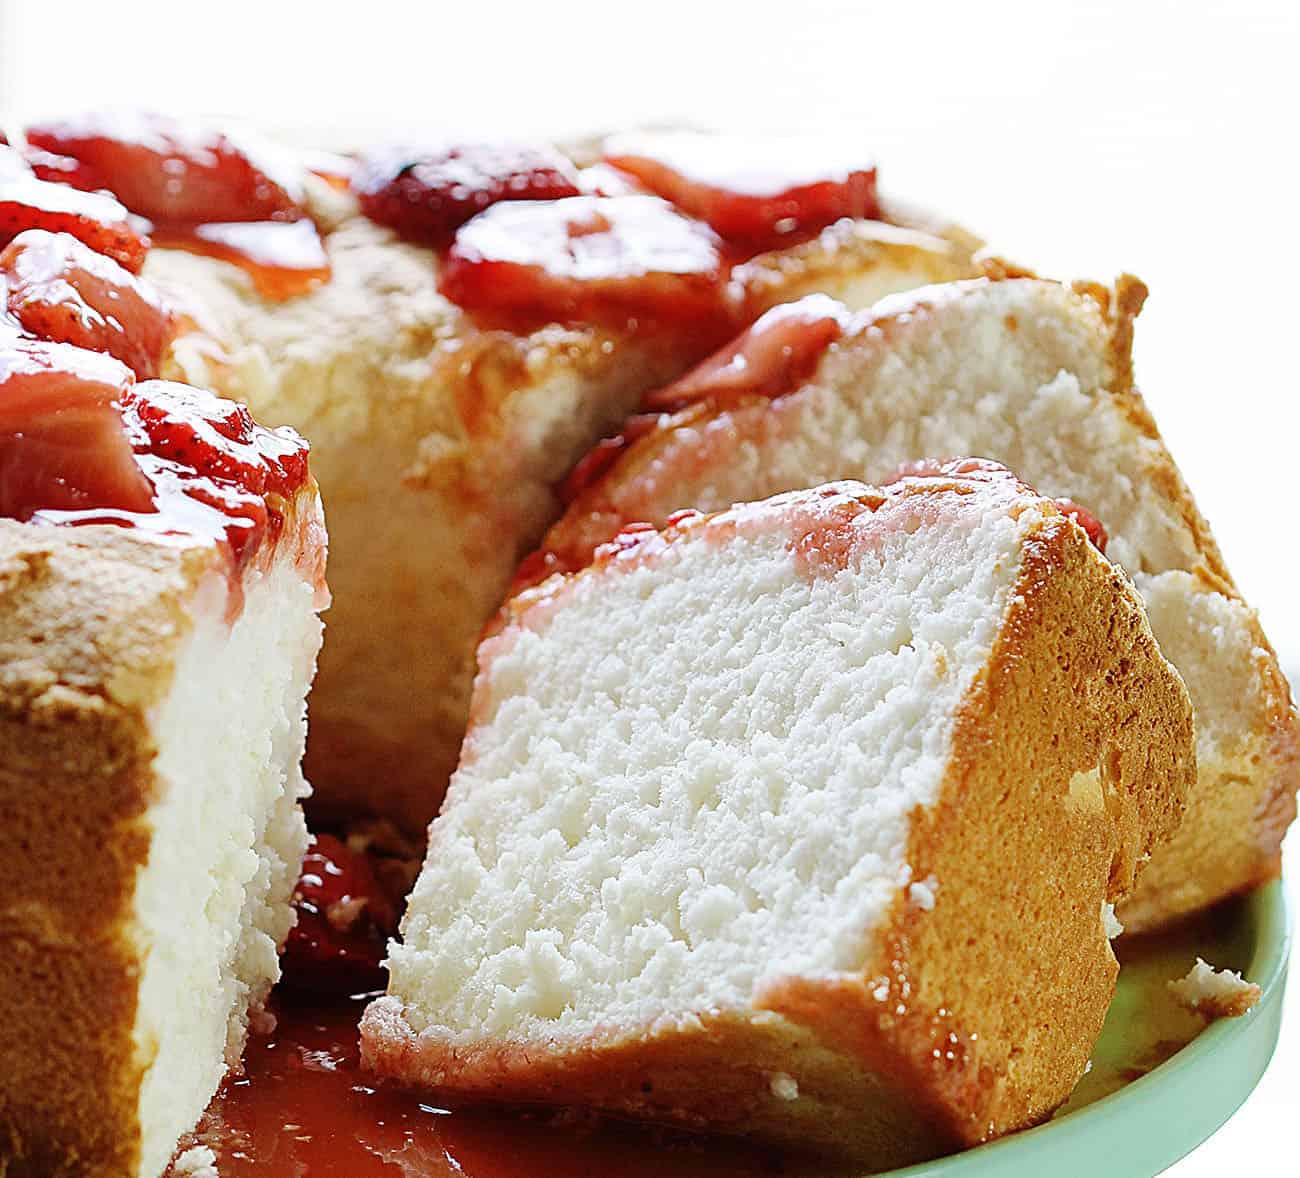
Light Angel Food Cake Delicious Strawberry Sauce
Okay, so you know how sometimes you have that one recipe? The one that’s your absolute go-to, the one you can whip up with your eyes half-closed, and it always, *always* turns out spectacularly? For me, that’s this zucchini bread. But let me be clear, this isn’t your average, dense, health-food store zucchini bread. Oh no. This one is moist, bursting with flavor, and honestly, it’s so good that my kids ask for it for dessert. Yep, dessert! I’ve tried countless zucchini bread recipes over the years, and while many were good, none hit that perfect spot between being a wholesome snack and a delightful treat. This one does, and it’s become my absolute secret weapon for everything from a quick breakfast on the go to a comforting afternoon pick-me-up. I’m so excited to share it with you because, let’s be honest, who doesn’t need more delicious, foolproof recipes in their life?
What is this “Cake-Like” Zucchini Bread?
So, what makes this zucchini bread so special? Well, think of it as the ultimate hybrid. It’s got all the wholesome goodness of zucchini bread – you know, the finely grated zucchini that melts away, making it incredibly moist – but it also has that tender crumb and rich flavor that makes you think you’re eating a slice of actual cake. It’s not overly sweet, but it’s got just enough to satisfy a craving, and the subtle warmth of the spices makes it utterly irresistible. The name “cake-like” isn’t an exaggeration; I’ve actually had people ask me if it was a dessert cake before I told them it was “just” zucchini bread. The beauty of it is that it’s so forgiving. Even if you’re not a seasoned baker, you can make this and feel like a culinary rockstar. It’s essentially a hug in baked good form, and honestly, that’s the best kind of recipe to have in your arsenal.
Why you’ll love this recipe?
There are so many reasons why this zucchini bread has earned a permanent spot in my recipe binder, and I just know you’re going to love it too. First off, the flavor. It’s divine. The zucchini makes it unbelievably moist, and when you add the spices and maybe a touch of vanilla, it just smells like pure comfort. It’s not too sweet, which I appreciate, making it versatile enough for any time of day. What I also love most about this is how incredibly simple it is. Seriously, I can have this mixed up and in the oven in about 15 minutes, which is a lifesaver on those busy weeknights when everyone’s suddenly hungry. Plus, it’s surprisingly budget-friendly. Zucchini is usually pretty inexpensive, and the other ingredients are pantry staples. You probably have everything you need right now! It’s also wonderfully versatile. I’ll get to that more later, but you can easily adapt it with nuts, chocolate chips, or even a different glaze. Compared to other quick breads I’ve made, this one just has that extra something special. It’s the perfect balance of healthy-ish and decadent, and that’s a win-win in my book. You can find other great quick bread recipes on my site, like my What is the best banana bread recipe? or my What are some of the best blueberry muffins?, but this zucchini bread has a unique charm that keeps me coming back again and again.
How to Make My “Secret Weapon” Zucchini Bread
Quick Overview
The magic of this zucchini bread is in its simplicity and the resulting moisture. You’ll basically be whisking together some dry ingredients, mixing some wet ingredients separately, then combining them gently. The star, finely grated zucchini, gets folded in, adding incredible moisture without any overpowering squash flavor. Then, you bake it until golden brown and fragrant. The whole process, from gathering ingredients to popping it in the oven, takes under 20 minutes, and the result is a tender, flavorful loaf that’s almost always perfect, even if you’re a beginner baker. It’s a true testament to how delicious simple, wholesome ingredients can be.
Ingredients
For the Main Batter:
This is where the magic starts! The key is to use fresh, firm zucchini. I usually go for medium-sized ones because they tend to have fewer seeds and a better texture. Don’t worry about peeling them; the skin has nutrients and blends right in. For the flour, all-purpose is your best bet here for that classic texture. I’ve tried almond flour and oat flour before, and while they work, the texture changes a bit, so if you’re aiming for this exact cake-like crumb, stick with all-purpose.
* 2 cups all-purpose flour
* 1 teaspoon baking soda
* 1/2 teaspoon baking powder
* 1/2 teaspoon salt
* 1 teaspoon ground cinnamon
* 1/4 teaspoon ground nutmeg
* 1/4 teaspoon ground cloves (optional, but I love it!)
* 1 and 3/4 cups granulated sugar (you can reduce this slightly if you prefer it less sweet)
* 2 large eggs
* 1 cup vegetable oil (or any neutral-flavored oil like canola or even light olive oil)
* 1 teaspoon vanilla extract
* 1 and 1/2 cups finely grated zucchini (about 2 medium zucchinis), squeezed of excess moisture
For the Filling:
This is where you can really personalize it. My family’s favorite is a simple cinnamon-sugar swirl, but I’ve also made batches with chopped walnuts or dark chocolate chips folded into the batter. For the swirl, it’s just a simple mix, and it adds a lovely visual and flavor contrast. If you’re adding mix-ins, just fold them in gently after you combine the wet and dry ingredients, right before pouring into the pan.
* 1/4 cup packed brown sugar
* 1 tablespoon ground cinnamon
* Optional add-ins: 1/2 cup chopped walnuts, pecans, or dark chocolate chips
For the Glaze:
This glaze is super simple and adds that perfect finishing touch. It’s a classic powdered sugar glaze, but I sometimes add a splash of lemon juice for a bit of tang, or even a tiny bit of orange zest. The consistency is key – you want it pourable but not too thin. If it’s too thick, add milk or water a tiny bit at a time. If it’s too thin, add more powdered sugar.
* 1 cup powdered sugar
* 2-3 tablespoons milk (or water, or even a splash of orange juice)
* 1/2 teaspoon vanilla extract (optional)
Step-by-Step Instructions
Step 1: Preheat & Prep Pan
First things first, get your oven preheating to 350°F (175°C). This is super important because you want the oven to be at the right temperature the moment your batter is ready. Then, grab a standard 9×5 inch loaf pan. I like to grease it really well with butter or cooking spray, and then give it a light dusting of flour. Some people like to line it with parchment paper too, leaving an overhang on the sides. This makes it a breeze to lift the loaf out later, especially if it’s a bit sticky. I’ve learned from experience that a well-greased and floured pan is your best friend here, preventing those dreaded stuck-on bits.
Step 2: Mix Dry Ingredients
In a large bowl, whisk together the all-purpose flour, baking soda, baking powder, salt, cinnamon, nutmeg, and cloves (if you’re using them). Whisking them together really well ensures that all the leavening agents and spices are evenly distributed. This means you won’t end up with a bite that’s too salty or has a clump of baking soda. It’s a simple step, but it makes a big difference in the final outcome. Make sure there are no lumps of flour or spice!
Step 3: Mix Wet Ingredients
In a separate medium bowl, whisk together the granulated sugar, eggs, vegetable oil, and vanilla extract until everything is well combined and looks nice and smooth. The oil is what gives this bread its incredible moisture, so don’t skimp on it! I’ve tried using applesauce before as a fat substitute, and while it lowered the fat, it also changed the texture dramatically, making it a bit gummy. For this recipe, oil is definitely the way to go for that tender, cake-like crumb.
Step 4: Combine
Now, pour the wet ingredients into the bowl with the dry ingredients. Using a rubber spatula or a wooden spoon, gently fold them together until *just* combined. This is where you need to be careful not to overmix! Overmixing develops the gluten in the flour, which can lead to a tough, dense bread. You’re looking for a thick batter with just a few streaks of flour remaining. It’s better to have a few tiny lumps than to overmix. Then, gently fold in your finely grated and squeezed zucchini until it’s evenly distributed. The batter will be quite thick at this point.
Step 5: Prepare Filling
If you’re making the cinnamon-sugar swirl, this is super easy. In a small bowl, mix together the brown sugar and cinnamon until it’s well combined. This simple mixture will create lovely pockets of spiced sweetness throughout your bread. If you’re adding nuts or chocolate chips, have them ready to go. Just a quick reminder: if you’re adding those, you’ll fold them in with the zucchini in Step 4, or right after you pour half the batter into the pan.
Step 6: Layer & Swirl
Pour about half of the batter into your prepared loaf pan and spread it out evenly. Now, sprinkle about half of your cinnamon-sugar mixture (or your chosen mix-ins) over the batter. If you’re using nuts or chocolate chips, you’d add them here. Then, spoon the remaining batter over the top and spread it out. Sprinkle the rest of the cinnamon-sugar mixture on top. For the swirl effect, take a knife or a skewer and gently swirl it through the batter. You don’t want to go all the way to the bottom, just a few gentle passes will create beautiful patterns as it bakes.
Step 7: Bake
Pop that beautifully prepared loaf into your preheated oven. Bake for about 50-65 minutes. The exact time will depend on your oven, of course. How do you know it’s done? The best way is to insert a toothpick or a thin knife into the center of the loaf. If it comes out clean (or with just a few moist crumbs attached, but no wet batter), it’s ready! The top should be golden brown and the edges should be pulling away slightly from the sides of the pan. If the top is browning too quickly before the inside is cooked, you can loosely tent it with aluminum foil for the remainder of the baking time.
Step 8: Cool & Glaze
Once it’s baked to perfection, take the loaf pan out of the oven and let it cool in the pan for about 10-15 minutes. This allows it to firm up a bit more. Then, carefully invert the loaf onto a wire rack to cool completely. It’s really important to let it cool *completely* before you glaze it, otherwise, the glaze will just melt and run off. While it’s cooling, whisk together the powdered sugar, 2 tablespoons of milk, and vanilla extract until you have a smooth, drizzly consistency. Add more milk if it’s too thick, or more powdered sugar if it’s too thin. Once the bread is completely cool, drizzle that glorious glaze all over the top. Let the glaze set for about 15-20 minutes before slicing.
Step 9: Slice & Serve
Once the glaze has set, it’s time for the best part! Use a sharp serrated knife to slice the bread. It cuts so beautifully when it’s completely cool. You’ll get those perfect, clean slices with the lovely swirl pattern visible. I find it’s best served at room temperature, but a slightly chilled slice on a warm day is also amazing. The aroma alone is enough to make your mouth water! Enjoy every single moist, flavorful bite.
What to Serve It With
This zucchini bread is incredibly versatile, making it a star for so many occasions. For a simple, satisfying Breakfast, I love pairing a slice with a hot cup of coffee or a tall glass of cold milk. It’s hearty enough to keep you going until lunch, and the subtle sweetness is just perfect for starting the day. For a more leisurely Brunch spread, it’s lovely served alongside fresh fruit salad, yogurt parfaits, or even alongside some savory egg dishes. A sprinkle of powdered sugar or a few extra berries on the plate can elevate it from a simple loaf to something a bit more elegant. As a decadent Dessert, it’s a winner. A dollop of whipped cream or a scoop of vanilla bean ice cream is heavenly. I sometimes even warm up a slice slightly and serve it with a drizzle of chocolate sauce. And for those Cozy Snacks that we all need, it’s perfect just as it is, perhaps with a warm mug of tea on a rainy afternoon. My kids always love it with a glass of chocolate milk after school – it’s their favorite treat!
Top Tips for Perfecting Your Zucchini Bread
After making this recipe countless times, I’ve picked up a few tricks that I think really elevate it from good to absolutely phenomenal. First, when it comes to Zucchini Prep, don’t skip squeezing out the excess moisture. Use a cheesecloth or a fine-mesh sieve. This is crucial for avoiding a gummy texture and ensures you get that lovely, tender crumb. Also, grate your zucchini finely; large chunks can sometimes be off-putting. For Mixing Advice, remember that rule about not overmixing. Seriously, just mix until it’s *almost* combined. A few small lumps are perfectly fine and actually a good sign. Overmixing is the quickest way to turn this moist wonder into something dense. When it comes to the Swirl Customization, get creative! You can use cocoa powder in your swirl for a chocolatey effect, or even add a drop of food coloring for a fun twist. Don’t overdo the swirls, though; just a few gentle passes will create a beautiful pattern. For Ingredient Swaps, while I’ve stuck to the tested recipe for years, I have experimented. For a dairy-free version, I’ve successfully used unsweetened almond milk for the glaze and a neutral oil like grapeseed for the batter, and it turned out wonderfully creamy. If you’re not a fan of cinnamon, a touch of cardamom or even some ginger can be lovely additions. For Baking Tips, know your oven. If you find your oven tends to run hot, you might need to slightly reduce the baking time or temperature. Always use the toothpick test as your guide. And for the Glaze Variations, don’t be afraid to play! A lemon zest glaze is amazing, or you can make a cream cheese glaze for an even more dessert-like experience. Just ensure the bread is completely cool before applying any glaze!
Storing and Reheating Tips
Keeping this zucchini bread fresh is thankfully quite easy, as it stays moist for quite a while. For Room Temperature Storage, once it’s completely cooled and the glaze has set, you can wrap the loaf tightly in plastic wrap or store it in an airtight container. It should stay delicious for about 2-3 days. I usually find it disappears much faster than that, though! For Refrigerator Storage, if you need it to last a bit longer, about 4-5 days, storing it in the fridge is a good option. Just make sure it’s in an airtight container to prevent it from drying out. When you’re ready to eat it, let it come back to room temperature for the best flavor and texture. If you’re planning way ahead, Freezer Instructions are your best bet. You can freeze the entire loaf or individual slices. Wrap them very well in plastic wrap, then in aluminum foil, or place them in a freezer-safe bag. It will keep well for up to 3 months. To thaw, let it sit at room temperature for a few hours. For Glaze Timing Advice, it’s always best to apply the glaze *after* the bread has completely cooled and *before* storing it for longer than a day or two at room temperature. If you’re freezing it, I recommend glazing it *after* thawing for the freshest look and taste, although a simple dusting of powdered sugar works well even before freezing.
Frequently Asked Questions
Final Thoughts
Honestly, this zucchini bread recipe is a game-changer. It’s more than just a way to use up extra zucchini; it’s a recipe that brings smiles, satisfies cravings, and makes you feel good about what you’re feeding your family. It’s that perfect balance of wholesome and decadent, easy enough for a weeknight but special enough for guests. I truly believe that every home cook should have a recipe like this in their repertoire – one that’s reliable, delicious, and brings a little bit of joy. If you’re a fan of this recipe, you might also enjoy my easy apple crumble bars or my bright lemon loaf cake. I can’t wait for you to try this zucchini bread and see for yourself just how amazing it is. Please let me know in the comments below how yours turns out, and if you discover any new variations or tips – I love hearing about them! Happy baking, everyone!
angel food cake
Ingredients
Method
- Preheat oven to 350°F and locate your angel food cake pan. Do not butter or spray or grease the pan in any way.
- In a large bowl sift together 0.75 cup (150 grams) of granulated sugar and the sifted cake flour.
- In the bowl of your stand mixer fitted with the whisk attachment, beat the egg whites until foamy, about 2 minutes.
- Add the cream of tartar, lemon juice, vanilla, and almond extract and continue to beat until soft peaks form roughly 2-3 minutes.
- Gradually beat in the remaining 0.75 cup (150 grams) granulated white sugar, a tablespoon at a time, until glossy stiff peaks form. You may need to scrape down the sides of the bowl.
- Remove bowl from stand mixer.
- Sift the flour mixture (0.25 cup at a time) over the egg whites and using a rubber spatula, gently fold (do not stir) the flour into the egg whites.
- Pour the batter into the pan and run a metal spatula or knife through the batter in a zig-zag motion to remove any air pockets. Smooth the top and then bake in the preheated oven for about 40-45 minutes. The cake is done when the cake springs back when gently pressed or there are cracks over the top.
- Immediately upon removing from the oven invert the pan and allow the cake to cool for about 1.5 hours. While the cake is cooling, roast the strawberries.
- When completely cool, run an offset spatula or knife around the sides and center tube of the pan to loosen the cake and then remove the cake from the pan.
- Next, use the offset spatula (or knife) along the bottom and remove. Set cake on cake stand.
- Increase the oven temperature to 400°F. Line a baking sheet with parchment paper.
- Place sliced strawberries in a single layer on a baking sheet lined with parchment paper.
- Drizzle evenly with syrup and sprinkle cinnamon on top.
- Roast for 10-12 minutes, or until berries are tender and have begun to release their juices.
- Place strawberry spread into a medium bowl. Dump roasted strawberries on top of spread and mix together with a fork. If the mixture seems too thick can add up to 0.5 cup warm water.
- When ready to serve, pour some sauce (not all) over cake. Cut cake using either a very (very) sharp knife or a serrated knife. Use a 'saw' motion and try not to press the cake down as you cut. Place the piece on a plate and drop a dollop of whipped cream on top. Cover with more strawberry sauce.