How to Make Delicious Marzipan Toffee Bites
Can I tell you a secret? This zucchini swirl cake has been my little kitchen obsession for years. I discovered it right after I had my first kid — you know those nights when you’re exhausted, craving something sweet but don’t want to spend hours baking? This recipe has saved me more times than I can count. The smell alone will bring everyone to the kitchen — sweet, warm, with just a hint of zucchini freshness — like a hug in dessert form. My kids ask for this all the time; it’s become a life favorite, especially during zucchini season when my garden’s bursting. I always do this when I want a cozy treat, and trust me, it’s just as good for breakfast with a cup of coffee on lazy mornings. You’ll love how it looks, too — the marbled swirl pattern makes every slice feels like a little masterpiece. And the best part? It’s incredibly simple, even if you’re not a baker at heart. Let’s dive into my family’s go-to zucchini swirl cake — it’s honestly a game-changer.
What is Zucchini Swirl Cake?
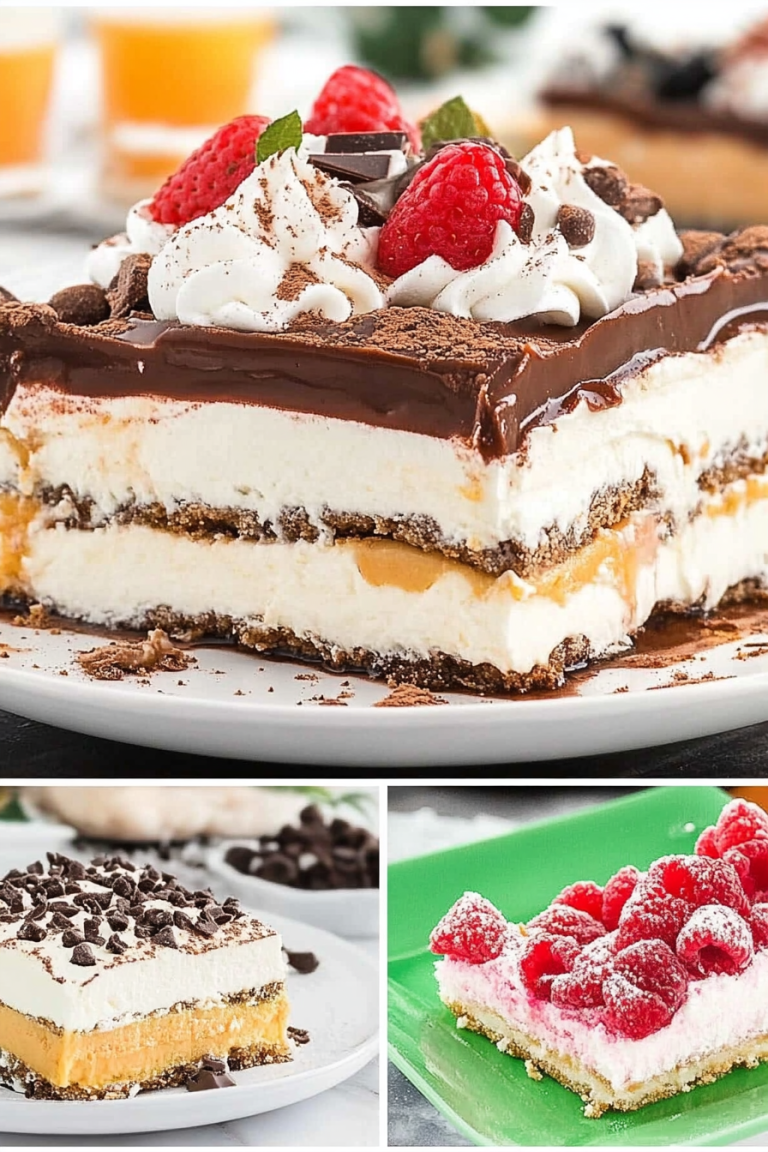
This zucchini swirl cake is like a delightful marriage between a rich sponge cake and a beautifully marbled dessert, thanks to a simple swirl of zucchini and cinnamon running through its heart. Think of it as a cozy, slightly rustic cake that’s much more than the sum of its parts. The name might sound fancy, but it’s basically a moist, tender cake that showcases zucchini in the best way — not as a hidden ingredient, but as part of the flavor journey. It’s essentially a quick, fuss-free baked good that hits all the right notes: sweet, spiced, and with a hint of that healthy vegetable goodness tucked inside. Unlike classic carrot cake or banana bread, this one’s unique because the zucchini makes it extra moist, yet the cinnamon and sugar swirl keeps it exciting. I love that each slice reveals a beautiful marbled pattern — like a little work of art in your hands. It’s perfect for anytime you want a comforting, homemade treat with minimum effort and maximum flavor.
Why you’ll love this recipe?
What I love most about this zucchini swirl cake is its simplicity — it’s truly a *grab-and-go* kind of dessert that doesn’t sacrifice flavor. The first time I made it, I was surprised how the zucchini added a super tender texture, almost like a velvet’s touch in each bite. The cinnamon and brown sugar swirl make it taste nostalgic — kind of like those cozy fall afternoons spent baking with family. Plus, this cake is budget-friendly; most of the ingredients are pantry staples, so you don’t need special shopping trips. It’s one of those recipes that’s versatile, too: Serve it as breakfast with your morning coffee, or as a sweet ending after dinner. I’ve tested this with different types of zucchinis and even added walnuts for crunch — honestly, it’s a blank canvas for whatever you like. And if I ever want to switch things up, I just throw in a handful of chocolate chips or swap the brown sugar filling for apple compote. The best part? The swirl technique. It’s like creating a little edible artwork every time. I swear, this cake always disappears in minutes at my house — I can’t keep my hands off it!
How do I make Zucchini Swirl Cake?
Quick Overview
This cake comes together quickly with basic ingredients, and the swirl part is what makes it visually stunning. I love how simple it is to prep — mix, layer, swirl, and bake. The batter is soft and fluffy, and the cinnamon-sugar mixture is easy to spread and swirl through the middle. What’s special about this method is that it’s forgiving — even if you overmix slightly or your swirl isn’t perfectly patterned, the result is still incredibly delicious. It’s perfect for busy weeknights or lazy weekends when you want something homemade that feels a little fancy. The entire process from mixing to baking takes less than an hour, and the smell alone will make your kitchen feel warm and inviting. Once out of the oven, a quick glaze or dusting of powdered sugar enhances that bakery feel, but honestly, it’s lovely on its own. I always say, the secret to a good swirl cake is patience — take your time layering and swirling, and the end result will be worth it.
Ingredients
For the Main Batter:
– 2 cups all-purpose flour (I prefer unbleached for richness)
– 1 ½ teaspoons baking powder
– ½ teaspoon baking soda
– ½ teaspoon salt
– 1 teaspoon cinnamon (for that cozy spice)
– 1 cup granulated sugar
– ½ cup brown sugar (for richness)
– ½ cup vegetable oil or melted butter
– 3 large eggs
– 1 teaspoon vanilla extract
– 1 cup grated zucchini (squeeze out excess water — trust me, moisture can ruin it)
For the Filling:
– ¼ cup brown sugar
– 1 teaspoon cinnamon
– 2 tablespoons melted butter or oil
– Optional: ¼ cup chopped nuts or chocolate chips for fun variations
For the Glaze (optional):
– ½ cup powdered sugar
– 1-2 teaspoons milk or cream
– Drop of vanilla or lemon juice for flavor
Step-by-Step Instructions
Step 1: Preheat & Prep Pan
Preheat your oven to 350°F (180°C). Grease a 9-inch springform pan or line it with parchment paper. I like springform because it makes removing the cake super easy, but a regular loaf pan works fine too. Just make sure to lightly butter or spray it so nothing sticks. I always do this step first so everything stays ready when I need it.
Step 2: Mix Dry Ingredients
In a large bowl, whisk together the flour, baking powder, baking soda, salt, and cinnamon. Doing this ensures everything’s evenly distributed, so your cake rises nicely and the flavors meld well. I can’t tell you how many times I’ve skipped this step and ended up with uneven bites or some pockets of plain flour — learn from me, trust me, this makes a difference!
Step 3: Mix Wet Ingredients
In another bowl, beat together the sugar, brown sugar, oil, eggs, and vanilla until smooth and slightly frothy. I find using a hand whisk at this stage helps get everything nice and combined. Add the grated zucchini last, and stir gently — don’t overmix, or the batter will turn dense instead of fluffy. The zucchini should be well incorporated but still retain some moisture.
Step 4: Combine
Pour the wet mixture into the dry ingredients, folding carefully with a spatula. Mix just until combined — a few lumps are okay! Overmixing can make the cake tougher, so take your time. The batter will be somewhat thick, but don’t worry—that’s what makes it moist and tender.
Step 5: Prepare Filling
Mix the brown sugar and cinnamon in a small bowl. Melt the butter and stir it into the cinnamon-sugar mixture. If you’re feeling adventurous, toss in some chopped nuts or mini chocolate chips here. This filling adds that perfect contrast of spicy sweetness and crunch.
Step 6: Layer & Swirl
Pour half the batter into your prepared pan. Spread the cinnamon-sugar filling evenly over the batter, then dollop the remaining batter on top. Using a skewer or knife, gently swirl through the batter and filling — creating a marbled effect. Patience is key here; don’t rush this step. The goal is to get that beautiful swirl without overly mixing.
Step 7: Bake
Pop it in the oven and bake for about 35-40 minutes. Check doneness with a toothpick — it should come out clean or with just a few moist crumbs. Every oven is different, so start checking around the 35-minute mark. The house will smell divine — I promise, your neighbors might come knocking! Let it cool in the pan for at least 20 minutes before transferring to a wire rack.
Step 8: Cool & Glaze
Once cooled slightly, if you want, whip up a quick glaze and drizzle over the top. The glaze adds a shiny finish and a sweet bonus. If you prefer plain, just dust with powdered sugar or serve warm — both ways are delightful. I love letting it cool completely before slicing, but honestly, warm is just as good, especially with a scoop of vanilla ice cream on the side.
Step 9: Slice & Serve
Use a sharp serrated knife for the cleanest slices. Wipe it clean between cuts for neat layers. Serve with a cup of coffee or tea, and watch how everyone asks for seconds. I love that each piece reveals the gorgeous swirl — it’s like a little piece of art on a plate. This cake is best enjoyed within 3 days, but it’s also lovely lightly warmed the next day if you’re leftovers-prone like me.
What to Serve It With
This cake is so versatile, I’ve served it in many ways. For breakfast, I pair it with a strong cup of black coffee or a frothy latte. The spiced sweetness wakes up my tired mornings, and the zucchini keeps it moist enough to enjoy even without frosting.
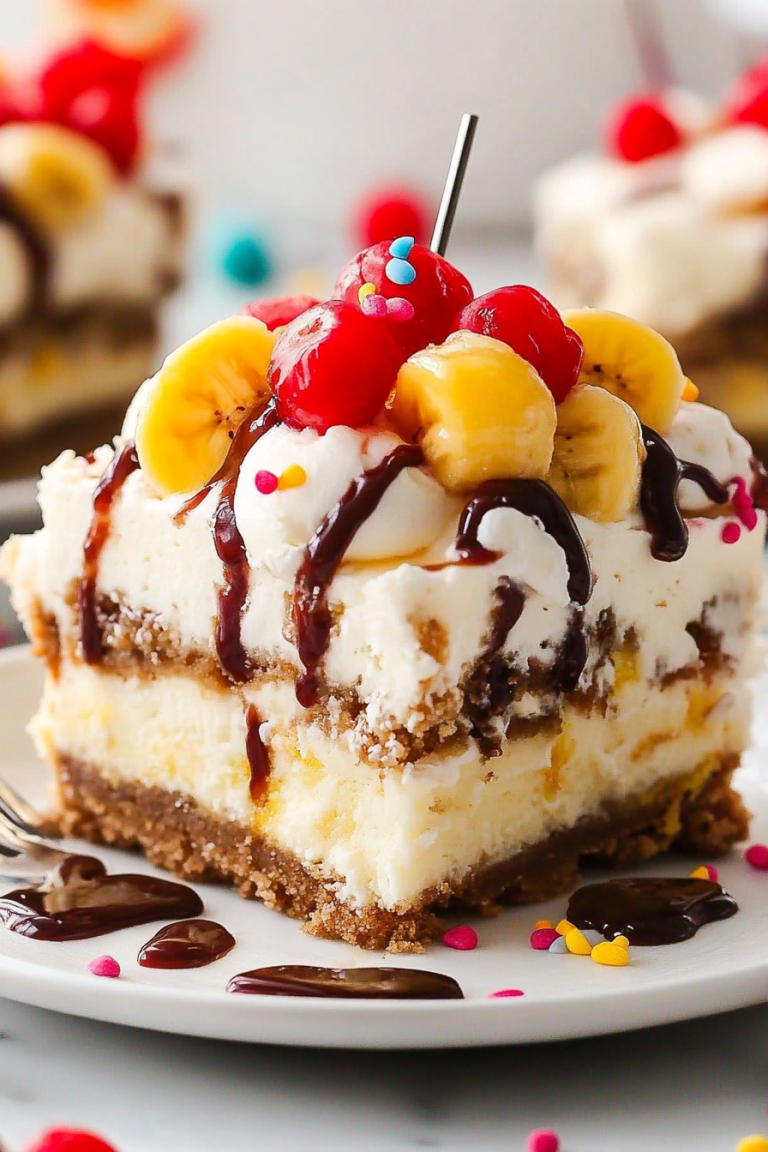
For brunch, I like to slice it thick and serve with fresh fruit and a dollop of Greek yogurt — it feels indulgent but balanced. My family loves it after dinner too, especially with a drizzle of honey or a scoop of vanilla ice cream. When I want something casual, I just cut big squares, maybe toss some berries on top, and call it a day. It’s also wonderful for potlucks because it travels well and looks pretty with minimal fuss.
Every family has their tradition — at ours, this cake usually makes an appearance during harvest season, with zucchinis from our garden, and it’s a hit among kids and adults alike. I’ve even made mini muffin versions for school lunches — just adjust the baking time to around 20 minutes, and they’re perfect for on-the-go snacking. I find that the slight spice and softness make it a comforting pick after a long day. Honestly, I could go on and on about how many ways this cake saves me when I need a little sweet escape!
Top Tips for Perfecting Your Zucchini Swirl Cake
After making this so many times, I’ve learned a few tricks that boost the flavor and appearance every time. First, squeezing out excess water from the zucchini is clutch — too much moisture can make the batter gloopy and dense. Grate and then press it with a paper towel or a clean kitchen towel; it takes a minute but makes a big difference. I tested this with different zucchinis, and older, larger ones tend to be more watery, so extra squeeze is a must.
When mixing the batter, don’t overdo it. Just fold until everything’s just combined — this keeps the cake tender and light. For the swirl pattern, a toothpick or a skewer works beautifully. Start from the center and make gentle swirling motions outward; don’t overmix once you start swirling because that can blend the layers too much. I’ve experimented with adding chocolate chips or dried fruit to the batter, and while it changes the texture slightly, it’s an instant upgrade for kids’ favorites. Trust me on this: a pinch of nutmeg or ginger instead of cinnamon also works if you want different spice accents.
Oven temperature can vary, so keep an eye after 35 minutes. If your cake is browning too fast, tent it with foil and reduce the temperature slightly. One mistake I made early on was overbaking; I learned that pulling it out just before it’s completely firm ensures it stays moist and tender. Also, let the cake cool completely before glazing or serving — this helps the swirl set and makes slicing so much easier. For the glaze, I love adding a splash of lemon juice instead of vanilla — it brightens the flavor and pairs beautifully with the zucchini’s freshness.
Finally, don’t be afraid to personalize this recipe. Swap spices, adjust sugar levels, or add your favorite goodies. I’ve found that the more I play, the better it turns out — but honestly, even my first attempt was a hit. The key is loving what you make and sharing it with people who appreciate homemade desserts as much as I do. Trust me, this will be your new go-to, too!
Storing and Reheating Tips
This cake stays moist and delicious for a couple of days — perfect for making ahead. Store leftovers in an airtight container at room temperature for up to 2 days, covered loosely with foil or a tea towel to prevent it from drying out. For longer storage, pop it in the refrigerator — just make sure to wrap it well, as zucchini is quite moist and can cause fridge odors if not covered properly. It’s good for about 4 days this way. If you want to keep it longer, freezing slices individually wrapped in plastic works beautifully. Thaw at room temperature or microwave briefly for a quick warm-up. I do this when I want a little slice of comfort on busy mornings. The glaze can be added after reheating, or sprinkled on top just before serving so it stays crisp and shiny. I’ve learned that trying to re-glaze it the next day isn’t quite the same, so I recommend glazing fresh for the best appearance and flavor. This cake, honestly, tastes just as good the next day — if not better, because the flavors meld together — but be sure not to leave it out for too long, especially during warm weather.
Frequently Asked Questions
Final Thoughts
This zucchini swirl cake has truly become a staple in my baking rotation. It’s a wonderful way to make the most of garden zucchinis, and its comforting taste and pretty swirl pattern make it stand out on any dessert table. The simplicity is what keeps me returning — no complicated techniques, just honest, delicious baking that feels like home. Whether you’re hosting a brunch, need a quick snack, or just want a cozy afternoon treat, this cake is a winner every single time. I love sharing recipes that carry family memories and bring smiles — and I hope yours does, too. Give it a try, have fun customizing it, and don’t forget to let me know how it turns out! Happy baking, my friend — and remember, great food always tastes better when made with love.
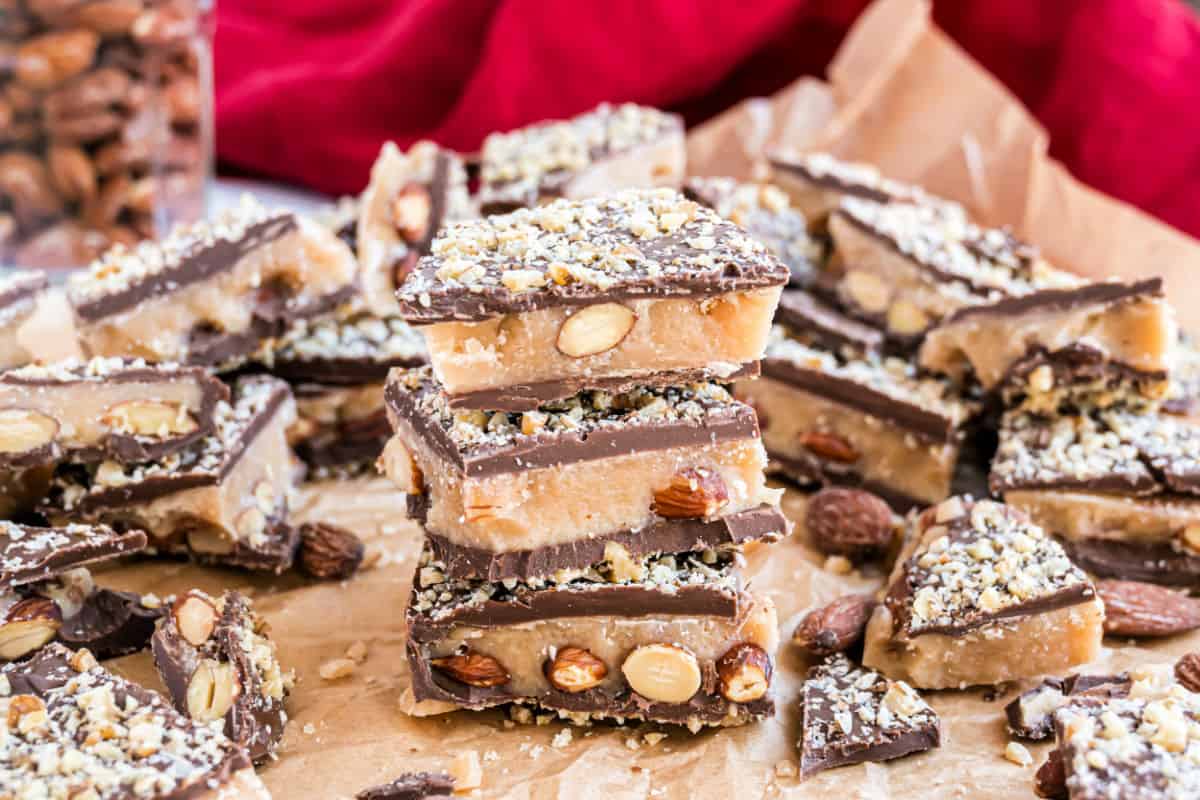
almond toffee
Ingredients
Method
- Line an 11x7 inch baking dish with foil and arrange almonds in a single layer. Set aside.
- In a heavy saucepan, combine butter, margarine, sugar, salt, and vanilla. Cook over medium-high heat, stirring constantly until butter melts and mixture begins to boil. Bring to a rolling boil.
- Continue boiling and stirring for 5-7 minutes until the candy turns a caramel color, approximately 300°F. Quickly pour over the almonds in the pan.
- Allow the toffee to cool completely, about 2 hours.
- Spread melted chocolate over the cooled toffee. Sprinkle with ground walnuts. Let set before breaking into pieces.