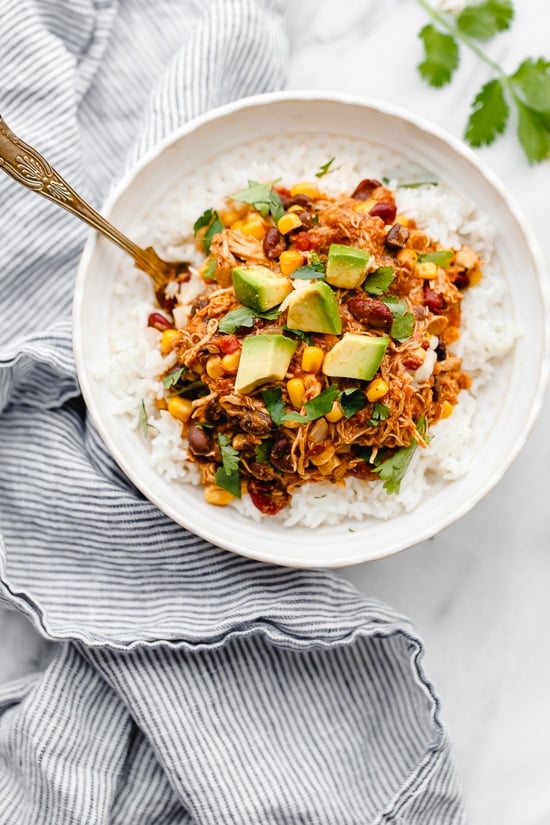
Easy Slow Cooker Chicken Taco Chili
I gotta tell you, this zucchini chocolate swirl cake is one of those recipes that sneaks up on everyone. I remember the first time I made it — I was just looking for a way to use up a mountain of zucchini from my garden, and I thought, “Hey, why not toss some in a cake?” The smell alone—rich cocoa and fresh zucchini—had my kids asking if I’d baked brownies. Honestly, I do this every summer now, and it’s become a family favorite. It’s surprisingly indulgent, without feeling overly sweet or heavy. Plus, it’s so easy to pull together, even on those busy weeknights when I don’t want to fuss over complicated desserts. This one’s a lifesaver on nights when dessert feels like a treat but I also want to sneak in some veggies. Trust me, once you try it, you’ll be hooked. It’s all about that perfect swirl of chocolate and zucchini—moist, flavorful, and just the right amount of decadent. And the best part? It disappears in minutes at my house, and I always do this when I want something comforting and nostalgic, yet a little healthier. Let’s get into it!
What is Zucchini Chocolate Swirl Cake?
Think of this cake as a cozy hug in dessert form. It’s essentially a tender, moist cake made from simple ingredients, with shredded zucchini hidden inside — think of it as nature’s secret ingredient. The name “chocolate swirl” comes from the luscious chocolate batter that’s gently swirled into the zucchini mixture before baking, creating beautiful marbled patterns that are as pretty as they are tasty. The zucchini keeps the cake wonderfully moist and adds a subtle veggie boost, but don’t worry — the cocoa and hint of sweetness make it taste more like a brownie than a vegetable. It’s kind of like a cross between a quick bread and a moist layered cake, but all baked in one pan. I love how versatile it is; it’s perfect for casual weekends, potluck parties, or even a sneaky way to get the kids to eat more greens. Think of it as a treat that’s more about balance than indulgence — rich in flavor but still comforting and wholesome.
Why you’ll love this recipe?
What I love most about this zucchini chocolate swirl cake is how it hits every note — tender crumb, rich chocolate flavor, and just enough to feel like a real treat. The smell alone is enough to make everyone stop in their tracks — that warm cocoa mixed with fresh zucchini aroma. This recipe’s simplicity is what makes it a go-to in my kitchen; I always keep a “secret stash” of shredded zucchini in the freezer just in case I want to whip this up last minute. It’s incredibly budget-friendly, too — all ingredients are pantry staples, and you probably already have everything on hand. Plus, it’s super versatile. You can swap the cocoa for dark chocolate chunks, throw in nuts, or even add a sprinkle of sea salt on top — endless possibilities! I also appreciate how forgiving it is. Overmixing? Not a problem. Slightly underbaking? Still moist and delicious. It’s a crowd-pleaser that stands on its own but also plays nice with a scoop of vanilla ice cream or a dollop of whipped cream. Honestly, what I love most about this is that it’s a bit of a secret weapon — a healthy-ish, homemade dessert that feels indulgent without being overly guilty.
How do I make Zucchini Chocolate Swirl Cake?
Quick Overview
This cake comes together in just a few simple steps. First, you shred your zucchini and squeeze out any excess moisture—trust me, this is key for that perfect moist crumb. Then you mix up the dry ingredients in one bowl and the wet ingredients in another. After that, you fold everything together gently to keep the batter light and fluffy. The chocolate batter, made with melted dark chocolate or cocoa powder, is layered in by swirling into the zucchini base, creating those lovely marbled streaks. A quick bake, a little cooling, and then you’re ready to enjoy a slice of pure comfort. Honestly, it’s so straightforward that you’ll feel like a pro on your first try, and the taste? Well, that’s the reward. It’s perfect when you want something homemade but don’t want to spend hours in the kitchen.
Ingredients
For the Main Batter:
- 2 cups of shredded zucchini (about 2 medium zucchinis; I always use fresh, and I’ve tested with frozen—works great!)
- 1 ½ cups all-purpose flour (or gluten-free flour blend for friends with allergies)
- ¾ cup granulated sugar (or coconut sugar, for a hint of caramel flavor)
- ½ teaspoon baking soda
- ½ teaspoon baking powder
- ¼ teaspoon salt
- 1 teaspoon vanilla extract
- 3 large eggs
- ½ cup vegetable oil or melted coconut oil
For the Filling:
- ½ cup melted dark chocolate (or cocoa powder if you prefer a more intense chocolate flavor)
- 2 tablespoons milk of choice (almond, cow, or oat — I tested with almond milk and it made it even creamier!)
For the Glaze:
- ½ cup powdered sugar (or dairy-free alternative)
- 1-2 teaspoons milk liquid (again, your fave, I like oat milk)
- A few shavings of chocolate or a sprinkle of cocoa powder for garnish
Step-by-Step Instructions
Step 1: Preheat & Prep Pan
Heat your oven to 350°F (175°C). Grease a 9-inch round cake pan or line it with parchment paper — I like to give it a light spray and a dusting of flour to make sure nothing sticks. While the oven warms up, shred your zucchini and squeeze out as much excess moisture as you can using a clean dish towel or cheesecloth. This step is crucial so your cake stays moist but not soggy.
Step 2: Mix Dry Ingredients
In a big bowl, whisk together the flour, sugar, baking soda, baking powder, and salt. I always do this first — it helps distribute everything evenly. You’ll notice the dry ingredients get a little aerated, which is great for that fluffy texture we want.
Step 3: Mix Wet Ingredients
In a separate bowl, beat the eggs, vanilla, and oil until well combined and slightly frothy. Then stir in the shredded zucchini. If your eggs are cold, no worries — just make sure everything looks combined and smooth. This is where you add a splash more vanilla if you’re feeling extra indulgent. I tested this with coconut oil, and it adds a lovely tropical twist.
Step 4: Combine
Gently fold the wet ingredients into the dry, mixing just until combined. Don’t overmix—this keeps the batter tender and light. You might see a few lumps, and that’s totally fine. Overmixing can make the cake dense, and nobody wants that!
Step 5: Prepare Filling
While the batter rests, melt your chocolate with the milk over a double boiler or in short bursts in the microwave, stirring until smooth. Let it cool slightly, so it’s just pourable but not hardening. This will be your swirl — so make sure it’s nice and glossy.
Step 6: Layer & Swirl
Pour about two-thirds of the batter into your prepared pan. Dollop spoonfuls of the melted chocolate mixture on top, then top with the remaining batter. Using a skewer or toothpick, gently swirl the two together—think of making a marbled effect. Don’t overdo it — just a few gentle swirls to hold the marbling intact. The visual is just as delicious as the taste.
Step 7: Bake
Slide it into your preheated oven and bake for about 40-45 minutes. The top should be set, a little crackly, and a toothpick inserted in the center should come out with moist crumbs. Ovens vary, so keep an eye on it around the 40-minute mark. If it starts to brown too fast, loosely tent with foil.
Step 8: Cool & Glaze
Let the cake cool in the pan for about 15 minutes — I know, it’s hard, but cooling keeps it from falling apart. Transfer it to a wire rack if you want perfectly clean edges. Mix your powdered sugar with a splash of milk until smooth, drizzle over the cooled cake, and sprinkle with chocolate shavings or a dusting of cocoa powder for that finishing touch. This glaze is optional but makes it look so pretty!
Step 9: Slice & Serve
Once cooled completely, slice with a serrated knife for clean cuts. Serve with a dollop of whipped cream or a scoop of vanilla ice cream if you’re feeling extra decadent. I like to keep the slices a little thick — this cake is rich enough to stand on its own, and each bite melts in your mouth. Trust me, leftovers taste just as good the next day — if it lasts that long!
What to Serve It With
This zucchini chocolate swirl cake is versatile enough to be dressed up or down depending on the occasion. For a simple breakfast or brunch, pair it with a strong cup of coffee or a glass of cold milk. It’s also lovely as a sweet ending to a Sunday roast, served warm with a scoop of vanilla ice cream and a drizzle of caramel sauce. When I’m craving something cozy, I’ll warm a slice and top it with whipped cream and a few extra chocolate shavings. My kids ask for this all the time — they think it’s a secret chocolate cake with a veggie twist! For a casual snack, I slice it into little squares and pack it in lunchboxes — it’s surprisingly portable.
Top Tips for Perfecting Your Zucchini Chocolate Swirl Cake
Over the years, I’ve learned a few tricks that make this cake even better. First, I always make sure to squeeze out as much moisture from the zucchini as possible — it keeps the cake moist but not wet. If your zucchini is extra juicy, just give it a little longer to drain. When mixing, I avoid overworking the batter — gentle folds are key to that light, airy crumb. A trick I swear by is adding a splash of milk to the melted chocolate; it makes the swirl extra creamy and smooth. For the swirl pattern, don’t mess around with too many swirls — just a few gentle strokes produce a beautiful marbled effect. As for ingredient swaps, I’ve tested this with coconut sugar, and it adds a subtle caramel edge that pairs beautifully with the cocoa. If you want to make it gluten-free, swap in almond or oat flour — just be aware that the texture might change slightly. The oven is your best friend here; every oven is different, so start checking around the 40-minute mark and trust your senses — the cake should feel firm on top but still give a little when pressed. Lastly, don’t skip the glaze — it’s what elevates this cake from good to next level. I love experimenting with flavors — a dash of cinnamon or chili powder can add a fun twist. Just remember, the secret to success is gentle handling and patience — it’s worth every effort.
Storing and Reheating Tips
This cake keeps nicely for a few days if stored properly. Keep leftovers in an airtight container at room temperature for up to 2 days — just make sure it’s covered to prevent it from drying out. For longer storage, pop it into the refrigerator, wrapped tightly in plastic wrap or in an airtight container — it’ll stay fresh for about a week. I recommend letting it come to room temp before serving; it tastes even better! If you want to save some for later, freezing slices works well — wrap each piece individually in plastic wrap, then place in a freezer bag or airtight container. Thaw at room temperature or briefly reheat in the microwave for about 20 seconds for that just-baked feel. Be cautious with the glaze—if it’s set, a quick reheat can soften it, or you can add a fresh drizzle if needed. Trust me, this cake is just as good cold or slightly warm, so don’t feel pressured to reheat unless you prefer it that way.
Frequently Asked Questions
Final Thoughts
This zucchini chocolate swirl cake is one of those recipes that feels like a warm hug — it’s cozy, comforting, and surprisingly versatile. I love how it balances the richness of chocolate with the freshness of zucchini, creating a flavor that’s complex yet simple. It’s become my go-to when I want to impress someone without sacrificing ease. Every time I make it, I feel like I’ve discovered a little secret in my kitchen — that hidden veggie can be the star of a dessert! Whether you serve it at a weekend brunch, a casual family dinner, or just keep slices in the fridge for when that chocolate craving hits at midnight, I promise it’ll bring smiles. I hope you love making and eating this as much as I do. Drop a comment or share your own variations — I’d love to hear your twist on this! Happy baking, and remember: good food is made with love, patience, and a little bit of magic in the mix.
Chicken Taco Chili
Ingredients
Method
- Combine the drained beans, chopped onion, green chilies, corn, tomato sauce, diced tomatoes with chilies, cumin, chili powder, and taco seasoning in a slow cooker. Mix well.
- Nestle the chicken breasts into the mixture, ensuring they are completely covered. Cook on LOW for 8 to 10 hours or on HIGH for 4 to 6 hours.
- About half an hour before serving, remove the chicken from the slow cooker and shred it using two forks.
- Return the shredded chicken to the slow cooker and stir it into the chili.
- Serve hot, topped with fresh cilantro and your favorite toppings such as shredded cheese, sour cream, or avocado.