Easy Pumpkin Seed Brittle Delight
You know, I’ve been meaning to share this with you for ages. It’s one of those recipes that just feels like home, like a warm hug on a chilly afternoon. My mom used to make a version of this when I was little, and let me tell you, the smell of it baking in the oven was pure magic. It’s not just about the incredible, moist texture and the perfect balance of sweet and spice; it’s about the memories it brings back. This isn’t your average, dry, crumbly zucchini bread that leaves you wondering where the zucchini even went. Nope. This one is packed with flavor, surprisingly easy to whip up, and dare I say, a little bit virtuous thanks to all that glorious zucchini. Honestly, it’s a lifesaver on busy weeknights when you want to bake something delicious without spending hours in the kitchen. Think of it as a guilt-free indulgence, a treat that’s good for you and tastes even better.
What is Zucchini bread?
So, what exactly *is* this magical thing? It’s pretty much the best zucchini bread you’ll ever have, and I don’t say that lightly! The name itself, “The Ultimate Zucchini Bread,” is a promise, and I can confidently say it delivers. At its heart, it’s a classic quick bread, meaning no yeast or complicated rising times. It’s that simple. But what sets it apart is the way the zucchini works its wonders. It adds this incredible moisture and tenderness that you just can’t achieve with other ingredients. I’ve tried using applesauce or extra oil, but nothing beats the natural magic of grated zucchini. It’s the secret weapon that makes this bread incredibly soft and keeps it fresh for days. Plus, the spices—cinnamon, nutmeg, a hint of clove—they just sing together, creating a warm, comforting aroma that fills your entire house. It’s like a cozy blanket in edible form, and it’s so forgiving, even if you’re a total beginner in the kitchen.
Why you’ll love this recipe?
Honestly, where do I even begin? There are so many reasons why this zucchini bread has become a staple in my kitchen, and I just know you’re going to fall in love with it too. First off, the flavor is out of this world. It’s perfectly sweet, but not *too* sweet, with a beautiful warmth from the cinnamon and spices. The zucchini doesn’t overpower; it just lends this incredible moistness and a subtle earthiness that complements everything. Then there’s the texture. Oh, the texture! It’s unbelievably tender and soft, like a melt-in-your-mouth cloud. I’ve made this countless times, and it always comes out perfectly, never dry or dense. It’s also ridiculously easy to make. I mean, seriously, if you can stir ingredients together, you can make this zucchini bread. It’s a lifesaver when I’m short on time, and it’s one of those recipes that makes me feel like a baking rockstar with minimal effort. And let’s talk about being budget-friendly! Zucchini is usually pretty affordable, and the rest of the ingredients are pantry staples. It’s so much more satisfying (and cheaper!) than buying a loaf from the fancy bakery. Plus, it’s super versatile. I love it plain, but adding a handful of chocolate chips or some chopped nuts is always a good idea. It’s perfect for breakfast, a snack, or even a light dessert. What I love most about this is that it feels wholesome and comforting, like a recipe straight from my grandma’s recipe box, but it’s also modern and incredibly delicious. It’s that perfect balance of nostalgic and new, and that’s a winner in my book.
How do I make Zucchini bread?
Quick Overview
Get ready for the easiest, most delicious quick bread you’ll ever make! In just a few simple steps, you’ll have a beautifully moist and flavorful zucchini bread ready to impress. We’ll start by combining our dry ingredients, then whisking together the wet ingredients, and finally bringing them all together before baking. The secret? Grated zucchini, of course, which ensures ultimate moistness without any fuss. It’s a straightforward process that yields incredibly rewarding results, proving that delicious homemade treats don’t have to be complicated.
Ingredients
For the Main Batter:
2 cups all-purpose flour (I often use a blend of all-purpose and whole wheat for a bit more fiber, but plain all-purpose works beautifully)
1 teaspoon baking soda (this helps it rise beautifully!)
1/2 teaspoon salt (essential for balancing the sweetness)
1 teaspoon ground cinnamon (don’t skimp on this, it’s key to the cozy flavor!)
1/4 teaspoon ground nutmeg (just a whisper adds so much warmth)
1/8 teaspoon ground cloves (optional, but if you love that classic spice blend, add it!)
1 1/2 cups granulated sugar (you can reduce this slightly to 1 1/4 cups if you prefer it less sweet)
2 large eggs, at room temperature (room temp eggs incorporate better)
1 cup vegetable oil or melted unsalted butter (oil makes it extra moist, butter adds a lovely richness)
1 teaspoon vanilla extract (for that sweet aroma)
2 cups grated zucchini (about 2-3 medium zucchinis, squeezed dry – this is IMPORTANT!)
For Optional Add-ins (Mix-ins):
1 cup chocolate chips (semi-sweet are my go-to, but dark or milk work too!)
1/2 cup chopped walnuts or pecans (for a nice crunch)
For the Simple Glaze (Optional, but highly recommended!):
1 cup powdered sugar
2-3 tablespoons milk (or water for a thinner glaze)
1/2 teaspoon vanilla extract
Step-by-Step Instructions
Step 1: Preheat & Prep Pan
First things first, preheat your oven to a nice 350 degrees Fahrenheit (175 degrees Celsius). This is crucial for even baking. While the oven is heating up, grab a standard 9×5 inch loaf pan. I like to grease it really well with butter or cooking spray and then dust it with a little flour. This ensures your beautiful loaf slides out effortlessly. If you want to be extra fancy (and I often do!), you can also line the pan with parchment paper, leaving an overhang on the sides. It makes lifting the finished loaf out a breeze.
Step 2: Mix Dry Ingredients
In a large bowl, whisk together your all-purpose flour, baking soda, salt, cinnamon, nutmeg, and cloves (if you’re using them). Give it a good whisk to make sure everything is evenly distributed. This simple step helps prevent any pockets of baking soda or spices, ensuring a consistent texture and flavor throughout your bread. I always like to sift my flour if I have the time, but a good whisk does the trick!
Step 3: Mix Wet Ingredients
In a separate medium bowl, whisk together the granulated sugar and the eggs until they’re well combined and slightly lighter in color. Then, slowly drizzle in your vegetable oil (or melted butter) while whisking continuously. Finally, stir in the vanilla extract. This creates a luscious, smooth base for our batter.
Step 4: Combine
Now comes the fun part: bringing it all together. Pour the wet ingredients into the bowl with the dry ingredients. Stir gently with a spatula or wooden spoon until *just* combined. Be careful not to overmix here! Overmixing can develop the gluten in the flour, leading to a tougher, denser bread. A few streaks of flour are perfectly okay. Then, gently fold in your grated, squeezed zucchini and any add-ins like chocolate chips or nuts. The batter will be thick.
Step 5: Prepare Filling
Actually, for this particular recipe, there isn’t a separate “filling” step in the traditional sense. The zucchini is mixed directly into the batter, and if you’re adding chocolate chips or nuts, they go in at the same time. The “filling” is really the deliciousness that is inherent in the batter itself! If you were making something like a cinnamon swirl bread, this is where you’d prepare that separate cinnamon-sugar mixture to swirl in. But for this straightforward, incredibly moist zucchini bread, the magic is all in the batter!
Step 6: Layer & Swirl
Since we’re not doing a separate filling for this recipe, there’s no layering or swirling to worry about! Simply spoon the thick batter into your prepared loaf pan, spreading it out evenly with your spatula. You want to get it into all the corners. Give the pan a gentle tap on the counter a couple of times to help settle the batter and release any large air bubbles. That’s it! No fancy swirls needed for this one, the texture and flavor are perfect as is.
Step 7: Bake
Pop that pan into your preheated oven. You’ll want to bake it for about 55 to 70 minutes. The exact time can vary depending on your oven, so keep an eye on it. How do you know it’s done? The best way is to insert a wooden skewer or toothpick into the center of the loaf. If it comes out clean (or with just a few moist crumbs attached, but no wet batter), it’s ready! If it’s still wet, give it another 5-10 minutes and check again. The top should be golden brown and feel firm to the touch.
Step 8: Cool & Glaze
Once it’s baked to perfection, carefully remove the loaf pan from the oven and let it cool in the pan for about 10-15 minutes. This allows it to set up a bit more. Then, gently invert the loaf onto a wire cooling rack to cool completely. This is super important for the glaze! If you try to glaze it while it’s warm, the glaze will just melt and drip off. Once it’s completely cool, you can whip up the simple glaze. Just whisk together the powdered sugar, milk, and vanilla extract until smooth. If it’s too thick, add a tiny bit more milk; if it’s too thin, add more powdered sugar. Drizzle it generously over the top of the cooled loaf. It’s the perfect sweet finish!
Step 9: Slice & Serve
Once the glaze has set a little, it’s time for the best part: slicing and enjoying! I usually wait until the glaze is just slightly firm, but honestly, sometimes I can’t resist a warm slice right out of the oven (glaze or no glaze). Use a serrated knife for the cleanest slices. Serve it at room temperature for the best texture and flavor. It’s absolutely divine on its own, but it’s also wonderful with a smear of butter or cream cheese. Enjoy every moist, flavorful bite!
What to Serve It With
This zucchini bread is so versatile, it fits into almost any meal or occasion! For a quick and satisfying breakfast, I love a thick slice toasted with a generous smear of butter and a cup of hot coffee. It’s simple, comforting, and gets my day off to a delicious start. If you’re planning a leisurely brunch, it’s a fantastic addition to the spread. I often serve it alongside fresh fruit salad, scrambled eggs, and maybe some crispy bacon. A small dollop of Greek yogurt or even a light cream cheese frosting can elevate it for a more elegant brunch feel. For dessert, especially on a cooler evening, it’s wonderful served slightly warm with a scoop of vanilla bean ice cream or a drizzle of chocolate sauce. It’s like a warm, spiced cake without all the fuss. And for those cozy afternoon or evening snacks? It’s my go-to. It’s perfect with a glass of cold milk, or if you’re feeling a bit fancy, a warm cup of herbal tea. My kids also adore it as a post-school snack; it’s a much healthier alternative to processed cookies and they devour it in minutes!
Top Tips for Perfecting Your Zucchini Bread
Over the years, I’ve definitely picked up a few tricks that make this zucchini bread consistently amazing. Here are my top tips to help you achieve zucchini bread perfection:
Zucchini Prep: This is honestly the most critical step! You *must* squeeze the moisture out of your grated zucchini. I usually grate it on the large holes of a box grater, then place it in a fine-mesh sieve or a clean kitchen towel. Press down firmly to remove as much liquid as possible. If you skip this, your bread will be gummy and overly wet, and no one wants that! Trust me on this one; it makes all the difference.
Mixing Advice: Remember what I said about not overmixing? It’s worth repeating! As soon as you don’t see large streaks of dry flour, stop mixing. A few small pockets are fine because they’ll disappear as the bread bakes. Overmixing develops the gluten, resulting in a tough loaf, and we’re going for super tender and moist here.
Swirl Customization: While this recipe doesn’t have a specific swirl step, if you wanted to add one, you could make a simple cinnamon-sugar mixture (2 tbsp sugar, 1 tsp cinnamon) and sprinkle half the batter in the pan, then half the cinnamon-sugar, then the rest of the batter, and the rest of the cinnamon-sugar. Then, use a knife to gently swirl it through. It adds a lovely extra layer of flavor and visual appeal.
Ingredient Swaps: Feel free to experiment! For a slightly healthier loaf, you can substitute half of the all-purpose flour with whole wheat flour. It might make the bread a little denser, but it’s still delicious. You can also try using half the amount of granulated sugar and adding a tablespoon or two of honey or maple syrup for a different sweetness profile. I’ve even tested this with almond milk instead of cow’s milk in the glaze, and it worked perfectly, making it even creamier!
Baking Tips: Always bake in the center rack of your oven for the most even heat circulation. If you notice the top browning too quickly before the inside is cooked, you can loosely tent the loaf pan with aluminum foil. I’ve also found that ovens can vary greatly, so getting to know your own oven’s quirks is key. A reliable oven thermometer can be a game-changer!
Glaze Variations: The simple powdered sugar glaze is my favorite because it’s quick and complements the bread so well. But you can get creative! For a lemony twist, add a teaspoon of fresh lemon zest to the glaze. For a richer flavor, try using cream cheese instead of milk for a cream cheese glaze. Or, if you’re not a fan of glaze, a simple dusting of powdered sugar or a sprinkle of cinnamon sugar right before baking also looks and tastes great.
Storing and Reheating Tips
One of the best things about this zucchini bread is how well it keeps! It stays wonderfully moist for days, making it perfect for baking ahead. For storing at room temperature, make sure the loaf is completely cooled. Wrap it tightly in plastic wrap or place it in an airtight container. It should stay fresh and delicious for about 3-4 days. I usually keep a loaf on the counter, and it’s always the first thing to disappear!
If you know you won’t get through the whole loaf in a few days, or if your kitchen tends to be warm, storing it in the refrigerator is a great option. Again, make sure it’s completely cooled and wrap it tightly or store it in an airtight container. It will stay good in the fridge for up to a week. When you’re ready to enjoy a slice, you can eat it cold, or I personally love to give it a quick zap in the microwave for about 15-20 seconds to warm it up slightly and bring back that just-baked tenderness.
For longer storage, this zucchini bread freezes beautifully! Once it’s completely cooled, wrap the entire loaf (or individual slices) tightly in plastic wrap, then in aluminum foil, or place it in a freezer-safe bag. It can be stored in the freezer for up to 2-3 months. To thaw, simply remove it from the freezer and let it come to room temperature on the counter for a few hours. If you like it warm, you can reheat slices in a toaster oven or a low oven for a few minutes. The glaze is best applied *after* thawing and reheating if you’ve frozen a glazed loaf, or you can glaze it once it’s thawed and ready to eat.
Frequently Asked Questions
Final Thoughts
So there you have it – my absolute favorite, go-to zucchini bread recipe. It’s more than just a recipe to me; it’s a little piece of comfort and joy that I love sharing. It’s proof that you can have something incredibly delicious, moist, and satisfying that also happens to be packed with goodness from a humble vegetable. It’s the kind of recipe that makes you feel good about what you’re serving your family and friends, and it’s so easy that it never feels like a chore. I truly hope you give this a try, and I can’t wait to hear how much you love it! If you’re already a fan of baked goods that feel wholesome yet decadent, you might also want to check out my recipe for moist blueberry muffins or my easy banana bread recipe – they have that same comforting vibe. Happy baking, and I hope this zucchini bread brings as much joy to your kitchen as it does to mine!
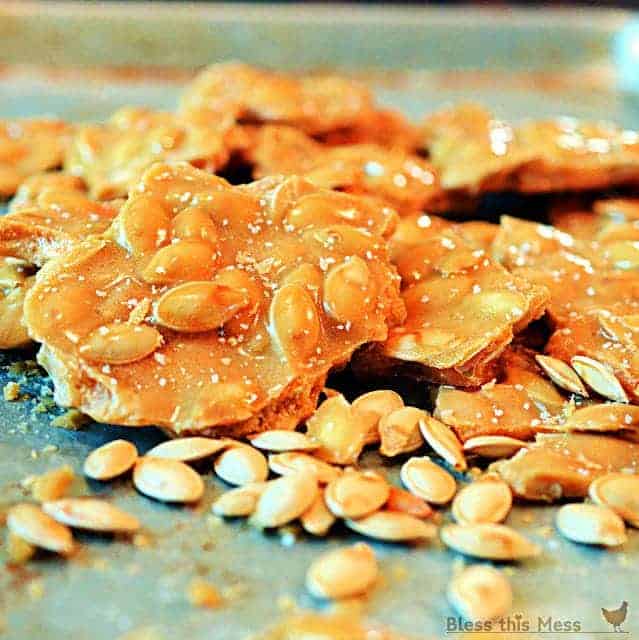
Roasted Pumpkin Seed Brittle
Ingredients
Method
- Wash the pumpkin seeds well and remove any bits of pumpkin pulp.
- Preheat the oven to 325 degrees F.
- Lay the seeds out on an unlined, ungreased metal baking sheet and let them dry while the oven is heating. Once the oven is hot place the pumpkin seeds inside and bake for 30 minutes.
- After 30 minutes stir the seeds around and then continue to bake until seeds start to brown slightly and begin to have an aroma, 20 to 30 minutes. Once the seeds are cooked, remove from the oven.
- Butter a large metal baking sheet and set aside.
- Measure out the baking soda, vanilla, and butter into a small bowl and set it aside.
- In a medium saucepan, bring the water, corn syrup, and sugar to a boil over medium high heat. Stir the mixture while the sugar is dissolving. Once the sugar is dissolved and the mixture begins to bubble, don't stir anymore.
- Using a candy thermometer, allow the mixture to reach 285 degrees F (soft crack stage). Stir in the toasted pumpkin seeds and continue cooking. Cook until the mixture reaches 300 degrees F (hard crack stage), and be sure to stir often once the seeds have been added to prevent them from sticking to the bottom of the pan.
- Remove the sugar and seed mixture from the heat and stir in the baking soda, vanilla, and butter. The mixture will puff up and foam; that's normal. Stir until it almost stops foaming and then quickly pour the brittle, as thin as possible, onto the buttered baking sheet.
- You can pick up the edges of the pan and tilt it back and forth to help the brittle spread, just don't spread it with a spoon. While the brittle is still hot, sprinkle on the kosher salt.
- Let the brittle completely cool and then break it into pieces.