Easy Potato Dumplings Polish Comfort Food
Oh, hello there! Come on in, grab a mug. I was just thinking about that amazing zucchini bread I made the other day, and it got me all excited to share it with you. It’s one of those recipes that just feels like a warm hug, you know? The kind that fills your kitchen with the most incredible aroma, pulling everyone in like a magnet. My kids, who can be the pickiest eaters on the planet, devour this. It’s not just *any* zucchini bread; this is the one that changed my whole perspective on what a simple quick bread could be. It’s moist, it’s bursting with flavor, and it’s surprisingly easy. Honestly, if you’ve ever been intimidated by baking, or if your past zucchini bread experiences have been… well, a little *meh*, you need to try this. It’s what I always bake when I have a surplus of zucchini from the garden, or frankly, when I just need a little bit of comforting sweetness without a ton of fuss. It’s right up there with my ultimate chocolate chip cookies, but in a totally different, cozy way.
What is Zucchini bread?
So, what exactly *is* this magical zucchini bread we’re talking about? At its heart, it’s a quick bread, which means it uses chemical leaveners like baking soda or baking powder instead of yeast. This makes it super fast to whip up – no waiting for dough to rise! The “zucchini” part comes from finely grated zucchini, which might sound a little odd at first, but trust me, it’s the secret weapon. It adds an incredible moisture and a subtle, earthy sweetness without that overwhelming veggie flavor. Think of it as a sneaky way to get more veggies into your diet, disguised as a ridiculously delicious treat. It’s not cake, it’s not a dense loaf; it’s that perfect in-between, ideal for a satisfying breakfast, a delightful afternoon snack, or even a simple dessert. The name itself, “zucchini bread,” tells you exactly what it is, but the experience is so much more than the sum of its parts. It’s comfort, it’s nostalgia, it’s pure deliciousness.
Why you’ll love this recipe?
There are so many reasons why I’ve made this recipe more times than I can count, and why I know you’ll fall in love with it too. First off, the flavor profile is just out of this world. It’s not just sweet; it has these beautiful warm spice notes from the cinnamon and nutmeg that just sing. And that zucchini? It adds a subtle sweetness that’s so much better than just relying on sugar alone. It makes it feel rich and satisfying. Then there’s the texture – oh my goodness, the texture! It’s incredibly moist and tender, never dry or crumbly. That’s all thanks to the zucchini and a few other little tricks I’ve learned over the years. And let’s be real, simplicity is key for me, especially on busy weeknights. This recipe is a lifesaver. You can literally mix up the batter in about 10-15 minutes and then let the oven do the rest. It’s also surprisingly budget-friendly, using common pantry staples. You probably have most of the ingredients on hand right now! What I love most about this is its versatility. You can enjoy it plain, with a simple dusting of powdered sugar, or even a luscious glaze. It’s fantastic with a cup of coffee in the morning, a surprise treat for kids after school, or even served warm with a dollop of cream cheese frosting as a dessert. It’s so much more forgiving than a delicate cake, and it holds up beautifully. It’s the kind of recipe that makes you feel like a baking rockstar, even if you’re a total beginner.
How do you make Zucchini bread?
Quick Overview
This recipe is all about effortless deliciousness. We’re going to start by whisking together your dry ingredients, then combine your wet ingredients separately. The magic happens when you gently bring them together, followed by folding in the star ingredient: grated zucchini! We’ll then get creative with a simple, dreamy filling and a swirl that looks as good as it tastes. Pop it in the oven, and in less than an hour, you’ll have a masterpiece. It’s designed to be straightforward, with minimal cleanup, and maximum reward. You don’t need any fancy equipment, just a couple of bowls, a whisk, and a spatula.
Ingredients
For the Main Batter:
Here’s what you’ll need for the base of our amazing zucchini bread. I always try to use good quality all-purpose flour – it just makes a difference in the final texture. For the sugar, I use a mix of granulated and brown sugar; the brown sugar adds a lovely depth and moisture. And of course, eggs, melted butter (or a neutral oil like vegetable or canola if you prefer – I’ve tested it both ways and it’s wonderful!), and a splash of vanilla extract to round everything out. Don’t forget your leaveners – baking soda and baking powder – and a good pinch of salt to balance the sweetness. And the cinnamon and nutmeg? They’re non-negotiable for that cozy, bakery-worthy aroma and flavor. Make sure your baking soda and baking powder are fresh; that’s a common reason for flat baked goods!
For the Filling:
This is where we add an extra layer of flavor and texture! I usually go with a simple mix of chopped walnuts or pecans, but you could also use chocolate chips (mini or regular, your call!), or even some dried cranberries if you’re feeling fruity. If you’re using nuts, toasting them lightly beforehand really brings out their flavor – just a few minutes in a dry skillet until fragrant. This part is totally customizable to what you have on hand or what your family loves most. It’s what makes each loaf unique!
For the Glaze:
This is totally optional, but oh-so-worth-it! It’s just a simple mix of powdered sugar, a touch of milk (or almond milk – I tested this with almond milk and it actually made it even creamier!), and a splash of vanilla. You can also add a squeeze of lemon juice for a little tang, or even a bit of cinnamon to echo the flavors in the bread. You want it to be pourable but not too thin. I’ll give you some tips on getting the consistency just right!
Step-by-Step Instructions
Step 1: Preheat & Prep Pan
First things first, let’s get that oven preheated to 350°F (175°C). This is crucial for an even bake. While it’s heating up, grab your loaf pan – a standard 9×5 inch pan is perfect. Give it a good grease and flour, or line it with parchment paper. I find parchment paper makes lifting the bread out a breeze, which is a lifesaver when you’re eager to dig in!
Step 2: Mix Dry Ingredients
In a large bowl, whisk together your all-purpose flour, granulated sugar, brown sugar, baking soda, baking powder, salt, cinnamon, and nutmeg. Whisking them together helps to distribute the leaveners evenly, which is key for a good rise. You want to see a nice, uniform mixture. No lumps allowed!
Step 3: Mix Wet Ingredients
In a separate medium bowl, whisk your eggs until they’re lightly beaten. Then, stir in your melted butter (make sure it’s not too hot, or it’ll cook the eggs!), milk, and vanilla extract. Give it a good whisk until everything is well combined and looks smooth and emulsified. The smell of vanilla alone is so comforting!
Step 4: Combine
Now for the exciting part: bringing it all together! Pour the wet ingredients into the bowl with the dry ingredients. Using a spatula or a wooden spoon, gently fold them together until *just* combined. It’s really important not to overmix here. A few streaks of flour are totally okay; they’ll disappear during baking. Overmixing develops the gluten too much, which can lead to a tough loaf, and we definitely don’t want that. This is a lesson I learned the hard way years ago!
Step 5: Prepare Filling
If you’re adding nuts or chocolate chips, this is the time to get them ready. Give your nuts a rough chop if they aren’t already. If you’re using chocolate chips, just have them ready to go. These add little pockets of joy throughout the bread.
Step 6: Layer & Swirl
Now, gently fold in your grated zucchini and your chosen filling (nuts, chocolate chips, etc.) into the batter. Again, do this gently, just until it’s incorporated. Then, pour about half of the batter into your prepared loaf pan. Sprinkle half of your filling mixture over the top. Spoon the remaining batter over that, and then sprinkle the rest of your filling on top. If you want to add a swirl, you can take a knife and gently swirl the top layer of batter a few times. It creates these gorgeous patterns and makes each slice unique!
Step 7: Bake
Pop that beautiful pan into your preheated oven. Bake for about 55-65 minutes. The best way to check for doneness is to insert a toothpick or a thin skewer into the center of the loaf. If it comes out clean (or with just a few moist crumbs attached), it’s ready! If it comes out with wet batter, give it another 5-10 minutes and check again. Ovens can be tricky, so always trust the toothpick test over the clock!
Step 8: Cool & Glaze
Once it’s baked, let the zucchini bread cool in the pan for about 10-15 minutes. This is important for it to set up properly. Then, carefully invert it onto a wire rack to cool completely. Resist the urge to slice into it right away if you’re planning to glaze! Once it’s mostly cooled, you can whip up your glaze. Whisk the powdered sugar and milk together until smooth. You want it thick enough to coat but thin enough to drizzle. Drizzle it all over the top of the cooled loaf. The glaze will set slightly as it cools further. It’s perfect when you’re craving something sweet at 10pm but don’t want to bake a whole cake!
Step 9: Slice & Serve
Once the glaze has set a bit, or if you skipped the glaze, it’s time to slice! Use a sharp serrated knife for the cleanest cuts. Serve it warm or at room temperature. It’s absolutely divine on its own, but a little pat of butter is never a bad idea!
What to Serve It With
This zucchini bread is so versatile, it’s practically a chameleon! For breakfast, it’s absolute perfection alongside a steaming mug of coffee or a nice cup of tea. I love it lightly toasted with a smear of cream cheese – it adds a lovely tang that complements the sweetness. For a more elegant brunch spread, I’ll sometimes slice it a little thinner and arrange it on a pretty platter, perhaps with some fresh berries on the side for a pop of color and freshness. It also pairs wonderfully with mimosas or a sparkling cider. If you’re serving it as dessert, especially if you’ve gone with the glaze or a chocolate chip version, it’s wonderful with a scoop of vanilla bean ice cream or a dollop of whipped cream. My family’s favorite way to enjoy it, though, is just as a cozy snack. On a chilly afternoon, with a glass of cold milk, it’s pure comfort. I’ve even packed it for picnics, and it holds up beautifully!
Top Tips for Perfecting Your Zucchini Bread
Over the years, I’ve learned a few tricks that make this zucchini bread consistently amazing. When it comes to the zucchini prep, don’t skip squeezing out the excess moisture! Grate your zucchini using the large holes of a box grater, then place it in a fine-mesh sieve or wrap it in a clean kitchen towel or cheesecloth. Give it a good squeeze to remove as much liquid as possible. This is crucial for preventing a soggy loaf and ensuring a good texture. If you skip this, your bread might turn out gummy. For mixing, remember my earlier tip: *do not overmix*. It’s the number one rule for tender quick breads. Mix until *just* combined. When it comes to the swirl, you can get really creative. For a simple swirl, just use a knife or a skewer to gently draw lines through the top layer of batter. If you want more distinct patterns, you can add a bit of cocoa powder to a portion of the batter and swirl that in. For ingredient swaps, if you don’t have butter, a neutral oil like vegetable or canola works perfectly – just use the same amount. I’ve even tested this with applesauce as a partial fat substitute, and it was surprisingly moist, though it changed the flavor profile a bit. For baking, always use the toothpick test. Ovens vary wildly, so don’t be afraid to give it an extra 10 minutes if needed. If the top starts browning too quickly before the inside is cooked, you can loosely tent it with foil. And for the glaze, if it’s too thick, add milk a teaspoon at a time until it reaches your desired consistency. If it’s too thin, add more powdered sugar, a tablespoon at a time. Experiment with different extracts too – almond extract can be a lovely addition!
Storing and Reheating Tips
The best part about this zucchini bread is how well it keeps! If you’ve got some left (which is rare at my house!), you can store it at room temperature for up to 3 days. Just make sure it’s completely cooled and wrap it tightly in plastic wrap or store it in an airtight container. If you plan to keep it longer, or if your kitchen is particularly warm, the refrigerator is your friend. Wrap it well in plastic wrap and then place it in an airtight container. It’ll stay fresh in the fridge for up to a week. The flavor often gets even better after a day! If you want to freeze it for even longer storage, wrap the completely cooled loaf (or individual slices) tightly in plastic wrap, then in a layer of aluminum foil, and then place it in a freezer-safe bag. It can last in the freezer for up to 3 months. To reheat, if it’s from the fridge, a quick few seconds in the microwave (about 10-15 seconds per slice) is usually enough to warm it up. If it’s from frozen, let it thaw overnight in the refrigerator or at room temperature. If you’ve glazed your bread, it’s usually best to add the glaze *after* reheating if you’re warming up leftovers, especially if you’re microwaving, as the glaze can get a bit sticky. For room temperature storage, glazing is fine as long as it’s completely cool before covering.
Frequently Asked Questions
Final Thoughts
So there you have it, my absolute favorite zucchini bread recipe! It’s more than just a recipe; it’s a little piece of kitchen happiness that I love sharing. I truly believe that anyone can make this and get amazing results. It’s the perfect example of how simple ingredients can transform into something truly special. The moist texture, the warm spices, that hint of sweetness – it’s a winner every single time. If you love this recipe, you might also enjoy my recipe for moist banana bread or my famous lemon blueberry scones. They’re all made with the same love and attention to detail. I can’t wait for you to try this zucchini bread and experience that incredible aroma filling your own home. Let me know in the comments how yours turns out, what delicious fillings you chose, or any fun variations you dreamt up! Happy baking, everyone!
Polish dumplings
Ingredients
Method
- Place the potatoes in a large pot and cover with water. Bring to a boil and then simmer until fork tender, about 15 minutes. Drain the water and mash the potatoes. Place the mashed potatoes in a mixing bowl and chill in the refrigerator until cold.
- In a small skillet over medium heat, warm the olive oil and then sauté the onion until tender. Let them cool for a few minutes and then add the cooked onions to the bowl of cold mashed potatoes. Place the sauerkraut in a strainer and rinse very well under running water, for at least 3 minutes. Drain thoroughly and add the sauerkraut to the bowl with the potatoes. Add the farmer's cheese and stir to combine. Store in the refrigerator until ready to make the pierogies. The filling can be made a day or two in advance and refrigerated until needed.
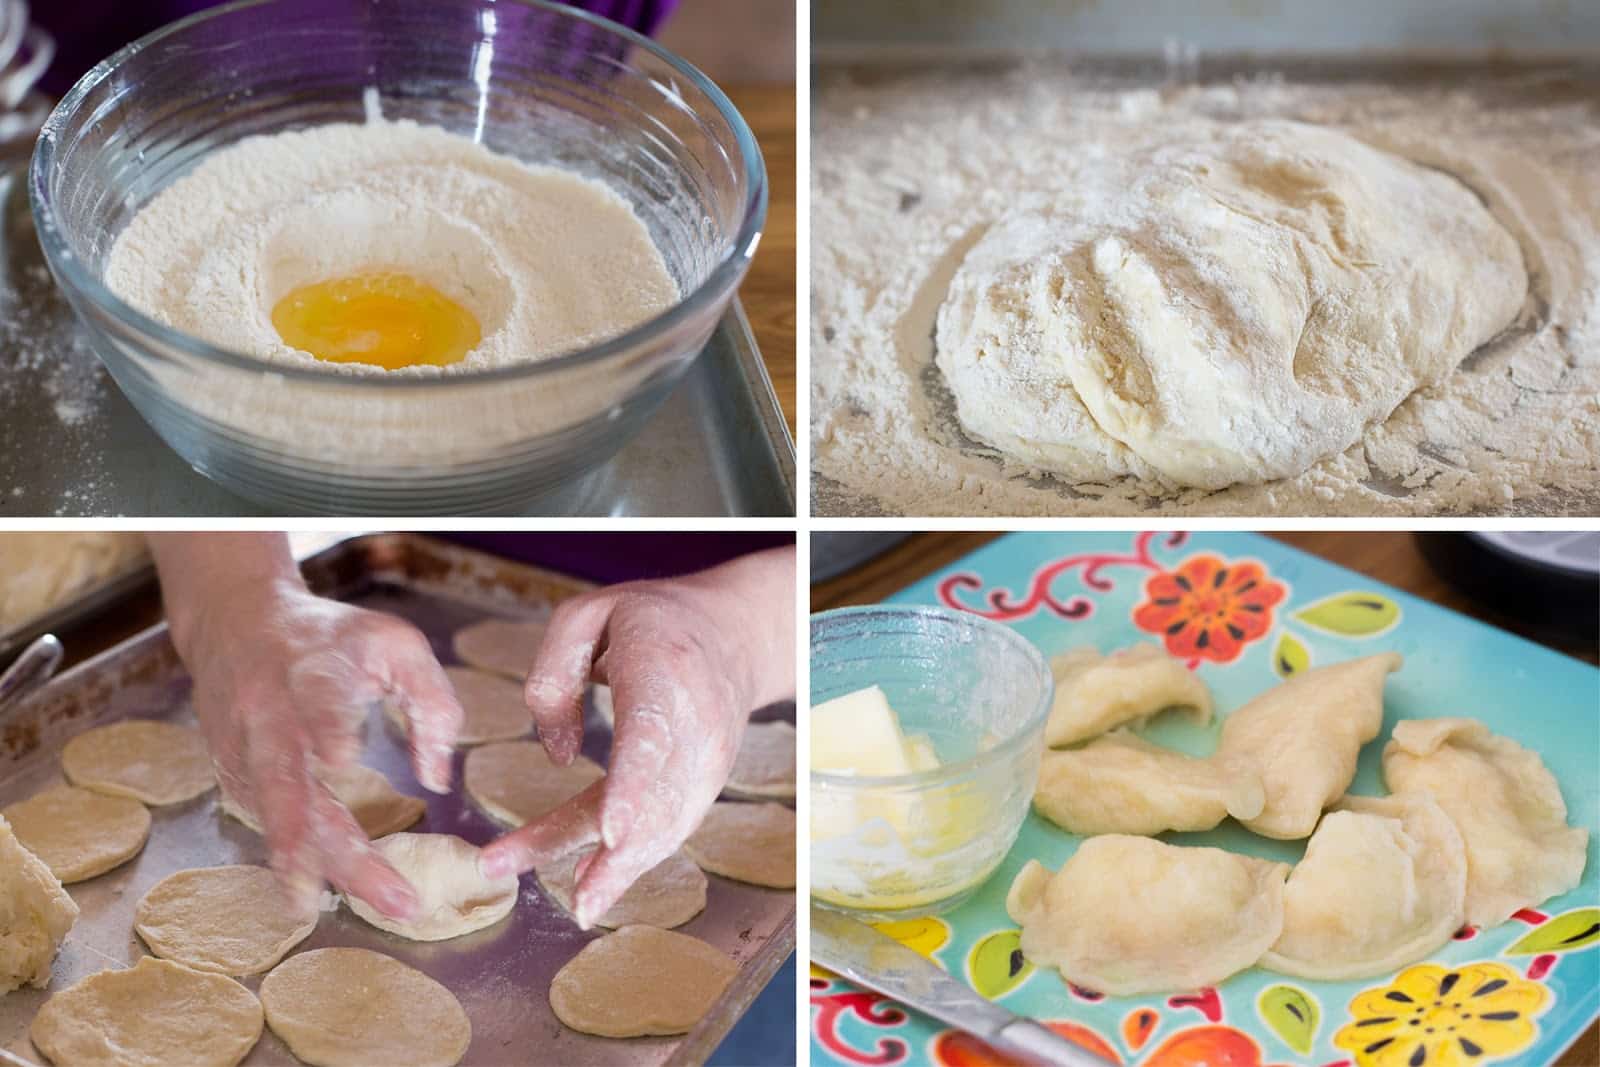
- Place the flour and salt in a large bowl and stir to combine. Make a small well with your hand and crack the egg into it. Stir to combine and then gradually add the hot water, mixing with your hands until the dough is very sticky and well combined. If it becomes too sticky and wet, add just a tablespoon or so more flour. Chill the dough in the refrigerator for at least an hour.
- Bring a large pot of water to a boil. Sprinkle a large board with flour. Transfer the chilled dough to the floured surface and flip it over a few times to coat with flour. Gently knead the dough a few times with your hands, adding a sprinkling of flour as needed.
- To Shape Pierogies: Divide the dough into four sections and roll out one of the sections very thin, to about 0.125-inch thickness (just a bit thinner than a pie crust). Cut into circles using a round cutter. Place 1 tablespoon of the potato filling on one side of each circle. Fold over the circle and pinch firmly around the edges of the dough to seal. Place the prepared pierogies in a single layer onto a waiting plate, ensuring they don't touch to prevent sticking.
- To Boil Pierogies: Drop the shaped pierogies into the boiling water, a few at a time, being careful not to overcrowd the pot. Use a spoon or spatula to gently nudge them off the bottom of the pot if they stick. When they float to the surface of the water (this indicates they are cooked through), lift them out carefully with a slotted spoon. Place them on a buttered plate and drizzle a small amount of melted butter on top to prevent sticking together. Let the boiled pierogies cool for a few minutes before frying them.
- To Fry Pierogies: In a large skillet over medium heat, melt a tablespoon of butter. When the butter sizzles, place the boiled pierogies in the skillet in a single layer. Let them cook for 2-3 minutes per side, until lightly browned and crispy on the edges. The pierogies will not turn brown all over, but the edges should crisp and be light brown. Remove the finished pierogies to a buttered baking dish. Serve hot with sour cream or applesauce, if desired.