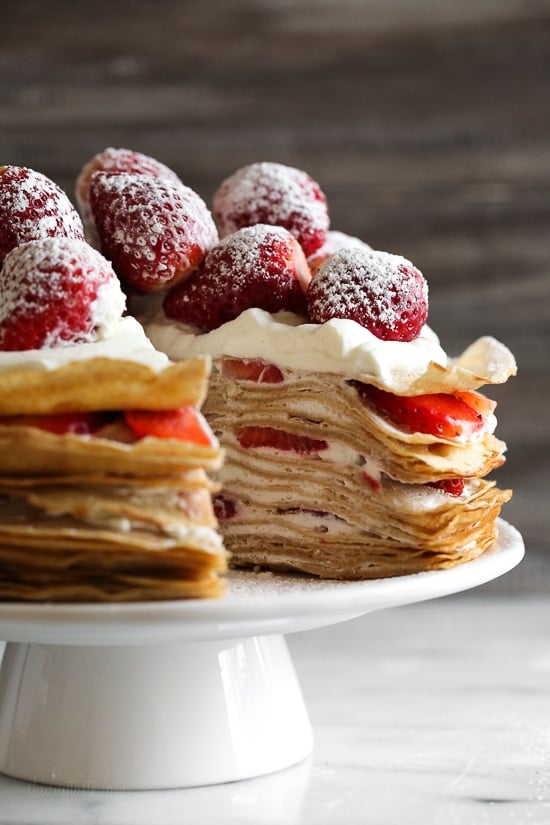
Easy Crepe Cake With Strawberries and Cream
There are some recipes that just feel like coming home, right? For me, it’s this zucchini bread. It’s not just any zucchini bread; it’s the one my grandma used to make, the one that filled our house with the most incredible aroma, the one that’s become a staple in my own kitchen. I’ve tweaked it a little over the years, adding my own little touches, but the soul of it remains the same. It’s moist, perfectly spiced, and has this incredible depth of flavor that makes you close your eyes and just savor it. Honestly, if you’ve ever been intimidated by baking quick breads, or if you’ve tried other zucchini breads that turned out dry and crumbly (we’ve all been there!), this is the one to try. It’s my go-to when I’ve got a bounty of zucchini from the garden, or even just when I need a little something sweet to brighten my day. It’s honestly leagues better than that box mix stuff you might be tempted to grab in a pinch. This is the real deal, made with love and guaranteed to be a hit.
What is this delicious Zucchini Bread?
So, what exactly *is* this glorious zucchini bread I’m raving about? Think of it as the ultimate comfort food baked into loaf form. It’s a quick bread, meaning it’s leavened with baking soda or baking powder instead of yeast, so there’s no kneading or long rising times involved. It’s essentially a moist, tender cake packed with shredded zucchini, warm spices, and sometimes a little something extra like nuts or chocolate chips. The “zucchini” part is key because it adds incredible moisture without making the bread taste like vegetables, I promise! The name itself, “The Ultimate Zucchini Bread,” is a bit of a bold claim, I know, but after years of making it and watching people devour it, I’m standing by it. It’s the kind of bread that’s perfect for any time of day, and it always seems to disappear faster than I can bake it!
Why you’ll love this recipe?
Let’s be honest, there are a million zucchini bread recipes out there, so why this one? Well, for starters, the flavor is just out of this world. It’s got that perfect balance of sweetness and spice – think cinnamon, nutmeg, and a hint of cloves that just sing together. It’s unbelievably moist, which is the holy grail of quick breads, and that’s all thanks to the magic of zucchini. Seriously, you can’t taste the zucchini, but it makes the bread so tender and rich. And the simplicity! This recipe is a lifesaver on busy weeknights or when unexpected guests pop over. You probably have most of the ingredients in your pantry already. Plus, it’s super budget-friendly, especially if you’re growing your own zucchini. Another huge plus is its versatility. You can dress it up with walnuts or chocolate chips, or keep it classic. It’s fantastic on its own, but also wonderful toasted and slathered with butter. Compared to other zucchini breads I’ve tried, or even other quick breads like banana bread, this one has a special place in my heart because it’s just *so* reliably delicious and satisfying. What I love most about this recipe is that it never fails to impress, and it always brings a smile to people’s faces. It’s more than just a recipe; it’s a memory maker.
How do you make Zucchini bread?
Quick Overview
This recipe is beautifully straightforward. You’ll whisk together your dry ingredients, whip up your wet ingredients separately, then gently combine them. The shredded zucchini gets folded in, and then it’s just a matter of pouring it into a prepared loaf pan and baking until golden and fragrant. It’s really that simple! The beauty of this method is that it ensures everything is evenly distributed and prevents overmixing, which is the number one enemy of tender quick breads. You’ll be amazed at how quickly it comes together, making it perfect for those moments you need a delicious treat in a hurry.
Ingredients
For the Main Batter:
This is the heart of our zucchini bread, the foundation for all that deliciousness. When you’re grabbing your zucchini, try to pick ones that are medium-sized and firm. Avoid anything too huge and seedy. For the flour, all-purpose is perfectly fine, but if you have a good quality unbleached all-purpose flour, I find it gives a slightly better texture. And for the sugar, I use a mix of granulated and brown sugar – the brown sugar adds a lovely depth of flavor and extra moisture. It’s a little trick I picked up years ago that makes a big difference!
* 2 cups all-purpose flour
* 1 teaspoon baking soda
* 1/2 teaspoon salt
* 1 teaspoon ground cinnamon
* 1/2 teaspoon ground nutmeg
* 1/4 teaspoon ground cloves (optional, but highly recommended!)
* 1/2 cup unsalted butter, softened
* 1 cup granulated sugar
* 1/2 cup packed light brown sugar
* 2 large eggs, at room temperature
* 1 teaspoon vanilla extract
* 2 cups finely grated zucchini (about 2 medium zucchinis), squeezed dry
For Optional Add-ins (but highly recommended!):
This is where you can really personalize it. My kids *love* chocolate chips, so we usually throw in a cup of those. But chopped walnuts or pecans are also fantastic if you prefer a bit of crunch. I’ve even tried stirring in a few dried cranberries once, which was a lovely tart surprise. Just don’t go overboard, you don’t want to weigh down the batter too much.
* 1 cup chocolate chips (semi-sweet or dark are my favorites!)
* 1/2 cup chopped walnuts or pecans
For a Simple Glaze (optional, but makes it fancy!):
This glaze is super simple and takes this bread from great to absolutely divine. It adds a little extra sweetness and a beautiful finish. It’s not strictly necessary, but if you’re feeling a bit extra, I say go for it! Make sure your bread is completely cool before you drizzle this on, otherwise, it’ll just melt right off. Trust me on this one!
* 1 cup powdered sugar
* 2-3 tablespoons milk (or buttermilk for a tangier flavor!)
* 1/2 teaspoon vanilla extract
Step-by-Step Instructions
Step 1: Preheat & Prep Pan
First things first, let’s get that oven preheating. I like to set mine to 350°F (175°C). This gives it plenty of time to warm up fully while you get everything else ready. While that’s happening, grab a standard 9×5 inch loaf pan. You want to grease it really well and then flour it. I usually use butter or cooking spray for greasing and then give it a light dusting of flour, tapping out any excess. Some people like to line their pan with parchment paper – that’s a great option too, especially if you’re worried about sticking. Just make sure the parchment overhangs slightly so you can easily lift the bread out later.
Step 2: Mix Dry Ingredients
In a medium-sized bowl, whisk together your flour, baking soda, salt, cinnamon, nutmeg, and those lovely cloves if you’re using them. Whisking is important here to make sure all the leavening agents and spices are evenly distributed. You don’t want any surprises like a pocket of baking soda! You can even sift them together if you’re feeling extra precise, but a good whisk usually does the trick for me.
Step 3: Mix Wet Ingredients
Now for the wet ingredients. In a large bowl, cream together your softened butter, granulated sugar, and brown sugar. Beat them together until it’s light and fluffy. This step is crucial for incorporating air, which helps make the bread tender. Then, beat in the eggs one at a time, making sure each one is fully incorporated before adding the next. Stir in the vanilla extract. The mixture should look smooth and a little glossy.
Step 4: Combine
Here’s where we bring it all together. Gradually add the dry ingredients to the wet ingredients, mixing on low speed (or by hand with a spatula) until *just* combined. Seriously, don’t overmix! A few streaks of flour are okay at this stage; they’ll disappear when you add the zucchini. Overmixing develops the gluten too much, leading to a tough bread, and nobody wants that. Next, gently fold in your grated and squeezed zucchini, along with any optional add-ins like chocolate chips or nuts.
Step 5: Prepare Filling
For this recipe, the “filling” is really the zucchini and any add-ins that get mixed directly into the batter. Make sure your zucchini is well-drained. I usually grate it using the medium holes on a box grater, then wrap it in a clean kitchen towel or paper towels and squeeze out as much liquid as I possibly can. This is a critical step to prevent a soggy bread! For chocolate chips, I just toss them in straight from the bag. If you’re using nuts, a rough chop is perfect.
Step 6: Layer & Swirl
There’s no real layering or swirling with this particular recipe since the add-ins are mixed throughout the batter. You’ll simply pour the prepared batter evenly into your greased and floured loaf pan. Use a spatula to spread it out so it’s level. You can even give the pan a gentle tap on the counter to help settle the batter and remove any large air pockets.
Step 7: Bake
Pop that pan into your preheated oven. Bake for about 50-65 minutes. Baking time can vary quite a bit depending on your oven, so start checking around the 50-minute mark. The best way to tell if it’s done is to insert a toothpick or a thin knife into the center of the loaf. If it comes out clean (or with just a few moist crumbs, but no wet batter), it’s ready. If it’s still wet, give it another 5-10 minutes and check again.
Step 8: Cool & Glaze
Once it’s done, take the loaf pan out of the oven and let it cool in the pan for about 10-15 minutes. This allows it to set up a bit before you try to remove it. Then, carefully invert the pan onto a wire rack to release the loaf. Let it cool completely on the wire rack. This is important, especially if you plan to glaze it, because a warm bread will melt the glaze right off. Once it’s totally cool, you can whisk together your glaze ingredients until smooth. Drizzle it over the top and let it set.
Step 9: Slice & Serve
Once the glaze is set (or if you skipped the glaze), it’s time to slice! I find using a serrated knife works best for a clean cut. Serve it as is, or toasted with a generous spread of butter. It’s absolutely delicious warm or at room temperature.
What to Serve It With
This zucchini bread is so versatile, it truly fits into any meal or occasion! For a leisurely weekend breakfast, I love serving a thick slice toasted and buttered alongside a steaming mug of my favorite coffee. It’s a simple pleasure that just feels so right. For brunch, it’s a fantastic addition to the spread. I’ll often cut it into smaller squares or rounds and arrange it on a platter with fresh fruit, yogurt parfaits, and maybe some savory egg dishes. It offers that perfect sweet balance to the meal. As a dessert, especially if you’ve added chocolate chips, it’s wonderful served slightly warmed with a dollop of whipped cream or a scoop of vanilla bean ice cream. It’s that perfect after-dinner treat that satisfies a sweet craving without being too heavy. And for those cozy snacks – maybe it’s an afternoon pick-me-up or a late-night craving – a simple slice on its own is pure bliss. My family loves it with a cold glass of milk, and it’s always a hit when we have friends over for a casual get-together. It’s one of those things that just brings people together.
Top Tips for Perfecting Your Zucchini Bread
I’ve made this zucchini bread more times than I can count, and over the years, I’ve picked up a few tricks that make a world of difference. These are the little things that elevate it from good to truly exceptional.
Zucchini Prep: I can’t stress this enough – squeeze out that moisture! Grating the zucchini and then wrapping it in a clean kitchen towel or paper towels and wringing it out is the absolute key to a non-soggy loaf. You want that moisture *in* the bread for tenderness, but not so much that it makes it heavy or wet. I use the medium holes on my grater; too fine and it can get mushy, too coarse and you might get big chunks.
Mixing Advice: The cardinal rule of quick breads is “do not overmix.” Mix the dry and wet ingredients until *just* combined. A few tiny streaks of flour are perfectly fine. Seriously, stop mixing when you can’t see big pockets of dry flour. Overmixing develops the gluten, which results in a tough, chewy texture. You want it tender and delicate.
Swirl Customization: While this recipe doesn’t require swirling, if you were making a double batch and wanted to add a cinnamon-sugar swirl, you’d typically sprinkle it between layers of batter. For our chocolate chips or nuts, just fold them in gently at the end. Don’t overwork the batter when adding them.
Ingredient Swaps: If you don’t have brown sugar, you can use all granulated sugar, but you’ll lose a bit of that deep flavor and moisture. For the spices, feel free to adjust them to your liking. If you’re not a fan of cloves, just omit them. And if you’re out of regular milk for the glaze, buttermilk adds a nice tang, or even a dairy-free milk like almond or oat milk works perfectly.
Baking Tips: Ovens can be so finicky! If you know your oven runs hot, start checking for doneness a little earlier. If it’s browning too quickly on top before the inside is cooked, you can loosely tent it with foil for the last 15-20 minutes of baking. The toothpick test is your best friend here. Make sure you insert it into the center, avoiding any chocolate chips or nuts if you’ve added them.
Glaze Variations: If you want a thinner glaze, just add a touch more milk. For a thicker glaze, use a little less milk or more powdered sugar. You can also add a squeeze of lemon juice to the glaze for a bit of brightness, or even a tablespoon of cocoa powder for a chocolate glaze. Don’t stress too much about perfection here; a rustic drizzle looks just as beautiful and tastes amazing!
Storing and Reheating Tips
Proper storage is key to keeping this delicious zucchini bread fresh and tasty. Because it’s so moist, it tends to stay good for a decent amount of time. For room temperature storage, once the bread is completely cooled, wrap it tightly in plastic wrap or place it in an airtight container. It should stay wonderfully fresh for about 3-4 days. I usually keep it on the counter, and it’s always gone by then anyway! If you need it to last longer, refrigerator storage is your friend. Again, make sure it’s well-wrapped or in an airtight container. It can last for about a week in the fridge. The texture might change slightly, becoming a bit denser, but it’s still delicious, especially when toasted. For freezer instructions, this bread freezes beautifully! Once it’s completely cool, wrap it very tightly in a couple of layers of plastic wrap, then in a layer of aluminum foil. It should keep well in the freezer for up to 3 months. To thaw, unwrap it and let it come to room temperature on the counter for a few hours. You can also gently reheat slices in a toaster oven or microwave. As for glaze timing, I always recommend glazing *after* the bread has completely cooled, and ideally, right before serving if you plan to store it for more than a day. If you freeze it with the glaze on, the glaze can sometimes become a bit sticky or soft upon thawing. It’s usually best to glaze it after it’s thawed and ready to eat.
Frequently Asked Questions
Final Thoughts
So there you have it – my tried-and-true, utterly delicious zucchini bread recipe. It’s more than just a recipe; it’s a little piece of home, a comforting aroma that fills the kitchen, and a guaranteed crowd-pleaser. I truly believe this recipe captures the essence of what makes homemade baking so special – simple ingredients transformed into something truly wonderful. It’s the perfect way to use up that garden zucchini, or just to treat yourself and your loved ones to something truly delicious. If you’re a fan of this moist, spiced perfection, you might also enjoy my Lemon Poppy Seed Muffins for another delightful quick bread experience, or perhaps my Classic Chocolate Chip Cookies for a different kind of sweet indulgence. I really hope you give this zucchini bread a try. It’s a recipe that has brought so much joy to my kitchen, and I can’t wait to hear how yours turns out! Let me know in the comments if you try it, and what delicious add-ins you might have used!
crepe cake strawberries
Ingredients
Method
- In a blender, combine the milk, egg whites, egg, oil, vanilla, sugar and salt. Add the flours and cinnamon and blend until smooth.
- Heat a 10-inch nonstick skillet over medium-low heat. When hot, lightly spray with oil.
- Pour 0.25 cup of batter into the skillet, swirling the pan slightly to form a thin, even coating on the bottom of the skillet.
- Cook until the bottom of the crepe sets and is golden in color, 1 to 2 minutes. Gently flip with a spatula and cook the second side for about 1 minute.
- Repeat with the remaining batter, stacking finished crepes on a plate.
- In a stand mixer or hand mixer on medium speed, whip the cream, cane sugar and vanilla until stiff peaks form, about 2 minutes. Fold in the yogurt.
- Slice half of the strawberries, leaving the other half whole for topping.
- Place one crepe on a clean plate. Using a small spatula, spread a thin layer (about 3 tablespoons) of filling on the crepe, leaving a 0.25-inch border.
- Repeat, adding a layer of strawberries every 4 - 5 crepes in a single layer evenly over filling. Cover with another crepe and repeat to make a stack of about 12 crepes total.
- To finish, top with the remaining whole strawberries and sprinkle with 1 teaspoon powdered sugar; reserve remaining powdered sugar for serving.