Easy Cinnamon Swirl Cheesecake Delights
I remember the first time I pulled this loaf out of the oven. The whole house filled with this incredible, warm, cinnamon-spiced aroma that just screamed “comfort.” My kids, who are usually pretty picky about anything green in their food, came running into the kitchen, noses twitching. That was years ago, and honestly, the smell still gets me every single time. This isn’t just any zucchini bread; it’s the kind of recipe that becomes a staple, a guaranteed win when you need something delicious without a fuss. It’s like the friendliest version of banana bread, but with a subtle sweetness and a texture that’s just… perfect. If you’ve ever been intimidated by baking, or just looking for that one recipe that always delivers, you’ve found it. This is my absolute favorite way to use up zucchini, and trust me, no one will ever guess what the secret ingredient is!
What is Zucchini bread?
So, what exactly *is* zucchini bread? At its heart, it’s a quick bread, much like banana bread or pumpkin bread, but it gets its incredible moistness and tender crumb from grated zucchini. The zucchini itself bakes down and practically melts into the batter, lending a subtle earthy sweetness and a really lovely, soft texture. It’s not like you’re biting into chunks of zucchini, not at all! It’s more about what the zucchini *does* for the bread. The name comes directly from its star ingredient, and it’s a classic for a reason. Think of it as a humble, yet utterly delightful, way to sneak some extra veggies into your day, disguised as a treat. It’s comforting, it’s forgiving, and it smells like a hug in a loaf pan.
Why you’ll love this recipe?
Honestly, there are so many reasons why this particular zucchini bread recipe has earned a permanent spot in my recipe binder. First off, the flavor. It’s got that perfect balance of sweet, with a gentle warmth from the cinnamon and a hint of vanilla. It’s not overly sweet, which I appreciate, especially for breakfast or a mid-afternoon snack. The texture is where it truly shines for me. It’s incredibly moist and tender, almost melt-in-your-mouth, thanks to that sneaky zucchini. And speaking of sneaky, the fact that you can’t taste the zucchini is a huge win in my book! My kids devour it, and I feel good knowing they’re getting some extra goodness. Beyond the taste, it’s ridiculously simple to make. I can whip this up on a weeknight when I get home from work, and it’s ready before dinner is even done. No fancy equipment needed, just a bowl and a whisk. It’s also wonderfully budget-friendly; most of the ingredients are pantry staples. And versatility? Oh yes! I love it plain, but adding chocolate chips or walnuts takes it to a whole new level. It’s a lifesaver when you have a surplus of zucchini from the garden or a farmer’s market haul. It truly is the best of all worlds: delicious, easy, affordable, and adaptable!
How do I make Zucchini bread?
Quick Overview
This is about as straightforward as it gets. We’ll mix up the wet and dry ingredients separately, then gently combine them. The grated zucchini gets stirred in, and then it’s all about getting it into the loaf pan and into the oven. The magic happens while it bakes, transforming those simple ingredients into a golden-brown, wonderfully fragrant loaf. It’s a one-bowl wonder for the wet ingredients, making cleanup a breeze, which is always a win in my kitchen!
Ingredients
For the Main Batter:
You’ll need about 2 cups of grated zucchini. Don’t worry about peeling it; just make sure to give it a good wash! I usually use the medium holes on my box grater. A cup and a half of all-purpose flour is standard. I always use unbleached, but any all-purpose will do. For sweetness, we’re going with a cup of granulated sugar. You can reduce this slightly if you prefer it less sweet, but this amount gives it a lovely balance. Two large eggs, at room temperature if you can remember, will help bind everything together. Then, half a cup of melted unsalted butter. I’ve tried oil before, but butter gives it that richer, homemade flavor that I just adore. A teaspoon of pure vanilla extract is essential for that classic baked goods aroma. And for the lift and leavening, we’ve got a teaspoon of baking soda and half a teaspoon of baking powder. A pinch of salt (about half a teaspoon) to balance the sweetness. And my absolute favorite part for warming spices: a generous teaspoon of ground cinnamon. If you’re feeling adventurous, a quarter teaspoon of nutmeg is also wonderful.
For the Filling:
This is where you can really have fun! My classic go-to is half a cup of semi-sweet chocolate chips. They melt into little pockets of gooey goodness. If you’re more of a nutty person, half a cup of chopped walnuts or pecans are fantastic. Sometimes, I even mix them! If you want to boost the cinnamon flavor, you can stir in another teaspoon of cinnamon with your chips or nuts.
For the Glaze:
This is entirely optional but highly recommended for that extra special touch. A simple powdered sugar glaze is made with about a cup of powdered sugar, a tablespoon or two of milk (or even a little lemon juice for a tang!), and a tiny splash of vanilla extract. Whisk it until it’s smooth and pourable.
Step-by-Step Instructions
Step 1: Preheat & Prep Pan
First things first, get your oven preheating to 350 degrees Fahrenheit (175 degrees Celsius). I always grease and flour a standard 9×5 inch loaf pan. You can also line it with parchment paper for super easy removal, which is what I usually do now. Just make sure the parchment hangs over the sides a bit so you can lift the loaf out easily.
Step 2: Mix Dry Ingredients
In a large mixing bowl, whisk together the flour, sugar, baking soda, baking powder, salt, and cinnamon (and nutmeg if you’re using it). Give it a good whisk to make sure everything is evenly distributed. This ensures your leavening agents are mixed throughout, which means a nice, even rise.
Step 3: Mix Wet Ingredients
In a separate medium bowl (or a large liquid measuring cup), whisk together the melted butter (make sure it’s cooled slightly so it doesn’t cook the eggs!), the eggs, and the vanilla extract until well combined. This is where the magic starts to happen.
Step 4: Combine
Pour the wet ingredients into the bowl with the dry ingredients. Now, this is important: mix until *just* combined. A few lumps are perfectly fine! Overmixing develops the gluten in the flour, which can make your bread tough, and we definitely don’t want that. Gently fold in your grated zucchini. Again, don’t go crazy; just stir it in until you don’t see any dry streaks of flour.
Step 5: Prepare Filling
If you’re adding chocolate chips or nuts, now’s the time to gently fold them into the batter. I like to toss my chocolate chips with a tablespoon of the flour mixture before adding them to the batter; it helps prevent them from sinking to the bottom during baking.
Step 6: Layer & Swirl
(This step is for if you’re doing a double swirl or cinnamon swirl bread, but for this basic zucchini bread, you just pour the batter into the pan.) Pour the batter evenly into your prepared loaf pan. If you’re feeling fancy and want a cinnamon swirl, you can sprinkle a little extra cinnamon and sugar mixture over the top before baking, or even swirl it in gently with a knife. But for this simple loaf, just pour and smooth the top a bit.
Step 7: Bake
Bake for 50-65 minutes, or until a wooden skewer or toothpick inserted into the center comes out clean or with a few moist crumbs attached. Ovens can be so different, so it’s always good to start checking around the 50-minute mark. If the top is browning too quickly, you can loosely tent it with aluminum foil.
Step 8: Cool & Glaze
Once it’s done, let the loaf cool in the pan for about 10-15 minutes. Then, carefully invert it onto a wire rack to cool completely. This step is crucial if you want to glaze it. If you glaze it while it’s warm, the glaze will just melt right off! Once it’s totally cool, whisk together your glaze ingredients until you have a smooth consistency, then drizzle it over the top. Let the glaze set for a bit before slicing.
Step 9: Slice & Serve
Once the glaze is set (or if you skipped the glaze), slice the loaf using a serrated knife for clean cuts. Enjoy it at room temperature for the best texture. It’s delicious on its own, or with a little smear of butter.
What to Serve It With
This zucchini bread is a champion all on its own, but it also plays wonderfully with other things. For breakfast, I love a thick slice toasted and served with a dollop of plain Greek yogurt or a smear of cream cheese. It’s hearty enough to keep you full until lunch. For a more elegant brunch spread, a platter of this alongside fresh fruit, maybe some scrambled eggs and a nice quiche, is always a hit. It adds that sweet, comforting element that everyone appreciates. As a dessert, it’s fantastic on its own, of course, but serving it warm with a scoop of vanilla bean ice cream or a drizzle of caramel sauce is pure indulgence. And for those cozy snack moments, when you just need something comforting with your afternoon tea or coffee? This is it. My family also loves it just plain, as a little sweet treat after school. Honestly, it fits into any part of the day!
Top Tips for Perfecting Your Zucchini Bread
Over the years, I’ve learned a few things that make this recipe consistently amazing. First, about the zucchini itself. You want to use fresh, firm zucchini. I usually grate mine and then, this is key, I gently squeeze out *some* of the excess moisture. You don’t need to wring it out bone dry, but getting a good amount of the water out prevents your bread from becoming too dense or wet. I just use my hands, or you can put it in a fine-mesh sieve and press down. For mixing, I cannot stress enough the importance of not overmixing. Once the wet and dry ingredients meet, mix until they’re *just* combined. Seriously, a few flour streaks are fine. Overmixing is the enemy of tender quick breads. If you’re adding chocolate chips or nuts, tossing them with a tablespoon of the dry flour mixture before adding them to the batter really helps them stay suspended and not sink to the bottom. It’s a little trick I picked up that makes a big difference in the final appearance. When it comes to baking, every oven is a bit different. My best advice is to start checking for doneness a little early, around 50 minutes. A skewer or toothpick inserted into the center should come out with moist crumbs, not wet batter. If the top is browning too quickly, a loose tent of foil is your best friend. For ingredient swaps, I’ve tested this with almond milk instead of regular milk in the glaze, and it turned out just as creamy! You can also substitute some of the all-purpose flour with whole wheat for a slightly nuttier flavor, but I’d stick to about half and half to keep the texture light. And if you don’t have cinnamon? You can try a mix of allspice and a pinch of ground cloves for a different spice profile, but cinnamon is truly classic here.
Storing and Reheating Tips
This loaf is pretty forgiving when it comes to storage. At room temperature, it’s best enjoyed within 2-3 days. I usually wrap it tightly in plastic wrap or beeswax wrap, or store it in an airtight container. It stays wonderfully moist this way. If you think you won’t get through it that quickly, or if it’s a particularly warm day, the refrigerator is your friend. Wrapped well, it can last up to a week in the fridge. The texture might firm up a bit, but it’s still delicious. My favorite way to reheat refrigerated slices is in a toaster oven or a regular oven at a low temperature (around 300°F or 150°C) for about 5-10 minutes until warmed through. It brings back that fresh-baked softness. For longer storage, this bread freezes beautifully! Once completely cooled, I wrap the entire loaf (or individual slices) tightly in plastic wrap, then in aluminum foil, or use a freezer-safe bag. It can stay frozen for up to 3 months. Thaw it overnight at room temperature or gently reheat it from frozen in the oven at a low temperature. If you’re glazing, I recommend glazing *after* it’s thawed and reheated, just before serving. Glazing a frozen or fully thawed loaf and then refreezing can sometimes lead to a less-than-ideal texture for the glaze itself.
Frequently Asked Questions
Final Thoughts
There you have it – my absolute favorite, go-to zucchini bread recipe. It’s the kind of recipe that makes baking feel effortless and rewarding. It’s perfect for using up that summer zucchini, but honestly, I make it year-round because it’s just that comforting. The moist crumb, the warm spices, and the potential for chocolatey goodness – it’s all just so good. If you’re looking for a simple, reliable recipe that brings smiles to faces (and probably asks for seconds!), this is it. I truly hope you give it a try and that it becomes a cherished recipe in your own home, just like it is in mine. If you make it, please let me know how it turns out in the comments below! I’d love to hear about your variations or any little twists you add. Happy baking, and enjoy every delicious slice!
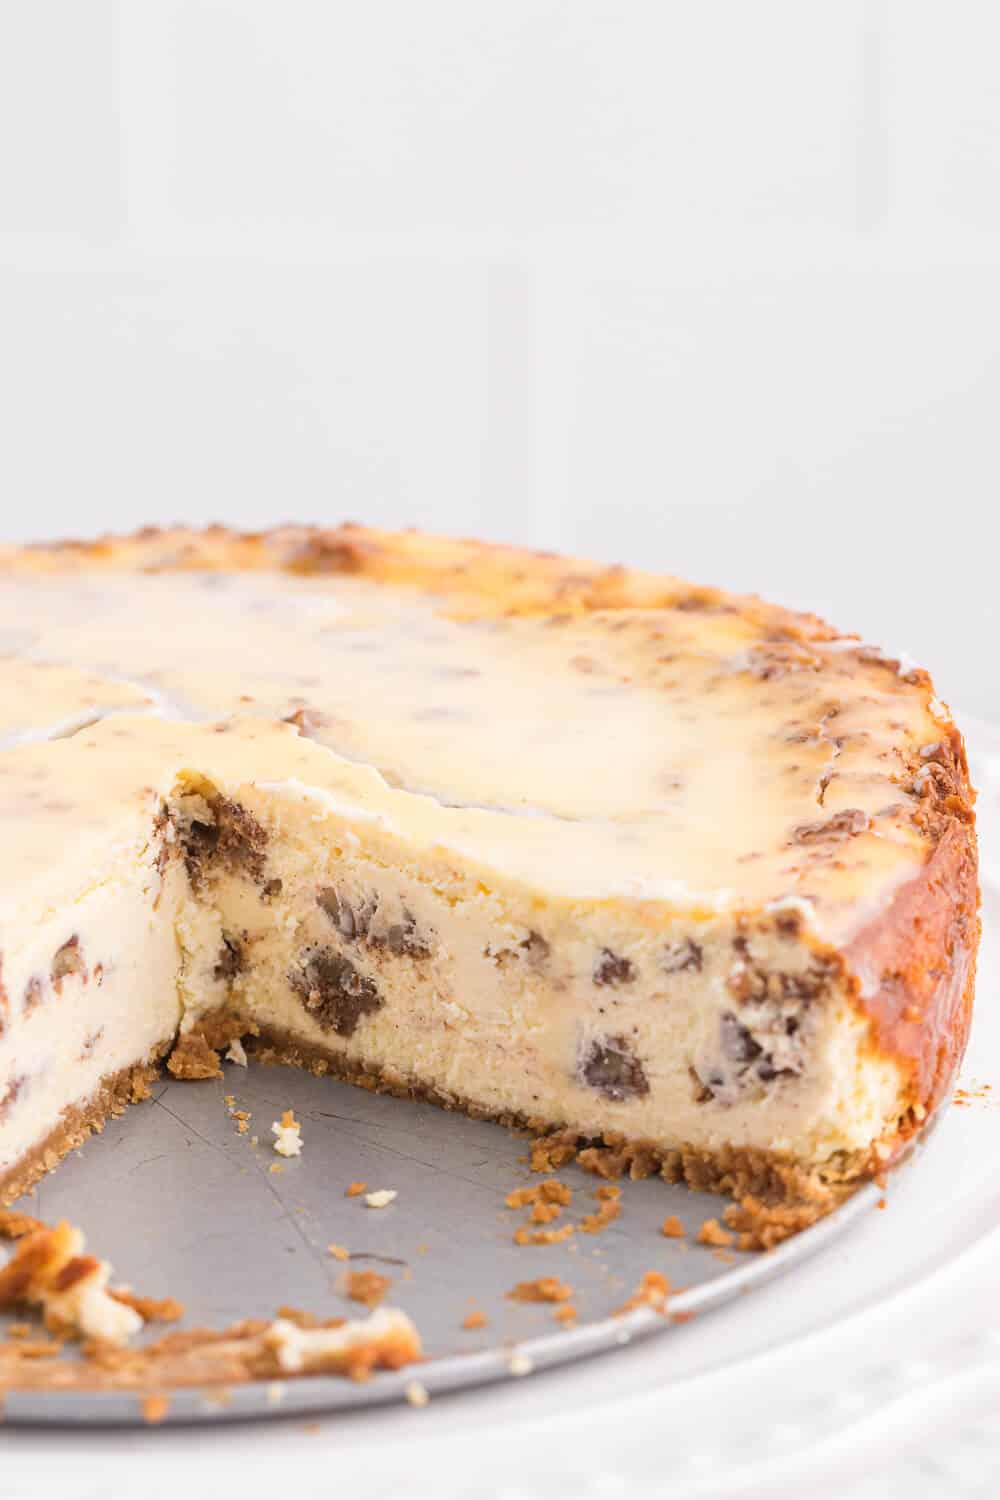
cinnamon swirl cheesecake
Ingredients
Method
- Preheat oven to 325°F. Grease a 9-inch springform pan with cooking spray.
- Add graham cracker crumbs, butter and sugar to a medium bowl and stir to combine. Press mixture into the bottom of the greased springform pan.
- In a small bowl, stir together graham cracker crumbs, butter, pecans, cinnamon and sugar.
- Add cream cheese, vanilla and sugar to a large mixing bowl. Beat with a mixer on low speed until blended. Add eggs, one at a time, mixing on low speed after each addition.
- Pour 2 cups of the cheesecake filling over the crust in the springform pan. Sprinkle with half of the cinnamon layer topping.
- Pour on top half of the remaining cheesecake filling. Sprinkle the remaining cinnamon layer topping on top.
- Pour on remaining cheesecake filling and smooth over with a spoon. Place springform pan on top of a baking sheet.
- Bake for 65 minutes until the center of the cheesecake is almost set. Cool completely at room temperature and then chill in the fridge for 4 hours or overnight.
- In a medium bowl, whisk together milk and powdered sugar. Spread on top of cheesecake. Refrigerate until ready to serve.