Easy Chocolate Silk Tart Perfection
Oh, I am SO excited to share this recipe with you! You know those days when you just want something sweet, comforting, and ridiculously easy? This zucchini bread is my absolute go-to. It’s the kind of thing that fills your kitchen with the most amazing smell, and before you know it, the whole loaf is gone. My family begs for it constantly, especially when those first crisp autumn days roll around, but honestly, it’s a lifesaver any time of year. It reminds me so much of my grandmother’s kitchen – that warm, cozy feeling you get when you know something delicious is baking. It’s not overly sweet, and the zucchini keeps it wonderfully moist, kind of like how a really good chocolate chip cookie has that perfect chewy center. If you’ve ever tried those fancy coffee shop quick breads, this one is its humble, homemade cousin, but I’d argue it’s even better.
What is Zucchini bread?
So, what exactly *is* zucchini bread? At its heart, it’s a quick bread – meaning it uses leavening agents like baking soda or baking powder instead of yeast, so you don’t have to wait around for dough to rise. Think of it like a cake, but heartier and less fussy. The “zucchini” part is where the magic happens. When you grate it and mix it into the batter, it basically melts away during baking, adding incredible moisture and a subtle, earthy sweetness that balances out the spices perfectly. It’s not like biting into a vegetable; it’s more like a secret ingredient that makes everything incredibly tender and rich. The name itself is pretty straightforward, but the result is anything but ordinary. It’s the kind of simple pleasure that feels incredibly decadent without being complicated.
Why you’ll love this recipe?
Seriously, why *wouldn’t* you love this? Let me count the ways! First off, the flavor. It’s that perfect balance of warm spices – cinnamon, nutmeg, maybe a hint of clove if you’re feeling it – with a subtle sweetness that’s just right. It’s not overwhelmingly sugary, which I actually prefer. The zucchini, as I mentioned, does this incredible job of keeping it super moist and tender. It’s like biting into a cloud, but a delicious, spiced cloud! And the texture? Oh my goodness. It’s got a lovely crumb that’s soft but also has a bit of structure. I also adore how budget-friendly it is. Zucchini is usually pretty affordable, and the other ingredients are pantry staples for most bakers. This is a lifesaver for those moments when you have a couple of zucchini hanging around that need using up before they go bad. It’s also incredibly versatile. You can add nuts, chocolate chips, or even a bit of lemon zest for a brighter flavor. I’ve even seen people add dried cranberries, which sounds divine! What I love most about this particular recipe, though, is its unfailing reliability. I’ve made this countless times, tweaking it here and there, and it *never* fails to turn out perfectly. It’s the kind of recipe that makes you feel like a baking rockstar, even if you’re a beginner. It’s like the comforting hug of baked goods, and that’s something everyone can appreciate, right?
How do you make Zucchini bread?
Quick Overview
This recipe is designed to be as straightforward as possible. You’ll mix your dry ingredients, whip up your wet ingredients separately, then combine them gently. The grated zucchini is folded in, and then it’s just a matter of getting it into the oven. The whole process, from start to finish, usually takes under an hour and a half, and a good chunk of that is just passive baking time. It’s the kind of thing you can whip up on a Saturday morning and have warm bread by lunchtime, or even on a weeknight if you’re feeling ambitious. The ease is a huge part of its charm, trust me.
Ingredients
For the Main Batter:
You’ll need about 2 cups of all-purpose flour. I always use unbleached, it just seems to give a better texture. Make sure it’s lightly spooned into your measuring cup and leveled off, not packed in! You’ll also need 1 teaspoon of baking soda and half a teaspoon of salt. For the spices, I swear by 1 teaspoon of ground cinnamon and a good pinch (about ¼ teaspoon) of ground nutmeg. If you like a little more warmth, feel free to add a tiny pinch of ground cloves, but don’t overdo it! And the sugar – 1 cup of granulated sugar is usually perfect for me, but you can dial it back slightly if you prefer. Don’t use powdered sugar here; granulated is key for the right texture.
For the Wet Ingredients & Zucchini:
This is where the moisture comes from! You’ll need 2 large eggs, lightly beaten. Then, ½ cup of melted butter – unsalted is best, so you can control the salt level. If you’re looking for a slightly healthier option, I’ve tested this with half melted butter and half neutral oil like canola or vegetable, and it works beautifully, making it even more tender! Now for the star: about 2 cups of grated zucchini. Make sure to squeeze out as much excess liquid as you can – this is a crucial step for avoiding a soggy bottom! I usually use a clean kitchen towel or cheesecloth for this. You can also use a fine-mesh sieve. And a splash of vanilla extract, about 1 teaspoon, to really amp up the flavor.
For the Optional Filling (Swirl):
This is where you can really play! My favorite swirl involves about ½ cup of packed brown sugar, 1 tablespoon of all-purpose flour, and 1 teaspoon of cinnamon. Mix these together. Some people like to add chopped nuts like walnuts or pecans here, about ½ cup. It’s totally optional, but it adds a lovely texture.
For the Optional Simple Glaze:
If you want that extra touch of sweetness and polish, you’ll need about 1 cup of powdered sugar and 2-3 tablespoons of milk (or water, or even lemon juice for a tang!).
Step-by-Step Instructions
Step 1: Preheat & Prep Pan
First things first, preheat your oven to 350 degrees Fahrenheit (175 degrees Celsius). This is a pretty standard baking temperature, and it works like a charm for most ovens. While that’s heating up, grab a standard loaf pan, about 9×5 inches. Grease it really well with butter or non-stick spray, and then lightly dust it with flour. You can also line it with parchment paper for super easy removal – I’ve started doing this more often, and it’s a game-changer. Just make sure the parchment overhangs a bit on the sides so you can lift the loaf out easily.
Step 2: Mix Dry Ingredients
In a large bowl, whisk together the flour, baking soda, salt, cinnamon, and nutmeg. Whisking is important here because it distributes the leavening agent and spices evenly throughout the flour. This ensures every bite is as flavorful as the last and that your bread rises nicely. Make sure there are no clumps of flour or spice.
Step 3: Mix Wet Ingredients
In a separate, medium-sized bowl, whisk together the beaten eggs, melted butter (or butter/oil combo), and vanilla extract. Give it a good whisk until it’s all well combined. The mixture should look smooth and slightly emulsified. Don’t worry if it seems a little thin; that’s perfectly normal.
Step 4: Combine
Now, pour the wet ingredients into the bowl with the dry ingredients. Using a rubber spatula or wooden spoon, gently fold them together until *just* combined. This is super important: do not overmix! Overmixing develops the gluten in the flour, which can lead to a tough, dense bread. A few streaks of dry flour are okay; they’ll disappear as you add the zucchini.
Step 5: Prepare Filling (if using)
If you’re making the brown sugar swirl, now’s the time to mix those ingredients together in a small bowl: brown sugar, flour, and cinnamon. If you’re adding nuts, stir them in now. This makes a wonderfully crumbly, spiced filling that peeks through the bread.
Step 6: Fold in Zucchini & Add Swirl (if using)
Gently fold the squeezed, grated zucchini into the batter. Again, be gentle! You just want to distribute it evenly without overworking the batter. Now, if you’re doing the swirl, spoon about half of the batter into your prepared loaf pan. Sprinkle half of the brown sugar mixture evenly over the top. Then, spoon the remaining batter over the brown sugar mixture. Sprinkle the rest of the brown sugar mixture on top. For a really pretty swirl effect, you can take a butter knife or a skewer and gently swirl it through the batter a few times, being careful not to go all the way to the bottom. Just a few passes will create those lovely ribbons of flavor and texture.
Step 7: Bake
Place the loaf pan in the preheated oven on the center rack. Bake for 50-65 minutes. The baking time can vary a bit depending on your oven, so start checking around the 50-minute mark. To check for doneness, insert a wooden skewer or toothpick into the center of the loaf. If it comes out clean (or with just a few moist crumbs attached, not wet batter), it’s ready! If it’s still wet, give it another 5-10 minutes and check again. The top should be golden brown and slightly springy to the touch.
Step 8: Cool & Glaze
Once it’s baked, carefully remove the loaf pan from the oven. Let the bread cool in the pan for about 10-15 minutes. This allows it to set up a bit so it won’t fall apart when you try to remove it. After that, invert the pan onto a wire rack to let the loaf cool completely. If you’re adding the glaze, wait until the bread is completely cool before drizzling it on. To make the glaze, whisk together the powdered sugar and milk until you have a smooth, pourable consistency. If it’s too thick, add a tiny bit more milk; if it’s too thin, add a bit more powdered sugar. Drizzle it over the top of the cooled loaf.
Step 9: Slice & Serve
Once the glaze has set (or if you skipped the glaze), slice the bread using a serrated knife for clean cuts. I like to serve it slightly warm, but it’s also delicious at room temperature. It’s the perfect size for sharing, but I won’t judge if you want to keep the whole thing to yourself! Enjoy that first amazing bite.
What to Serve It With
This zucchini bread is so wonderfully versatile! For a simple, cozy breakfast, I love it toasted and spread with a little butter. It’s also fantastic alongside a hot cup of coffee or a steaming mug of tea. The warm spices just make mornings feel so much more inviting. For a more elegant brunch spread, I’ll often serve thick slices of this alongside fresh fruit salad, maybe some scrambled eggs or a quiche. It adds a touch of sweetness and homemade charm that guests always rave about. As a dessert, it’s surprisingly satisfying. A small slice with a dollop of whipped cream or even a scoop of vanilla bean ice cream is pure bliss, especially on a cool evening. And for those late-night cravings, when you need something sweet but don’t want to bake a whole cake, this is my absolute go-to. It’s comforting, delicious, and always hits the spot. My personal favorite is to have a slice with a tall glass of cold milk after the kids are in bed – pure, simple indulgence!
Top Tips for Perfecting Your Zucchini Bread
Alright, let’s talk about making this the *best* zucchini bread possible. These are the little things I’ve learned over the years that make a big difference.
Zucchini Prep: This is probably the most critical step. You MUST squeeze out as much water as possible from the grated zucchini. Seriously, wring it out like a dishrag! If you don’t, your bread will be heavy and soggy. I use a clean kitchen towel, but cheesecloth works wonders too. Grating it on the larger side of a box grater usually gives you nice little tender pieces that disappear into the batter. Smaller grating can sometimes make it too mushy.
Mixing Advice: Remember that “just combined” rule? It’s golden. Overmixing is the enemy of tender quick breads. When you add the wet to the dry, stir until you don’t see large dry patches of flour. A few small ones are fine; they’ll get hydrated as the zucchini releases its moisture. Be gentle when folding in the zucchini too – you’re not trying to beat it into submission!
Swirl Customization: If you’re adding the brown sugar swirl, don’t be afraid to play with it. You can add chopped pecans or walnuts for crunch, or even a bit of cocoa powder to the brown sugar mixture for a chocolatey surprise. Just keep the proportions similar. And remember, you don’t need to go crazy with the swirling; a few gentle passes with a knife or skewer will create beautiful ribbons without disturbing the batter too much.
Ingredient Swaps: I’ve experimented with different fats, and while butter gives a lovely flavor, using half butter and half neutral oil (like canola, vegetable, or even light olive oil) can make the bread incredibly moist and tender for days. I’ve also successfully used applesauce instead of some of the oil/butter for a lighter version, though it can alter the flavor profile slightly. For the flour, while all-purpose is best, I’ve had decent results using a 1:1 gluten-free baking blend, though the texture might be a bit different.
Baking Tips: Ovens can be tricky, so always trust your nose and the toothpick test. If your bread is browning too quickly on top before the center is cooked, loosely tent it with aluminum foil for the remaining baking time. Ensure your oven rack is in the center for even heat distribution. Avoid opening the oven door too much, especially in the first 30-40 minutes, as this can cause the loaf to sink.
Glaze Variations: The simple powdered sugar glaze is classic, but don’t stop there! For a lemon kick, use lemon juice instead of milk. For a richer glaze, use cream cheese thinned with a little milk. You can also skip the glaze entirely and just dust the cooled loaf with a bit of powdered sugar through a sieve for a more rustic look.
Storing and Reheating Tips
So, you’ve baked this masterpiece, and you have leftovers (amazing!). Here’s how to keep it tasting fresh:
Room Temperature: This is my preferred method for short-term storage. Once the bread has completely cooled, wrap it tightly in plastic wrap or store it in an airtight container. It should stay wonderfully moist at room temperature for about 2-3 days. I’ve found that if you put it in a bread box, it stays nice and soft. If it’s very humid where you are, I’d lean towards the refrigerator just to be safe.
Refrigerator Storage: If you think you won’t get through it in 2-3 days, or if your kitchen is particularly warm, the refrigerator is a good option. Again, wrap it tightly in plastic wrap or place it in an airtight container. It will keep well in the fridge for up to a week, though it might lose a little bit of its initial tenderness. The good news is, reheating brings back that lovely moistness!
Freezer Instructions: This bread freezes beautifully! Once completely cooled, wrap the whole loaf or individual slices very tightly in a double layer of plastic wrap, then add a layer of aluminum foil or place it in a freezer-safe bag. It will keep well in the freezer for up to 3 months. When you’re ready to enjoy it, the best way to thaw is to unwrap it and let it come to room temperature on the counter for a few hours. You can also reheat slices gently in a toaster oven or a low oven.
Glaze Timing Advice: If you’ve added the glaze, it’s best to store the bread at room temperature or in the refrigerator. The glaze can get sticky in the freezer. If you plan to freeze the loaf *with* glaze, make sure the glaze is fully set and firm before wrapping it.
Frequently Asked Questions
Final Thoughts
There you have it – my absolute favorite zucchini bread recipe. It’s a testament to how simple ingredients can create something truly magical. This isn’t just a recipe for me; it’s a little piece of home, a comforting tradition that I’m so happy to share with you. It’s proof that you don’t need complicated techniques or fancy equipment to make something incredibly delicious and satisfying. If you love this kind of cozy, spiced baked good, you might also enjoy my recipe for Spiced Apple Crumble Muffins or my Classic Banana Bread – they’re equally heartwarming! I really hope you give this zucchini bread a try. I’m already dreaming of the next time I can bake it. Let me know in the comments below how yours turns out, and if you have any favorite additions or variations – I always love hearing from you! Happy baking, my friends!
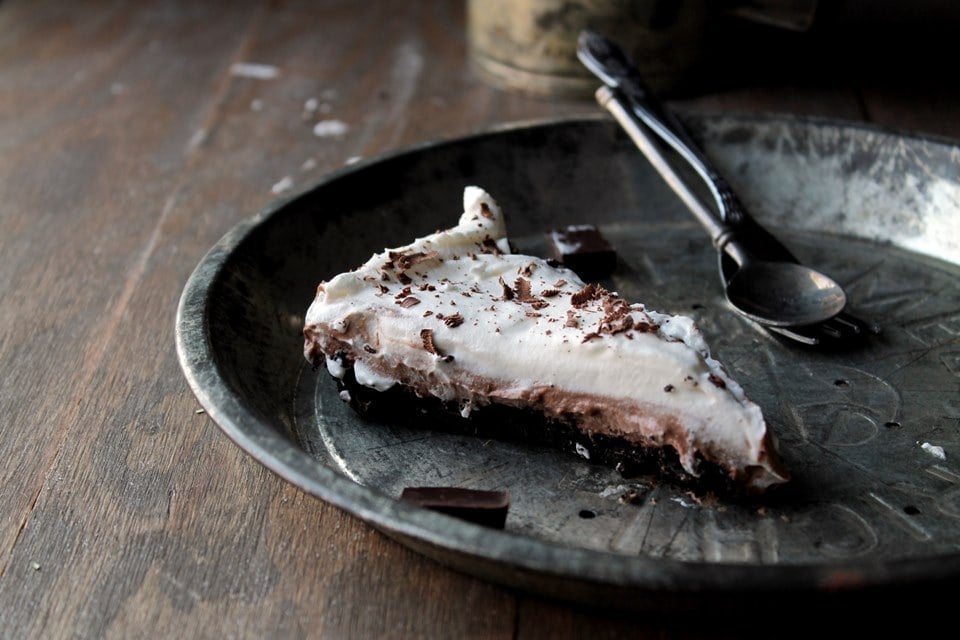
Chocolate Silk Tart
Ingredients
Method
- Combine the crushed Oreo cookies and melted butter in a small bowl; mix well until evenly moistened.
- Press the mixture firmly onto the bottom of an 8-inch springform pan.
- Refrigerate the crust while you prepare the filling.
- Pour 1 1/2 cups of heavy cream into a medium-sized mixing bowl. Microwave for 1.5 to 2 minutes, or until hot but not boiling.
- Add the chocolate chips to the hot cream and whisk until the chocolate is completely melted and the mixture is smooth.
- Refrigerate the chocolate mixture for at least one hour, or until it is cold and slightly thickened.
- In a separate bowl, combine 1 cup of heavy cream, vanilla extract, and sugar.
- Cover and chill this mixture in the refrigerator for 30 minutes.
- Once the cream mixture for the topping is chilled, beat it with an electric mixer until stiff peaks form.
- Take out the chilled chocolate mixture and beat it on medium speed with an electric mixer until stiff peaks form.
- Spread the chocolate filling evenly over the chilled Oreo crust.
- Spoon the whipped cream topping over the chocolate layer and spread it evenly.
- Refrigerate the tart for at least one hour, or until it is fully set.
- Garnish with chocolate shavings, if desired, before slicing and serving.