Easy Chocolate Cupcakes: The Best Homemade Recipe
There’s something about zucchini that makes me think of summer gardens and family dinners on the porch. I remember sneaking bites of my mom’s hide-and-seek zucchini bake as a kid, but honestly, I’ve fallen in love with this lighter, more playful take: these zucchini roll-ups. They’re surprisingly simple to make, look adorable on the plate, and taste even better than they look — cheesy, fresh, and just a hint of savory herbs. I always do this when I want something homemade and satisfying but don’t have hours to spend in the kitchen. Plus, my kids ask for these all the time — they’re definitely a family favorite. I’ve made this countless times, tweaking little things here and there, and trust me, once you get the technique down, it’s smooth sailing. This is perfect when you’re craving something cheesy but want a vegetable boost, or when you need a quick appetizer that looks like you put way more effort in than you really did. They disappear in minutes at my house, and I bet they’ll do the same at yours. Ready to roll?
What is Zucchini Roll-Up?
Think of these zucchini roll-ups as the adorable, healthified cousin of stuffed grape leaves or burritos. They’re essentially thin slices of zucchini that are grilled or baked just enough to soften, then rolled around a creamy, cheesy filling — usually cream cheese, herbs, and sometimes a splash of lemon or garlic for extra flavor. The name is pretty straightforward: you take the zucchini, slice it lengthwise into thin strips, layer on your filling, and then roll ‘em up like little tiny burritos. It’s a dish that’s as customizable as your mood — you can add bacon, swap in different cheeses, or even throw in some chopped spinach or sun-dried tomatoes for a flavor twist. The best part? The fresh crunch of zucchini combined with melty cheese makes every bite feel indulgent but still light. Think of it as a fancy appetizer that feels homey, perfect for company or just a cozy night in with the fam.
Why you’ll love this recipe?
What I love most about these zucchini roll-ups is how foolproof they are — seriously, even if you’re not a perfect chef, you’ll nail these every time. The flavor is incredible; the mild zucchini, rich cheese, and herbs create this harmonious balance that keeps everyone coming back for more. Plus, they’re super versatile. You can serve them hot or cold — perfect for a picnic or an elegant dinner. It’s also budget-friendly. Zucchini is in season almost year-round, and cream cheese or ricotta won’t break the bank. I also love how adaptable they are: on a busy weeknight, I toss these in the oven and call it a day. Want a vegan option? Swap out the cheese for hummus or vegan cream cheese, and you’re golden. These are great as an appetizer, light lunch, or even a fun snack — I’ve made a batch for every occasion, and they always get rave reviews! What I especially appreciate is how they look fancy but are so straightforward — I promise, once you try it, it’s going to be your go-to for easy entertaining or quick bites.
How do you make Zucchini Roll-Ups?
Quick Overview
This recipe is all about simple steps with big flavor. You’ll start by slicing zucchini into thin strips, then either grill or bake them until just tender. Meanwhile, mix up a creamy cheese filling with your favorite herbs. Once everything’s ready, spread the filling on each zucchini strip, roll them up carefully, and finish with a brief bake or chill, depending on your preference. The magic is in the layering — you want just enough filling to make each bite flavorful without spilling out. Honestly, the most time-consuming part is slicing, but if you use a mandoline, it’s a breeze. The whole process takes less than 45 minutes, and the results look so impressive you’ll feel like a professional chef. Whether you serve them warm with a crunchy side or cold straight from the fridge, they’re guaranteed to impress. Plus, I’ve tested this with almond cheese for a dairy-free version, and it still works beautifully — adaptable and forgiving, just how I like it.
Ingredients
For the Main Filling:
– 8 oz (about 1 cup) cream cheese or vegan cream cheese, softened
– 1 cup shredded mozzarella or vegan cheese blend
– 2 tbsp chopped fresh basil or parsley
– 1 clove garlic, minced
– Salt and pepper to taste
For the Zucchini:
– 3 medium zucchinis
– Olive oil for brushing
– Salt for sprinkling
Optional Extras:
– Crumbled cooked bacon
– Sun-dried tomatoes chopped finely
– A dash of lemon zest for brightness
For the Glaze:
– A little olive oil or honey drizzle (optional)
– Fresh herbs for garnish
Step-by-Step Instructions
Step 1: Preheat & Prep Pan
Start by preheating your oven to 375°F (190°C). Line a baking sheet with parchment or a silicone mat. Using a mandoline slicer (trust me, it makes perfect slices fast), slice the zucchini lengthwise into thin, even strips about 1/8-inch thick. Brush the zucchini slices lightly with olive oil and sprinkle with a pinch of salt. This lightly seasons and helps them caramelize just enough. If you’re grilling, get your grill pan hot, ready for those slices to develop a slight char — that smoky flavor is so good! I always do this step outside when the weather’s nice because I love that grilled flavor mingled with the cheesy filling.
Step 2: Mix Dry Ingredients
In a small bowl, combine the shredded cheese, herbs, garlic, salt, and pepper. I love using fresh herbs here for that bright, garden-fresh flavor. If I want it more indulgent, I throw in some crumbled bacon or sun-dried tomatoes. Mix until well combined, and set aside. The cheese mixture should be creamy but firm enough to spread easily on the zucchini strips — if it feels too soft, just stir in a little more cheese or a splash of milk (or plant milk).
Step 3: Mix Wet Ingredients
Since most of our filling comes from the cheese and herbs, this step is simple. Just make sure your cream cheese is at room temperature so it’s easy to blend. I usually whip it up with a fork or small whisk before mixing in the shredded cheese. That way, it’s super smooth, and spreading is a breeze. I’ve tested this with almond milk and it actually made it even creamier — just a little tip for dairy-free friends!
Step 4: Combine
Add the cheese mixture to a bowl and stir gently. You don’t want to overmix; just fold until it’s evenly combined. If it’s too thick, add a tiny splash of milk or water, so it’s spreadable but not runny. Now, lay out your zucchini slices on a clean surface or a baking sheet. Using a small spatula or butter knife, spread a good dollop of the filling onto each slice, leaving a little border at the edges. The trick is to keep it fairly thin so they roll easily without bursting.
Step 5: Prepare Filling
Once each slice has a layer of filling, start rolling from one end to the other, gently but firmly. If some filling oozes out, no worries — just tuck it in or wipe it off before rolling. For a prettier presentation, you can secure the rolls with toothpicks or place them seam-side down. If you’re feeling fancy, sprinkle more herbs or cheese on top before baking.
Step 6: Layer & Swirl
If you want to get creative, layer some sun-dried tomatoes or chopped herbs between the rolls on your baking sheet for a layered look. For a marble swirl effect, spread a thin layer of cheese on the zucchini before adding the herbs, then roll. This way, each bite gets a burst of flavor and a pretty visual touch. Don’t overthink it — just have fun with the pattern!
Step 7: Bake
Bake in the preheated oven for about 20-25 minutes until the zucchini is tender, and the cheese is bubbly and golden. Keep an eye on them toward the end; oven times can vary. If you like a crispier top, broil them for an extra couple of minutes — just watch carefully so they don’t burn. You’ll know they’re done when they smell amazing and you see bubbling cheese and lightly browned zucchini edges.
Step 8: Cool & Glaze
Let the rolls cool for about 5 minutes before serving. If you’re adding a glaze or drizzle, do it after they’ve cooled slightly to avoid all that cheesy goodness sliding off. A drizzle of honey, a splash of balsamic, or even a dusting of paprika can elevate these to a fancy-level snack or appetizer. I like to sprinkle fresh herbs on top for color and freshness — it makes everything feel elegant.
Step 9: Slice & Serve
Slice each roll into two or three beautiful pieces with a sharp knife, and plate them up. These look gorgeous on a wooden board with some extra herbs and lemon wedges. They’re perfect warm, but I also love them chilled — especially when I want a quick snack straight from the fridge on busy days. Honestly, they’re so good, I’ve made a batch just to snack on for days. Trust me, once you do it a few times, you’ll realize how forgiving and fun this dish really is.
What to Serve It With
These zucchini roll-ups are pretty versatile, so think beyond just serving them solo. For breakfast, pair them with a bright cup of coffee or fresh fruit — a little yogurt on the side is always nice, especially if you want to make it a brunch. They’re perfect for a light appetizer at dinner parties, especially with a crisp white wine or sparkling water with lemon. I’ve even served them as part of a picnic platter with crusty bread, olives, and fresh tomato salad — they’re that adaptable. For a casual snack, I like to set out a few extra herbs, some sliced baguette, and maybe even a little spicy hummus for dipping. A quick dip in a tangy vinaigrette and they become a fancy yet laid-back treat. My kids love that they’re not “Kinder surprise” type fancy — just simple, good ingredients rolled up into something special. It’s like a little taste of summer no matter the season.
Top Tips for Perfecting Your Zucchini Roll-Ups
Over the years, I’ve learned a few tricks to make these even better:
- Zucchini Prep: Salt the zucchini slices lightly and let them sit for about 10 minutes before patting them dry. This helps draw out excess moisture and keeps the rolls from getting soggy. Trust me, soggy zucchini is no fun — firm, tender slices are key.
- Mixing Advice: When blending your cheese filling, keep it smooth but not overmixed. Overmixing can make it grainy or runny. Use fresh herbs when possible — they flavor the filling without overpowering it.
- Swirl Customization: For a marbled look, spread a thin layer of cheese on the zucchini, then add small dollops of tomato or pesto before rolling. Play around with colors and textures; it makes each batch more unique and eye-catching.
- Ingredient Swaps: Swap out the cheese for hummus or Greek yogurt for a lighter, tangier kick. Add chopped olives or walnuts for crunch. These simple swaps keep the dish interesting and adaptable to what you have on hand.
- Baking Tips: Place the rolls seam-side down on your baking sheet to prevent them from unrolling. For a crispy top, broil them for about 2 minutes at the end — just keep an eye so they don’t burn!
- Glaze Variations: Brighten up your presentation with lemon zest mixed into the cheese or a little honey drizzled on top. Fresh herbs like dill, chives, or basil add instant freshness that makes each bite sing.
After many tests and tweaks, I’ve found that the key is balance. Don’t be shy with herbs, keep the zucchini slices even, and don’t rush the baking step. The result? Perfectly tender, cheesy, fresh bite-sized rolls that everyone will ask for again and again.
Storing and Reheating Tips
If you have leftovers (which rarely happens at my house — they’re that good!), here’s how to keep them fresh:
- Room Temperature: These are best enjoyed fresh, but if you must store them at room temp, do so for no more than a couple of hours and keep covered. After that, moisture can make them soggy.
- Refrigerator Storage: Store in an airtight container for up to 2 days. Reheat gently in the microwave or oven, but I prefer eating them cold or at room temp — they’re just as tasty!
- Freezer Instructions: Wrap tightly with plastic wrap or place in a freezer bag and store up to 2 months. Let thaw in the fridge overnight, then reheat, covered lightly with foil. A quick oven blast brings back that just-baked feel.
- Glaze Timing: If you like a shiny or sweet glaze, add it right before serving. Applying it beforehand might cause it to seep into the filling and make everything soggy.
Honestly, these keep surprisingly well, and I love having a batch ready for quick snacks or lunches. The key is gentle reheating and keeping them covered so they don’t dry out.
Frequently Asked Questions
Final Thoughts
Honestly, these zucchini roll-ups have become my go-to when I need something quick, fresh, and a little fancy. The combination of tender zucchini and cheesy filling is just irresistible. They look adorable on a platter and taste like you fussed over them for ages — but I swear, they’re really simple and forgiving. Plus, they pack a veggie punch that makes them feel a little healthier than most cheesy appetizers. Once I perfected the technique, I started experimenting with different cheeses, herbs, and fillings, and it’s always a hit. I love that they can be served warm or cold — perfect for any occasion, any season. So, give them a try, and I’d love to hear how yours turn out! Share your tips or twist in the comments — I always love hearing from fellow food lovers. Happy baking and rolling!
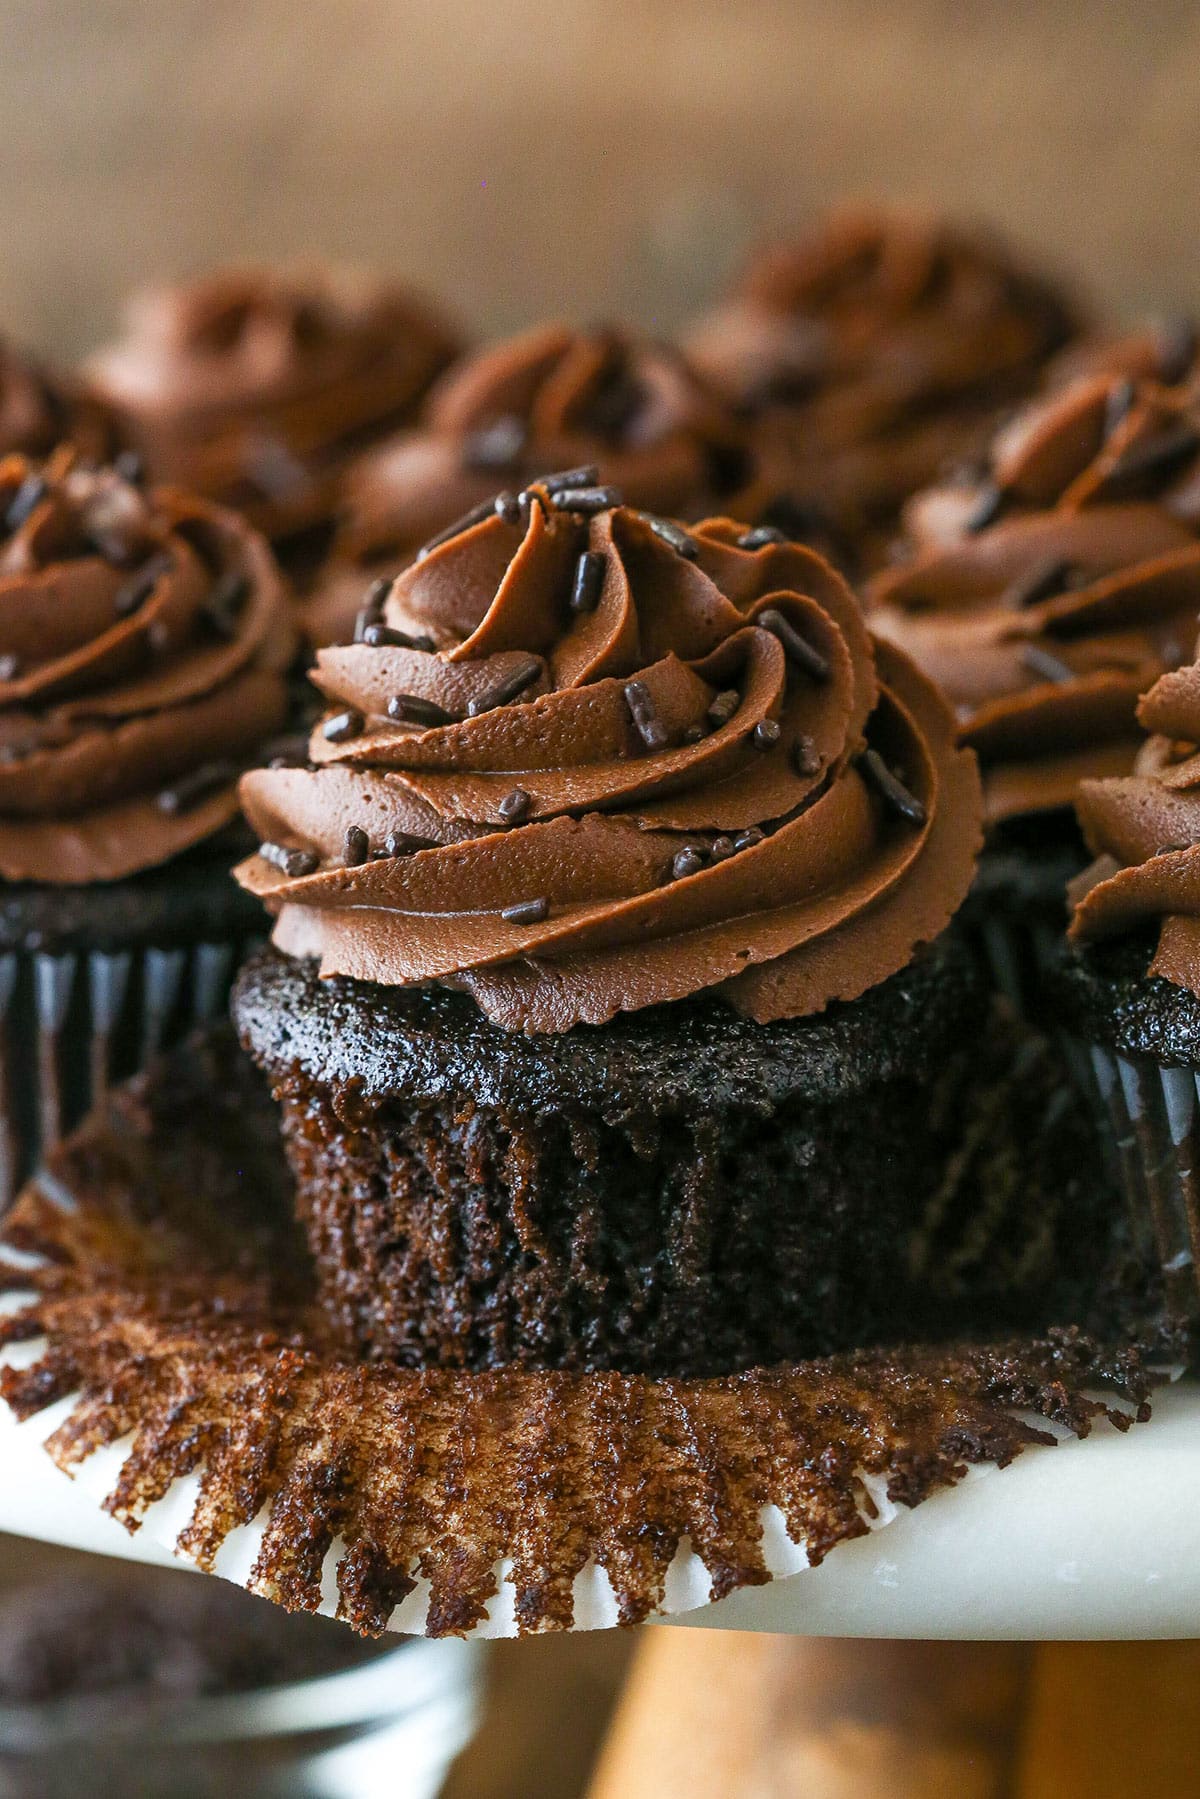
chocolate cupcakes
Ingredients
Method
- Preheat oven to 300°F and prepare a cupcake pan with liners.
- Mix flour, sugar, cocoa powder, baking soda, and salt in a large bowl.
- Whisk egg, milk, oil, and vanilla extract in another bowl.
- Combine wet and dry ingredients until smooth.
- Add hot water and mix until the batter is thin.
- Fill cupcake liners halfway and bake for 18-23 minutes.
- Cool cupcakes on a rack after baking.
- Make frosting by beating butter until smooth.
- Mix melted chocolate into the frosting.
- Add cocoa powder and mix well.
- Gradually add powdered sugar and heavy cream to reach desired consistency.
- Frost cooled cupcakes with chocolate frosting.