Easy Butternut Squash Pasta Spicy Delight
You know those recipes that just feel like a warm hug? The ones you pull out on a rainy Sunday, or when you need a little pick-me-up, or when you’ve got unexpected company and want to impress them without breaking a sweat? Well, this zucchini bread is *that* recipe for me. It’s the one that always disappears first from the dessert table, the one my kids beg for when they get home from school, and the one that makes my whole kitchen smell like pure bliss. I’ve tried so many zucchini bread recipes over the years, and while many are good, this one… this one is special. It’s got that perfect balance of moistness, sweetness, and just the right hint of spice. It’s like a richer, more flavorful cousin to a classic pound cake, but with way more personality. Trust me, once you try this, you’ll understand why it’s earned a permanent spot in my recipe binder.
What is Zucchini bread?
So, what exactly *is* zucchini bread? At its heart, it’s a quick bread – meaning it uses chemical leaveners like baking soda and baking powder instead of yeast, so you don’t have to wait for dough to rise. The star ingredient, of course, is zucchini! Now, I know what some of you might be thinking, “Zucchini? In a sweet bread?” And I get it! It sounds a little strange at first. But here’s the magic: the zucchini basically melts into the batter as it bakes, adding incredible moisture and a subtle, almost undetectable vegetal note that just makes everything taste better. It’s not about tasting zucchini; it’s about the *result* of using it. Think of it as nature’s secret weapon for super moist baked goods. It’s not a cake, it’s not really a muffin, it’s its own delightful thing – a perfect cross between a quick bread and a very tender, flavorful loaf cake.
Why you’ll love this recipe?
Honestly, there are so many reasons why this zucchini bread has become my go-to. First off, the flavor is just out of this world. It’s not overly sweet, which I really appreciate. The cinnamon and nutmeg give it this warm, comforting aroma and taste that’s just perfect. The texture is what really sets it apart, though. It’s incredibly moist and tender, thanks to that hidden zucchini magic. And speaking of magic, this recipe is surprisingly simple to whip up, which is a lifesaver on busy weeknights or when I need a last-minute treat. You don’t need any fancy equipment, just a couple of bowls and a whisk. Plus, it’s super budget-friendly! Zucchini is usually pretty affordable, and the other ingredients are pantry staples. I also love how versatile it is. You can easily swap out the nuts, add chocolate chips (my kids’ favorite variation!), or even throw in some dried cranberries. It’s just a really forgiving recipe, which is always a win in my book. I’ve tested this with almond milk instead of regular milk, and it actually made it even creamier, which was a happy accident! It’s perfect when you’re craving something sweet at 10 pm but don’t want to bake a whole cake. Honestly, what’s not to love?
How do you make Zucchini bread?
Quick Overview
Making this zucchini bread is a breeze! We’ll start by prepping our dry and wet ingredients separately, then gently combine them, fold in some delicious additions, and bake it all up until golden and fragrant. The key is not to overmix, which is a common mistake I’ve learned to avoid over the years. This method ensures a tender crumb every single time. It truly is as simple as whisking, mixing, and baking!
Ingredients
For the Main Batter:
This is the base of our moist and delicious bread. I always try to use medium-sized zucchinis for the best moisture content – they’re usually the sweetest too. Grating them by hand gives you a bit more control over the texture than a food processor, but honestly, either works in a pinch. Don’t worry about peeling them; the skin adds great color and nutrients! Make sure your baking soda and baking powder are fresh, though; that’s crucial for a good rise. A touch of vanilla extract really rounds out the flavors, so don’t skip it!
- 2 cups all-purpose flour
- 1 teaspoon baking soda
- 1/2 teaspoon salt
- 1 teaspoon ground cinnamon
- 1/2 teaspoon ground nutmeg
- 2 large eggs, at room temperature
- 3/4 cup granulated sugar
- 1/2 cup packed light brown sugar
- 1 cup vegetable oil (or other neutral oil like canola or melted coconut oil)
- 1 teaspoon vanilla extract
- 2 cups finely grated zucchini (about 2 medium zucchinis), excess moisture squeezed out
For the Filling:
This is where you can really play! My family adores a classic cinnamon-sugar swirl, but chocolate chips are a close second. You can also toss in some chopped walnuts or pecans for a lovely crunch. If you’re using nuts, toasting them beforehand really brings out their flavor. I sometimes add a pinch of extra cinnamon to the swirl mixture just to amp up the spice. If you’re feeling adventurous, a little bit of espresso powder mixed into the chocolate chip variation is surprisingly good!
- 1/4 cup granulated sugar
- 1 teaspoon ground cinnamon
- 1/2 cup chopped walnuts or pecans (optional)
- 1/2 cup chocolate chips (optional)
For the Glaze:
This is totally optional, but I think it takes the zucchini bread from “delicious” to “absolutely divine.” It adds a lovely sheen and an extra touch of sweetness. You want the glaze to be pourable but not too thin, so you can drizzle it nicely. I usually aim for a consistency similar to heavy cream.
- 1 cup powdered sugar
- 2-3 tablespoons milk (or buttermilk for a slight tang)
- 1/2 teaspoon vanilla extract
Step-by-Step Instructions
Step 1: Preheat & Prep Pan
First things first, get your oven preheating to 350 degrees Fahrenheit (175 degrees Celsius). This is important because you want the oven to be at the perfect temperature when your batter is ready. While that’s heating up, generously grease and flour a 9×5 inch loaf pan. I like to use butter or cooking spray and then dust it with flour, making sure to tap out any excess. This ensures your beautiful loaf won’t stick. You can also line it with parchment paper, leaving an overhang on the sides to make lifting it out super easy later – that’s a trick I learned after one too many loaves stuck to the pan!
Step 2: Mix Dry Ingredients
In a medium bowl, whisk together the all-purpose flour, baking soda, salt, cinnamon, and nutmeg. Whisking them together now helps distribute the leavening agents evenly, which means your bread will rise uniformly. It also gets rid of any little clumps. You want to see a nice, even mixture of all those dry spices and flour. This step seems simple, but it really sets you up for success.
Step 3: Mix Wet Ingredients
In a large bowl, beat the eggs lightly. Then, whisk in the granulated sugar, brown sugar, vegetable oil, and vanilla extract until everything is well combined and looks smooth. Don’t worry if it seems a little thick at this stage; that’s totally normal. The oil is what contributes so much to the incredible moistness of this bread. Make sure your eggs are at room temperature; it helps them emulsify better with the other wet ingredients.
Step 4: Combine
Now for the magical part: combining the wet and dry ingredients. Add the dry ingredients to the wet ingredients and stir *just until combined*. Seriously, this is the most crucial step for tender zucchini bread. Overmixing develops the gluten in the flour, which can lead to a tough, dense loaf. A few streaks of flour are okay; they’ll disappear as you fold in the zucchini. I usually use a spatula or a wooden spoon for this and stop as soon as I don’t see big pockets of dry flour anymore.
Step 5: Prepare Filling
If you’re adding nuts or chocolate chips, this is the time to prepare them. For the swirl, simply mix the 1/4 cup sugar and 1 teaspoon cinnamon in a small bowl. If you’re using nuts, give them a rough chop. If you’re using chocolate chips, have them ready to go. These additions are what make each slice of your zucchini bread a little surprise!
Step 6: Layer & Swirl
Gently fold the grated zucchini into the batter. It will look like a lot, but it’ll incorporate. Now, for the swirl! Pour about half of the batter into your prepared loaf pan. Sprinkle half of your chosen filling (sugar/cinnamon, nuts, or chocolate chips) over the batter. Then, carefully pour the remaining batter on top, followed by the rest of your filling. If you’re doing a cinnamon swirl, you can use a knife or skewer to gently swirl the filling through the batter. Just don’t over-swirl, or you’ll lose the definition. For a simpler approach, just sprinkle the additions on top!
Step 7: Bake
Pop that pan into the preheated oven. Bake for 50-65 minutes, or until a wooden skewer or toothpick inserted into the center comes out clean. Baking times can vary quite a bit depending on your oven and the moisture content of your zucchini, so start checking around the 50-minute mark. If the top is browning too quickly, you can loosely tent it with aluminum foil. The aroma that fills your house during this stage is truly heavenly!
Step 8: Cool & Glaze
Once it’s done, let the zucchini bread cool in the pan on a wire rack for about 10-15 minutes. This allows it to firm up a bit. Then, carefully invert the pan and lift the loaf out (or lift it out using the parchment paper overhangs). Let it cool completely on the wire rack before glazing. If you try to glaze it while it’s still warm, the glaze will just melt and run off. For the glaze, whisk together the powdered sugar, milk, and vanilla until smooth. Drizzle it over the cooled loaf. Let the glaze set for about 15-20 minutes before slicing.
Step 9: Slice & Serve
Once the glaze has set (or if you skipped the glaze), use a sharp knife to slice your beautiful zucchini bread. I like to serve it slightly warm or at room temperature. It’s fantastic on its own, but also delicious with a smear of butter or even a dollop of cream cheese. The aroma when you slice into it is just divine!
What to Serve It With
This zucchini bread is so versatile, it works for almost any occasion! For breakfast, I love a thick slice with a good cup of strong coffee. It’s not too sweet, so it’s perfect for starting the day without a sugar rush. My kids, of course, will eat it plain as is, or sometimes with a tiny bit of peanut butter spread on top – a sneaky way to add some protein!
For Brunch: If I’m serving this at a brunch, I like to present it a little more elegantly. I’ll slice it neatly and arrange it on a nice platter, perhaps with a few fresh berries on the side for color and freshness. It pairs wonderfully with mimosas or a nice iced tea. It’s a crowd-pleaser that feels a little special but is still incredibly easy.
As Dessert: This is where it really shines for me! For an after-dinner treat, I’ll sometimes serve a warm slice with a scoop of vanilla bean ice cream or a drizzle of caramel sauce. It’s the perfect size for satisfying a sweet craving without being too heavy. It’s like a warm, comforting hug after a meal.
For Cozy Snacks: On a chilly afternoon, there’s nothing better than curling up with a mug of hot chocolate and a slice of this zucchini bread. It’s the ultimate comfort food. I’ll often cut off a corner for myself while the loaf is still warm from the oven – don’t tell anyone!
Top Tips for Perfecting Your Zucchini Bread
Over the years, I’ve learned a few tricks that really make this zucchini bread sing. These are the little things that I always do now because I’ve seen the difference they make.
Zucchini Prep: The most important step is to really squeeze out as much moisture as you can from the grated zucchini. I use a clean kitchen towel or cheesecloth and really give it a good squeeze. Excess water will make your bread soggy. I also find that using medium zucchinis yields the best results – they have more flesh and less seeds.
Mixing Advice: I can’t stress this enough: do NOT overmix the batter! Once you combine the wet and dry ingredients, stir just until the flour streaks disappear. A few small lumps are okay. Overmixing leads to a tough loaf, and we want tender, moist perfection here.
Swirl Customization: If you’re doing a swirl, don’t go crazy with it. A few gentle passes with a knife or skewer is all you need to create beautiful ribbons of flavor. Too much swirling will just blend it all together. Experiment with different additions like mini chocolate chips or chopped dates for unique flavor profiles.
Ingredient Swaps: While this recipe is fantastic as is, I’ve played around a bit. For a dairy-free version, I’ve used melted coconut oil instead of vegetable oil and unsweetened almond milk for the glaze, and it was still wonderfully moist. Using whole wheat flour can add a nuttier flavor and more fiber, but I usually stick to all-purpose for that classic tender crumb. I once tried using mashed banana instead of some of the oil, but it changed the texture quite a bit, so I stick to the oil for consistent moisture.
Baking Tips: Ovens can be tricky! Always use the middle rack for even baking. If your oven runs hot, you might need to reduce the temperature slightly or cover the loaf with foil sooner. A clean toothpick test is your best friend for determining doneness. If the top is golden but the inside isn’t quite done, foil is your saving grace.
Glaze Variations: If you’re not a fan of sweet glazes, you can skip it entirely, or just dust the cooled loaf with a little powdered sugar for a simple, elegant finish. For a cream cheese glaze, soften some cream cheese and whisk it with a little powdered sugar and milk. It’s decadent!
Storing and Reheating Tips
One of the best things about this zucchini bread is how well it keeps. It’s one of those baked goods that actually tastes better the next day!
Room Temperature: Once completely cooled, I store my zucchini bread at room temperature in an airtight container or tightly wrapped in plastic wrap. It stays wonderfully moist for about 3-4 days. If it’s particularly warm where you live, you might want to refrigerate it sooner to prevent spoilage, but I find it best at room temp for texture.
Refrigerator Storage: If you know you won’t finish it within a few days or if your kitchen is very warm, you can store it in the refrigerator. Wrap it well in plastic wrap and then place it in an airtight container. It should keep well for about a week. The texture might become a bit firmer when cold, but that’s easily fixed.
Freezer Instructions: This zucchini bread freezes beautifully! Once completely cooled and glazed (if using), wrap the loaf tightly in plastic wrap, then in aluminum foil, and place it in a freezer-safe bag. It will keep in the freezer for up to 3 months. To thaw, unwrap it and let it sit at room temperature for a few hours, or gently reheat it.
Glaze Timing Advice: If you plan to freeze the loaf, I highly recommend glazing it *after* thawing. The glaze can sometimes become a little sticky or separate in the freezer. If you’re just storing it for a day or two, glazing after cooling is perfectly fine.
Frequently Asked Questions
Final Thoughts
This zucchini bread isn’t just a recipe; it’s a little piece of home for me. It’s that comforting, reliable bake that always turns out perfectly and brings a smile to everyone’s face. The moist texture, the warm spices, and the delightful hint of sweetness make it an absolute winner in my book. It’s proof that simple ingredients can create something truly magical in your own kitchen. If you love a good quick bread or are looking for a fantastic way to use up those garden zucchinis, you absolutely have to give this one a try. I think you’ll find, like I have, that it’s just one of those recipes you’ll return to again and again. Don’t forget to let me know in the comments how yours turns out, and if you try any fun variations! Happy baking!
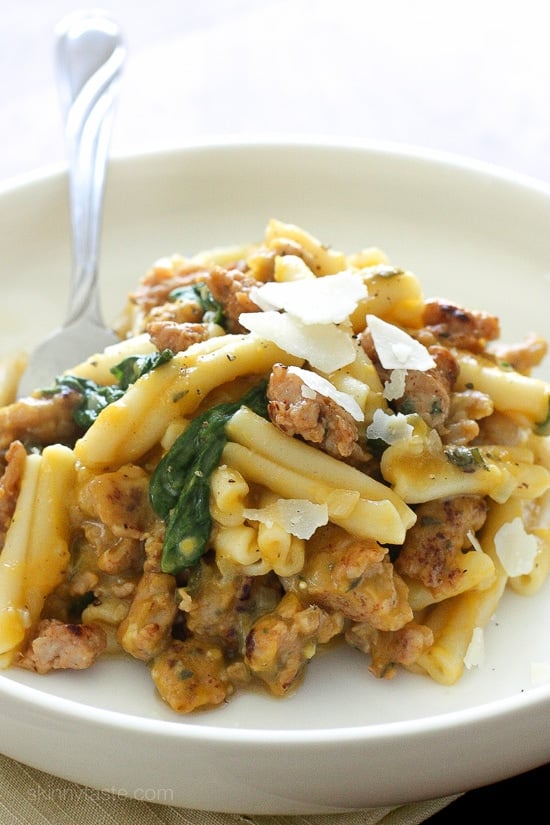
butternut squash pasta
Ingredients
Method
- Bring a large pot of salted water to a boil. Add butternut squash and cook until soft.
- Remove squash with a slotted spoon and place in a blender, blend until smooth.
- Add pasta to the boiling water and cook according to package directions for al dente, reserving at least 1 cup of the pasta water before draining.
- Meanwhile, in a large deep non-stick skillet, sauté sausage over medium heat until browned, breaking up with a spoon as it cooks. When cooked through, set aside on a plate.
- Reduce heat to medium-low and melt the butter, sauté the shallots and garlic until soft and golden, about 5 - 6 minutes.
- Add pureed butternut squash, season with salt and fresh cracked pepper and add a little of the reserved pasta water (I used about 1 cup) to thin out the sauce to your liking.
- Add baby spinach and stir in parmesan cheese and sage. Toss in cooked pasta and sausage and mix until well coated.
- Serve with additional parmesan cheese on the side if desired.