Easy Berry Oatmeal Bars Recipe
There’s something about baking with fresh zucchini that just makes me feel like I’m giving vegetables a delicious second chance. Growing up, my grandma used to toss shredded zucchini into her bread, and the smell of warm cinnamon and baking sugar always took me right back to those cozy Sunday afternoons. Now, my kids ask for this zucchini cinnamon swirl cake all the time — and I can’t blame them. It’s the perfect mix of moist, tender cake with a sweet, flavorful swirl that looks as pretty as it tastes. Honestly, I always do this when I want something homemade but don’t want to fuss with complicated recipes. It’s incredibly forgiving, smells divine, and the flavor? Well, it’s a delightful surprise—think pumpkin bread but lighter, with just a touch of cinnamon that makes you want to keep slicing. This one’s a lifesaver on busy nights when a quick dessert can still wow everyone. Trust me, once you try it, it’ll become a staple in your baking rotation, too. And the best part? No one ever suspects there’s zucchini hiding inside!
What is a Zucchini cinnamon swirl cake?
Think of it as a cozy, comforting cake that’s packed with sneaky veggies and a cinnamon-spiced swirl running through it. It’s essentially a simple sponge-style cake, moist and tender, with grated zucchini folded into the batter. The swirl — a mixture of cinnamon, sugar, and a hint of butter — gets layered in before baking, creating a beautiful marbled effect that’s irresistible. The name might sound fancy, but it’s honestly just an easy-to-make homemade treat that’s perfect for breakfast, brunch, or a sweet snack with coffee. Its origins are rooted in that classic idea of turning humble, everyday ingredients into something extraordinary, and that’s exactly what I love about this recipe. The zucchini adds moisture and a subtle veggie boost, but you’d never know it because it comes out tasting too good to be true. It’s like a warm hug wrapped in a slice of cake, and I promise, your family will be asking for it all the time.
Why you’ll love this recipe?
What are some of the best reasons to make a zucchini cinnamon swirl cake?
• Flavor: The aroma alone will fill your kitchen with a warm, inviting scent. The tender cake gets warmed with cinnamon, and the swirls with sugar and spice add just the right amount of sweet richness. It’s subtly complex but perfectly balanced—like a hug in baked form.
• Simplicity: No fancy equipment or hard-to-find ingredients here. Just basic pantry staples, grated zucchini, and a mixing bowl. I’ve made this with my kids helping me, and it’s always a quick, stress-free process.
• Cost-efficiency: What is the best way to measure cost-efficiency?: Zucchini is cheap and plentiful during summer, and most of the other ingredients are pantry staples. Honestly, a loaf of this costs less than buying store-bought muffins or snack cakes, and it’s way more satisfying.
• Versatility: I love serving slices warm with a dollop of yogurt or whipped cream. My kids ask for it for breakfast, and it’s also excellent as a teatime treat or even as a ‘going-home’ dessert at dinner parties. You can even swap out the sugar for honey or maple syrup if you want a more natural sweetness. Trust me on this one, this recipe is a little bit of everything good—moist, flavorful, forgiving, and just so darn pretty. It’s like baking a little piece of home, and once you try it, you’ll see why I’m obsessed.
How to Make Zucchini Cinnamon Swirl Cake
Quick Overview
This cake is all about easy, straightforward steps that come together quickly. You start by preheating your oven and preparing your pan, then mix the dry ingredients and wet ingredients separately. Gently fold everything together, layer in the zucchini batter, add the cinnamon swirl, and bake until fluffy and golden. The magic is in the swirl: layering and swirling in the cinnamon mixture creates that gorgeous marbled look and adds a punch of cinnamon flavor. It’s perfect for baked goods newbies and seasoned bakers alike because it’s forgiving and adaptable. Plus, it smells so good while baking that everyone will be hovering around the oven. Once it’s out, I let it cool slightly — just enough to handle — then drizzle with a simple glaze or enjoy plain. Honestly, it’s so quick to make, you can enjoy fresh slices in less than an hour from start to finish, which makes it a total everyday hero.
Ingredients
For the Main Batter:
- 2 cups grated zucchini (about 2 small zucchinis)
- 1 ½ cups all-purpose flour (white flour works perfectly, or try gluten-free blend if you prefer)
- 1 teaspoon baking powder
- ½ teaspoon baking soda
- ½ teaspoon salt
- 1 teaspoon ground cinnamon
- 1 cup granulated sugar (or coconut sugar for a healthier twist)
- ½ cup vegetable oil or melted unsalted butter
- 3 large eggs
- 1 teaspoon vanilla extract
For the Filling:
- ½ cup brown sugar or coconut sugar
- 2 teaspoons ground cinnamon
- 1 tablespoon softened butter or coconut oil
For the Glaze:
- 1 cup powdered sugar
- 2-3 tablespoons milk (dairy or plant-based)
- ¼ teaspoon vanilla extract
Step-by-Step Instructions
Step 1: Preheat & Prep Pan
Heat your oven to 350°F (175°C). Grease a 9-inch round or square baking pan with butter or non-stick spray. Lining with parchment paper works great too — I always do this because it makes removing the cake a breeze. Set your pan aside and get ready for some delicious baking magic.
Step 2: Mix Dry Ingredients
In a large bowl, whisk together the flour, baking powder, baking soda, salt, and cinnamon. This step ensures everything is evenly distributed, so each bite is perfectly balanced. I like to do this first to avoid lumps later, and it keeps the batter light and fluffy.
Step 3: Mix Wet Ingredients
In a separate bowl, beat the eggs, then add the sugar, oil (or melted butter), and vanilla. Whisk until well combined and slightly frothy. Then, fold in the grated zucchini — I squeeze out excess moisture using a clean dish towel or paper towel before adding it in. This little trick helps prevent a watery batter and keeps the cake super moist.
Step 4: Combine
Gently fold the wet ingredients into the dry, just until combined. Be careful not to overmix — this is what keeps the cake tender and airy. A few lumps are okay! If you overmix, it can get dense, and we want this to stay light.
Step 5: Prepare Filling
Mix together the brown sugar, cinnamon, and softened butter. You want it crumbly but spreadable. Feel free to add chopped nuts if you want extra texture or a splash of orange zest for brightness.
Step 6: Layer & Swirl
Pour half of the batter into your prepared pan, spreading evenly. Drop spoonfuls of the cinnamon filling over the batter, then add the rest of the batter on top. Using a toothpick or a knife, gently swirl through the layers to create beautiful marbling. This step is my favorite — watching the cinnamon ribbons twist through the cake is almost as satisfying as tasting it.
Step 7: Bake
Pop the cake into your preheated oven. Bake for about 40-45 minutes, or until a toothpick inserted into the center comes out clean. Every oven is different, so start checking around 38 minutes. The top should be golden and slightly cracked — that’s how you know it’s moist inside.
Step 8: Cool & Glaze
Let the cake cool in the pan for at least 15 minutes, then transfer to a wire rack. If you’re adding the glaze, whisk together powdered sugar, milk, and vanilla until smooth. Drizzle it over the slightly warm cake — the warmth helps it seep into all those lovely marbled crevices. Don’t wait too long; the glaze hardens as it cools, giving you that perfect shiny finish.
Step 9: Slice & Serve
Use a sharp serrated knife and gentle sawing motions for clean cuts. Serve slices slightly warm or at room temperature with a cup of coffee or tea. I love pairing this with a dollop of whipped cream or a swirl of Greek yogurt — it’s comfort in every bite. Trust me, once you see the marbling and smell the cinnamon, you’ll be hooked!
What to Serve It With
This cake is pretty versatile, so I like to switch things up depending on the mood. For breakfast, a big mug of strong coffee does the trick — the earthy notes of the zucchini somehow balance the sweetness. On brunch days, I love slicing this thick and serving it with fresh berries and a splash of cream or yogurt. It’s also beautiful as a dinner-party dessert, paired with vanilla ice cream or mascarpone. When I want something casual, I just warm a slice and spread a little peanut butter or softened cream cheese on top. My family especially adores it when I make mini muffins out of the batter — perfect for packed lunches or a quick snack on the go. Honestly, it’s one of those recipes that reminds me of lazy weekend mornings and cozy afternoons, and I hope you’ll find that same comfort in every slice.
Top Tips for Perfecting Your Zucchini Cinnamon Swirl Cake
Over the years, I’ve learned a few tricks that make this cake turn out just perfect every time. First, always squeeze out excess moisture from your grated zucchini. If you don’t, the batter can get too watery, and your cake won’t rise as nicely. I keep a small bowl nearby and press out as much liquid as I can — it makes a noticeable difference.
Second, don’t overmix your batter — gentle folding is key for fluffy, tender cake. I used to rush this step until I realized that overmixing kills the airiness I’m after. Use a spatula, and just fold until everything is combined.
When adding the cinnamon sugar swirl, drop it by spoonfuls and swirl gently with a skewer or toothpick. If you go crazy swirling, you risk blending the layers completely, so aim for a delicate touch. Visualize it like creating a marbled painting — controlled but playful.
Substituting ingredients isn’t just possible; it’s encouraged! I’ve tested this with whole wheat flour, which gave it a nuttier flavor and slightly denser crumb, but still delicious. For a vegan version, substitute eggs with flaxseed meal or applesauce and use dairy-free butter or oil. The flavor might shift a little, but it remains a crowd-pleaser.
Baking tips: Rotate your pan halfway through baking if your oven has hot spots. Start checking doneness at 38 minutes — every oven is different. A clean toothpick means it’s done, but I also peek at the top to see if it’s starting to crack and turn golden.
And finally, don’t skip the glaze if you want that extra touch of sweetness and shine — it’s the finishing touch that makes this cake look as beautiful as it tastes. I’ve played around with honey, maple syrup, and even coconut cream for the glaze — each adds a little twist!
One thing I’ve definitely learned over time: patience and gentle handling are everything. The batter is forgiving, but handling it with care yields the best results. And hey, if you mess up a little in the swirl or forget the glaze, totally fine — the taste still shines through. That’s what makes baking such a joy, right? Experiment, learn, have fun — that’s how I ended up with a recipe I love and keep making over and over.
Storing and Reheating Tips
This cake keeps really well for a few days if stored properly. Once cooled completely, wrap it tightly in plastic wrap or store it in an airtight container. At room temperature, it’s good for up to two days — just keep it in a cool, dry spot, away from direct sunlight. For longer storage, pop slices into a resealable bag or container and stash it in the fridge for up to five days. The flavor intensifies a bit after a day or two, so it’s actually better the next day in my opinion. When reheating, a quick 10-15 second blast in the microwave restores that fresh-baked warmth, or you can warm slices in the oven at 350°F for about 10 minutes. If you want to add a fresh glaze after reheating, do it just before serving — it keeps everything looking pretty and tasting fresh. Freezing is also a good option: wrap slices tightly, and they’ll stay good for up to three months. To thaw, just leave at room temp or microwave gently. I’ve found that glazing after freezing can be tricky — it’s best to do it fresh for that perfect shiny top. Whatever method, this cake remains one of my house’s favorites, and I love having it on hand for impromptu gatherings or a simple treat after dinner.
Frequently Asked Questions
Final Thoughts
This zucchini cinnamon swirl cake has become a go-to favorite in my house. It’s almost effortless, yet it feels special enough to serve at any gathering or even for an impromptu coffee date. The smell alone—warm cinnamon and zucchini baking—draws everyone into the kitchen, eager for a slice. Each time I make it, my family raves about how moist and flavorful it is, and honestly, I love that it’s sneaking extra vegetables into our day without any fuss. It’s a little reminder that simple ingredients, with a bit of love, can turn into something unforgettable. Whether you’re baking with kids, in a rush, or just craving that cozy home-baked smell, this recipe hits the spot every time. I hope you give it a try and make it your own — maybe with a few tweaks or personal touches — because that’s what makes baking so wonderful. Happy baking, and I can’t wait to hear how yours turns out! Feel free to leave a comment, share your variations, and enjoy every bite.
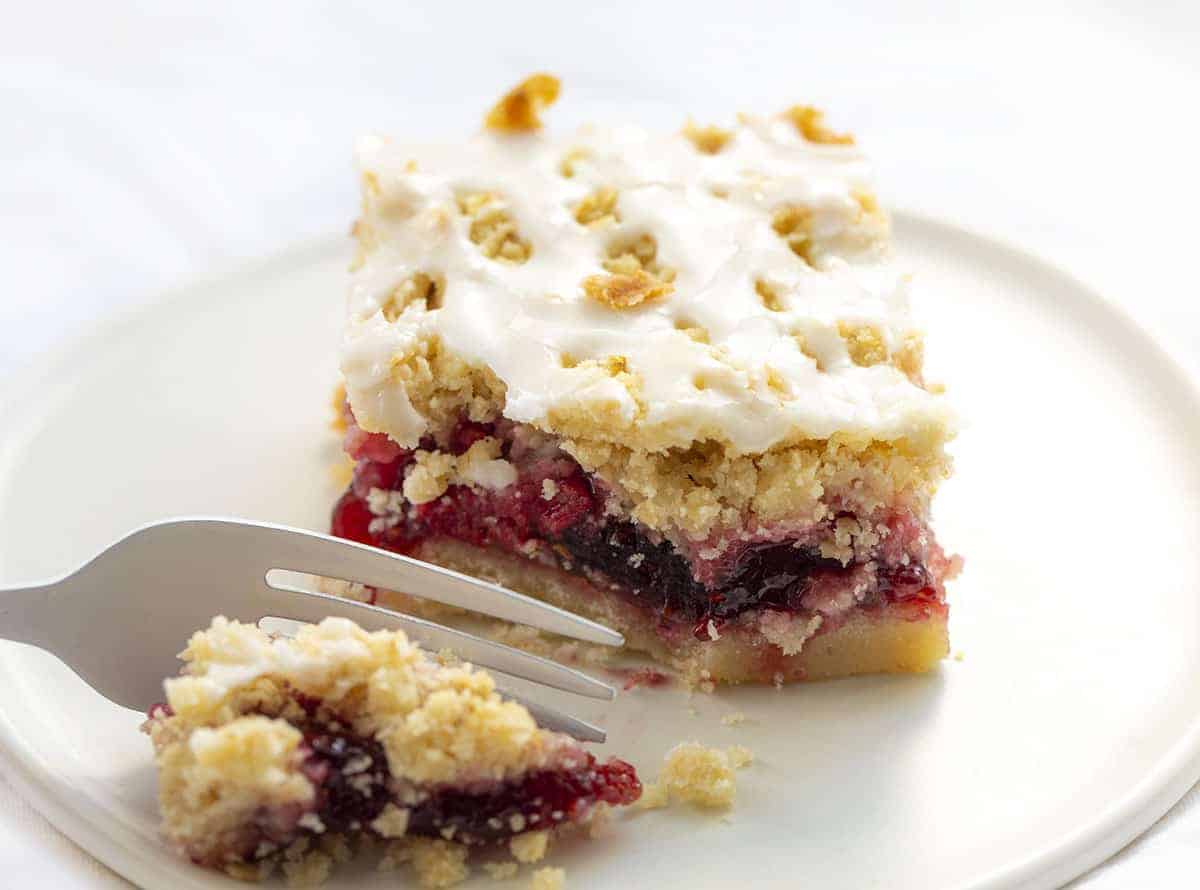
Raspberry Oatmeal Bars
Ingredients
Method
- Preheat oven to 350°F (175°C). Spray an 8x8-inch baking dish with nonstick spray or line with parchment paper.
- In a large bowl, blend the flour, confectioners' sugar, and cold butter for the crust. You can use a food processor or pastry cutter, but using your hands works well. Mix until the butter is no bigger than pea-sized pieces and the ingredients are well incorporated.
- Press the crust mixture evenly into the prepared baking dish.
- Bake the crust for 12-15 minutes, or until the edges just begin to turn golden. Remove from the oven.
- Spread the raspberry preserves evenly over the baked crust. Then, place the fresh raspberries evenly over the preserves.
- For the topping: In a medium bowl, combine the cold butter, flour, confectioners' sugar, and quick oats. Using your hands, sift the flour over the butter and start breaking down each piece into pea-sized pieces to create a crumbly mixture.
- Crumble the oatmeal topping mixture evenly over the raspberry filling.
- Bake for 45-50 more minutes, or until the crumble topping is a light golden brown. Let the bars cool at room temperature for at least 30 minutes. Then, place them in the refrigerator to chill for at least 2 hours before adding icing.
- For the icing: In a medium bowl, combine the confectioners' sugar, milk, and almond extract. Add more milk, one teaspoon at a time, until you reach your desired drizzling consistency.
- Drizzle the almond icing over the chilled bars. Serve immediately, or keep chilled in the refrigerator if preferred.