Easy Avocado Chicken Sandwich Grilled Perfection
Okay, confession time. I used to think zucchini bread was… fine. You know, a decent way to use up that garden surplus or a slightly healthier-ish treat. But then, my aunt Clara, the queen of baking in our family, shared her secret. And let me tell you, it’s not just ‘fine’ anymore. It’s spectacular. It’s the kind of zucchini bread that makes you close your eyes and savor every single bite. The smell alone when it’s baking? Pure magic, filling the whole house with this comforting, sweet aroma. This isn’t just another quick bread; it’s my go-to when I need a guaranteed win, something that feels like a warm hug in edible form. If you’ve ever felt let down by dry, crumbly baked goods, you’re going to absolutely adore this one. It’s a true testament to how simple ingredients, treated with a little love, can create something truly extraordinary. I’m so excited to share this with you, because once you try it, I have a feeling it’ll become your favorite zucchini bread recipe too, just like it did for me. It’s honestly a lifesaver on those days when you want something delicious but don’t have hours to spend in the kitchen.
What is Zucchini bread?
So, what exactly *is* this magical zucchini bread I’m raving about? At its heart, it’s a quick bread, meaning it uses chemical leaveners like baking soda or baking powder instead of yeast, so you don’t have to wait for dough to rise. Think of it as a cakey, slightly denser cousin to a muffin, but so much better. The “zucchini” part isn’t just for show; when grated, zucchini adds an incredible amount of moisture and a subtle sweetness to the batter, making the final loaf unbelievably tender and moist. It’s a clever way to sneak in a vegetable without anyone even noticing, especially the pickiest eaters! The name itself is pretty straightforward, but the experience of eating it? That’s where the real story unfolds. It’s the perfect balance of sweet spice, tender crumb, and that hint of goodness from the zucchini. It’s essentially a hug in loaf form, and honestly, that’s the best way I can describe it.
Why you’ll love this recipe?
There are so many reasons why this zucchini bread has earned a permanent spot in my recipe repertoire, and I have a feeling you’ll feel the same way. First off, the flavor is just out of this world. It’s perfectly sweet, with just the right hint of cinnamon and nutmeg that makes it feel cozy and comforting, even on a warm day. But the real star is the texture. It’s unbelievably moist and tender. I’ve tried so many zucchini bread recipes that end up dry and disappointing, but this one? It stays moist for days, which is a miracle in my house. And speaking of my house, the kids go absolutely bonkers for it. It’s one of those things they’ll actively ask for, which is a mom win in my book! Plus, it’s surprisingly simple to whip up. Even if you’re not a seasoned baker, you can totally nail this. The ingredients are all pretty standard pantry staples, making it super budget-friendly, too. I love that it’s versatile; I often toss in a handful of chocolate chips or walnuts, and it’s always a hit. Honestly, what I love most about this recipe is that it’s so forgiving. I’ve made it when I’m rushed, I’ve made it when I have time to meticulously measure everything, and it always turns out beautifully. It’s just one of those recipes that consistently delivers pure joy. If you’ve ever enjoyed my classic banana bread or my surprisingly simple apple crumble, you’re going to fall head over heels for this zucchini bread.
How do you make Zucchini bread?
Quick Overview
Making this amazing zucchini bread is ridiculously easy. You basically just whisk together your dry ingredients, then your wet ingredients, then combine them, fold in the zucchini, and bake. That’s it! The secret to its incredible moistness lies in how we treat the zucchini and a few key ratios that just work. It’s one of those recipes that feels impressive but is actually totally doable for even beginner bakers. You’ll be amazed at how quickly it comes together, and the aroma that fills your kitchen is just divine. Seriously, it’s a game-changer for weeknight treats or a lazy weekend breakfast.
Ingredients
For the Main Batter:
You’ll need about 2 cups of all-purpose flour. Make sure it’s lightly spooned into your measuring cup and leveled off; don’t scoop directly from the bag as that can lead to too much flour. A teaspoon of baking soda and about half a teaspoon of baking powder will give us that perfect lift. Don’t skip the salt; it really balances the sweetness. And for that warm, comforting flavor, we’ll add a teaspoon of ground cinnamon and a quarter teaspoon of ground nutmeg. Some people add a pinch of cloves too, but I find cinnamon and nutmeg are just perfect here. We’ll also need 1 ½ cups of granulated sugar. If you’re trying to reduce sugar a little, you *can* use ¾ cup granulated and ¾ cup brown sugar for a slightly deeper flavor, but I find the classic mix is hard to beat. And for pure richness, we’ll use 2 large eggs, lightly beaten. About ½ cup of melted unsalted butter is key for that tender crumb, and I sometimes do half butter, half a neutral oil like vegetable or canola, for even more moisture. And of course, the star: 2 cups of finely grated zucchini, and it’s important to squeeze out most of the excess moisture (more on that later!).
For the Filling (Optional, but highly recommended!):
This is where things get really fun. You can absolutely leave the bread plain, and it’s still delicious. But if you want to add a little something extra, I love to make a simple cinnamon-sugar swirl. For this, you’ll need about ¼ cup of packed brown sugar and 1 tablespoon of ground cinnamon. That’s it! Sometimes, I’ll stir in a handful of chopped walnuts or pecans, or even some chocolate chips if the mood strikes. You can’t go wrong!
For the Glaze (Optional, but oh-so-pretty!):
If you want that extra touch of sweetness and visual appeal, a simple glaze is the way to go. You’ll need about 1 cup of powdered sugar. Then, start with 2 tablespoons of milk (any kind works, but I’ve tested this with almond milk and it actually made it even creamier!) and add more, a teaspoon at a time, until you reach your desired drizzling consistency. A tiny splash of vanilla extract adds a lovely aroma and flavor. If you want a lemon glaze, just swap out the milk and vanilla for fresh lemon juice!
Step-by-Step Instructions
Step 1: Preheat & Prep Pan
First things first, get your oven preheating to 350 degrees Fahrenheit (175 degrees Celsius). This is crucial for even baking. While the oven heats up, grab a standard 9×5 inch loaf pan. The best way to prep it is to grease it well with butter or cooking spray, and then lightly dust it with flour. Tap out any excess flour. Alternatively, you can line it with parchment paper, leaving a little overhang on the sides – this makes lifting the baked loaf out a breeze. I usually go with the parchment paper method because I’m a little clumsy and always worried about sticking!
Step 2: Mix Dry Ingredients
In a large bowl, whisk together your 2 cups of all-purpose flour, 1 teaspoon of baking soda, ½ teaspoon of baking powder, and ½ teaspoon of salt. Then, add in your 1 teaspoon of cinnamon and ¼ teaspoon of nutmeg. Whisk everything together really well until it’s all evenly distributed. This ensures you don’t get any pockets of leavening agents or spice, and it’s the first step to a perfectly textured bread.
Step 3: Mix Wet Ingredients
In a separate medium bowl, combine your 1 ½ cups of granulated sugar (or sugar and brown sugar mix), the 2 lightly beaten eggs, and the ½ cup of melted butter (or butter and oil mix). Whisk these together until they’re smooth and well combined. It should look glossy and slightly thickened.
Step 4: Combine
Now, pour the wet ingredients into the bowl with the dry ingredients. Using a spatula or a wooden spoon, gently fold them together until *just* combined. It’s really important not to overmix here! You’ll still see a few streaks of flour, and that’s okay. Overmixing develops the gluten too much, which can lead to a tough bread. So, mix until you barely see any dry bits, and then stop. This is a lesson I learned the hard way early on in my baking journey!
Step 5: Prepare Filling
If you’re making the cinnamon-sugar swirl, now’s the time. In a small bowl, mix together ¼ cup of packed brown sugar and 1 tablespoon of cinnamon. If you’re adding nuts or chocolate chips, stir them into this mixture too. Set it aside.
Step 6: Layer & Swirl
Gently fold your 2 cups of squeezed, grated zucchini into the batter. Don’t overmix! You just want it incorporated. Now, spoon about half of the batter into your prepared loaf pan, spreading it evenly. Sprinkle about half of your cinnamon-sugar mixture (or nuts/chips) over the top. Then, spoon the remaining batter on top, and sprinkle the rest of the filling ingredients over that. If you’re not doing a swirl, just gently fold the zucchini into the batter until *just* combined. To create a swirl (if you did the layering method), take a knife or a skewer and gently swirl it through the batter a few times. Don’t go too deep or you’ll mix everything too much. The goal is lovely ribbons of cinnamon-sugar throughout the bread.
Step 7: Bake
Place the loaf pan in your preheated oven. Bake for 50-65 minutes. The exact time will vary depending on your oven. You’ll know it’s done when a wooden skewer or toothpick inserted into the center comes out clean, or with just a few moist crumbs attached (no wet batter!). If the top starts to brown too quickly before the center is cooked, you can loosely tent it with foil for the last 10-15 minutes of baking. I always check mine around the 50-minute mark.
Step 8: Cool & Glaze
Once baked, carefully remove the loaf pan from the oven. Let the zucchini bread cool in the pan for about 10-15 minutes. This is important because it allows the bread to firm up a bit before you remove it. After 10-15 minutes, invert the pan onto a wire rack. If you used parchment paper, you can easily lift it out. Let the loaf cool completely on the wire rack before glazing. If you try to glaze it while it’s warm, the glaze will just melt right off! Once it’s totally cool, whisk together the powdered sugar with your milk and vanilla extract until smooth. Drizzle it over the top of the cooled loaf, letting it drip down the sides. If you’re not glazing, this is also the time to slice and enjoy!
Step 9: Slice & Serve
Once the glaze has set a little (or if you skipped the glaze), it’s time to slice! Use a serrated knife for clean cuts, especially if you have a swirl. Serve it at room temperature. This bread is fantastic on its own, but a little pat of butter never hurt anyone, right? Enjoy that incredible moist texture and delicious flavor!
What to Serve It With
This zucchini bread is so wonderfully versatile, it fits into almost any meal or occasion. For a cozy breakfast, it’s absolutely divine served warm with a good cup of coffee. The rich, sweet flavors are the perfect start to the day. You can also add a thin layer of cream cheese or a dollop of Greek yogurt for a little extra protein and tang. For a more elegant brunch, I love to slice it a little thinner and arrange it on a tiered stand, perhaps with some fresh berries on the side. A light dusting of powdered sugar can make it look extra special. It’s also fantastic as a dessert! Serve it after dinner with a scoop of vanilla bean ice cream or a drizzle of chocolate sauce – it’s decadent without being too heavy. And for those moments when you just need a comforting snack? This zucchini bread is a lifesaver. It’s perfect for a 10pm craving when you don’t want to bake a whole cake. I often pack a slice for my kids’ lunchboxes, and they always come home asking for more. Honestly, the best thing to serve it with is a smile and good company. My family loves it straight from the pan, still slightly warm, while I prefer it completely cooled so the glaze has time to set.
Top Tips for Perfecting Your Zucchini Bread
I’ve made this zucchini bread more times than I can count, and through trial and error, I’ve picked up a few tricks that really make a difference. So, let’s talk zucchini prep. Grating is key, and I always use the medium-sized holes on my box grater. After grating, and this is SUPER important, you *must* squeeze out as much moisture as possible. I usually pile the grated zucchini into a clean kitchen towel or a fine-mesh sieve and wring it out like crazy. You’ll be amazed at how much water comes out! This step is non-negotiable for preventing a soggy loaf and ensuring that perfect texture. When it comes to mixing, remember the golden rule: don’t overmix! Seriously, once the wet and dry ingredients meet, just combine them until you don’t see dry flour anymore. A few lumps are fine. Overmixing is the enemy of tender quick breads.
For that beautiful swirl effect, don’t go overboard with the knife when swirling. A few gentle passes are all you need to create lovely ribbons of flavor without muddying the batter. If you’re feeling adventurous with flavor, try adding a teaspoon of orange zest to the batter – it’s surprisingly delicious and adds a bright note. For ingredient swaps, I’ve tested this with whole wheat flour, substituting about a quarter of the all-purpose flour, and it works beautifully, adding a bit more nuttiness and fiber. For a dairy-free option, you can use a non-dairy milk like almond or oat milk in the glaze, and you can also swap the butter for melted coconut oil or a vegan butter substitute, though the flavor might change slightly. Baking is where patience pays off. Always trust the toothpick test! Ovens can be fickle, so use that as your guide rather than relying solely on the time. If your loaf is browning too fast, don’t be afraid to loosely tent it with foil. For glaze variations, a little espresso powder mixed into the chocolate chip version is divine, or a touch of cardamom can add a wonderfully exotic flair to the basic glaze.
Storing and Reheating Tips
One of the best things about this zucchini bread is how well it keeps! Stored properly, it stays wonderfully moist and delicious for days. At room temperature, it’s best kept in an airtight container or well-wrapped in plastic wrap and then foil. It should stay fresh for about 3-4 days. I usually find myself reaching for it long before then, though! If you live in a warmer climate or want it to last a bit longer, refrigerator storage is your best bet. Wrap it tightly in plastic wrap, then place it in an airtight container. It can keep well in the fridge for up to a week. When you want to enjoy a slice from the fridge, you can eat it cold, or let it come to room temperature for about 20-30 minutes, or pop it in the microwave for about 10-15 seconds – just enough to take the chill off and make it wonderfully soft again. Freezer instructions are a lifesaver for when I bake a double batch. I let the loaf cool completely, then wrap it tightly in two layers of plastic wrap, followed by a layer of heavy-duty aluminum foil. It will keep well in the freezer for up to 3 months. To thaw, remove the foil and plastic wrap and let it sit at room temperature for a few hours, or thaw it overnight in the refrigerator. For the glaze, I highly recommend waiting until the loaf is completely cooled and you’re ready to serve it, or if you’re freezing it, glaze it *after* thawing. If you glaze a loaf before freezing, the glaze can sometimes get a little sticky or crack when thawing, though it’s still edible!
Frequently Asked Questions
Final Thoughts
So there you have it – my absolute favorite zucchini bread recipe. I truly believe this recipe is something special. It’s more than just a way to use up extra zucchini; it’s a recipe that brings comfort, joy, and a little bit of magic to your kitchen. The incredible moistness, the perfect balance of spices, and the sheer ease of making it are what make it a winner in my book. It’s the kind of thing that makes people say, “Wow, who made this?” and leaves you feeling like a baking superstar, even if you’re a total beginner. I hope you give it a try and fall in love with it as much as I have. If you love this recipe, you might also enjoy my simple Lemon Blueberry Loaf or my incredibly popular Chocolate Chip Banana Bread – they have that same comforting, home-baked feel. I can’t wait to hear how your zucchini bread turns out! Please leave a comment below to share your experience, any variations you tried, or just to say hello. And if you’re feeling social, share a picture of your beautiful loaf on Instagram and tag me – I’d love to see it!
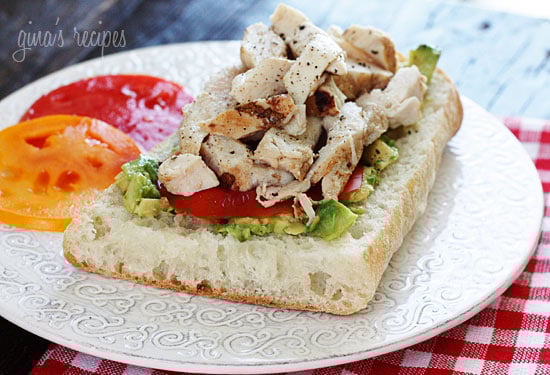
grilled chicken sandwich avocado
Ingredients
Method
- Slice the Ciabatta bread open and smear mashed avocado evenly on the bread. Season with salt and freshly ground black pepper to your taste.
- Top the avocado-smeared bread with the sliced ripe tomatoes and the grilled chicken breast. Add additional fresh cracked pepper if desired. Serve immediately and enjoy!