Chocolate Swirls Easy Hot Cocoa Fun
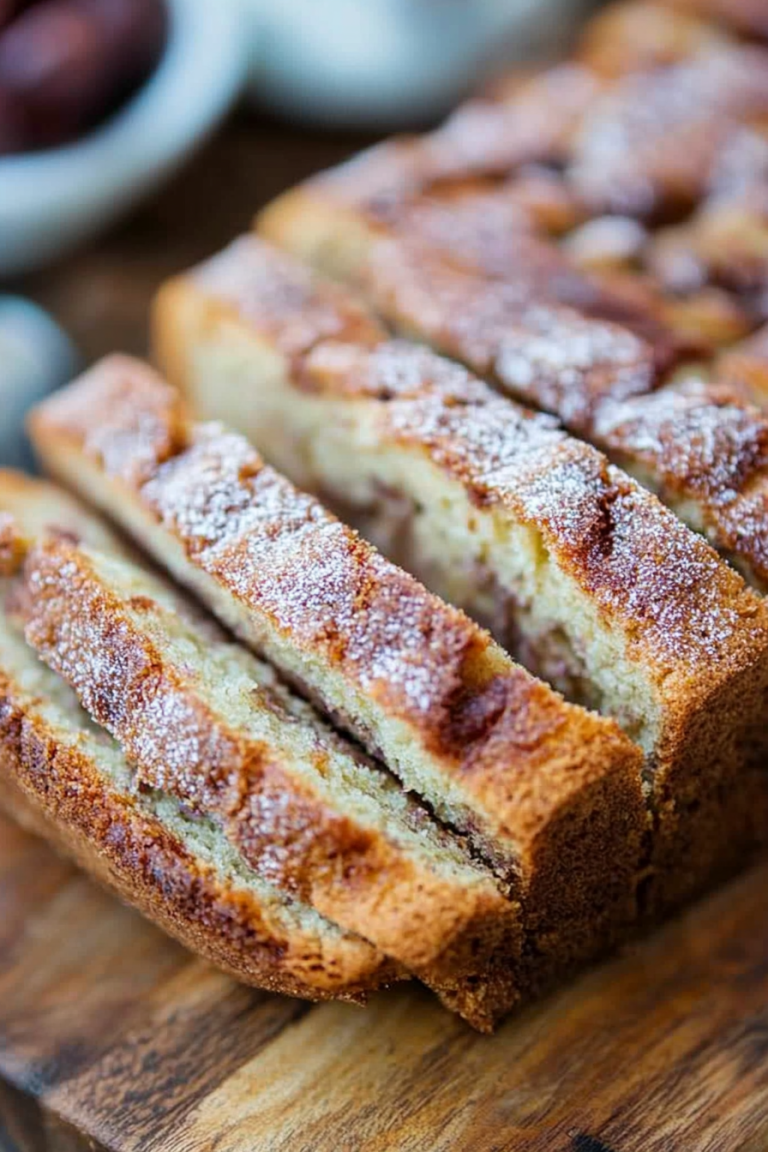
Oh, hello there! Come on in, grab a mug. I’ve been so excited to share this with you. You know those recipes that just *feel* like home? The ones that have that magical ability to make your whole house smell amazing and bring smiles to everyone’s faces? This is one of those for me. It’s my go-to, my absolute favorite Zucchini Bread recipe. Forget those dense, heavy loaves you sometimes find; this one is unbelievably moist, perfectly spiced, and has this tender crumb that just melts in your mouth. My kids, bless their picky little hearts, will devour this faster than I can bake it. And honestly, it’s a lifesaver on those busy weeknights when you need a little something sweet but don’t have hours to spend in the kitchen. It’s kind of like a super-moist cake meets a comforting quick bread, and it’s just… perfection. If you’ve ever tried other Zucchini Bread recipes and felt underwhelmed, trust me, you’re going to want to bookmark this one. It’s the one that finally clicked for me, and I’ve been making it for years.
What is Zucchini bread?
So, what exactly *is* Zucchini Bread? At its heart, it’s a quick bread that gets its incredible moisture and tender texture from, you guessed it, grated zucchini! Don’t worry, you won’t taste the zucchini itself; it’s a total stealth ingredient. Its magic lies in how it imparts moisture without making the bread heavy. Think of it as the ultimate secret weapon for a moist baked good. The name itself is pretty straightforward – it’s a bread, and zucchini is the star ingredient that makes it special. It’s not like a yeast bread that requires rising and kneading; this is a “quick bread,” meaning it uses chemical leaveners like baking soda and baking powder to get its lift. It’s essentially a delicious cake batter baked in a loaf pan, but with that extra boost of goodness from the zucchini. It’s the kind of treat that feels both wholesome and indulgent, a perfect balance for any time of day.
Why you’ll love this recipe?
There are so many reasons why this Zucchini Bread has earned a permanent spot in my recipe binder, and I just know you’re going to love it too. First off, let’s talk flavor. It’s subtly sweet, perfectly spiced with cinnamon and a hint of nutmeg (though you can totally play with those spices!), and that hint of vanilla just rounds everything out beautifully. It’s not overly sweet, which I appreciate, making it perfect for breakfast or a more sophisticated dessert. Then there’s the texture – oh my goodness, the texture! It is unbelievably moist and tender, thanks to the secret weapon, zucchini. It’s like biting into a cloud. And the best part? It’s ridiculously simple to make. Seriously, if you can stir ingredients together, you can make this bread. I’ve tested this with almond milk and it actually made it even creamier, so don’t be afraid to experiment! It’s also incredibly cost-effective. Zucchini is usually pretty affordable, and the other ingredients are pantry staples. Plus, it’s wonderfully versatile. Serve it warm with a smear of butter, toasted for breakfast, or even with a dollop of whipped cream for a more decadent dessert. What I love most about this recipe is that it’s forgiving. Even if you’re a beginner baker, you’re going to get amazing results. It’s one of those recipes that makes you feel like a baking pro without even trying!
How do you make Zucchini bread?
Quick Overview
This Zucchini Bread recipe is all about simplicity and delicious results. You’ll start by whisking together your dry ingredients, then combine your wet ingredients, and finally, bring them all together with the star: grated zucchini. Fold in any delicious add-ins like chocolate chips or nuts, pour into a prepared loaf pan, and bake until golden and a toothpick comes out clean. The whole process takes under 15 minutes of active prep time, making it incredibly manageable, even on a busy day. It’s that easy!
Ingredients
For the Main Batter:
2 cups all-purpose flour
1 teaspoon baking soda
1/2 teaspoon baking powder
1/2 teaspoon salt
1 teaspoon ground cinnamon
1/4 teaspoon ground nutmeg (optional, but I love it!)
1 1/2 cups granulated sugar (you can reduce this slightly if you prefer less sweetness)
1/2 cup (1 stick) unsalted butter, softened
2 large eggs
1 teaspoon vanilla extract
1 cup finely grated zucchini, squeezed dry (this is key!)
For the Filling:
1 cup semi-sweet chocolate chips (or chopped nuts like walnuts or pecans, or a mix!)
(Optional: 1/4 cup brown sugar mixed with 1 teaspoon cinnamon for a streusel-like swirl)
For the Glaze:
1 cup powdered sugar
2-3 tablespoons milk (or lemon juice for a tangy kick)
1/2 teaspoon vanilla extract
Step-by-Step Instructions
Step 1: Preheat & Prep Pan
First things first, let’s get that oven going. Preheat it to 350°F (175°C). Now, grab your favorite loaf pan – a standard 9×5 inch one is perfect. I like to grease it really well with butter or non-stick spray, and then give it a light dusting of flour. This ensures your beautiful Zucchini Bread won’t stick, making for a clean release. You can also line it with parchment paper, leaving some overhang on the sides – that makes lifting it out a breeze! I learned the parchment paper trick after a few close calls where my loaf almost stuck. Never again!
Step 2: Mix Dry Ingredients
In a medium-sized bowl, whisk together your flour, baking soda, baking powder, salt, cinnamon, and nutmeg if you’re using it. Give it a good whisking to make sure everything is evenly distributed. This is a small step, but it’s important for ensuring your leavening agents are spread throughout, which helps your bread rise evenly. You don’t want pockets of baking soda, trust me! Just a nice, uniform mix is what we’re after here.
Step 3: Mix Wet Ingredients
In a large bowl, cream together your softened butter and granulated sugar until the mixture is light and fluffy. This is where you’ll get that lovely sweetness and richness. Then, beat in your eggs, one at a time, making sure each is fully incorporated before adding the next. Stir in the vanilla extract. The mixture should look smooth and creamy.
Step 4: Combine
Now, it’s time to bring it all together! Gradually add the dry ingredients to the wet ingredients, mixing on low speed or by hand until *just* combined. This is super important: do NOT overmix! Overmixing can develop the gluten too much and result in a tough bread. We want tender, moist, and delicious, not chewy. Stop mixing as soon as you don’t see any dry streaks of flour. It’s okay if the batter looks a little lumpy; that’s perfectly fine.
Step 5: Prepare Filling
This is where you can get creative! If you’re using chocolate chips or chopped nuts, gently fold them into the batter now. For that extra special touch, you can create a swirl. If you’re doing this, reserve about half of the batter in a separate bowl. To the reserved batter, add your chocolate chips (or nuts). Then, spread half of the *plain* batter into your prepared loaf pan. Sprinkle half of your chocolate chips (or nuts) over that. Then spread the *other half* of the plain batter, followed by the remaining chocolate chips. If you’re doing the cinnamon-sugar swirl, you’ll add that after the first layer of batter. It’s a simple step that adds a beautiful visual and an extra burst of flavor. I sometimes do this when I have guests coming over and want to impress them a little – it always gets rave reviews!
Step 6: Layer & Swirl
If you’re doing the optional cinnamon-sugar swirl (which I highly recommend for a bit of extra texture and flavor!), you’ll add it between layers of batter. So, after you spread the first half of your batter in the pan, sprinkle about half of the cinnamon-sugar mixture evenly over the top. Then, carefully spread the remaining batter over it. If you’re using chocolate chips or nuts without the swirl, just fold them into the batter in step 4 and pour it all into the pan. If you want to get fancy with swirling, pour the batter into the pan, then sprinkle the chocolate chips/nuts or cinnamon sugar on top. Then, take a knife or a skewer and gently swirl it through the batter to create pretty patterns. Don’t overdo it, just a few gentle swirls are enough!
Step 7: Bake
Pop that glorious pan into your preheated oven. Bake for 50-65 minutes. The exact time can vary depending on your oven, so keep an eye on it. You’ll know it’s done when a toothpick inserted into the center comes out clean, or with just a few moist crumbs attached (especially if you have chocolate chips!). The top should be golden brown. If the top starts browning too quickly before the inside is cooked, you can loosely tent it with aluminum foil. I usually check mine around the 50-minute mark.
Step 8: Cool & Glaze
Once it’s baked to perfection, take the Zucchini Bread out of the oven and let it cool in the pan for about 10-15 minutes. This allows it to set up a bit. Then, carefully invert it onto a wire rack to cool completely. Once it’s mostly cooled, you can whip up the glaze. Whisk together the powdered sugar, milk (or lemon juice), and vanilla extract until smooth. You want a pourable consistency, not too thick and not too thin. Drizzle this over the cooled Zucchini Bread. If you’re going to serve it later, sometimes I wait to glaze it until just before serving so it doesn’t get too soggy, but honestly, it’s delicious either way!
Step 9: Slice & Serve
Once the glaze has set a bit (or if you skipped the glaze), it’s time to slice and enjoy! I usually use a serrated knife for a clean cut. Serve it warm or at room temperature. It’s absolutely divine on its own, but a little butter or cream cheese is also fantastic. Enjoy every single bite!
What to Serve It With
This Zucchini Bread is so wonderfully versatile, it’s practically a chameleon when it comes to pairings. For a delightful Breakfast, I love serving it warm, fresh from the oven, with a good cup of coffee. A simple slice is perfect on its own, or you can add a light smear of butter for extra richness. It’s hearty enough to keep you going but not so heavy that you feel sluggish. If you’re planning a leisurely Brunch, this Zucchini Bread can be part of a more elegant spread. I like to serve it on a nice platter, perhaps with a little bowl of fresh berries on the side for color and freshness. It pairs beautifully with mimosas or a nice iced tea. As a decadent Dessert, especially if you’ve gone with the chocolate chip version and added the glaze, it’s simply divine. Serve it with a scoop of vanilla bean ice cream or a dollop of lightly sweetened whipped cream. The warm spices and tender crumb are just heavenly after a meal. And for those Cozy Snacks moments, when you just need a comforting bite? A slice with a glass of cold milk is pure bliss. It’s the ultimate comfort food, perfect for an afternoon pick-me-me-up or a late-night treat. My family often just grabs a slice as they’re running out the door, and it’s always a welcome sight!
Top Tips for Perfecting Your Zucchini Bread
I’ve made this Zucchini Bread more times than I can count, and over the years, I’ve picked up a few tricks that I think really elevate it. For Zucchini Prep, the most crucial step is squeezing out as much moisture as you can. Grate your zucchini, then wrap it in a clean kitchen towel or paper towels and give it a good squeeze. This prevents the bread from becoming too wet and gummy. Fresh zucchini is always best, but if you have some that’s been in the fridge a bit, it’ll still work beautifully. When it comes to Mixing Advice, remember my mantra: do NOT overmix! Once the flour is added, mix only until it’s just combined. Overmixing develops gluten, leading to a tough texture, and we want this bread to be tender and melt-in-your-mouth soft. It’s better to have a few tiny lumps than to overwork the batter. For Swirl Customization, don’t be afraid to get creative. You can use different nuts, dried fruits like cranberries or raisins, or even a mix of white and dark chocolate chips. The cinnamon-sugar swirl is wonderful, but a simple poppy seed or even a drizzle of melted peanut butter swirled in can be amazing too. When it comes to Ingredient Swaps, I’ve had success using whole wheat flour for half of the all-purpose flour for a slightly heartier loaf, though it might be a touch denser. For dairy-free, I’ve tested this with almond milk and it actually made it even creamier – you can also use a plant-based butter substitute. For Baking Tips, always know your oven! Ovens can vary, so using a toothpick test is your best bet. If the top is browning too quickly, tent it loosely with foil. I usually bake mine on the middle rack for even heat distribution. And for Glaze Variations, if you want a tangier glaze, swap out some or all of the milk for fresh lemon juice – it’s amazing! If you prefer no glaze, a simple dusting of powdered sugar before serving is also lovely, or you can serve it with a nice apple butter.
Storing and Reheating Tips
This Zucchini Bread is pretty forgiving when it comes to storage, which is another reason I love it so much. If you’re going to eat it within a day or two, keeping it at Room Temperature is perfectly fine. Just wrap it tightly in plastic wrap or place it in an airtight container. It usually stays fresh and moist for about 2-3 days this way, though it’s so good, it rarely lasts that long in my house! For longer storage, Refrigerator Storage is your best bet. Wrap the cooled loaf tightly in plastic wrap, then in aluminum foil, or store it in an airtight container. It should keep well in the fridge for up to a week. When you’re ready to enjoy it, just let it come back to room temperature, or give it a quick warm-up. If you’re planning way ahead, this Zucchini Bread freezes beautifully. For Freezer Instructions, let the loaf cool completely, then wrap it tightly in plastic wrap, followed by a layer of aluminum foil or a freezer-safe bag. It can stay frozen for up to 3 months. To thaw, simply unwrap it and let it come to room temperature on the counter. If you want to reheat a slice, you can pop it in the toaster oven for a few minutes until warmed through. Regarding Glaze Timing Advice, I usually add the glaze once the bread has cooled almost completely, just before serving or storing at room temperature. If you’re refrigerating or freezing, it’s often best to store the bread *without* the glaze and add it once the bread is thawed and brought back to temperature, as the glaze can sometimes become a little sticky or weepy in the fridge or freezer. But honestly, it’s delicious either way!
Frequently Asked Questions
Final Thoughts
So there you have it – my absolute favorite Zucchini Bread recipe! I truly hope you give this one a try. It’s more than just a recipe to me; it’s a little slice of comfort, a guaranteed crowd-pleaser, and proof that simple ingredients can create something truly magical. The fact that it uses up garden zucchini is just a bonus! If you love this recipe and are looking for more ways to use up produce, you might also enjoy my [link to another related recipe, e.g., Healthy Carrot Muffins] or my [link to another related recipe, e.g., Easy Apple Crumble]. These have that same cozy, home-baked feel. I can’t wait to hear how yours turns out! Please, leave a comment below and tell me what you think, or if you tried any fun variations. And if you loved it, a rating would be so appreciated! Happy baking!
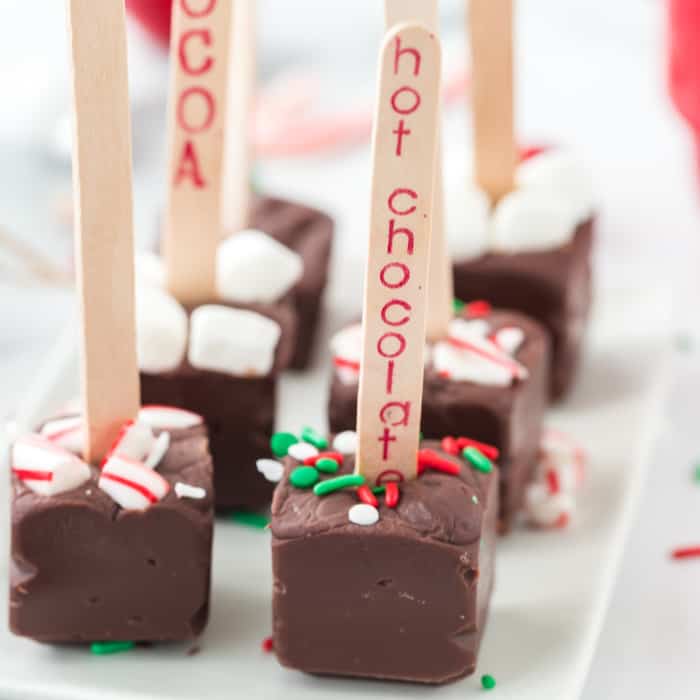
Hot Chocolate on a Stick
Ingredients
Method
- Place 2 silicone molds (each with about 15 squares, approximately 1.5in x 1.5in x 1.5in per square) onto a rimmed baking sheet. Set aside.
- In a large bowl, combine the semi-sweet chocolate chips and the broken pieces of the bittersweet chocolate baking bar. Set aside.
- In a medium saucepan, over medium heat, add the sweetened condensed milk and heavy cream. Heat the mixture until it reaches approximately 120-130°F, which will take about 3-4 minutes.
- Pour the hot milk mixture over the chocolates in the large bowl, ensuring the chocolates are completely covered. Allow to sit undisturbed for 3-4 minutes before whisking until fully incorporated and smooth.
- Transfer the melted chocolate mixture into a large piping bag or a zip-top plastic bag with one corner snipped off. Keep the open tip facing up until ready to pipe.
- Pipe the melted chocolate into each square opening of the silicone molds, filling them about ¾ full. Leave some space to top with 4-5 mini marshmallows, gently pressing them down. If omitting marshmallows, fill squares completely.
- Insert one lollipop stick into the center of each chocolate square. Place the baking sheet with the molds into the refrigerator to chill and firm up for 3 hours, or preferably overnight.
- Once the hot chocolate squares are firm, remove two individual squares from the silicone mold to make one mug of hot chocolate. (This recipe yields 14-15 servings, using 2 squares per 1 cup of milk).
- To prepare the hot chocolate drink, place two chocolate cubes on a stick into a large 10-12 oz. mug.
- In a microwave-safe 2-cup measuring cup with a spout, heat the whole milk on high for 2-2.5 minutes until scalded (hot but not boiling). Pour the hot milk over the chocolate cubes in the mug. Stir with the lollipop sticks until the chocolate is completely melted, creating a rich cup of hot chocolate with marshmallows. Discard the lollipop sticks after stirring.