Best Coffee Sugar Cookie Recipe Made Easy
You know, some recipes just stick with you. They become part of your kitchen’s soundtrack, the smell that signals comfort and home. For me, that recipe is this zucchini bread. It’s not just *any* zucchini bread, though. This is the one that convinced my super picky nephew that vegetables could actually be delicious (a true miracle, trust me!). It’s incredibly moist, perfectly spiced, and has this subtle sweetness that just hits the spot. Honestly, it’s way better than a lot of those fancier cakes you see out there, and the best part? It’s surprisingly simple to whip up. It’s the kind of thing I can make on a Tuesday after work and still feel like I’ve accomplished something amazing. It’s definitely my go-to when I’m craving something a little special without all the fuss.
What is Zucchini bread?
So, what exactly *is* zucchini bread, and why does it have “zucchini” in the name when you can barely taste it? Well, think of it as a super moist, flavorful quick bread that happens to have grated zucchini as its secret weapon. The zucchini doesn’t really add a strong flavor, but it’s an absolute champion at keeping the bread incredibly tender and moist. It’s not dense like a pound cake, nor is it light and airy like a sponge cake. It sits in that wonderfully satisfying middle ground. The name itself is pretty straightforward – it’s a bread, and it’s made with zucchini! It’s a brilliant way to use up that garden surplus, or, like me, the extra zucchini you always seem to end up with from the grocery store. It’s become a classic for a reason, and this version is, in my humble opinion, the absolute best.
Why you’ll love this recipe?
There are so many reasons why this zucchini bread has become my ultimate favorite, and I have a feeling it might become yours too! First off, the flavor is just divine. It’s warm, comforting, and has just the right amount of sweetness thanks to a blend of spices like cinnamon and nutmeg. The texture is where it really shines, though. Thanks to that grated zucchini, it’s unbelievably moist and tender. It’s not dry or crumbly at all, which is a common pitfall with quick breads. And speaking of pitfalls, this recipe is so forgiving! I’ve made it on nights when I’m completely exhausted, and it’s turned out perfectly every single time. It’s also wonderfully cost-effective. The main ingredients are pretty basic pantry staples, making it a budget-friendly treat that feels like a real indulgence. Plus, it’s incredibly versatile. You can easily customize it with nuts, chocolate chips, or even a little citrus zest. It’s just so adaptable! Honestly, what I love most about this recipe is that it’s pure comfort. It’s the perfect accompaniment to a hot cup of coffee in the morning or a delightful little pick-me-up in the afternoon. It’s not overly sweet, so it works beautifully for breakfast without feeling like you’re having dessert too early.
How do I make Zucchini bread?
Quick Overview
The process for making this zucchini bread is wonderfully straightforward. You basically mix your dry ingredients in one bowl, your wet ingredients in another, and then combine them. While that’s happening, you’ll also quickly prep your filling (if you’re using one!) and get your pan ready. The whole thing comes together in under 15 minutes of active prep time before it hits the oven. It’s truly a lifesaver on busy weeknights or when unexpected guests drop by. You get an amazing, homemade treat with minimal effort.
Ingredients
For the Main Batter:
This is where all the magic starts. The quality of your flour and the freshness of your eggs really do make a difference here! I always opt for all-purpose flour, and if I can, I’ll use fresh eggs from my local farmer’s market – they just seem to have a richer color and flavor.
* 2 cups All-Purpose Flour: Sifted, to ensure a lighter texture.
* 1 teaspoon Baking Soda: Make sure it’s not expired! This is crucial for the rise.
* 1/2 teaspoon Baking Powder: A little extra lift never hurt anyone.
* 1/2 teaspoon Salt: Balances out the sweetness.
* 1 teaspoon Ground Cinnamon: For that warm, cozy aroma.
* 1/4 teaspoon Ground Nutmeg: Just a pinch to add depth.
* 1/2 teaspoon Ground Ginger: For a little extra spice kick.
* 1 cup Granulated Sugar: You can adjust this slightly, but this is the sweet spot for me.
* 1/2 cup Packed Brown Sugar: Adds moisture and a caramel-like note.
* 2 Large Eggs: Room temperature is best for better emulsification.
* 1/2 cup Vegetable Oil: Or any neutral-flavored oil like canola or grapeseed. You can even use melted butter, but oil gives it that signature moistness.
* 1/2 cup Milk: Whole milk or even almond milk works beautifully. I tested this with almond milk and it actually made it even creamier! Make sure it’s at room temperature.
* 1 teaspoon Vanilla Extract: Don’t skimp on this; it elevates everything.
* 2 cups Grated Zucchini: About 2-3 medium zucchinis. Squeeze out as much liquid as you possibly can! This is key.
For the Filling (Optional but Highly Recommended!):
This is what makes my zucchini bread truly special. It’s like a little surprise burst of flavor and texture in every bite. You can skip this if you want a simpler version, but I really think it’s worth the extra minute or two.
* 1/2 cup Chopped Walnuts or Pecans: Toasted for extra flavor.
* 1/2 cup Chocolate Chips: Semi-sweet or dark chocolate are my favorites.
* 1 teaspoon Cinnamon: Just to boost the spiced goodness.
* 2 tablespoons Granulated Sugar: To help create a nice, caramel-y swirl.
For the Glaze:
This glaze is super simple and adds a lovely finishing touch without being too overpowering. It hardens slightly, giving it a nice texture contrast.
* 1 cup Powdered Sugar: Sifted, to avoid lumps.
* 2-3 tablespoons Milk or Lemon Juice: Start with 2 and add more to reach your desired consistency. Lemon juice adds a lovely tang!
* 1/2 teaspoon Vanilla Extract: For extra flavor.
Step-by-Step Instructions
Step 1: Preheat & Prep Pan
First things first, get that oven preheating to 350°F (175°C). This is the magic temperature for most quick breads. While it’s warming up, generously grease and flour a 9×5 inch loaf pan. I like to use a little non-stick spray and then dust it with flour, tapping out any excess. Alternatively, you can line it with parchment paper, leaving some overhang on the sides to help you lift the bread out later. This prevents any sticking, which is the worst! Make sure you get into all the corners.
Step 2: Mix Dry Ingredients
In a large mixing bowl, whisk together the sifted all-purpose flour, baking soda, baking powder, salt, cinnamon, nutmeg, and ginger. Give it a really good whisk to make sure everything is evenly distributed. This step is super important because it ensures your leavening agents and spices are spread throughout the batter, so you don’t end up with dense pockets or uneven flavor. Think of it as setting the foundation for a perfect bake.
Step 3: Mix Wet Ingredients
In a separate, medium-sized bowl, whisk together the granulated sugar, brown sugar, room temperature eggs, vegetable oil, milk, and vanilla extract. Whisk until everything is well combined and the mixture is smooth and slightly lighter in color. Make sure there are no streaks of egg white visible.
Step 4: Combine
Now, pour the wet ingredients into the bowl with the dry ingredients. Using a spatula or a wooden spoon, gently fold everything together until just combined. Be careful not to overmix! Overmixing develops the gluten in the flour, which can lead to a tough bread. A few streaks of flour are perfectly fine at this stage; they’ll disappear as you add the zucchini. This is a critical step, so just mix until you don’t see any large dry patches.
Step 5: Prepare Filling
If you’re adding the filling mixture, this is when you’d quickly combine the chopped nuts (make sure they’re toasted!), chocolate chips, 1 teaspoon of cinnamon, and 2 tablespoons of sugar in a small bowl. Give it a quick stir. This little mixture is what you’ll swirl into the batter for those delightful pockets of goodness.
Step 6: Layer & Swirl
Now for the fun part! Add the grated and thoroughly squeezed zucchini to the batter. Gently fold it in until it’s just incorporated. Now, spoon about half of the batter into your prepared loaf pan. Sprinkle half of your filling mixture evenly over the top. Then, spoon the remaining batter over the filling, and sprinkle the rest of the filling on top. If you want more of a marbled effect, you can gently run a knife or skewer through the batter in a swirling motion. Don’t overdo it; just a couple of swirls will do the trick!
Step 7: Bake
Pop that pan into your preheated oven. Bake for 50-65 minutes. The exact time will depend on your oven, of course. You’ll know it’s done when a wooden skewer or toothpick inserted into the center comes out clean, with maybe just a few moist crumbs attached (no wet batter!). If the top starts to brown too quickly before the inside is cooked, you can loosely tent it with aluminum foil for the last 15-20 minutes of baking. I always keep an eye on it towards the end.
Step 8: Cool & Glaze
Once it’s baked, carefully remove the pan from the oven and let it cool in the pan for about 10-15 minutes. This allows the bread to set up a bit. Then, use the parchment paper overhang (or carefully invert it if you didn’t use parchment) to remove the loaf from the pan and place it on a wire rack to cool completely. Once it’s completely cool (and I mean *completely* cool – this is important for the glaze!), you can whip up the glaze. Whisk together the powdered sugar, vanilla extract, and 2 tablespoons of milk or lemon juice. Add more liquid, a teaspoon at a time, until you reach a pourable but not too thin consistency. Drizzle it over the top of the cooled loaf, letting it drip down the sides. It will set up slightly as it dries.
Step 9: Slice & Serve
Once the glaze has set a bit, you’re ready to slice into this beauty! I find a serrated knife works best for a clean cut. Serve it at room temperature. The aroma alone is enough to make your mouth water. It’s perfect on its own, or with a little pat of butter if you’re feeling extra indulgent.
What to Serve It With
This zucchini bread is so versatile, it’s practically a chameleon in the kitchen! For a perfect breakfast treat, I love pairing a warm slice with a steaming mug of my favorite coffee. The rich, nutty notes in a dark roast complement the spices in the bread beautifully. It’s also fantastic with a glass of cold milk for the kids (and let’s be honest, for me too!). For a more elegant brunch spread, I’ll slice it a bit thinner and arrange it on a pretty platter. It pairs wonderfully with fresh fruit salad, yogurt parfaits, or even a light quiche. As a dessert, it’s surprisingly satisfying. A small slice with a dollop of whipped cream or a scoop of vanilla bean ice cream is pure bliss. I’ve also found it’s incredible with a drizzle of honey or a light caramel sauce. And for those moments when you just need a cozy snack, it’s perfect on its own, perhaps with a soothing cup of herbal tea. My family also loves it when we have it with a side of cream cheese – it adds a lovely tangy creaminess!
Top Tips for Perfecting Your Zucchini Bread
I’ve learned a few things over the years of making this bread, and I’m happy to share them with you! Firstly, the zucchini prep is *crucial*. You absolutely must grate your zucchini and then squeeze out as much moisture as humanly possible. I use a clean kitchen towel or cheesecloth for this, and I really put some muscle into it. Excess water is the enemy of a good quick bread texture; it can make it gummy. Don’t shy away from squeezing hard!
When it comes to mixing, remember my mantra: “just combined.” Overmixing is the number one culprit for tough baked goods. As soon as you don’t see large pockets of dry flour, stop mixing. It’s better to have a few tiny streaks of flour than a tough loaf. You want that tender, melt-in-your-mouth texture, and gentle handling is key.
The swirl is really where you can have some fun! You don’t need to be an artist. Just sprinkle your filling ingredients over the batter in the pan and use a butter knife or a skewer to gently swirl them in a few places. Aim for a marbled look rather than a completely uniform mix. This creates little bursts of chocolate or nuts within the bread, making each bite a bit of a surprise.
Ingredient swaps are my jam! If you don’t have nuts, don’t worry. You can easily omit them or swap them for seeds like sunflower or pumpkin seeds. If you’re not a chocolate chip fan, try white chocolate chips, dried cranberries, or even chopped dried apricots. For a dairy-free version, I’ve had great success using a good quality plant-based milk and ensuring your oil is neutral.
Baking can be a little tricky because ovens vary. My best advice is to really get to know your oven. Use the toothpick test religiously. If the top is browning too fast, tenting with foil is your best friend. I usually bake mine on the middle rack to ensure even heat circulation. Avoid opening the oven door too early in the baking process, as the sudden temperature change can cause your bread to sink in the middle.
And finally, glaze variations! While the simple milk-based glaze is classic, I love adding a touch of lemon zest or a splash of orange juice for a citrusy kick. If you prefer a thicker glaze, just use less liquid. For a sugar-free option, you can make a simple glaze using erythritol or xylitol (powdered) and a little water or unsweetened almond milk. It’s all about personal preference!
Storing and Reheating Tips
One of the best things about this zucchini bread is how well it keeps. At room temperature, I find it stays wonderfully moist for about 2-3 days. I usually store it in an airtight container or wrap it tightly in plastic wrap, and then place it in a bread box or on the counter. If it’s particularly warm or humid where you live, you might want to pop it in the fridge after the first day.
Refrigerator storage will extend its life considerably. I’ve kept it in the fridge for up to a week, and it’s still delicious. Just make sure it’s well-wrapped in plastic wrap or in an airtight container to prevent it from drying out. When you’re ready to eat a slice from the fridge, I personally prefer to let it come back to room temperature for about 15-20 minutes for the best texture and flavor.
Freezing is an absolute lifesaver if you’ve baked a double batch or just want to have some on hand for later. Once the bread is completely cooled, I wrap the entire loaf tightly in a couple of layers of plastic wrap, followed by a layer of aluminum foil. You can also slice it first and wrap individual slices, which makes it super convenient to grab just one serving. Frozen zucchini bread will keep its quality for about 2-3 months. To thaw, unwrap it and let it sit at room temperature for a few hours, or gently reheat it in a low oven.
Regarding the glaze, it’s best to apply it only when the bread is completely cool and you plan to serve it soon, especially if it’s at room temperature. If you’re freezing the bread, I highly recommend glazing it *after* you’ve thawed it. The glaze can get a little sticky or melt if frozen for too long.
Frequently Asked Questions
Final Thoughts
So there you have it – my beloved zucchini bread recipe! I truly hope you give it a try. It’s more than just a recipe to me; it’s a little slice of home, a memory maker, and proof that sometimes the simplest ingredients can create the most incredible flavors. The moistness, the subtle spice, and that delightful texture are something that has to be tasted to be believed. If you love this recipe, you might also enjoy my recipe for {{< temp “apple cinnamon muffins” >}} or my {{< temp “blueberry crumble bars” >}} – they have that same cozy, homemade feel!
I can’t wait to hear what you think. If you make it, please leave a comment below and tell me how it turned out! Did your picky eaters approve? Did you add any special twists? I’d love to see your creations, so feel free to share photos too. Happy baking, everyone!
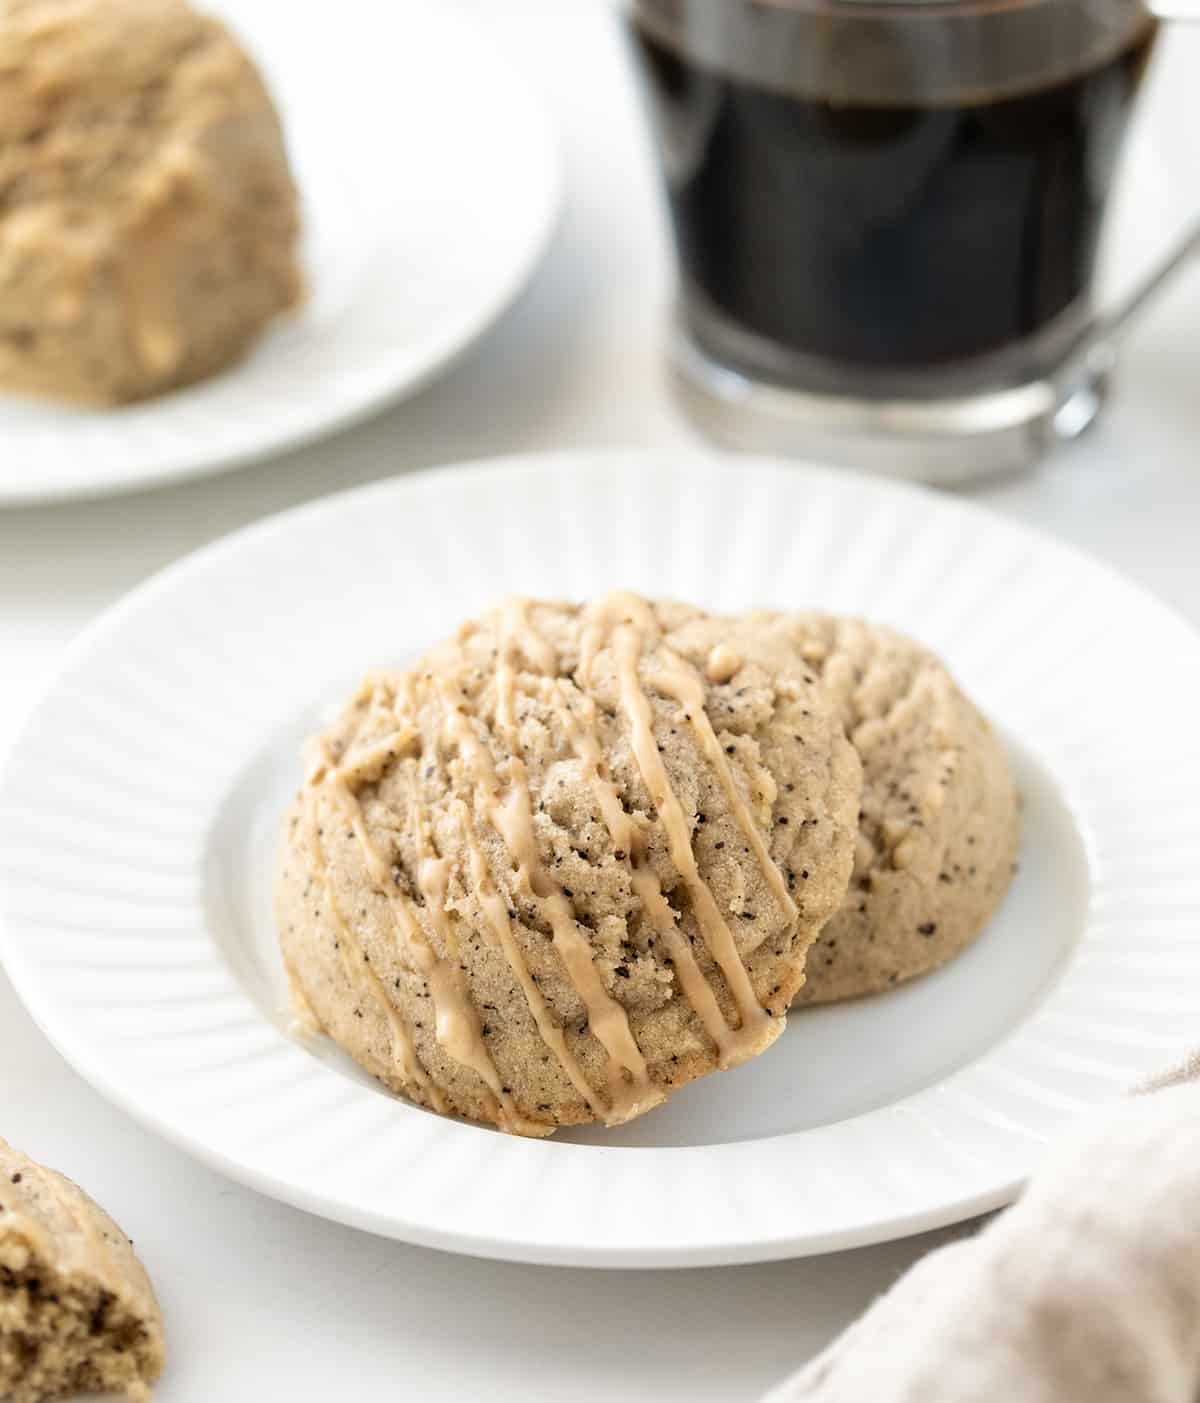
Coffee Sugar Cookies
Ingredients
Method
- Preheat oven to 375°F and line baking sheets with parchment paper.
- In a large bowl, combine flour, baking soda, and cream of tartar. Whisk to combine and set aside.
- In the bowl of a stand mixer fitted with the paddle attachment, cream together butter, oil, granulated sugar, and confectioners sugar on medium-high speed until light and fluffy, scraping the sides of the bowl as necessary.
- Reduce speed to medium and add the eggs, one at a time, mixing until just combined after each addition.
- Add the vanilla and coffee grounds and continue mixing until combined.
- Reduce speed to low and add the flour mixture in three additions, scraping the sides of the bowl as necessary.
- Using a 2-tablespoon cookie scoop, scoop cookies and place them onto the prepared baking sheet, spaced about 1 inch apart. (They will not spread much)
- Bake 8-10 minutes or until the edges of the cookie start to turn golden brown.
- In a small bowl combine confectioners' sugar and coffee. Whisk together until smooth.
- Drizzle the cookies with the coffee glaze.
- Cookies can be served warm or cold.