Autumn Spice Cookies with Brown Butter Cream
There’s something about waking up on a quiet Saturday, knowing I have the perfect breakfast waiting—warm, fragrant, a little sweet, and totally comforting. This zucchini swirl coffee cake has been my go-to for years, especially when I want to wow family or just treat myself to something cozy. I always do this when I’m craving a little decadence but don’t want to fuss much in the kitchen. My kids ask for it all the time, and honestly, it’s gotten to where I can practically make it with my eyes closed. The smell alone—warm cinnamon, buttery batter, with that tender zucchini swirl—all of it just makes the whole house feel happy. And the best part? It’s surprisingly simple to pull together, even on frantic mornings. Trust me, once you try this, it’ll become a staple that you find yourself making season after season.
What is Zucchini Swirl Coffee Cake?
This zucchini swirl coffee cake is like a warm hug wrapped up in a slice. Think of it as a classic coffee cake, but with a twist—moist zucchini grated right into the batter, swirling through cinnamon-sugar goodness. Its name pretty much describes what it is: a moist cake with a cinnamon-spiced zucchini ribbon swirling in the middle, topped with crunchy streusel. It’s essentially a breakfast cake, perfect for mornings with a cup of coffee or tea, but I won’t judge if you sneak a slice at 10 pm when that sweet tooth hits. The beauty of this recipe is how versatile it is—made with simple pantry staples, it’s budget-friendly, and feels wholesome enough that you don’t have to feel guilty about indulging in seconds. Over the years, I’ve tested this with different kinds of zucchinis and even added a splash of vanilla or nutmeg—each variation just makes it even better. It’s a recipe I always come back to because it’s cozy, familiar, and oh-so-delicious.
Why you’ll love this recipe?
What I love most about this zucchini swirl coffee cake is how it combines the best of both worlds: that tender, cake-like crumb with a generous swirl of cinnamon-spiced zucchini that keeps it moist and flavorful. It’s a true comfort food, perfect to start the weekend or serve at brunch gatherings. The flavor profile is just enough sweetness with a warm cinnamon kick, balanced by the subtle earthiness of zucchini—something I find surprisingly addictive. Plus, it’s really easy to make. No fancy tools or complicated techniques, just straightforward mixing and layering. I’ve made this countless times because it’s a lifesaver on busy nights when I want something homemade but don’t have hours to fuss. It’s also super budget-friendly because the main ingredients are pantry staples and a bit of zucchini that’s probably already sitting in your fridge. And if you want to switch things up, you can add nuts, dried fruit, or even swap out part of the sugar for a drizzle of honey or maple syrup. It’s versatile, forgiving, and, honestly, my kids ask for this all the time—they love the swirl and the cinnamon topping best of all!
How do I make Zucchini Swirl Coffee Cake?
Quick Overview
This coffee cake is all about layering and minimal fuss. You start by mixing a simple batter—flour, sugar, baking powder, eggs, milk, and butter—until just combined. Meanwhile, the zucchini gets grated and gently squeezed to remove excess moisture, so the cake stays tender and fresh. You prepare a cinnamon-sugar mixture for the swirl and streusel topping. Then, it’s just a matter of pouring half the batter into your pan, spreading the cinnamon-zucchini mixture over it, covering with the remaining batter, and swirling it all beautifully with a knife or skewer. A quick sprinkle of streusel on top, into the oven it goes, and before you know it, your house is filled with the smell of cinnamon and baked goodness. It’s foolproof—perfect for both baking newbies and seasoned cooks. And trust me, the smell alone will make everyone race to the kitchen.
Ingredients
For the Main Batter:
- 2 cups all-purpose flour (I like unbleached for a richer flavor)
- 1 cup granulated sugar (or coconut sugar for a more caramel note)
- 1 tablespoon baking powder
- ½ teaspoon salt
- 1 teaspoon cinnamon (because everything’s better with cinnamon!)
- ½ cup unsalted butter, melted (use good-quality butter for extra flavor)
- 2 large eggs
- 1 cup milk (dairy or almond milk work equally well)
- 1 teaspoon vanilla extract (makes it smell like heaven)
For the Filling:
- 1 cup grated zucchini (about 1 small zucchini, grated thin)
- 2 tablespoons brown sugar
- 1 teaspoon cinnamon
- A pinch of nutmeg (if you love that warm spice)
For the Glaze (optional but recommended):
- ½ cup powdered sugar
- 1 tablespoon milk (or lemon juice for a tangy twist)
- A splash of vanilla
Step-by-Step Instructions
Step 1: Preheat & Prep Pan
Set your oven to 350°F (180°C). Grease a 9-inch round or square baking pan well with butter or non-stick spray. I always line mine with parchment paper for easy removal—trust me, it makes life so much simpler! Once preheated, gather all your ingredients, and grate the zucchini finely. Squeeze out as much moisture as you can—this prevents the cake from getting soggy.
Step 2: Mix Dry Ingredients
In a large bowl, whisk together the flour, sugar, baking powder, salt, and cinnamon. I do this step first to ensure every bite is bursting with cinnamon-spiced goodness. Proper mixing now ensures even distribution and fluffy texture later.
Step 3: Mix Wet Ingredients
In a separate bowl, beat the eggs lightly, then add the milk, melted butter, and vanilla. Whisk until smooth. I’ve tested this batter with almond milk, and honestly, it made it even creamier—so use what you prefer! Just make sure everything’s at room temperature so it blends seamlessly.
Step 4: Combine
Pour the wet ingredients into the dry, and gently fold with a spatula until just combined—don’t overmix! The batter should be thick but smooth—think muffin batter consistency. Overmixing can make the cake dense, and nobody wants that.
Step 5: Prepare Filling
In a small bowl, combine the grated zucchini, brown sugar, cinnamon, and nutmeg. Mix well. The zucchini should be evenly coated, and the mixture should look moist but not watery. I like to taste a little to ensure it’s nice and cinnamony—the kids always ask for extra cinnamon here!
Step 6: Layer & Swirl
Pour half of the batter into your prepared pan, spreading it out gently. Then, spoon the cinnamon-zucchini mixture over the batter, spreading it into an even layer. Carefully pour the remaining batter over the top, and using a butter knife or skewer, swirl through the batter to create those lovely ribbons of zucchini and cinnamon—don’t overdo it; just a few gentle marbles do the trick. The visual swirling is part of the charm.
Step 7: Bake
Pop it into the oven on the middle rack and bake for 35–40 minutes. You want a golden-brown top and a toothpick inserted in the center to come out clean. Every oven is different, so keep an eye on it after 30 minutes. If it’s browning too fast, tent it loosely with foil. Once done, let it cool in the pan for about 15 minutes—this helps the crumb set and makes slicing easier.
Step 8: Cool & Glaze
Transfer the cake to a wire rack and let it cool completely if you’re glazing. Mix your powdered sugar, milk, and vanilla for the glaze—add a touch more milk if you want it drizzling thin, or more sugar if you prefer thicker. Drizzle it over the cooled cake, letting it drip down the sides just enough for that homemade look.
Step 9: Slice & Serve
Using a sharp serrated knife, slice gently to reveal the beautiful swirl. Serve warm or at room temperature—either way, it’s a delight. I love pairing this with a steaming cup of coffee or a glass of cold milk. Honestly, it’s best enjoyed fresh, but I’ve also stored leftovers in an airtight container in the fridge for up to three days. The flavor deepens overnight, and it still tastes fantastic.
What to Serve It With
This cake is so versatile, I always have a few ideas up my sleeve. For a cozy breakfast, I love to serve it alongside a strong cup of coffee or a frothy latte—my mornings are always brighter with this on the table. If I’m hosting brunch, I’ll add a dollop of whipped cream or a splash of vanilla yogurt on the side—it makes it feel a little fancy. My family loves it as a dessert, warmed slightly with a scoop of vanilla ice cream or a drizzle of caramel. And on casual days, it’s perfect sliced into oatmeal or yogurt bowls for a quick, nourishing snack. I actually learned this trick from my grandma—she’d always sneak a bit of zucchini into her baked goods to get us to eat more greens, and this cake’s no different. It’s a crowd-pleaser no matter how you serve it, and trust me, everyone will be asking for seconds.
Top Tips for Perfecting Your Zucchini Swirl Coffee Cake
Over the years, I’ve learned some tricks to make this cake even better. First, zucchini prep is everything—no soggy cake here! Squeeze out as much moisture as possible after grating, or the batter can end up too wet. I’ve tested adding a tiny bit of cornstarch to the zucchini to absorb moisture—works like magic and keeps everything light. When mixing, be gentle—overmixing can lead to a dense crumb, so fold just enough until combined. As for the swirl pattern, I recommend reserving some of the cinnamon-sugar mixture for the top—it creates a gorgeous, crunchy topping. If you want a more caramel-like flavor, sprinkle some brown sugar on the streusel. If you’re feeling adventurous, tossing in chopped nuts or dried cranberries adds a nice crunch and flavor. A little vanilla extract makes the batter smell amazing and adds depth of flavor. When baking, oven positioning matters—middle rack is best, and keep an eye on that top—it can brown quickly. And don’t forget, the best glaze is simple: powdered sugar mixed with just enough milk to create a slow-drip consistency. If it’s too runny, add more sugar; too thick, a splash more milk. These little tweaks are what make this cake shine every time, and I’ve learned these tricks the hard way. Patience in cooling and careful swirling makes all the difference. This recipe is forgiving, so even if it’s not perfect on your first try, it’ll still taste incredible!
Storing and Reheating Tips
This cake keeps surprisingly well—if you’ve got leftovers, here’s the scoop. At room temperature, it’s best enjoyed within a day or two—cover loosely with foil or a clean towel to prevent it from drying out. I usually store slices in an airtight container or wrap individual pieces in plastic wrap for easy grab-and-go snacking. In the fridge, it stays fresh for about 3 days—just make sure to cover tightly to retain moisture. The flavor develops overnight, making it even more delicious the next day if you want to make it ahead. If you’re freezing leftovers, wrap the slices tightly in plastic, then in foil. They’ll last up to 2 months. To reheat, just warm in the microwave for about 20 seconds or in a low oven until warm—add a little extra glaze or a dusting of powdered sugar if you want that bakery-fresh touch. For the glaze, I prefer to add it after reheating so it stays shiny and sweet. The key is not to overheat—nothing kills the moistness faster than a scorched bottom. When you’re ready to serve again, a quick zap makes it taste fresh and warm, just like from the bakery!
Frequently Asked Questions
Final Thoughts
There’s just something about this zucchini swirl coffee cake that feels like home—warm, welcoming, and a little bit nostalgic. I’ve made it from scratch so many times that I can eyeball the layering now, but even when I mess up the swirl pattern, it still tastes incredible. It’s a recipe I love sharing with friends because I know it’ll brighten their day, just like it does for my family. The combination of moist zucchini, cinnamon-sugar swirl, and buttery crumb is pure comfort and a reminder that simple ingredients can create magic. So go ahead, give it a try—you might find yourself making this more often than you expected. And I’d love to hear how yours turns out! Drop a comment or share your twists—happiness in baking is always better when shared. Happy baking, friends!
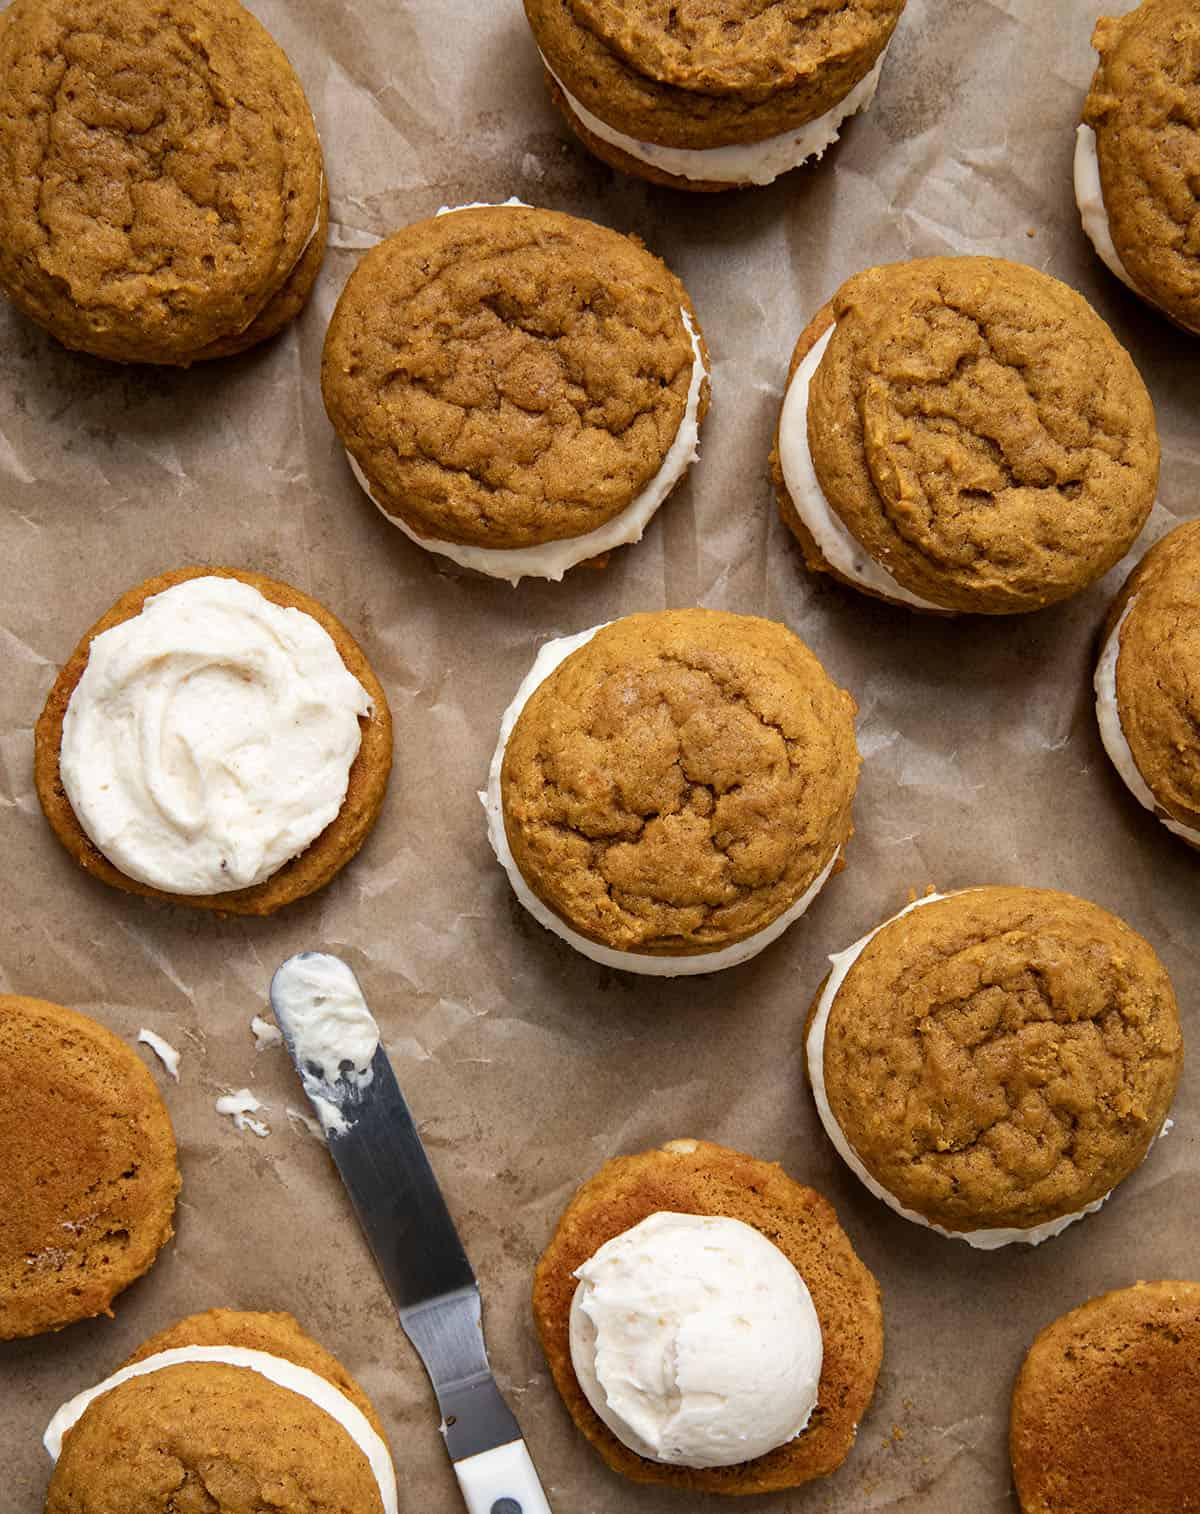
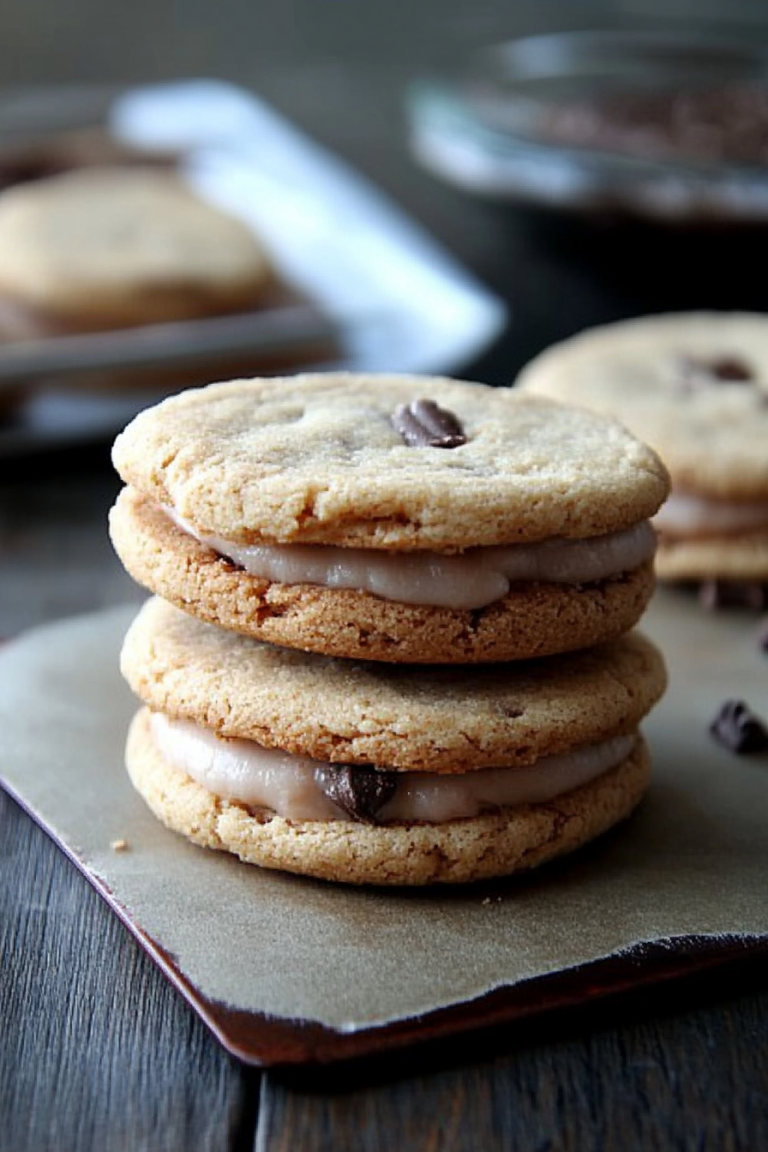
Pumpkin Sandwich Cookies with Brown Butter Buttercream
Ingredients
Method
- Preheat oven to 350°F (177°C). Line two baking sheets with parchment paper and set aside.
- Place the pure pumpkin into a fine mesh strainer set over a bowl. Allow it to drain for at least 10–15 minutes to remove excess liquid.
- In a large bowl, whisk together the flour, baking powder, baking soda, salt, pumpkin pie spice, cinnamon, and ginger. Set aside.
- In a separate large bowl, use a hand mixer on medium speed to cream the softened butter, brown sugar, and granulated sugar until smooth, about 2 minutes.
- Add the egg and beat on high speed until combined, about 1 minute, scraping down the sides of the bowl as needed.
- Add the milk and strained pumpkin, then mix on high speed until combined. The mixture may look slightly lumpy—this is normal.
- Add the dry ingredients to the wet ingredients, mixing on low speed until just combined. The dough will be thick and sticky. Using a 2-tablespoon scoop, drop the dough onto the lined baking sheets, about 2 inches apart.
- Bake for 14–15 minutes, or until the edges appear set but the center is still soft.
- Remove from the oven and let cookies cool completely.
- In a medium saucepan, melt the butter over medium heat. Continue cooking, stirring frequently, until the butter foams and brown bits form at the bottom. This takes about 5-7 minutes. Watch closely to avoid burning. When the butter reaches a warm amber color and has a nutty aroma, remove it from heat.
- Pour the browned butter into a heat-safe bowl and chill it in the refrigerator for 20-30 minutes.
- Once the browned butter is cooled, place it in a stand mixer fitted with the whisk attachment. Whip the butter on medium-high speed for about 1 minute.
- Gradually add the confectioners' sugar. Then, add the vanilla.
- Reduce the mixer speed to low. Add buttermilk, one tablespoon at a time, until the frosting reaches a smooth and spreadable consistency. Whip the frosting on high speed for 1–3 minutes, until light and fluffy.
- Once the cookies are completely cooled, spread or pipe a generous amount of brown butter buttercream on the bottom of one cookie. Top with a second cookie to form a sandwich. Repeat with remaining cookies and buttercream.