Air Fryer Chicken Parmesan Easy Recipe
You know, there are some recipes that just feel like a warm hug, right? The kind that instantly transport you back to your grandma’s kitchen or a cozy Sunday morning. For me, that recipe is definitely my ultimate zucchini bread. I’ve been making this for years, and honestly, it’s one of those baked goods that never, ever fails to impress. It’s got that perfect balance of moistness, a hint of sweetness, and just enough spice to make you want more. If you’ve ever tried those dry, crumbly zucchini breads that taste more like disappointment than dessert, you’re in for a treat. This isn’t that. This is the good stuff. It’s almost like a moist cake, but better because it’s practically a vegetable, right? Ha! My kids ask for this all the time, especially as an after-school snack, and the smell that fills the house while it’s baking? Pure magic. It’s the kind of recipe that makes you feel like a baking superstar, even if you’re just starting out.
What is Zucchini bread?
So, what exactly *is* zucchini bread? At its heart, it’s a quick bread that uses grated zucchini as its star ingredient. Now, I know what you might be thinking – zucchini in a sweet bread? But trust me on this! The zucchini is incredibly mild in flavor; you’d never guess it’s there unless I told you. What it *does* do is add this incredible, unbeatable moisture to the batter. It’s what keeps this bread from ever being dry or dense. Think of it as nature’s secret weapon for the most tender baked goods. The “bread” in its name is a bit of a misnomer because it’s more like a moist, flavorful cake or a very forgiving muffin batter. It’s the kind of treat that’s simple enough for a weeknight but feels special enough for company. It’s essentially a delightful way to sneak some extra veggies into your diet without anyone even noticing!
Why you’ll love
What are some of the reasons why zucchini bread is my go-to bread?flavor is just out of this world. It’s perfectly spiced with cinnamon and a hint of nutmeg that just screams comfort. It’s not overly sweet, so you can really taste all those delicious warm spices. And the texture? Oh my goodness. It’s unbelievably moist, thanks to that secret ingredient: zucchini. I’ve tried other zucchini breads that were, frankly, a little sad and dry, but this one stays tender for days. It’s also incredibly simple to makeI don’t need any fancy equipment, just a couple of bowls, a whisk, and a spatula. It’scost-effective. Zucchini is usually pretty affordable, and the other ingredients are pantry staples. What I love most about this recipe is its versatility. It’s fantastic on its own, but you can also add chopped nuts, chocolate chips, or even a swirl of cream cheese if you’re feeling fancy. It’s perfect for breakfast, a midday snack, or even a light dessert. It’s really the ultimate crowd-pleaser, and it’s the kind of recipe that just makes everyone happy. It rivals my favorite banana bread, but with a unique twist!
How to Make Zucchini Bread
Quick Overview
The process for making this incredible zucchini bread is wonderfully straightforward. We’ll start by prepping our zucchini and then quickly mix the wet and dry ingredients separately before combining them gently. The filling gets swirled in, and then it’s off to the oven for a bake that fills your home with the most amazing aroma. It’s truly a no-fuss, high-reward recipe that anyone can master, and the results are consistently delicious. You get a beautifully moist, flavorful loaf every single time.
Ingredients
For the Main Batter:
This is where all the magic begins. Using good quality, fresh zucchini is key. I usually grab mine from the farmer’s market when they’re in season, but any medium-sized zucchini will work just fine. You’ll need about 2 cups of finely grated zucchini. And when I say finely grated, I mean it – we don’t want big chunks! I usually use the side of my box grater with the smaller holes. Don’t worry about squeezing out all the moisture; that’s what we want! We’ll also need all-purpose flour (about 2 cups), baking soda and baking powder for that perfect lift, salt to balance the sweetness, and of course, those warming spices: cinnamon and a pinch of nutmeg. For sweetness, I use granulated sugar and a little bit of brown sugar for extra moisture and depth of flavor. And you absolutely need eggs and oil for richness and binding. I prefer a neutral oil like vegetable or canola oil, but melted butter works too if you want a slightly different flavor profile. And a splash of vanilla extract, naturally!
For the Filling:
This is optional but highly recommended if you want to take your zucchini bread to the next level! I often make a simple cinnamon-sugar mixture with a touch of flour to help it bind. It’s basically just cinnamon and sugar, maybe a tablespoon or two of each, mixed together. Some people like to add chopped walnuts or pecans here, which is also divine! If you’re feeling really decadent, a handful of chocolate chips can be stirred in, either to the filling or directly into the batter. My kids are obsessed with the chocolate chip version!
For the Glaze:
This is the crowning glory! It’s a super simple powdered sugar glaze. You’ll need powdered sugar, a bit of milk or cream (or even orange juice for a citrusy twist!), and a tiny splash of vanilla. The trick is to get the consistency just right – thick enough to coat but not so thin that it just runs off. I always start with a few tablespoons of liquid and add more very slowly until it’s perfect.
Step-by-Step Instructions
Step 1: Preheat & Prep Pan
First things first, get that oven preheating to 350 degrees Fahrenheit (175 degrees Celsius). This is crucial for an even bake. While the oven is warming up, I like to grease and flour a standard 9×5 inch loaf pan. You can also line it with parchment paper for super easy removal – I usually do this if I’m in a rush and don’t want to worry about sticking. Make sure you get into all the corners of the pan!
Step 2: Mix Dry Ingredients
In a large bowl, whisk together your flour, baking soda, baking powder, salt, cinnamon, and nutmeg. Give it a good whisk to make sure everything is evenly distributed. This is important so you don’t end up with pockets of baking soda or spice. I usually sift my flour in if I have time, but a good whisk works just fine. You want to see a lovely, uniform pale beige mixture.
Step 3: Mix Wet Ingredients
In a separate medium bowl, whisk together the eggs, sugars (granulated and brown), oil, and vanilla extract until well combined. It should look smooth and slightly glossy. If you’re using melted butter, make sure it’s cooled slightly so it doesn’t cook the eggs.
Step 4: Combine
Now, pour the wet ingredients into the dry ingredients. Gently fold them together with a spatula or wooden spoon until *just* combined. This is the most important part to avoid a tough bread: do not overmix! A few streaks of flour are okay; they’ll disappear as you add the zucchini. I always say, “When in doubt, stop mixing!” Overmixing develops the gluten too much and can make your bread tough.
Step 5: Prepare Filling
If you’re adding a filling, now’s the time to mix your cinnamon and sugar together in a small bowl. If you’re using nuts or chocolate chips, have them ready to go.
Step 6: Layer & Swirl
Gently fold in the grated zucchini into the batter. It might seem like a lot of zucchini, but it will incorporate. The batter will be quite thick at this point. If you’re using a filling, pour about half of the batter into your prepared loaf pan. Sprinkle half of your cinnamon-sugar mixture (or nuts/chocolate chips) over the top. Then, add the remaining batter, followed by the rest of the filling. You can then use a knife or a skewer to gently swirl the filling into the batter. Don’t overdo it; you want distinct layers and swirls, not a uniform color.
Step 7: Bake
Place the loaf pan in the preheated oven. Bake for about 50-65 minutes. The exact time will depend on your oven, so keep an eye on it. You’ll know it’s done when a wooden skewer or toothpick inserted into the center comes out clean, or with just a few moist crumbs attached. The top should be golden brown and look beautiful.
Step 8: Cool & Glaze
Once baked, let the zucchini bread cool in the pan for about 10-15 minutes. This helps it set. Then, carefully invert it onto a wire rack to cool completely. This is crucial before glazing! Trying to glaze a warm bread will just make a sticky mess. While it’s cooling, whisk together your powdered sugar, milk, and vanilla for the glaze. Once the bread is completely cool, drizzle the glaze generously over the top. Let the glaze set for a few minutes before slicing.
Step 9: Slice & Serve
And there you have it! The most delicious, moist, and flavorful zucchini bread. Slice it up and enjoy! It’s best served at room temperature, but honestly, I’ve eaten it warm straight from the oven (with extra glaze, of course!).
What to Serve It With
This zucchini bread is so versatile, it’s practically its own food group! For a quick and satisfying breakfast, I love a thick slice toasted and topped with a schmear of butter or cream cheese. It pairs perfectly with a steaming mug of coffee or a glass of cold milk. For a more elegant brunch spread, I’ll often serve it alongside fresh fruit salad, maybe some yogurt parfaits, and of course, a nice pot of tea or some mimosas. It adds a touch of homemade goodness that always feels special. As a dessert, it’s fantastic on its own, especially with that lovely glaze. But if you’re feeling indulgent, a small scoop of vanilla bean ice cream on the side is heavenly. It’s also just the perfect thing for cozy snacks. When that 3 pm craving hits, or I need something comforting for a late-night treat, a slice of this is pure bliss. My family loves it with a glass of milk after school, and it’s always a hit when I bring it to potlucks or gatherings. I’ve also found that it’s amazing with a dollop of whipped cream or a drizzle of honey for an extra touch of sweetness.
Top Tips for Perfecting Your Zucchini Bread
I’ve made this zucchini bread more times than I can count, and along the way, I’ve picked up a few tricks that I think really make a difference. For zucchini prep, don’t bother peeling it! The skin is thin and adds great color and nutrients. Just give it a good wash and trim the ends. Grating it finely is key; a box grater on the smallest holes is your best friend here. And again, don’t squeeze out the moisture – that’s the secret to its legendary moistness! When it comes to mixing advice, remember that golden rule: do not overmix. As soon as the wet and dry ingredients are *just* combined, stop. A few small lumps are fine, and it’s much better to have a slightly under-mixed batter than an over-mixed one, which leads to a tough, dense loaf. For swirl customization, have fun with it! You can create simple lines with a knife, or get more creative with a toothpick to make beautiful marbled patterns. Just don’t over-swirl, or you’ll lose the definition. If you’re looking for ingredient swaps, I’ve tested this with different types of oil, and they all work well. For a healthier twist, you can reduce the sugar slightly, but don’t go too low, or it might affect the texture. I’ve also successfully used applesauce in place of some of the oil, but it does make it a bit denser. For baking tips, always trust your oven. If yours tends to run hot, start checking a bit earlier. Placing the loaf pan on the middle rack ensures even heat circulation. A clean skewer test is your most reliable doneness indicator. And for glaze variations, the possibilities are endless! A little lemon or orange zest in the glaze adds a wonderful brightness, or you can add a touch of maple syrup for a different flavor profile. Just remember to let the bread cool completely before applying any glaze or frosting.
Storing and Reheating Tips
One of the best things about this zucchini bread is how well it keeps! For room temperature storage, I usually keep it in an airtight container or well-wrapped in plastic wrap on the counter. It stays wonderfully moist and delicious for about 3-4 days. If it’s a particularly warm day, or if you live in a humid climate, popping it in the fridge might be a good idea. Refrigerator storage is great for extending its life even further. In the fridge, it can easily last up to a week, still tasting fantastic. Just make sure it’s in a well-sealed container to prevent it from drying out or absorbing other fridge odors. If you want to make a big batch and save some for later, freezer instructions are your best bet. You can wrap the cooled loaf tightly in a couple of layers of plastic wrap, then a layer of aluminum foil, or place it in a freezer-safe bag. It freezes beautifully for up to 3 months. When you’re ready to enjoy it, just thaw it overnight in the refrigerator, or on the counter for a few hours. For glaze timing advice, if you plan to store it at room temperature or in the fridge, it’s best to add the glaze once the bread has completely cooled. If you’re freezing it, I usually recommend glazing *after* thawing. This prevents the glaze from getting weird or sticky in the freezer. If you do glaze it before freezing, just be aware the texture might be slightly different upon thawing.
Frequently Asked Questions
Final Thoughts
So there you have it, my ultimate zucchini bread recipe. It’s truly one of those comfort foods that just makes everything feel a little bit better. The moistness, the warm spices, that hint of sweetness – it’s pure joy in every bite. It’s the kind of recipe that I hope you’ll try and love as much as my family and I do. It’s proof that simple ingredients, when treated with a little care and love, can create something truly spectacular. If you enjoy this, you might also love my moist blueberry muffins or my classic apple crumble! Don’t be afraid to experiment with additions like nuts or chocolate chips – that’s part of the fun! I can’t wait to hear how your zucchini bread turns out. Please leave a comment below and let me know your favorite way to enjoy it, or any fun variations you try! Happy baking!
air fryer chicken parmesan
Ingredients
Method
- Combine breadcrumbs and Parmesan cheese in a bowl. Melt the butter in another small bowl.
- Lightly brush the melted butter onto each chicken cutlet, then dip into the breadcrumb mixture, pressing to coat evenly.
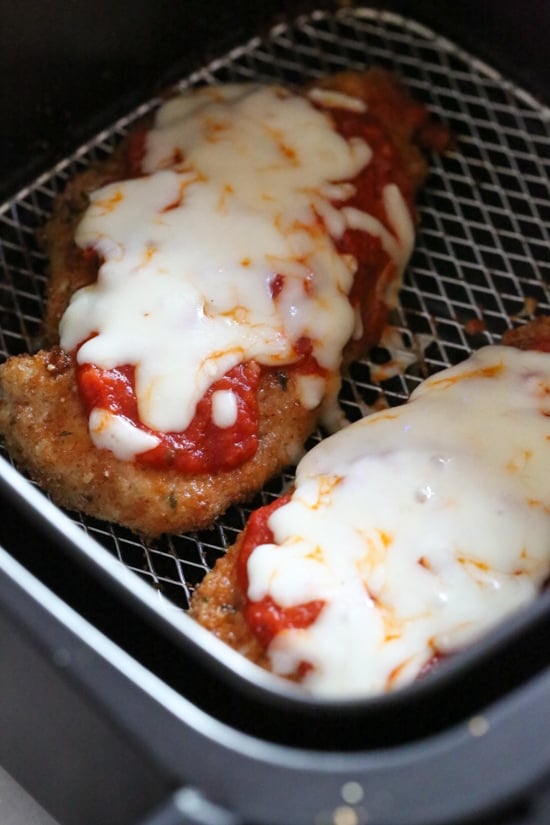
- Arrange the breaded chicken in the air fryer basket in a single layer, working in batches if necessary. Spray the top of each cutlet lightly with olive oil spray.
- Air fry at 360°F (180°C) for 5 minutes. Flip the chicken, then top each cutlet with 2 tablespoons of marinara sauce and 1.5 tablespoons of shredded mozzarella cheese.
- Continue to cook in the air fryer for 3 more minutes, or until the chicken is cooked through and the cheese is melted and bubbly.