Easy Tuna Salad a Quick Healthy Meal
Oh, hello there! Come on in and make yourself comfortable. I’ve got a fresh pot of coffee brewing, and I’ve been *dying* to share this recipe with you. It’s my absolute go-to, the one that always gets rave reviews, and honestly, it feels like a warm hug in cake form. We’re talking about my legendary Zucchini Bread. Now, I know what you might be thinking – zucchini? In a sweet bread? Trust me, it sounds a little wild, but before you dismiss it, picture this: moist, tender crumbs bursting with warm spices, a hint of sweetness, and that incredible aroma filling your kitchen. It’s like a little slice of heaven. This isn’t just any zucchini bread, though. This is the kind that makes your kids (or mine, anyway!) ask for seconds and thirds, the kind that’s perfect with a cup of tea on a drizzly afternoon, and the kind that’s surprisingly simple to whip up, even on a weeknight. It’s even better than those fancy bakery muffins, in my humble opinion, and way more satisfying than anything you can grab from a grocery store shelf. So, settle in, grab your mug, and let’s dive into what makes this zucchini bread so darn special.
What is this magical Zucchini Bread?
So, what exactly is this much-hyped zucchini bread? At its heart, it’s a quick bread, meaning no fancy yeast or lengthy rising times. Think of it as a really moist, spiced cake that just happens to have zucchini in it. The name itself, “Zucchini Bread,” tells you the star ingredient, but the magic is in how it transforms. You grate the zucchini, and it basically melts into the batter as it bakes, adding incredible moisture and a super tender crumb without any discernible “vegetable” flavor. Honestly, if you didn’t know it was there, you’d just taste the warm cinnamon, the hint of nutmeg, and the sweet undertones. It’s essentially a vehicle for those comforting spice notes and a perfect canvas for a creamy, dreamy glaze. It’s the kind of recipe that feels old-fashioned and comforting, but it’s eternally relevant because it’s just so darn delicious and adaptable.
Why you’ll love this recipe?
There are so many reasons why this zucchini bread has earned a permanent spot in my recipe box, and I’m betting it’ll become a favorite for you too. First off, let’s talk about the FLAVOR. It’s just divine. The combination of cinnamon and nutmeg creates this warm, spicy hug that’s perfect any time of year, but especially comforting as the weather cools down. The zucchini, as I mentioned, works wonders to keep the bread incredibly moist and tender. It’s not dry or crumbly like some quick breads can be; this one has a luscious, melt-in-your-mouth texture. And the SIMPLICITY! Seriously, you can have this in the oven in about 15 minutes flat. It’s a lifesaver when you need a last-minute bake sale contribution or a sweet treat for unexpected guests. Forget complicated cakes; this is your secret weapon. It’s also incredibly COST-EFFECTIVE. Zucchini is usually pretty budget-friendly, especially when it’s in season, and the other ingredients are pantry staples. You get a whole loaf (or two!) for just pennies. Plus, it’s SO VERSATILE. While I love it plain with that simple glaze, you can easily toss in some chocolate chips, chopped nuts, or even a swirl of cream cheese for an extra special touch. It’s also incredibly forgiving. Unlike some finicky baking recipes, this one is pretty hard to mess up, which is a huge win in my book. What I love most about this recipe, though, is the pure, unadulterated joy it brings. The smell that wafts through the house while it’s baking is just pure happiness, and seeing the smiles when people take their first bite? Priceless. It truly stands out from other quick breads because of its perfect balance of moisture, spice, and sweetness, and that amazing, comforting texture.
How do I make Zucchini bread?
Quick Overview
This recipe is all about simplicity and maximum flavor payoff. You’ll basically whisk together your dry ingredients, mix your wet ingredients, then combine them gently. While that’s happening, you’ll prep your zucchini and any add-ins, then pour the batter into your pan, maybe swirl in some extra goodness, and let the oven do its magic. The whole process from start to finish, including baking, is surprisingly quick. It’s designed to be foolproof, delivering a perfectly moist and flavorful zucchini bread every single time. Don’t be intimidated; it’s genuinely easier than it sounds!
Ingredients
For the Main Batter:
2 cups all-purpose flour (I sometimes use a mix of half all-purpose, half whole wheat for a little extra depth)
1 teaspoon baking soda (Make sure yours is fresh! It’s crucial for lift.)
1/2 teaspoon salt
1 teaspoon ground cinnamon (Good quality cinnamon makes a HUGE difference here!)
1/4 teaspoon ground nutmeg (Just a pinch, but it adds that cozy warmth)
1 3/4 cups granulated sugar (Or you can reduce it slightly if you prefer, but I like it sweet)
2 large eggs, at room temperature (Room temp eggs incorporate better)
3/4 cup vegetable oil (Or a neutral oil like canola or grapeseed. Melted butter works too, but oil gives it that incredible moisture!)
1/4 cup milk (Whole milk or even buttermilk is lovely, but I’ve tested this with almond milk and it actually made it even creamier!)
1 teaspoon vanilla extract
2 cups grated zucchini (About 2-3 medium zucchinis. Squeeze out *most* of the excess moisture before measuring!)
For the Filling (Optional, but oh-so-worth-it!):
1/2 cup brown sugar (Packed)
1 tablespoon cinnamon
1/2 cup chopped nuts (Walnuts or pecans are my go-to)
OR
1 cup chocolate chips (Semi-sweet or dark are best!)
For the Glaze:
1 cup powdered sugar
2-3 tablespoons milk (or water for a thinner glaze)
1/2 teaspoon vanilla extract (optional)
Step-by-Step Instructions
Step 1: Preheat & Prep Pan
First things first, let’s get your oven nice and toasty. Preheat it to 350°F (175°C). Now, grab your favorite loaf pan – a standard 9×5 inch pan is perfect. Grease it really well with butter or cooking spray, and then I like to give it a light dusting of flour. Just tap out any excess. This extra step might seem small, but it ensures your beautiful loaf slides out perfectly without sticking. Trust me on this one; no one wants a broken loaf!
Step 2: Mix Dry Ingredients
In a large bowl, whisk together the flour, baking soda, salt, cinnamon, and nutmeg. Give it a good whisking until everything is nicely combined. This is important because it distributes the leavening agents (the baking soda) and spices evenly, so you don’t get little pockets of baking soda flavor or uneven spice distribution. You’re looking for a light, airy mix of dry ingredients.
Step 3: Mix Wet Ingredients
In a separate, medium-sized bowl, whisk together the granulated sugar and eggs until they’re well combined and slightly lighter in color. Then, slowly drizzle in the vegetable oil while whisking continuously until it’s fully incorporated. Stir in the milk and vanilla extract. It should be a smooth, homogenous mixture.
Step 4: Combine
Now, it’s time to bring them together! Pour the wet ingredients into the bowl with the dry ingredients. Using a rubber spatula or a wooden spoon, mix *just* until combined. Please, please, please don’t overmix! A few streaks of flour are okay. Overmixing develops the gluten in the flour, which can lead to a tough, dense bread. We want it tender and moist, remember?
Step 5: Prepare Filling
This is where you can add some extra pizzazz if you’re using it. If you’re going for a streusel-style filling, mix the brown sugar and cinnamon in a small bowl. If you’re adding chocolate chips or nuts, just have them ready. The grated zucchini should have had most of its moisture squeezed out by now – I usually use my hands or wrap it in a clean kitchen towel to give it a good squeeze.
Step 6: Layer & Swirl
Gently fold the grated zucchini into the batter. Don’t overmix! Then, pour about half of the batter into your prepared loaf pan. If you’re using a filling, sprinkle half of your brown sugar mixture or chocolate chips/nuts evenly over the batter. Then, dollop the remaining batter on top, spreading it gently. Sprinkle the rest of your filling over the top. If you want to get fancy, you can take a knife or a skewer and swirl it through the batter to create pretty patterns. It looks extra special!
Step 7: Bake
Pop that loaf pan into your preheated oven. Bake for 50-65 minutes. Baking times can vary depending on your oven, so start checking around the 50-minute mark. You’ll know it’s done when a wooden skewer or toothpick inserted into the center comes out clean, or with just a few moist crumbs attached (no wet batter!). If the top is browning too quickly, you can loosely tent it with aluminum foil.
Step 8: Cool & Glaze
Once it’s baked, take it out of the oven and let it cool in the pan on a wire rack for about 10-15 minutes. This allows it to set up a bit. Then, carefully invert the pan to remove the loaf and let it cool *completely* on the wire rack before glazing. If you try to glaze it while it’s still warm, the glaze will just melt right off! For the glaze, whisk together the powdered sugar, milk (start with 2 tablespoons and add more if needed for your desired consistency), and vanilla extract until smooth. It should be thick enough to drizzle but thin enough to spread easily.
Step 9: Slice & Serve
Once the bread is completely cool and glazed, it’s ready to slice! Use a serrated knife for the cleanest cuts. I love serving it as is, maybe with a little extra drizzle of glaze on top. It’s fantastic on its own, or with a smear of butter if you’re feeling indulgent. The aroma is just heavenly, and the texture is so wonderfully tender and moist.
What to Serve It With
This zucchini bread is so versatile, it’s pretty much perfect with anything! For a casual BREAKFAST, I love it toasted and served with a smear of cream cheese or just plain. It’s a much more interesting way to start the day than toast! With my morning coffee, it’s just pure bliss. For BRUNCH, I often make a double batch and cut it into smaller squares. It looks so elegant alongside a fruit salad, quiche, or a platter of smoked salmon. A little dusting of powdered sugar on top can make it feel extra special. As a simple DESSERT, it’s wonderful on its own, or you could serve it with a dollop of whipped cream or a scoop of vanilla bean ice cream. The warm spices are a perfect complement to something cool and creamy. And for COZY SNACKS, well, this is its true calling! It’s the ultimate afternoon treat with a warm mug of tea or a glass of cold milk. My kids devour it after school. Honestly, I’ve even eaten a slice (or two!) for a late-night craving when I don’t want to bake a whole cake. It’s perfect for those moments when you just need something sweet but don’t want the fuss.
Top Tips for Perfecting Your Zucchini Bread
I’ve made this recipe so many times that I’ve picked up a few tricks, and I want to share them with you so you can achieve zucchini bread perfection right from the first try!
Zucchini Prep: This is CRUCIAL. You *must* squeeze out as much excess moisture as you can from the grated zucchini. If you don’t, your bread can end up soggy and dense. I like to grate it on the large holes of a box grater, then put it in a clean kitchen towel or cheesecloth and wring out every last drop. It’s a little messy, but so worth it! Fresh zucchini is best, and don’t bother peeling it; the skin adds nutrients and color.
Mixing Advice: Remember what I said about not overmixing? It bears repeating! Mix the wet and dry ingredients *just* until they come together. A few little lumps are fine. Overworking the batter will create a tough texture, and we want this to be wonderfully tender and moist. Similarly, when you fold in the zucchini, be gentle. You’re not aiming for a perfectly uniform mix; just distribute it evenly.
Swirl Customization: If you’re doing a swirl, don’t go overboard. A few gentle passes with a knife or skewer are enough to create a pretty pattern without overmixing the batter. You can also add things like a swirl of peanut butter or Nutella for a different flavor dimension!
Ingredient Swaps: While this recipe is fantastic as is, feel free to play around! For a dairy-free version, use your favorite non-dairy milk (almond or oat milk work great) and a neutral oil. For a less sweet bread, you can reduce the sugar by about 1/4 cup, but it might affect the moisture slightly. I’ve also had success using half all-purpose flour and half whole wheat flour for a nuttier flavor and added fiber.
Baking Tips: Ovens can be quirky! If your loaf is browning too quickly on top but isn’t cooked through in the center, loosely tent it with aluminum foil for the remaining baking time. Placing your loaf pan in the center of the oven helps ensure even baking. Always do the toothpick test – it’s the most reliable way to know if it’s done.
Glaze Variations: The basic glaze is simple and delicious, but you can jazz it up! Add a splash of lemon juice for a bit of tang, a teaspoon of orange zest for a citrusy note, or even a pinch of cardamom for an extra layer of spice. If you prefer a thicker glaze, use less liquid; for a thinner, more transparent glaze, use more liquid or even just a sprinkle of powdered sugar directly onto the cooled bread.
Storing and Reheating Tips
This zucchini bread is so good, you might find yourself making it disappear quickly, but if you happen to have leftovers, here’s how to keep it fresh:
Room Temperature: Once completely cooled, wrap the loaf tightly in plastic wrap or store it in an airtight container. It will stay delicious at room temperature for about 2-3 days. Honestly, it rarely lasts that long in my house!
Refrigerator Storage: If you live in a very warm climate or want it to last a bit longer, you can store it in the refrigerator for up to a week. Just make sure it’s well-wrapped in plastic wrap or foil to prevent it from drying out. The texture might become a bit firmer when cold, but it’s easily remedied.
Freezer Instructions: This bread freezes beautifully! Once completely cooled, wrap the loaf tightly in plastic wrap, then in a layer of aluminum foil, or place it in a freezer-safe bag. It can be frozen for up to 3 months. To thaw, unwrap it and let it sit at room temperature for a few hours, or gently reheat it.
Glaze Timing Advice: If you plan to store it at room temperature or in the fridge for more than a day, I actually prefer to glaze it right before serving. This keeps the glaze looking its freshest. If you freeze it, it’s best to freeze the bread *without* the glaze and add it once it’s thawed and you’re ready to eat it.
Frequently Asked Questions
Final Thoughts
So there you have it – my beloved zucchini bread recipe. It’s more than just a recipe to me; it’s a source of comfort, a guaranteed crowd-pleaser, and proof that simple ingredients can create something truly extraordinary. The way it brings people together, the cozy scent it fills the house with, and that perfect, tender crumb… it’s just pure joy. It’s the kind of recipe that makes you feel like a baking superstar, even if you’re a total beginner. If you’re looking for something that’s incredibly rewarding to make and even more rewarding to eat, this is it. It’s the perfect balance of sweet, spice, and that irresistible moistness that only zucchini can provide. I really hope you give this recipe a try. I can’t wait to hear how yours turns out and what little twists you might add! Don’t forget to share your photos or leave a comment below with your experience!
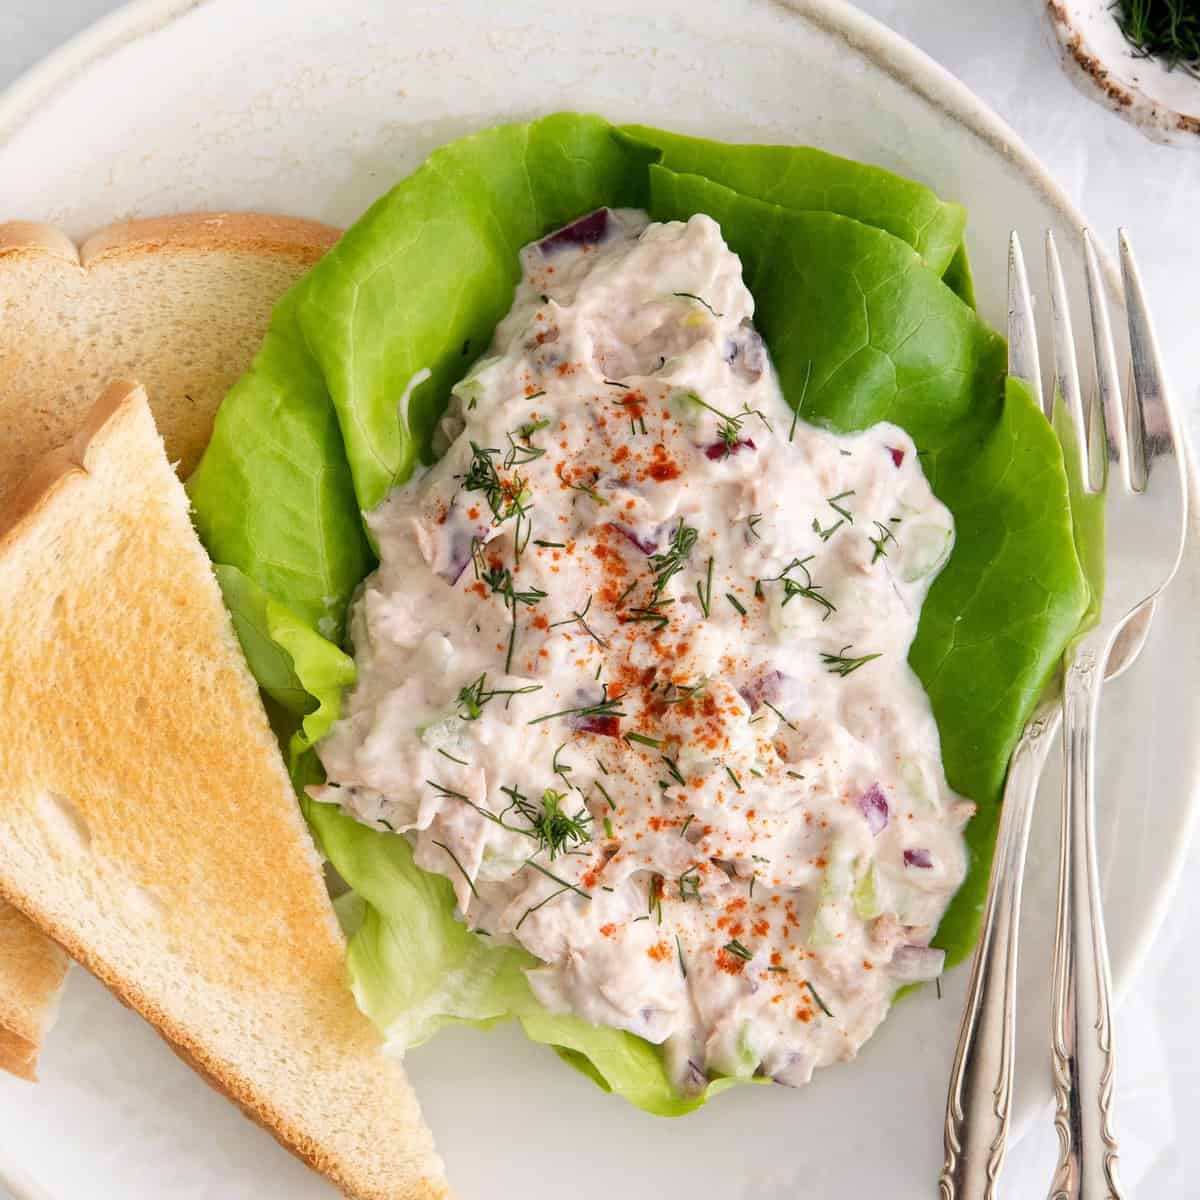
Healthy Tuna Salad Recipe
Ingredients
Method
- Place the tuna, red onion, and celery into a large bowl and mix until well combined.
- Add the Greek yogurt, mayo, lemon juice, mustard, salt, and pepper to the tuna and stir until combined. Be sure the tuna is coated in sauce.
- Top the tuna salad with paprika and fresh dill. Place the tuna salad in the refrigerator to chill or serve immediately on a sandwich or salad.