Easy Sweet Potato Bake Perfect Side Dish
You know those recipes that just feel like a warm hug? The ones that instantly transport you back to your kitchen as a kid, the air thick with the sweet, comforting aroma of something amazing baking? This Zucchini Bread is exactly that for me. It’s not just a recipe; it’s a memory. My mom used to whip this up all the time, especially when we had an abundance of zucchini from our garden. It was her magic trick for using up those giant green squash that seemed to grow faster than we could eat them. Honestly, before I tried this Zucchini Bread, I was a little wary of the idea. Zucchini in bread? It seemed… weird. But oh, how wrong I was! This isn’t your typical, dense, overly moist quick bread. This Zucchini Bread is light, incredibly flavorful, and has the most perfect tender crumb. It’s become my go-to, and I know you’re going to fall in love with it just as much as my family has. It’s honestly way better than a plain ol’ muffin, and feels so much more satisfying when you just need a little something sweet.
What is Mom’s famous Zucchini Bread?
So, what exactly is this “famous” Zucchini Bread all about? Think of it as your classic quick bread, but elevated. It’s essentially a tender, moist cake-like bread packed with finely grated zucchini, which, trust me, you won’t even taste in a “vegetable” way. Instead, it lends an incredible moisture and tenderness that’s hard to achieve otherwise. The name “Mom’s Famous” isn’t just a cute title; it’s earned! This recipe has been passed down, tweaked just a little over the years, and has consistently been the star of potlucks, school bake sales, and our family’s afternoon tea. It’s a deceptively simple treat that uses everyday ingredients, proving that the most delicious things often come from the simplest beginnings. It’s the kind of bread that makes you feel good, both from its taste and from knowing it’s a little bit wholesome too!
Why you’ll love this recipe?
Okay, let’s talk about why this Zucchini Bread is a total game-changer in my kitchen. First off, the flavor is just out of this world. It’s got this lovely sweetness, a hint of cinnamon, and that subtle, comforting richness that makes you want another slice the second you finish the first. It’s never too sweet, which is a balance I really appreciate. And the texture? Oh my goodness. It’s unbelievably tender and moist without being dense or gummy, thanks to the magic of zucchini. My kids, who can be a bit picky sometimes, absolutely devour this. They don’t even realize they’re eating a vegetable, which is always a win in my book! Then there’s the sheer simplicity of it. You don’t need any fancy equipment or a culinary degree. It comes together in one bowl (mostly!), making cleanup a breeze, which is a lifesaver on busy weeknights. Seriously, I can whip this up in less time than it takes to decide what to watch on TV. It’s also incredibly budget-friendly, using pantry staples you likely already have on hand. And the versatility! This bread is perfect for breakfast, a mid-afternoon snack, or even a light dessert. I’ve served it toasted with a smear of butter, plain and simple, and even with a drizzle of honey, and it’s always a hit. Compared to other quick breads, this Zucchini Bread has a unique moistness and a depth of flavor that just can’t be matched. What I love most about this recipe is how forgiving it is. Even if you’re a beginner baker, you’re going to nail this. It’s just that good and that easy.
How do I make Zucchini bread?
Quick Overview
Making this Zucchini Bread is surprisingly straightforward. You’ll mix your wet and dry ingredients separately, then gently combine them. The key is not to overmix! Then, we pour it into a prepared loaf pan and bake until golden and wonderfully fragrant. The zucchini does all the heavy lifting to keep it super moist and tender. It’s truly one of those recipes where minimal effort yields maximum deliciousness, and the smell that fills your house while it bakes is pure bliss. It’s your new secret weapon for impressive, easy baking!
Ingredients
For the Main Batter:
Here’s what you’ll need to get started. I always make sure my eggs and butter are at room temperature; it really helps everything emulsify beautifully. For the flour, all-purpose is perfect, but I have a friend who swears by a gluten-free blend, and it works great for her! The zucchini, of course, should be fresh. I tend to use medium-sized ones; they have the best moisture-to-seed ratio. Don’t worry about peeling them; the skin adds color and nutrients! My mom always said the key to the best texture was to squeeze out as much liquid as possible from the grated zucchini. So don’t skip that step! And for the spices, I use cinnamon, but a pinch of nutmeg is lovely too if you’re feeling adventurous. A good quality vanilla extract makes a difference, in my opinion!
- 2 cups all-purpose flour
- 1 teaspoon baking soda
- 1/2 teaspoon salt
- 1 teaspoon ground cinnamon
- 1/4 teaspoon ground nutmeg (optional, but lovely!)
- 1 cup granulated sugar
- 1/2 cup unsalted butter, softened
- 2 large eggs, at room temperature
- 1 teaspoon vanilla extract
- 1 1/2 cups grated zucchini (about 2 medium zucchini), squeezed dry
For the Filling:
This is where we add those little bursts of flavor and texture that make this bread so special. You can customize this part endlessly! My go-to is always walnuts for that classic crunch and nutty flavor. Chocolate chips are another huge hit, especially with the kids. I usually do about 1/2 cup, but honestly, you can add more if you’re feeling indulgent! Sometimes I’ll even mix in a few dried cranberries for a tart counterpoint. Just make sure whatever you add is roughly chopped so it distributes evenly.
- 1/2 cup chopped walnuts or pecans
- 1/2 cup chocolate chips (semi-sweet or dark work best)
For the Glaze:
This glaze is totally optional, but it adds that extra touch of sweetness and visual appeal that makes this Zucchini Bread feel like a real treat. It’s super simple – just powdered sugar and a liquid. I usually use milk, but a bit of lemon juice or even orange juice can add a lovely citrusy note. The key is to get the consistency right: thick enough to coat, but thin enough to drizzle. You want it to look elegant, not like a gloppy mess!
- 1 cup powdered sugar
- 2-3 tablespoons milk (or lemon juice/orange juice)
Step-by-Step Instructions
Step 1: Preheat & Prep Pan
First things first, let’s get our oven ready. Preheat it to 350 degrees Fahrenheit (175 degrees Celsius). This ensures an even bake from the moment the bread goes in. While the oven is warming up, grab a standard 9×5 inch loaf pan. Grease it really well with butter or cooking spray, and then lightly flour it. This is a step I never skip, even with non-stick pans. It guarantees your beautiful loaf will slide right out without sticking, which is a baking triumph in itself. You can also line it with parchment paper, leaving some overhang on the sides to make lifting it out even easier. My mom always did the parchment trick, and I’ve adopted it ever since!
Step 2: Mix Dry Ingredients
In a large bowl, whisk together the flour, baking soda, salt, cinnamon, and nutmeg (if you’re using it). Whisking dry ingredients together helps to distribute the leavening agents evenly, which is crucial for a good rise and a tender crumb. This simple step prevents those little pockets of baking soda that can sometimes happen if you just dump everything in. Give it a good whisk until everything looks uniform and well combined. This is your foundation for a perfect loaf!
Step 3: Mix Wet Ingredients
In a separate, medium-sized bowl, cream together the softened butter and granulated sugar until the mixture is light and fluffy. This usually takes a good couple of minutes with an electric mixer, or a bit more elbow grease by hand. Then, beat in the eggs one at a time, mixing well after each addition. Stir in the vanilla extract. This is where the richness of the batter starts to build. Make sure your butter is properly softened, not melted; it makes a huge difference in achieving that lovely, creamy texture.
Step 4: Combine
Now, it’s time to bring the wet and dry ingredients together. Gradually add the dry ingredients to the wet ingredients, mixing on low speed (or stirring gently with a spatula) until just combined. We’re talking *just* combined, folks! Overmixing develops the gluten in the flour too much, which can lead to a tough bread. A few streaks of flour are okay; they’ll disappear as you add the zucchini. This is the most important rule for a tender quick bread: mix until you barely see dry bits, and then stop. Trust me on this one – it’s a lesson learned after many a dense loaf in my early baking days!
Step 5: Prepare Filling
Gently fold in your chosen filling ingredients – the chopped walnuts, chocolate chips, or whatever you’ve decided on. Fold them in just until they’re distributed throughout the batter. Again, don’t overmix here. You want those little pockets of deliciousness to be distinct!
Step 6: Layer & Swirl
Now for the star: the zucchini! Gently fold the squeezed-dry grated zucchini into the batter. Once it’s incorporated, pour the batter into your prepared loaf pan. If you’re feeling fancy and want a little swirl effect, you can reserve a tablespoon or two of the batter, add a bit more cinnamon or cocoa powder to it, and then swirl it on top. But honestly, it’s delicious just as it is!
Step 7: Bake
Place the loaf pan in the preheated oven. Bake for 50-65 minutes. The exact time will depend on your oven, so it’s always best to check for doneness. You’ll know it’s ready when a wooden skewer or toothpick inserted into the center comes out clean, or with just a few moist crumbs attached (especially if you have chocolate chips!). The top should be golden brown and slightly cracked. If the top starts to brown too quickly before the inside is cooked, you can loosely tent it with foil. Patience is key here!
Step 8: Cool & Glaze
Once baked, let the Zucchini Bread cool in the pan on a wire rack for about 10-15 minutes. This allows it to set up properly. Then, carefully invert the pan to remove the loaf and place it directly on the wire rack to cool completely. This is crucial before glazing! If you glaze a warm loaf, the glaze will just melt and slide right off. Once it’s completely cool, whisk together the powdered sugar and milk (or other liquid) for the glaze. Start with 2 tablespoons of milk and add more, a teaspoon at a time, until you reach your desired drizzling consistency. Drizzle it generously over the top of the cooled Zucchini Bread. Let the glaze set for a bit before slicing.
Step 9: Slice & Serve
And there you have it! Your beautiful, homemade Zucchini Bread. Let the glaze set for about 15-20 minutes before slicing into perfect, thick slices. The smell alone is enough to make your mouth water. This bread is wonderful served at room temperature. It’s fantastic on its own, but a little butter or cream cheese is also divine. Enjoy every single bite!
What to Serve It With
This Zucchini Bread is so versatile, it fits into any meal or snack occasion! For a leisurely weekend breakfast, I love serving a warm slice toasted with a generous smear of good quality butter. It pairs perfectly with a steaming mug of coffee or a glass of fresh orange juice. For a more elegant brunch spread, I’ll slice it slightly thinner and arrange it on a beautiful platter alongside fresh fruit salad, maybe some yogurt parfaits, or even a savory quiche. It’s a lovely sweet balance to other brunch dishes. As a dessert, it’s fantastic served slightly warm with a dollop of whipped cream or even a small scoop of vanilla bean ice cream. The texture is so tender, it almost melts in your mouth. And for those cozy, quiet moments, when you just need a comforting snack, a slice of this Zucchini Bread is pure happiness. I often pair it with a cup of herbal tea or a glass of milk. My kids honestly just grab a slice and eat it standing at the counter, and I can’t blame them! It’s that good, that simple, and that satisfying.
Top Tips for Perfecting Your Zucchini Bread
Over the years, I’ve learned a few things that really elevate this Zucchini Bread from good to absolutely spectacular. First, when it comes to the zucchini itself, don’t skip squeezing out the moisture! I’ve tried it without, and while it’s still decent, it can sometimes make the bread a bit too dense or wet. A fine-mesh sieve and a spatula work wonders for this. Or, you can just use your hands after grating – it’s a bit messy but totally effective. Secondly, regarding mixing, remember my mantra: “just combined.” Seriously, this is the biggest secret to a tender crumb in quick breads. Overmixing activates the gluten too much, resulting in a chewy, tough texture. Aim for the batter to look just barely brought together, with maybe a few tiny flour streaks. The zucchini will help finish the job. For the filling, feel free to get creative! While walnuts and chocolate chips are my go-to, I’ve also had great success with chopped dried cranberries, blueberries (though they can bleed color), or even a sprinkle of shredded coconut. Just ensure they’re not too large so they distribute evenly. If you’re feeling really adventurous, try adding a pinch of cardamom or a bit of orange zest to the batter itself for a different flavor profile. For ingredient swaps, I’ve tested this with almond milk in place of regular milk for the glaze, and it actually made it even creamier! I’ve also used light brown sugar instead of granulated sugar for a slightly deeper flavor, but I’d reduce it slightly as it’s a bit sweeter. When it comes to baking, every oven is different. My biggest baking tip is to trust your nose and your skewer test. The aroma of this bread baking is heavenly and a sure sign it’s nearing perfection. If your oven tends to run hot, keep an eye on it after about 45 minutes and be ready with that foil tent if needed. Finally, for the glaze variations, a simple dusting of powdered sugar is perfectly lovely if you prefer something less sweet. Or, for a more rustic feel, skip the glaze altogether and serve it warm with butter. The options are endless, and that’s part of why I love this recipe so much!
Storing and Reheating Tips
This Zucchini Bread is surprisingly forgiving when it comes to storage. At room temperature, it stays wonderfully fresh for about 2-3 days, especially if you keep it well-wrapped. I usually just use plastic wrap or aluminum foil to tightly cover the cut end or the entire loaf if it’s still mostly intact. It’s perfect for snacking on throughout those days. If you find you won’t be able to finish it within a couple of days, or if your kitchen is particularly warm, refrigerating it is a great option. Stored in an airtight container in the fridge, it can last for up to a week. The texture might become a little firmer when cold, but that’s easily remedied. For longer storage, this Zucchini Bread freezes beautifully! I usually slice it first, then wrap each slice tightly in plastic wrap, followed by a layer of aluminum foil or placing them in a freezer-safe bag. This prevents freezer burn and keeps it tasting fresh for up to 3 months. To thaw, you can simply unwrap a slice and let it come to room temperature, or for a warm treat, pop it in the toaster oven or a regular toaster. If you’ve glazed your bread, it’s best to add the glaze *after* thawing and reheating, especially if you’re planning to freeze it. If you do glaze it before freezing, the glaze might become a little soft upon thawing. So, for the best results, store unglazed bread and add a fresh glaze or a dusting of powdered sugar just before serving after it’s been thawed or reheated.
Frequently Asked Questions
Final Thoughts
There you have it – my family’s beloved Zucchini Bread recipe! It’s more than just a bake; it’s a connection to my past, a way to share warmth, and proof that simple ingredients can create something truly magical. It’s the kind of recipe that makes your kitchen feel like the heart of your home. I really hope you give it a try. If you’re a fan of moist, flavorful quick breads that are also surprisingly easy, this one’s for you. It’s a true crowd-pleaser that never fails to impress, and best of all, it’s made with love. For those who enjoy this, you might also like my recipes for Banana Bread or my Cinnamon Swirl Coffee Cake – they have that same comforting, homemade feel. I can’t wait to hear how yours turns out! Don’t hesitate to leave a comment below or share your own delicious variations. Happy baking, friends!
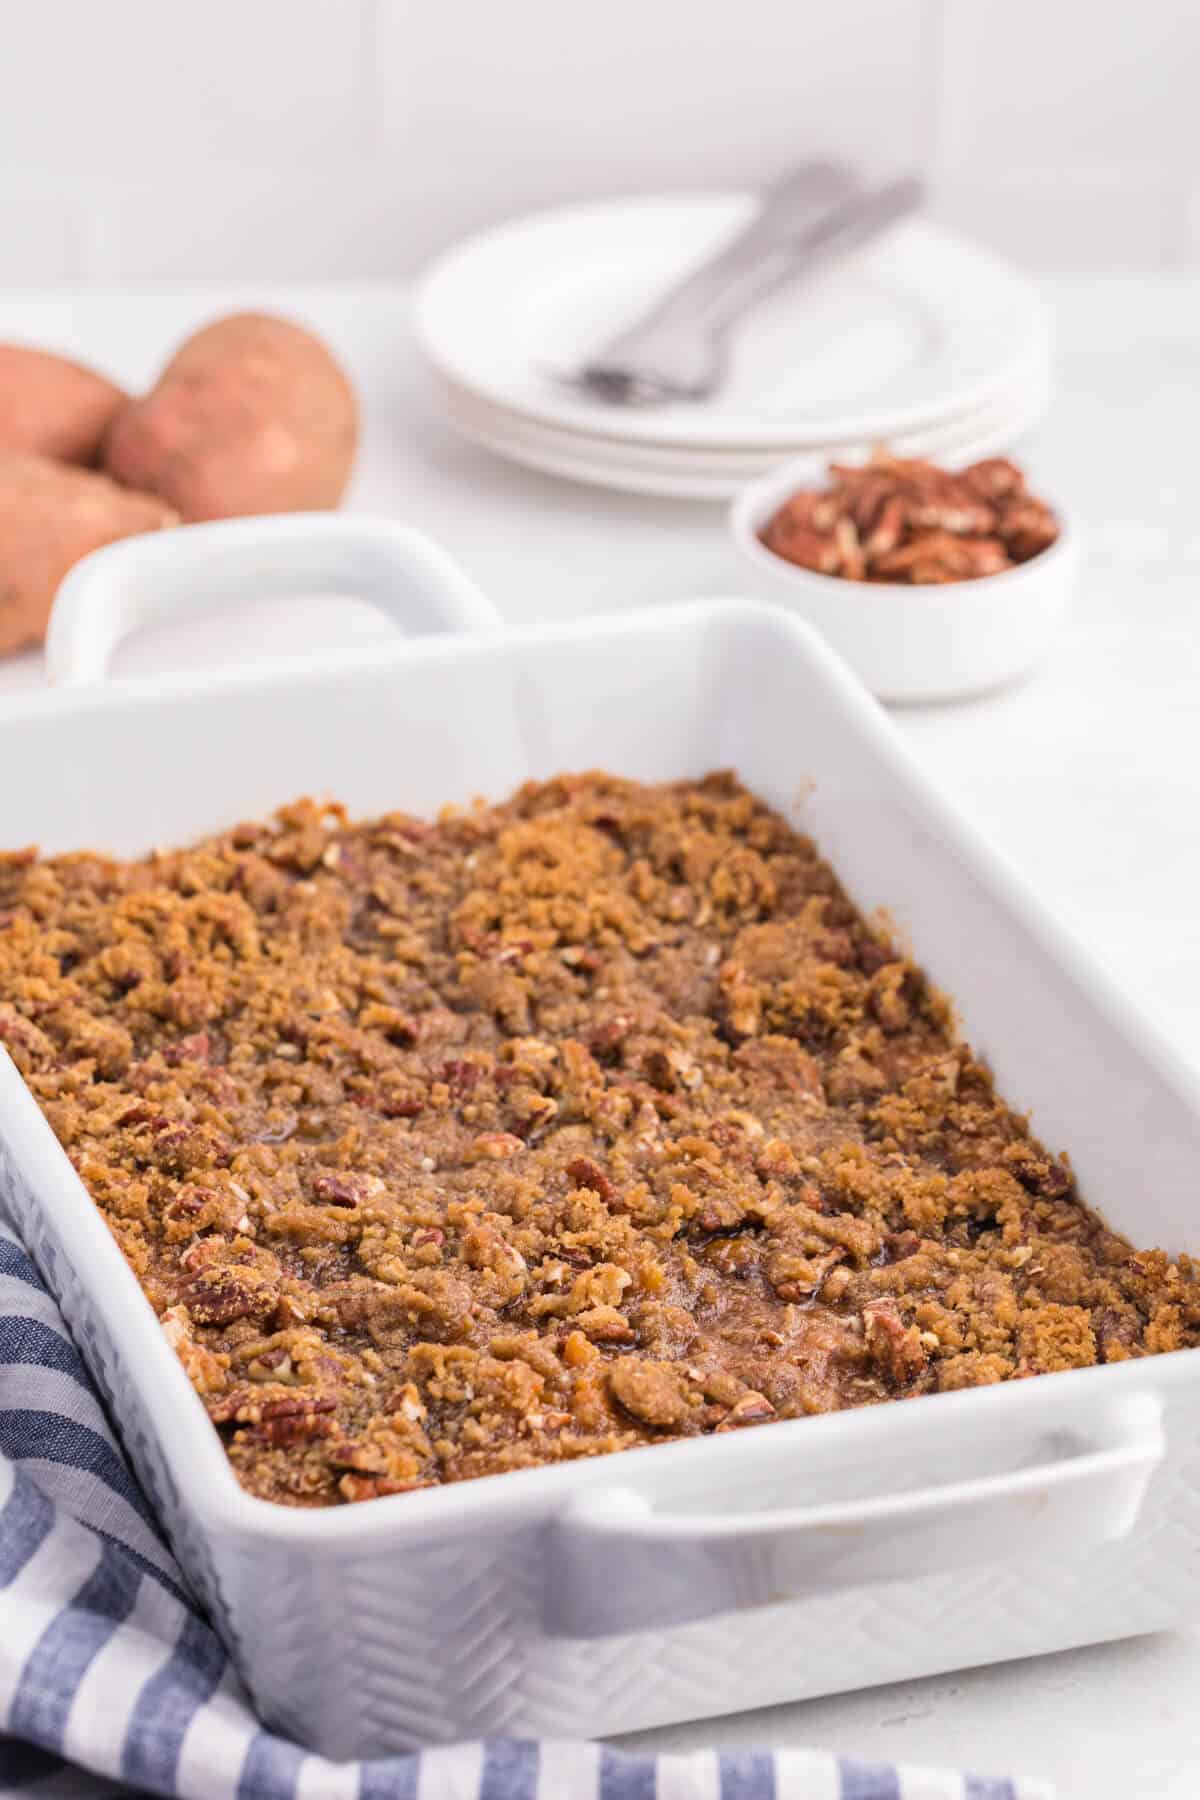
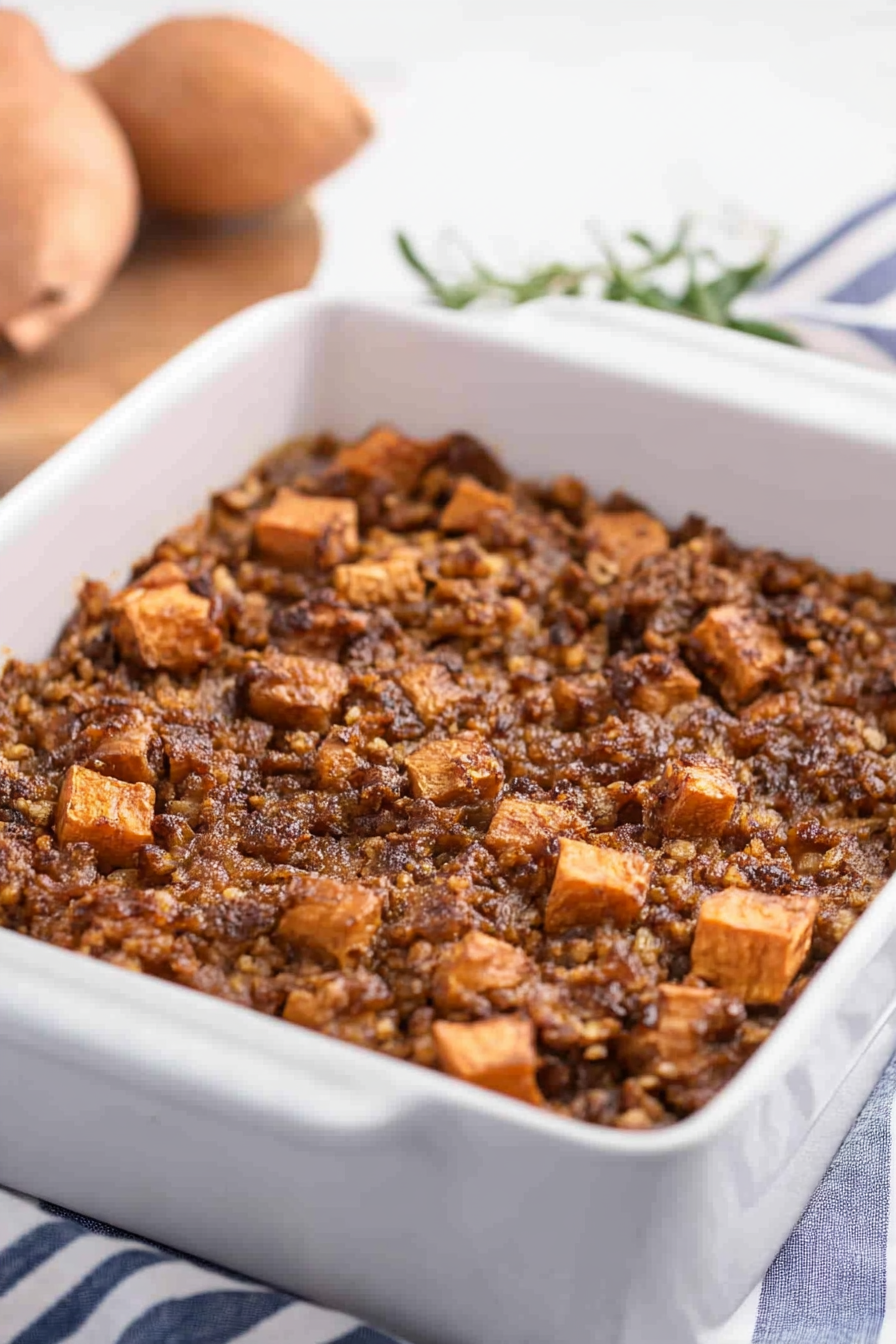
sweet potato bake
Ingredients
Method
- Preheat your oven to 350°F (175°C).
- In a large mixing bowl, combine the mashed sweet potatoes, 0.5 cup brown sugar, milk, eggs, vanilla extract, 4 tbsp softened unsalted butter, shredded sweetened coconut, and 0.5 tsp salt. Stir until all ingredients are well combined and smooth. Spread this mixture evenly into a 9x13 inch baking pan.
- In a separate medium bowl, combine the all-purpose flour, 1 cup brown sugar, 4 tbsp softened unsalted butter, and chopped pecans. Mix with your hands or a fork until a crumbly consistency is achieved. Sprinkle this topping evenly over the sweet potato mixture in the baking pan.
- Bake for 35 minutes, or until the topping is golden brown and the sweet potato filling is heated through and bubbly around the edges. Serve hot and enjoy your delicious sweet potato bake!