Easy Polish Dumpling Recipe
Oh, you guys. I’ve been meaning to share this with you for ages! This isn’t just any chocolate zucchini bread; this is *the* chocolate zucchini bread. The one that makes my kitchen smell like pure magic, the one my kids beg for after school, and the one I sneak a slice of at 10 PM when I just need a little sweet comfort. It sounds simple, right? Chocolate and zucchini? But trust me, there’s a little something-something in here that takes it from good to absolutely unforgettable. It’s the kind of recipe that feels like a warm hug in food form, and it’s honestly one of my absolute favorites to whip up. If you’ve ever tried those super-dense, almost gummy zucchini breads, forget that. This one is incredibly moist, tender, and has this deep, rich chocolate flavor that’s just perfection. It’s even better than my Grandma’s famous apple pie sometimes, and that’s saying something!
What is the secret ingredient in Zucchini Bread?
So, what makes this chocolate zucchini bread so special? Well, the “secret ingredient” isn’t really a secret, it’s more like a little trick I learned years ago that totally transforms the texture and flavor. It’s actually… sour cream! I know, it sounds a bit weird to put sour cream in a sweet bread, but it’s a total game-changer. It adds this incredible moisture and a slight tang that just balances out the sweetness and chocolate so beautifully. Think of it as the unsung hero of tender baked goods. This bread is essentially a moist, chocolatey loaf packed with shredded zucchini, which might sound odd, but the zucchini pretty much disappears into the batter, adding moisture and a tender crumb without any discernible zucchini flavor. It’s a brilliant way to sneak in a veggie, but honestly, no one ever guesses it’s there. It’s so simple, so delicious, and utterly comforting.
Why you’ll love this recipe?
Let me tell you why this recipe has earned a permanent spot in my recipe binder, and why I’m betting it will in yours too! First off, the flavor profile is just out of this world. You get that deep, rich chocolate goodness that’s not overly sweet, perfectly balanced by the subtle moistness that the zucchini and, yes, the sour cream, bring. It’s not just about the taste though; the texture is what really sets it apart. It’s unbelievably tender and moist, like biting into a cloud. And the best part? It’s ridiculously easy to make. You don’t need any fancy equipment, just a couple of bowls and a whisk. I can genuinely whip this up on a weeknight after work, and it’s a lifesaver when unexpected guests pop by or when that 3 PM sweet craving hits. Plus, it’s super budget-friendly! Zucchini is usually pretty affordable, and the other ingredients are pantry staples. It’s also incredibly versatile. While it’s fantastic on its own, I’ve also made it into muffins, and it’s just as delicious. What I love most about this chocolate zucchini bread, beyond the taste and ease, is the pure comfort it brings. It’s a reminder of simpler times, of cozy afternoons, and it always brings a smile to my face (and everyone else’s!) when they take that first bite. It’s truly a winner all around.
How do I make Zucchini bread?
Quick Overview
Making this chocolate zucchini bread is a breeze! You basically whisk together your dry ingredients, mix your wet ingredients (including that magic sour cream and chocolate!), then combine them gently. Fold in the shredded zucchini, pour it into a prepared pan, and bake until a toothpick comes out clean. The result is a perfectly moist, intensely chocolatey loaf that’s deceptively easy. It’s the kind of recipe that makes you feel like a baking rockstar with minimal effort.
Ingredients
For the Main Batter:
2 cups all-purpose flour (I always use unbleached, it seems to give a better texture)
1 ½ cups granulated sugar (you can slightly reduce this if you prefer it less sweet, but I find this perfect)
⅔ cup unsweetened cocoa powder (use a good quality one for the best chocolate flavor! Dutch-processed is my favorite here)
1 ½ teaspoons baking soda
½ teaspoon baking powder
½ teaspoon salt
2 large eggs, at room temperature (this is important for even mixing!)
1 cup milk (whole milk or 2% works best. I’ve even tested this with almond milk and it actually made it even creamier!)
½ cup vegetable oil (or any neutral oil like canola or grapeseed)
1 cup sour cream (full-fat is best for maximum moisture and tang)
1 teaspoon vanilla extract
For the Zucchini Filling:
2 cups finely shredded zucchini (about 2 medium zucchinis, squeezed dry – see tips below!)
For the Optional Chocolate Glaze:
1 cup powdered sugar
2-3 tablespoons milk (or water)
1 tablespoon unsweetened cocoa powder
½ teaspoon vanilla extract
Step-by-Step Instructions
Step 1: Preheat & Prep Pan
First things first, let’s get your oven preheated to 350°F (175°C). This is key for an even bake. Then, grab a 9×5 inch loaf pan. I like to grease it really well with butter or baking spray, and then dust it with a little flour or cocoa powder. If you’re using cocoa powder, it helps prevent that white powdery residue on the finished bread. You can also line it with parchment paper, leaving some overhang on the sides so you can easily lift it out later. This is a trick I learned after a few close calls trying to get a stubborn loaf out!
Step 2: Mix Dry Ingredients
In a large bowl, whisk together your flour, granulated sugar, unsweetened cocoa powder, baking soda, baking powder, and salt. Give it a really good whisk to make sure everything is evenly distributed and there are no clumps of cocoa powder. This ensures your leavening agents are spread out, giving you a nice, even rise. I always do this step first because it’s so easy to forget something if you’re just dumping things in.
Step 3: Mix Wet Ingredients
In a separate medium bowl, whisk together the eggs until they’re lightly beaten. Then, add in the milk, vegetable oil, sour cream, and vanilla extract. Whisk until everything is well combined and smooth. You’ll notice the mixture is quite liquidy, and that’s totally fine! The sour cream can sometimes look a little lumpy at first, but just keep whisking until it’s mostly incorporated.
Step 4: Combine
Now, pour the wet ingredients into the bowl with the dry ingredients. Here’s where you need to be a little gentle. Use a whisk or a spatula to mix until *just* combined. You don’t want to overmix! A few streaks of flour are okay; they’ll disappear as you add the zucchini. Overmixing develops the gluten in the flour too much, which can make your bread tough. We want tender, not chewy!
Step 5: Prepare Filling
This is crucial! Take your shredded zucchini and place it in a clean kitchen towel or cheesecloth. Squeeze out as much liquid as humanly possible. Seriously, really wring it out! Excess water from the zucchini will make your bread soggy and prevent it from baking properly. Once squeezed, gently fold the dry, shredded zucchini into the batter. It might look like a lot of zucchini, but it bakes down beautifully.
Step 6: Layer & Swirl (Optional but fun!)
Pour the batter into your prepared loaf pan. If you want to add a fun swirl, you can reserve about ¼ cup of the batter, stir in another tablespoon of cocoa powder into that reserved portion to make it darker. Then, dollop spoonfuls of the darker batter over the top of the main batter in the pan. Use a knife or a skewer to gently swirl the two batters together. Don’t over-swirl, or you’ll just end up with one muddy color. This is perfect when you’re craving something sweet at 10pm but don’t want to bake a whole cake, as it adds a little visual appeal.
Step 7: Bake
Pop that pan into your preheated oven. Bake for about 50-65 minutes. The exact time will depend on your oven, of course. You’ll know it’s done when a wooden skewer or toothpick inserted into the center comes out clean, or with just a few moist crumbs attached (not wet batter). If the top starts browning too quickly before the inside is cooked, you can loosely tent it with aluminum foil for the last 15-20 minutes of baking.
Step 8: Cool & Glaze
Once it’s baked, let the bread cool in the pan for about 10-15 minutes. This allows it to firm up a bit. Then, carefully invert it onto a wire rack to cool completely. I know it’s tempting to cut into it right away, but letting it cool is really important for the texture. Once it’s completely cool, you can make the glaze. Whisk together the powdered sugar, cocoa powder, milk, and vanilla extract until you have a smooth, pourable glaze. Drizzle it over the top of the cooled loaf. If you want a thicker glaze, use less milk. A thinner glaze is great if you like it to drip down the sides!
Step 9: Slice & Serve
Once the glaze has set a little (or if you skipped the glaze!), slice the bread with a serrated knife. Serve it at room temperature. It’s honestly amazing on its own, but a little smear of butter is also divine. The smell alone brings everyone to the kitchen!
What to Serve It With
This chocolate zucchini bread is so versatile, it fits into almost any meal or craving! For breakfast, a simple slice with a hot cup of coffee is pure bliss. The slightly sweet, chocolatey warmth is the perfect way to start the day. I often toast a slice lightly, and it’s just perfection. For a more leisurely brunch, I’ll serve it alongside some fresh fruit salad and maybe some scrambled eggs or yogurt. It adds a lovely, comforting element to the spread. As a dessert, this bread shines! It’s wonderful on its own, but you can elevate it by serving it with a dollop of whipped cream, a scoop of vanilla bean ice cream, or even a light raspberry coulis. The tartness of the raspberry cuts through the richness of the chocolate beautifully. And for those cozy snack times, which I practically live for, it’s perfect with a glass of cold milk or a mug of hot chocolate. My family loves to just grab a piece while they’re doing homework or watching a movie. It’s the ultimate comfort food, no matter the occasion.
Top Tips for Perfecting Your Chocolate Zucchini Bread
I’ve made this recipe more times than I can count, and I’ve picked up a few tricks along the way to ensure it turns out perfectly every single time. Here are my top tips:
Zucchini Prep: This is probably the most important step! You absolutely MUST squeeze the moisture out of your shredded zucchini. I use a clean kitchen towel for this and really wring it out. If you skip this, you’ll end up with a gummy, dense loaf that won’t bake through properly. Grating it on the fine side of a box grater helps it meld into the batter better. Don’t use pre-shredded zucchini; it’s often too wet.
Mixing Advice: Remember what I said about not overmixing? It bears repeating! Mix the wet and dry ingredients until *just* combined. A few small lumps of flour are perfectly fine. You want to avoid developing that gluten. Once you add the zucchini, fold it in gently until it’s distributed. The batter will be thick, and that’s exactly what you want.
Swirl Customization: If you decide to do the chocolate swirl, don’t go overboard. A few gentle swirls with a knife or skewer are all you need to create pretty patterns. You can also add a tablespoon of melted chocolate to the main batter for an extra chocolate boost!
Ingredient Swaps: I’ve experimented with a few things! For a dairy-free version, you can try using a plant-based milk and a dairy-free sour cream alternative (like cashew or coconut-based sour cream). The texture might be slightly different, but it’s still delicious. You can also swap the vegetable oil for melted unsalted butter if you prefer a slightly richer flavor, though the oil keeps it wonderfully moist.
Baking Tips: Every oven is different, so get to know yours! Keep an eye on the bread towards the end of the baking time. If the top is browning too fast, loosely tent it with foil. A reliable toothpick test is your best friend here. Don’t pull it out too early!
Glaze Variations: While I love the classic chocolate glaze, feel free to get creative! You can make a cream cheese glaze, a simple vanilla glaze, or even just dust the cooled loaf with powdered sugar. For a more intense chocolate flavor in the glaze, use a good quality cocoa powder. If you want a thinner glaze, just add a tiny bit more milk until you reach your desired consistency. A thicker glaze is great for when you want something more substantial!
Storing and Reheating Tips
One of the best things about this chocolate zucchini bread is how well it keeps! It stays wonderfully moist for days. At room temperature, it’s best stored in an airtight container or wrapped tightly in plastic wrap and then aluminum foil. It will stay fresh and delicious for about 3-4 days. If your kitchen is on the warmer side, or if you’re expecting it to last a little longer, popping it into the refrigerator is a great option. Wrapped well, it can stay good in the fridge for up to a week. The texture might firm up a little in the fridge, but don’t worry, it’s easy to bring it back to life! For longer storage, this bread freezes beautifully. Wrap individual slices or the whole loaf tightly in plastic wrap, then in a layer of aluminum foil, and finally in a freezer bag. It should last for up to 3 months in the freezer. To reheat, you can gently warm slices in a toaster oven or microwave for a few seconds – just enough to take the chill off and make it soft again. I usually don’t glaze the bread until I’m ready to serve it if I know I’ll be storing it, as the glaze can get a bit sticky when stored for a long time. But if you do glaze it, just ensure it’s fully cooled before wrapping!
Frequently Asked Questions
Final Thoughts
So there you have it – my absolute favorite chocolate zucchini bread recipe. It’s more than just a recipe for me; it’s a source of comfort, a way to use up those summer zucchinis, and a guaranteed crowd-pleaser. The secret ingredient, that little bit of sour cream, truly makes all the difference in achieving that incredibly moist and tender crumb that I just adore. It’s proof that sometimes, the simplest additions can have the biggest impact. I really hope you give this a try, and I can’t wait to hear how it turns out for you! If you love this recipe, you might also enjoy my Double Chocolate Chip Cookie Recipe or my Easy Banana Bread. They’re all about bringing that same warm, comforting feeling to your kitchen.
Let me know in the comments below how yours turned out, or if you have any special additions you like to make! Happy baking!
Polish dumplings recipe
Ingredients
Method
- Place the potatoes in a large pot and cover with water. Bring to a boil and then simmer until fork tender, about 15 minutes. Drain the water and mash the potatoes. Place the mashed potatoes in a mixing bowl and chill in the refrigerator until cold.
- In a small skillet over medium heat, warm the olive oil and then sauté the onion until tender. Let them cool for a few minutes and then add the cooked onions to the bowl of cold mashed potatoes. Place the sauerkraut in a strainer and rinse very well under running water for at least 3 minutes. Drain thoroughly and add the sauerkraut to the bowl with the potatoes. Add the farmer's cheese and stir to combine. Store in the refrigerator until ready to make the pierogies. The filling can be made a day or two in advance.
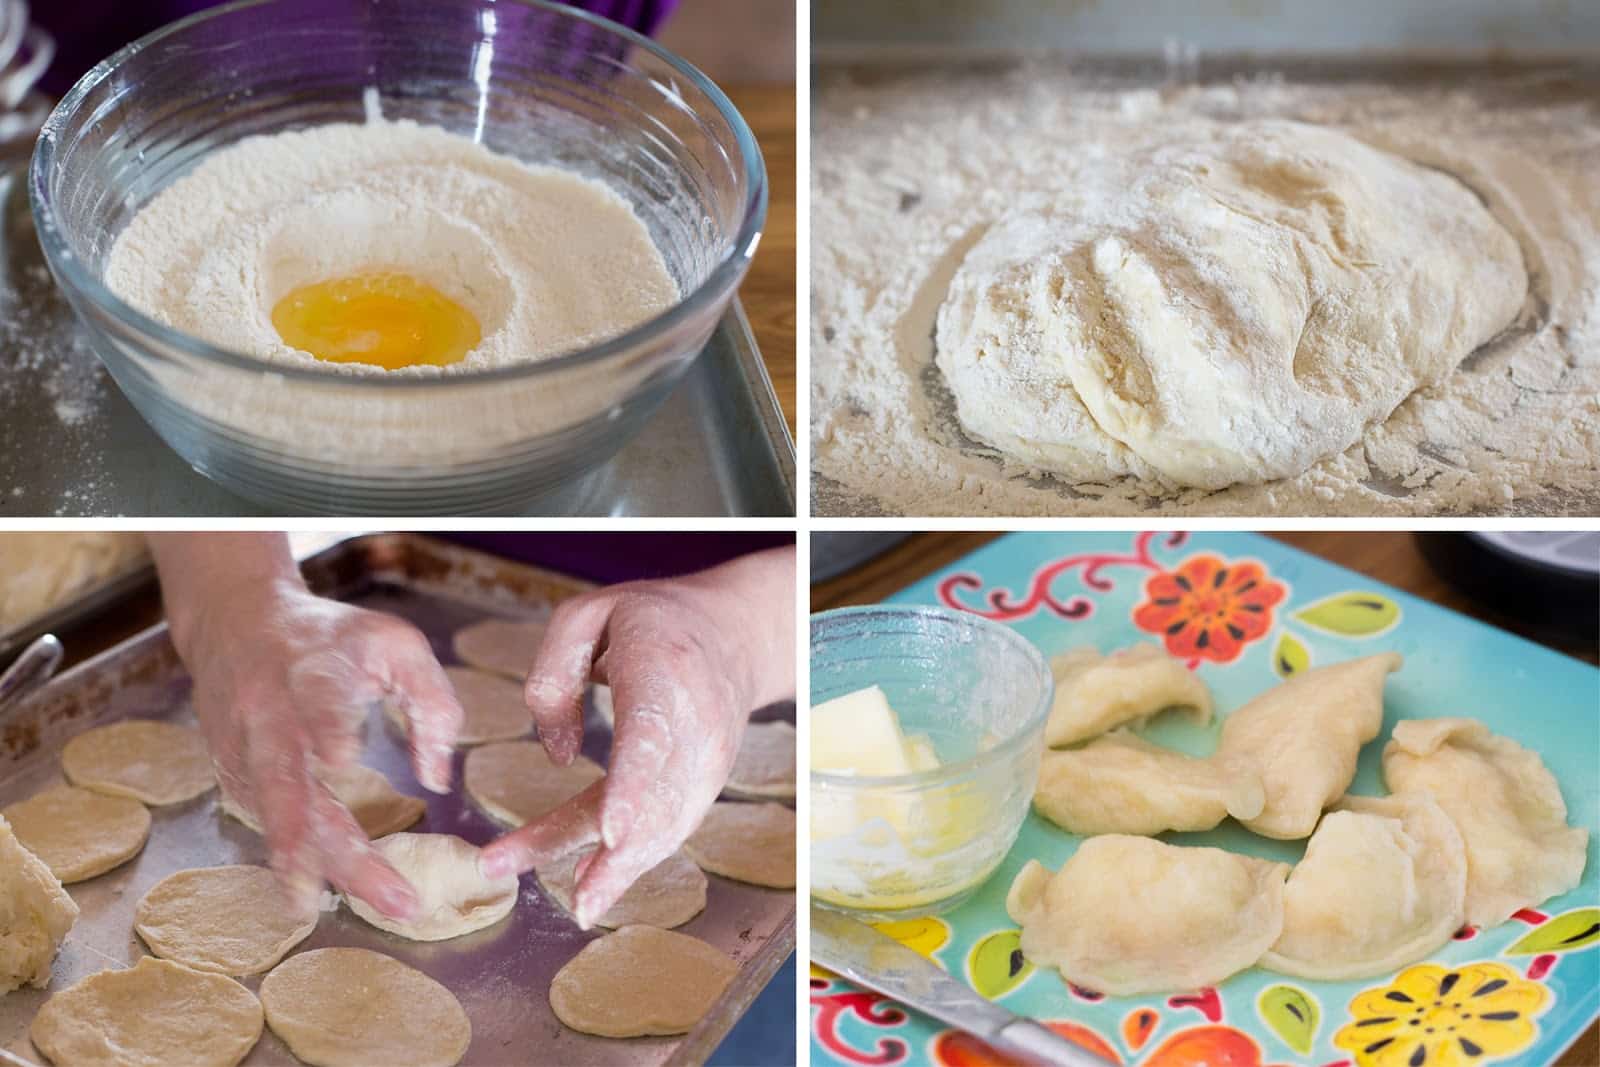
- Place the flour and kosher salt in a large bowl and stir to combine. Make a small well with your hand and crack the egg into it. Stir to combine and then gradually add the hot water, mixing with your hands until the dough is very sticky and well combined. If it becomes too sticky and wet, add just a tablespoon or so more flour. Chill the dough in the refrigerator for at least an hour.
- Bring a large pot of water to a boil. Sprinkle a large board with flour. Transfer the chilled dough to the floured surface and flip it over a few times to coat with flour. Gently knead the dough just a few times with your hands, adding a sprinkling of flour as needed.
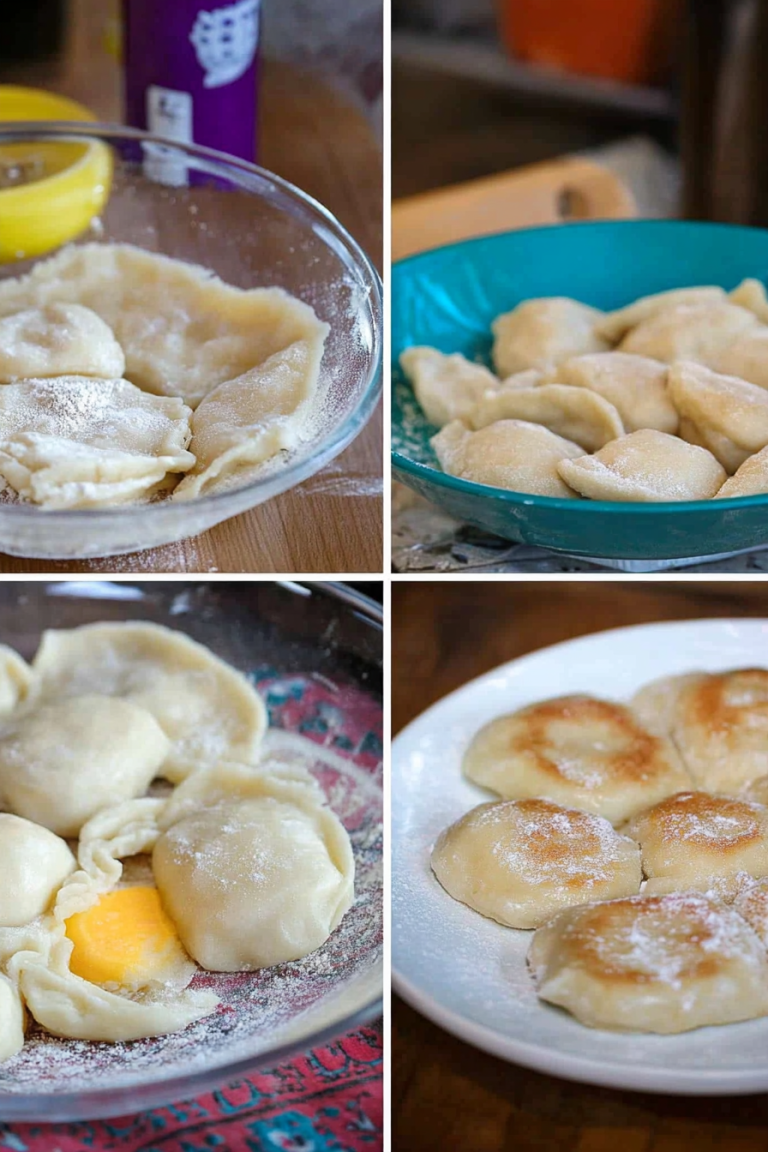
- To Shape Pierogies: Divide the dough into four sections and roll out one of the sections very thin, to about 0.125 inch thickness (a bit thinner than a pie crust). Cut into circles using a cookie cutter or glass rim. Place 1 tablespoon of the potato filling on one side of each dough circle. Fold over the circle and pinch firmly around the edges to seal. Place the prepared pierogies in a single layer onto a waiting floured plate. Do not stack them to prevent sticking.
- To Boil Pierogies: Carefully drop the waiting pierogies into the boiling water, a few at a time to avoid overcrowding. Use a spoon or spatula to gently nudge them off the bottom of the pot if they stick. When they float to the surface of the water, lift them out carefully with a slotted spoon. Place them on a buttered plate and drizzle a small amount of melted butter on top of them to prevent sticking together. Let the boiled pierogies cool for a few minutes before frying them.
- To Fry Pierogies: In a large skillet over medium heat, melt a tablespoon of butter. When the butter sizzles, place the boiled pierogies in the skillet in a single layer. Let them cook for 2-3 minutes, until lightly browned and crisp on the edges, then flip over and repeat. The pierogies will not turn brown all over, but the edges should crisp and be light brown. Remove the finished pierogies to a buttered baking dish.