California Chicken Salad Summer Yum
Oh, where do I even begin with this zucchini bread? It’s more than just a recipe to me; it’s a warm hug from my childhood, a smell that instantly transports me back to Grandma’s sun-drenched kitchen. I can still picture her, flour dusting her apron, humming a little tune as she’d pull a perfectly golden loaf from her oven. This isn’t just *any* zucchini bread, though. This one… this one is special. It’s the kind that makes people stop mid-bite and ask, “What is in this?!” It’s incredibly moist, bursting with cinnamon and vanilla, and has this perfect crumb that just melts in your mouth. Forget those dry, crumbly versions you might have tried before; this recipe is the real deal, and it’s surprisingly easy to whip up, even on a weeknight. It’s my go-to for potlucks, neighbor gifts, or honestly, just when that 3 pm craving hits and I need something comforting and delicious without all the fuss of a full cake.
What is Grandma’s Zucchini Bread?
So, what makes this zucchini bread, well, *legendary*? Think of it as the ultimate comfort bake, but with a secret weapon: zucchini! It might sound a little odd, right? Baking with a vegetable? But trust me on this one. The zucchini, when grated and incorporated properly, does something magical. It adds an unbelievable amount of moisture to the batter without imparting any strong vegetable flavor. What you get is a tender, rich loaf that’s just sweet enough, with warm spice notes that make you want to curl up with a good book. It’s essentially a super-moist, spiced cake in loaf form, but way easier to make and enjoy. The “legendary” part comes from how consistently good it is, and how it always surprises people with just how incredible it tastes. It’s the kind of bread that disappears faster than you can say “more, please!”
Why you’ll love this recipe?
What are some of the reasons why zucchini bread is a staple in my kitchen?flavor is out of this world. It’s a beautiful balance of sweet and spice, with that comforting warmth of cinnamon and a hint of vanilla. The zucchini keeps it incredibly moist, giving it a tender crumb that’s just divine. You’d never guess there was a vegetable in there, but you can absolutely taste the delicious result. Then there’s the simplicityWhat is a lifesaver? Mix wet and dry ingredients separately, then combine them. No fancy equipment needed, just a couple ofcost-efficient. Zucchini is usually pretty affordable, and the other ingredients are pantry staples you probably already have. Plus, it’s so versatile! I’ll get to more ways to serve it in a bit, but it’s fantastic on its own, toasted with butter, or even as a base for a sweet sandwich. What I love most about this recipe is that it always delivers. I’ve made it dozens of times, for picnics, for holidays, and just because, and it *never* fails to impress. It’s a crowd-pleaser that feels so homemade and special. It reminds me of my Grandma’s simpler baking, but with a modern touch of guaranteed moistness thanks to the zucchini. It’s like a more forgiving, more delicious version of a banana bread, and that’s saying something!
How to Make Grandma’s Legendary Zucchini Bread
Quick Overview
This recipe is all about simplicity and maximum flavor. We’ll whisk together our dry ingredients, mix our wet ingredients, then combine them with the star: grated zucchini! The batter comes together in a flash, gets poured into a loaf pan, and bakes into a fragrant, golden-brown masterpiece. The beauty of this method is how it guarantees that signature moist texture without any fuss. You really can’t mess this up, and the results are so rewarding, especially when that amazing aroma fills your kitchen.
Ingredients
For the Main Batter:
2 cups all-purpose flour (I usually use unbleached for a slightly better texture)
1 teaspoon baking soda (this is key for lift!)
1/2 teaspoon salt (balances the sweetness)
1 teaspoon ground cinnamon (don’t be shy with this one!)
1/4 teaspoon ground nutmeg (optional, but it adds a lovely warmth)
1 and 1/2 cups granulated sugar (you can reduce this slightly if you prefer, but I find this ratio perfect)
2 large eggs (at room temperature is best for emulsification)
3/4 cup vegetable oil or melted butter (I often use a mix, or even coconut oil for a subtle flavor boost!)
1 teaspoon vanilla extract (use the good stuff, it makes a difference!)
1 cup grated zucchini, well-drained (this is the secret weapon! More on draining later)
For the Filling (Optional but HIGHLY Recommended!):
1/2 cup chopped walnuts or pecans (for crunch!)
1/4 cup brown sugar (adds a caramelly depth)
1 teaspoon ground cinnamon
For the Glaze (My favorite part!):
1 cup powdered sugar
2-3 tablespoons milk (any kind works, even non-dairy!)
1/2 teaspoon vanilla extract
Step-by-Step Instructions
Step 1: Preheat & Prep Pan
First things first, get that oven preheated to 350 degrees Fahrenheit (175 degrees Celsius). While the oven is warming up, grab a standard 9×5 inch loaf pan. Grease it really well with butter or cooking spray, and then dust it with a little flour. I like to tap out any excess flour. This little step ensures your beautiful loaf slides right out without sticking, which is always a win.
Step 2: Mix Dry Ingredients
In a large bowl, whisk together the flour, baking soda, salt, cinnamon, and nutmeg (if you’re using it). Whisking them together thoroughly at this stage helps to distribute the leavening agents and spices evenly, so you don’t get any weird pockets of flavor or texture in your finished bread. Make sure there are no clumps!
Step 3: Mix Wet Ingredients
In a separate medium bowl, crack your two eggs. Add the granulated sugar, oil (or melted butter), and vanilla extract. Whisk this all together until it’s well combined and looks nice and smooth. It should be a lovely, pale yellow color.
Step 4: Combine
Now, pour the wet ingredients into the bowl with the dry ingredients. Gently fold them together with a spatula or wooden spoon. The key here is *not* to overmix. Mix just until you no longer see streaks of dry flour. A few small lumps are totally fine! Overmixing develops the gluten too much, which can lead to a tougher bread, and we definitely don’t want that. Then, gently fold in your well-drained grated zucchini. Make sure it’s evenly distributed throughout the batter.
Step 5: Prepare Filling
If you’re adding the optional filling (and I highly recommend you do!), in a small bowl, combine the chopped nuts, brown sugar, and cinnamon. Give it a quick stir to coat the nuts evenly. This little mixture adds such a fantastic layer of flavor and texture.
Step 6: Layer & Swirl
Pour about half of your batter into your prepared loaf pan. Sprinkle about half of your nut filling mixture evenly over the batter. Then, pour the remaining batter on top, spreading it gently to cover the filling. Sprinkle the rest of the nut mixture over the top of the batter. If you like, you can use a knife or skewer to gently swirl the nuts into the top layer of batter for a pretty marbled effect. It’s not essential, but it looks so nice!
Step 7: Bake
Pop that pan into your preheated oven. Bake for about 50-65 minutes. The exact time will depend on your oven, of course. You’ll know it’s done when a wooden skewer or toothpick inserted into the center comes out clean, or with just a few moist crumbs attached (no wet batter!). The top should be a beautiful golden brown, and the edges should be pulling away slightly from the sides of the pan.
Step 8: Cool & Glaze
Once it’s baked to perfection, take the loaf pan out of the oven and let it cool in the pan for about 10-15 minutes. This helps it set up and makes it easier to remove. Then, carefully invert the pan onto a wire rack to let the bread cool completely. While it’s cooling, whisk together the powdered sugar, 2 tablespoons of milk, and vanilla extract for the glaze. Add more milk, a tiny bit at a time, until you reach your desired drizzling consistency. Once the bread is completely cool (this is important, otherwise the glaze will melt off!), drizzle the glaze generously over the top. Let the glaze set for a bit before slicing.
Step 9: Slice & Serve
Once the glaze has set, you’re ready to slice! I usually use a serrated knife for the cleanest cuts. Serve it at room temperature, or lightly toasted with a slather of butter. It’s absolutely divine!
What to Serve It With
This zucchini bread is so incredibly versatile, it’s a star all on its own, but here are some of my favorite ways to enjoy it and serve it to others.
For Breakfast:
Honestly, a slice of this bread is practically a breakfast dessert! I love toasting a thick slice and slathering it with a little butter. It’s phenomenal alongside a strong cup of coffee or a creamy latte. For a slightly more elegant morning presentation, I’ll cut it into slightly thinner slices and arrange them on a pretty plate with some fresh berries. It feels like a special treat without any extra work.
For Brunch:
At a brunch gathering, this bread is always a hit. I’ll often serve it alongside a fruit salad or a yogurt parfait. It’s a nice sweet counterpoint to savory dishes like quiche or bacon. For a slightly more dressed-up vibe, I’ve been known to add a dollop of whipped cream or a spoonful of crème fraîche on top of a warm slice. It’s also fantastic with a mimosa or a refreshing glass of iced tea.
As Dessert:
This is where it really shines! It’s the perfect end to a casual dinner. I love serving it slightly warm, perhaps with a scoop of vanilla bean ice cream or a drizzle of caramel sauce. The warm spices in the bread pair beautifully with rich, creamy desserts. It’s also delicious with a cup of herbal tea after a long day. It feels indulgent but not overly heavy, making it perfect when you’re craving something sweet but don’t want to bake a whole cake.
For Cozy Snacks:
This is how my family eats it most often – just a simple slice whenever the mood strikes! It’s perfect with a glass of cold milk, a warm cup of hot chocolate, or just on its own as you’re unwinding. It’s my go-to when I need a little pick-me-up in the afternoon, or even a light, satisfying treat before bed. It’s pure comfort food, and it always hits the spot.
Top Tips for Perfecting Your Grandma’s Legendary Zucchini Bread
I’ve been making this zucchini bread for years, and along the way, I’ve picked up a few tricks that I think really make a difference. I want this to be perfect for you, so here are my best tips!
Zucchini Prep:
This is probably the most important step to get right. You *must* drain the grated zucchini. Zucchini is full of water, and if you don’t get rid of most of it, your bread will be too wet and won’t bake properly. After grating, place the zucchini in a fine-mesh sieve set over a bowl and let it sit for at least 15-20 minutes, pressing down occasionally to help release the liquid. Alternatively, and my preferred method, is to put the grated zucchini in a clean kitchen towel or cheesecloth and squeeze out as much moisture as humanly possible. You’ll be surprised how much comes out! Fresh zucchini works best; avoid zucchini that’s been sitting around for too long.
Mixing Advice:
Remember what I said about not overmixing? It really is crucial. As soon as you combine the wet and dry ingredients, stop mixing as soon as you don’t see any dry flour. A few small lumps in the batter are actually a good sign! They mean you haven’t overworked the gluten. This gentle approach is what keeps the bread tender and moist. When you fold in the zucchini, do it gently as well.
Swirl Customization:
While my optional filling is simple, you can get creative! For a chocolate lover, mix in some chocolate chips with the filling mixture. Or, for a pop of color and flavor, add a few dried cranberries or blueberries. If you don’t want to use nuts, simply omit them from the filling. You can also just skip the filling altogether; the bread will still be delicious!
Ingredient Swaps:
I’ve tested this recipe with various flours, and while all-purpose is my favorite, a 1:1 gluten-free flour blend can work if you need it to be gluten-free. You might find the texture is slightly different, a bit denser. For the oil, melted butter adds a wonderful richness, but a neutral oil like canola or even avocado oil works perfectly fine. You can also use a mix of oil and applesauce for a slightly lighter, though less rich, bread. I haven’t personally tried it with non-dairy milk in the glaze, but it should work just fine – just adjust the amount of liquid to get the right consistency.
Baking Tips:
Always preheat your oven thoroughly. An oven that’s not hot enough will affect how your bread rises and bakes. I usually place my loaf pan on the center rack. If you find the top of your bread is browning too quickly before the inside is cooked, you can loosely tent it with a piece of aluminum foil for the last 15-20 minutes of baking. The toothpick test is your best friend here – err on the side of slightly underbaked rather than overbaked for maximum moisture. It will continue to cook a little as it cools.
Glaze Variations:
The basic vanilla glaze is fantastic, but you can change it up! For a little tang, add a teaspoon of lemon juice or orange zest to the glaze. A touch of maple syrup instead of some of the powdered sugar can also be lovely. If you’re not a fan of glaze, a simple dusting of powdered sugar after cooling is also beautiful, or you can serve it plain!
Storing and Reheating Tips
Storing this delicious zucchini bread is pretty straightforward, and thankfully, it stays moist for quite a while! Here’s how I keep mine fresh:
Room Temperature:
Once completely cooled, I usually store this bread at room temperature. Wrap it tightly in plastic wrap or place it in an airtight container. It stays wonderfully moist and delicious for about 3-4 days. This is my preferred method for everyday enjoyment. Just grab a slice whenever that craving strikes!
Refrigerator Storage:
If your kitchen is particularly warm, or you want to extend its life a bit longer, you can refrigerate it. Wrap it well in plastic wrap or place it in an airtight container. It should keep well in the fridge for up to a week. The texture might become slightly firmer when cold, but it will still be delicious.
Freezer Instructions:
This bread freezes beautifully! If you know you won’t get through it within a few days, or you want to have some on hand for future cravings, wrap the completely cooled loaf (or slices!) tightly in plastic wrap, then in a layer of aluminum foil or place it in a freezer-safe bag. It will keep well in the freezer for up to 3 months. To thaw, unwrap it and let it come to room temperature on the counter. If you froze slices, you can even reheat them gently in a toaster or microwave.
Glaze Timing Advice:
If you plan to store the bread at room temperature or in the refrigerator, make sure the glaze has fully set before wrapping it. If you plan to freeze it, I highly recommend glazing it *after* it has thawed. If you freeze it already glazed, the glaze can sometimes become a bit sticky or uneven upon thawing. So, it’s best to freeze the bread plain and then glaze it once it’s thawed and ready to be enjoyed.
Frequently Asked Questions
Final Thoughts
There you have it – my absolute favorite zucchini bread recipe, straight from my Grandma’s heart to yours. This isn’t just about baking; it’s about creating moments of warmth and deliciousness that bring people together. The incredible moisture, the perfect spice blend, and that delightful hint of sweetness make this loaf something truly special. It’s proof that sometimes, the simplest ingredients and a little bit of love can create the most amazing results. I hope you try it, and I hope it brings as much joy to your kitchen as it does to mine. If you’re a fan of comforting, easy-to-make baked goods, you might also love my Classic Apple Crumble Pie or my Decadent Chocolate Chip Cookies!
I can’t wait to hear how your Grandma’s Legendary Zucchini Bread turns out! Please leave a comment below and let me know what you think, or share any fun variations you tried. Happy baking!
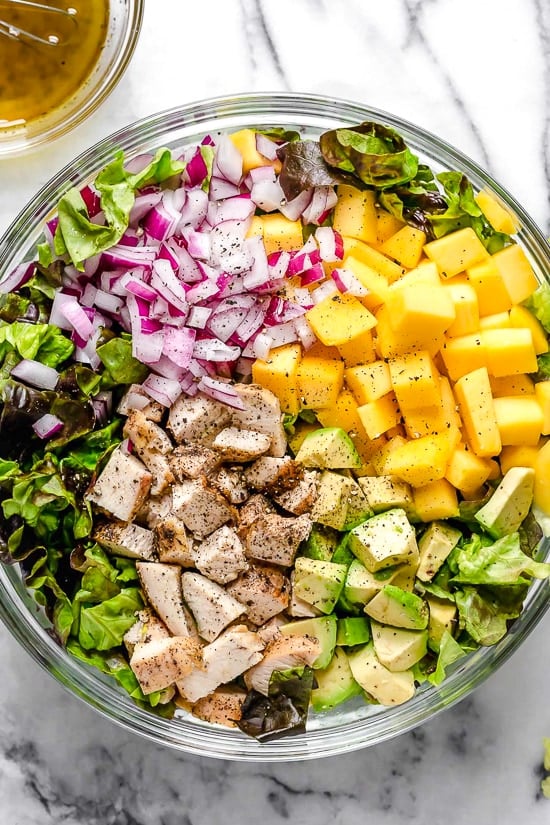
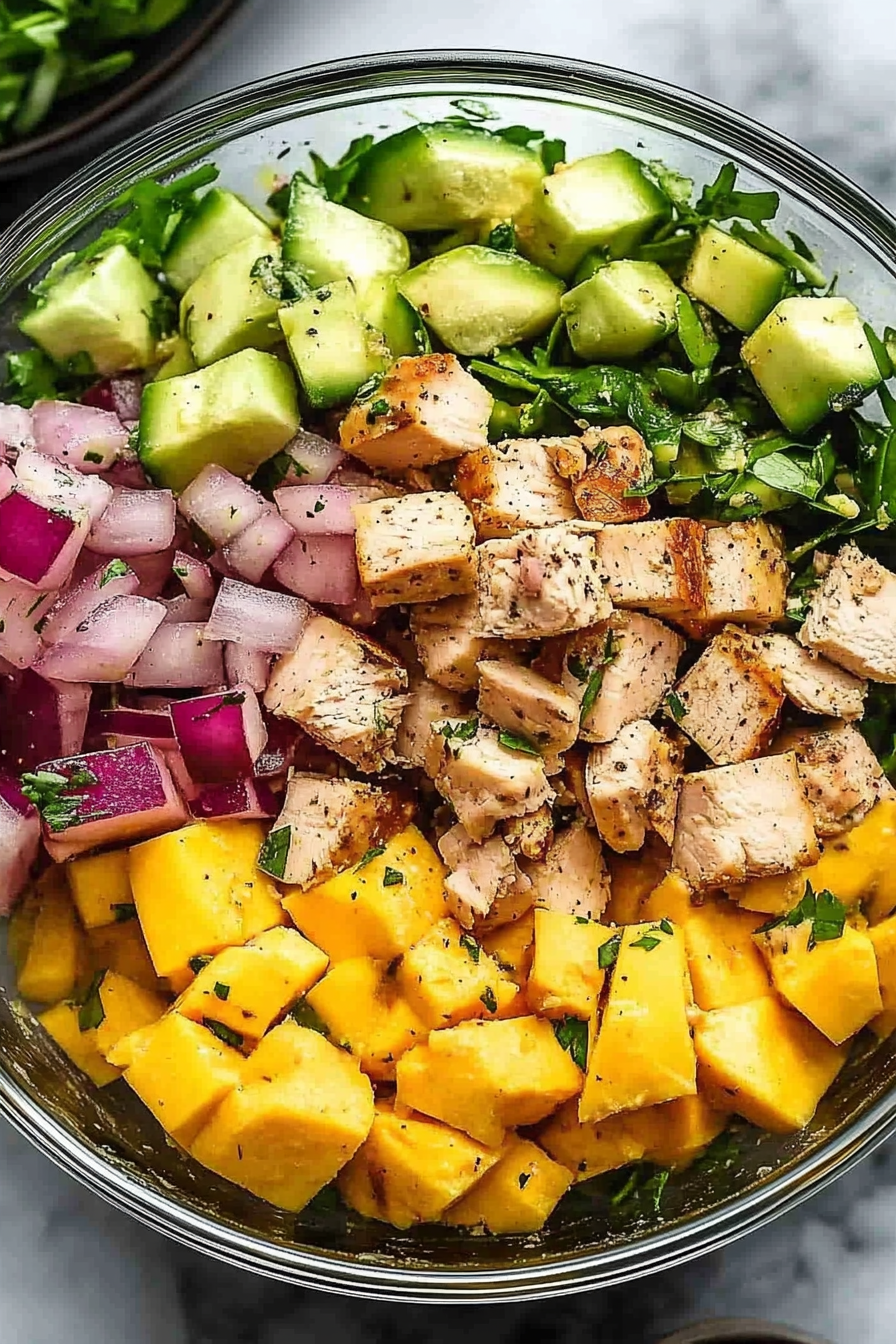
California chicken salad
Ingredients
Method
- Whisk vinaigrette ingredients (olive oil, white balsamic vinegar, salt, and pepper) and set aside.
- In a bowl, gently toss the diced avocado, mango, grilled chicken, and red onion together.
- Fill a large salad platter with baby greens or divide them evenly among 4 small dishes.
- Top the greens with the chicken/avocado mixture and drizzle about half of the prepared dressing on top.
- Serve immediately with the remaining dressing on the side, if desired.