Best ermine buttercream frosting recipe
Okay, so picture this: it’s a lazy Sunday morning, the smell of coffee is just starting to fill the air, and I’m craving something a little bit sweet, a little bit comforting, but I *really* don’t want to spend hours in the kitchen. Sound familiar? That’s exactly when this chocolate zucchini bread comes to my rescue. Honestly, calling it “bread” feels like an understatement; it’s more like a moist, decadent cake that just happens to have a lovely, tender crumb. It’s the kind of treat that disappears in minutes at my house, and it’s surprisingly simple, which is a total win-win. It’s kind of like a chocolate chip muffin’s fancier, more comforting cousin. If you’ve ever been hesitant about baking with vegetables, trust me on this one. It’s pure magic!
What is chocolate Zucchini bread?
So, what exactly *is* chocolate zucchini bread? At its heart, it’s a quick bread, meaning it doesn’t rely on yeast for leavening. Instead, we use baking soda and baking powder to get that lovely rise. The “zucchini” part comes from grated zucchini, which might sound a little strange, I know! But here’s the secret: the zucchini essentially melts into the batter as it bakes, adding an unbelievable amount of moisture without any detectable zucchini flavor. Seriously, if you have picky eaters or just want to sneak in an extra serving of veggies without anyone knowing, this is your golden ticket. And then, of course, there’s the chocolate. We load it up with cocoa powder and chocolate chips to make it rich and satisfying. It’s not overly sweet, which I love, but it’s got that comforting, indulgent chocolatey goodness that just hits the spot every single time.
Why you’ll love this recipe?
There are so many reasons why this chocolate zucchini bread has earned a permanent spot in my recipe binder, and I just know you’re going to feel the same way. First off, the flavor is absolutely divine. It’s got this deep, rich chocolate taste that’s perfectly balanced, not too sweet, not too bitter. The zucchini keeps it incredibly moist, giving it a tender crumb that’s just heavenly. And speaking of moist, I’ve tried adding different milks over the years, and while regular milk is great, I once accidentally used almond milk and it made it even creamier – a happy accident I now repeat! Then there’s the simplicity. This is genuinely a “dump and stir” kind of recipe, perfect for those busy weeknights when you need a quick dessert or a special treat that doesn’t require a whole afternoon. I’ve whipped this up when unexpected guests drop by, and it’s always a hit. It’s also incredibly cost-effective! Zucchini is usually pretty affordable, and the other pantry staples are things you likely already have on hand. Plus, the versatility is amazing. You can eat it plain, slather it with butter, or even top it with a simple glaze (more on that later!). Compared to something like a chocolate cake that requires multiple bowls and careful creaming, this is so much more forgiving and faster to get into the oven. It’s just a delightful, easy, and delicious bake that you’ll want to make again and again. My kids ask for this all the time, and it makes me feel good knowing they’re getting some extra veggies!
How do I make Zucchini bread?
Quick Overview
This chocolate zucchini bread is all about simplicity and delicious results. You’ll essentially mix your dry ingredients, then your wet ingredients, combine them, fold in some chocolatey goodness, and bake. The grated zucchini works its magic by adding incredible moisture, making the final product wonderfully tender and rich. It’s a straightforward process that guarantees a fantastic outcome, even if you’re new to baking. The whole thing comes together in about 15-20 minutes of prep time before it hits the oven, making it a lifesaver on busy days.
Ingredients
For the Main Batter:
You’ll need about 2 cups of all-purpose flour. I always use unbleached all-purpose flour because I find it gives a slightly better texture, but any AP flour will work just fine. Make sure to measure it properly by spooning it into your cup and leveling it off, rather than scooping directly from the bag, which can lead to too much flour. Then, we’ll add 1/2 cup of unsweetened cocoa powder. Dutch-processed cocoa powder will give you a deeper, richer chocolate flavor and color, but natural cocoa powder works too. You’ll also need 1 teaspoon of baking soda and 1/2 teaspoon of baking powder for that perfect lift. Don’t forget 1/4 teaspoon of salt to balance all the sweet and chocolatey flavors. A little bit of cinnamon, about 1/2 teaspoon, adds a lovely warmth that complements the chocolate beautifully, but it’s optional if you’re not a fan.
For the Filling:
This is where the magic happens! You’ll need 1 cup of grated zucchini. Make sure it’s packed down a bit. I usually just use a box grater on the medium-sized holes. Don’t worry about peeling it; the skin adds nice texture and nutrients. You’ll also need 3/4 cup of granulated sugar and 1/4 cup of packed brown sugar. The brown sugar adds a lovely depth of flavor and extra moisture. We’ll also add 2 large eggs, at room temperature if you can remember – it helps them incorporate better. Then, 1/2 cup of vegetable oil or a neutral-flavored oil like canola. If you want to try my almond milk trick, use 1/4 cup of oil and 1/4 cup of unsweetened almond milk for an extra creamy texture. A teaspoon of vanilla extract is essential for rounding out all those flavors. And, of course, the stars of the show: 1 cup of semi-sweet chocolate chips. You can use milk chocolate or dark chocolate chips too, depending on your preference!
For the Glaze:
This is totally optional but oh-so-worth it. You’ll need about 1 cup of powdered sugar. Then, we’ll add 2-3 tablespoons of milk (any kind works – dairy, almond, soy) and 1/2 teaspoon of vanilla extract. You want the glaze to be thick enough to coat but still pourable. We’ll adjust the milk until it’s just right.
Step-by-Step Instructions
Step 1: Preheat & Prep Pan
First things first, preheat your oven to 350 degrees Fahrenheit (175 degrees Celsius). This is super important for even baking, so don’t skip it! While the oven is heating up, get your loaf pan ready. I like to use a standard 9×5 inch loaf pan. Grease it really well with butter or cooking spray, and then dust it with a little bit of flour or cocoa powder. I prefer cocoa powder because it blends in with the bread and doesn’t leave white streaks. Tap out any excess. This step is key to making sure your beautiful bread releases easily after baking. I’ve learned the hard way that a poorly greased pan can ruin an otherwise perfect loaf!
Step 2: Mix Dry Ingredients
In a large bowl, whisk together your flour, cocoa powder, baking soda, baking powder, salt, and cinnamon if you’re using it. Whisking them together thoroughly ensures that all the leavening agents and salt are evenly distributed throughout the batter. This helps the bread rise evenly and prevents any “salty bites.” You want it to look like one uniform, slightly darker mixture. This is one of those simple steps that makes a big difference.
Step 3: Mix Wet Ingredients
In a separate medium bowl, whisk together your granulated sugar, brown sugar, eggs, oil (and milk if you’re using it!), and vanilla extract. Whisk until everything is well combined and the sugars are mostly dissolved. It should look smooth and slightly emulsified. Make sure your eggs are well beaten into the mixture. This wet base is going to bring all the dry ingredients to life.
Step 4: Combine
Now, pour the wet ingredients into the bowl with the dry ingredients. Gently fold them together with a spatula or wooden spoon until *just* combined. It’s really important not to overmix here! You’ll still see a few streaks of flour; that’s okay. Overmixing develops the gluten in the flour too much, which can make your bread tough and dense. We want a tender crumb, remember? Once it’s mostly combined, gently fold in your grated zucchini and most of your chocolate chips (save a handful for the top if you like!). The batter will be quite thick, and that’s exactly what you want.
Step 5: Prepare Filling
Wait, there’s no separate filling? Nope! In this recipe, the “filling” is literally the chocolate chips we just folded into the batter. It’s that simple! The beauty of this recipe is that the chocolate is already distributed throughout the moist zucchini bread. If you wanted to get fancier, you could swirl in some Nutella or peanut butter, but for this classic version, it’s all about those melty chocolate pockets within the bread itself.
Step 6: Layer & Swirl
Spoon the batter evenly into your prepared loaf pan. If you reserved some chocolate chips, sprinkle them over the top. You can also press a few extra chocolate chips onto the surface before baking; they’ll melt down slightly and create a lovely crust. There’s no real “swirling” technique needed here since the chocolate chips are distributed throughout the batter. The goal is just to get the batter into the pan evenly so it bakes uniformly. Make sure to smooth the top a bit so you don’t have a big dome in the middle and flatter sides.
Step 7: Bake
Pop that pan into your preheated oven. Bake for about 55-65 minutes. The baking time can vary depending on your oven, so start checking around the 50-minute mark. The best way to tell if it’s done is to insert a toothpick or a thin skewer into the center of the loaf. If it comes out clean or with a few moist crumbs attached (but no wet batter), it’s ready! If it’s still gooey, give it another 5-10 minutes and check again. Don’t be afraid to let it bake a little longer if needed; a slightly over-baked loaf is still delicious with this much moisture.
Step 8: Cool & Glaze
Once it’s out of the oven, let the bread cool in the pan for about 10-15 minutes. This allows it to set up properly. Then, carefully invert it onto a wire rack to cool completely. This is crucial! If you try to glaze it while it’s still warm, the glaze will just melt and slide right off. While the bread is cooling, you can whip up the glaze. In a small bowl, whisk together the powdered sugar, vanilla extract, and about 2 tablespoons of milk. Keep adding milk, just a teaspoon at a time, until you reach a pourable consistency. It should be thick enough to coat but still runny. Once the bread is completely cool, drizzle or spread the glaze over the top. Let the glaze set for about 15-20 minutes before slicing.
Step 9: Slice & Serve
Once the glaze is set (or if you skipped the glaze), use a sharp knife to slice the bread. I like to get about 1-inch thick slices. This bread is delicious at room temperature. If you did use the glaze, the perfect time to slice is when the glaze has hardened slightly. It’s wonderful on its own, but if you want to jazz it up, a dollop of whipped cream or a scoop of vanilla ice cream is pure indulgence. Enjoy every moist, chocolatey bite!
What to Serve It With
This chocolate zucchini bread is so versatile, it fits into almost any meal or craving! For breakfast, it’s a little slice of heaven. I love a thick slice with my morning coffee. It’s not overly sweet, so it feels perfectly acceptable as a breakfast treat. For brunch, it’s a fantastic addition to any spread. Serve it alongside some fresh fruit salad, yogurt parfaits, or even a savory quiche. It adds that touch of sweetness and indulgence that elevates the whole meal. As a dessert, it’s pure bliss. A warm slice with a scoop of vanilla bean ice cream or a drizzle of raspberry sauce is just divine. It’s the perfect end to a casual dinner party or a cozy night in. And for those times when you just need a little something sweet to get you through the afternoon slump or late-night cravings, this is perfect. It’s not a heavy dessert, but it’s satisfying enough. My family loves it with a glass of cold milk, and honestly, that’s my favorite way to enjoy a slice when I’m just looking for a comforting snack. I’ve even sent it to school with my kids in their lunchboxes, and it’s always a welcome surprise!
Top Tips for Perfecting Your Chocolate Zucchini Bread
I’ve made this chocolate zucchini bread more times than I can count, and over the years, I’ve picked up a few tricks that make it even better. When it comes to the zucchini, the key is to grate it and then *gently* squeeze out *some* of the excess moisture. You don’t want it bone dry, as the moisture is what makes the bread tender, but you don’t want it soaking wet either. Just a gentle squeeze between your hands or using a clean kitchen towel should do the trick. For mixing, I cannot stress enough the importance of not overmixing. Mix the wet and dry ingredients until *just* combined, and then fold in the zucchini and chips gently. A few streaks of flour are perfectly fine! Overmixing leads to a tough bread, and we definitely don’t want that. If you’re feeling adventurous with the swirl, you can reserve about half of the batter and fold in the chocolate chips into that portion, then dollop alternating spoonfuls of the plain and chocolatey batter into the pan and give it a gentle swirl with a knife. For ingredient swaps, I’ve tested this with different oils and milk types with great success. As I mentioned, almond milk adds a lovely creaminess. You can also try using Greek yogurt instead of some of the oil for a slightly healthier, tangier twist. For baking, always know your oven. If your oven tends to run hot, you might want to reduce the temperature by 25 degrees or start checking for doneness a bit earlier. Using a dark-colored loaf pan can also cause the crust to brown faster, so keep an eye on it. A good doneness test is crucial. Besides the toothpick test, the top should feel slightly firm and spring back a little when gently pressed. For the glaze, consistency is everything. If it’s too thick, add milk a drop at a time. If it’s too thin, add more powdered sugar. You can also experiment with flavors; a little lemon zest in the glaze adds a nice brightness, or a touch of espresso powder can deepen the chocolate flavor even further.
Storing and Reheating Tips
This chocolate zucchini bread is wonderfully forgiving when it comes to storage. If you’re planning to eat it within a couple of days, storing it at room temperature is perfectly fine. Just make sure it’s completely cooled before you wrap it up. I like to wrap the whole loaf tightly in plastic wrap, or use an airtight container. It usually stays fresh and moist for about 2-3 days this way. If you think it might take longer than that to finish, or if your kitchen tends to be warm, I’d recommend storing it in the refrigerator. Again, make sure it’s cooled completely. Wrap it well in plastic wrap, then place it in an airtight container. In the fridge, it should stay good for up to a week, though the texture might become a little firmer. For longer storage, the freezer is your best friend! You can freeze the whole loaf or individual slices. Wrap each slice or the entire loaf very well in plastic wrap, then in a layer of aluminum foil, or place it inside a heavy-duty freezer bag. It will keep beautifully in the freezer for up to 3 months. When you’re ready to enjoy a frozen slice, you have a few options. You can thaw it overnight in the refrigerator, or for a quicker fix, you can pop a slice straight from the freezer into a toaster oven or a conventional oven set to a low temperature (around 300°F/150°C) for about 10-15 minutes, or until heated through and wonderfully soft again. Reheating a room-temperature or refrigerated slice is also easy; just pop it in the toaster oven or microwave for about 20-30 seconds until warmed. If you glazed your bread, I generally recommend adding the glaze *after* reheating if you’ve frozen it, as the glaze can sometimes become a bit sticky or lose its sheen during freezing and thawing. But honestly, even a slightly softened glaze is still delicious!
Frequently Asked Questions
Final Thoughts
There you have it – my go-to chocolate zucchini bread recipe! It’s just one of those recipes that has earned its stripes in my kitchen because it’s consistently delicious, incredibly easy, and always brings a smile to people’s faces. The way the zucchini works its magic to create such a moist, tender crumb is truly one of nature’s little wonders, and combined with the rich chocolate flavor, it’s a match made in baking heaven. I really hope you give this one a try; it’s perfect for satisfying that sweet craving without a lot of fuss. If you love this recipe, you might also enjoy my classic chocolate chip zucchini muffins or my simple banana bread recipe for more easy baking inspiration. Don’t be a stranger – I’d absolutely love to hear how your chocolate zucchini bread turns out in the comments below! Happy baking, friends!

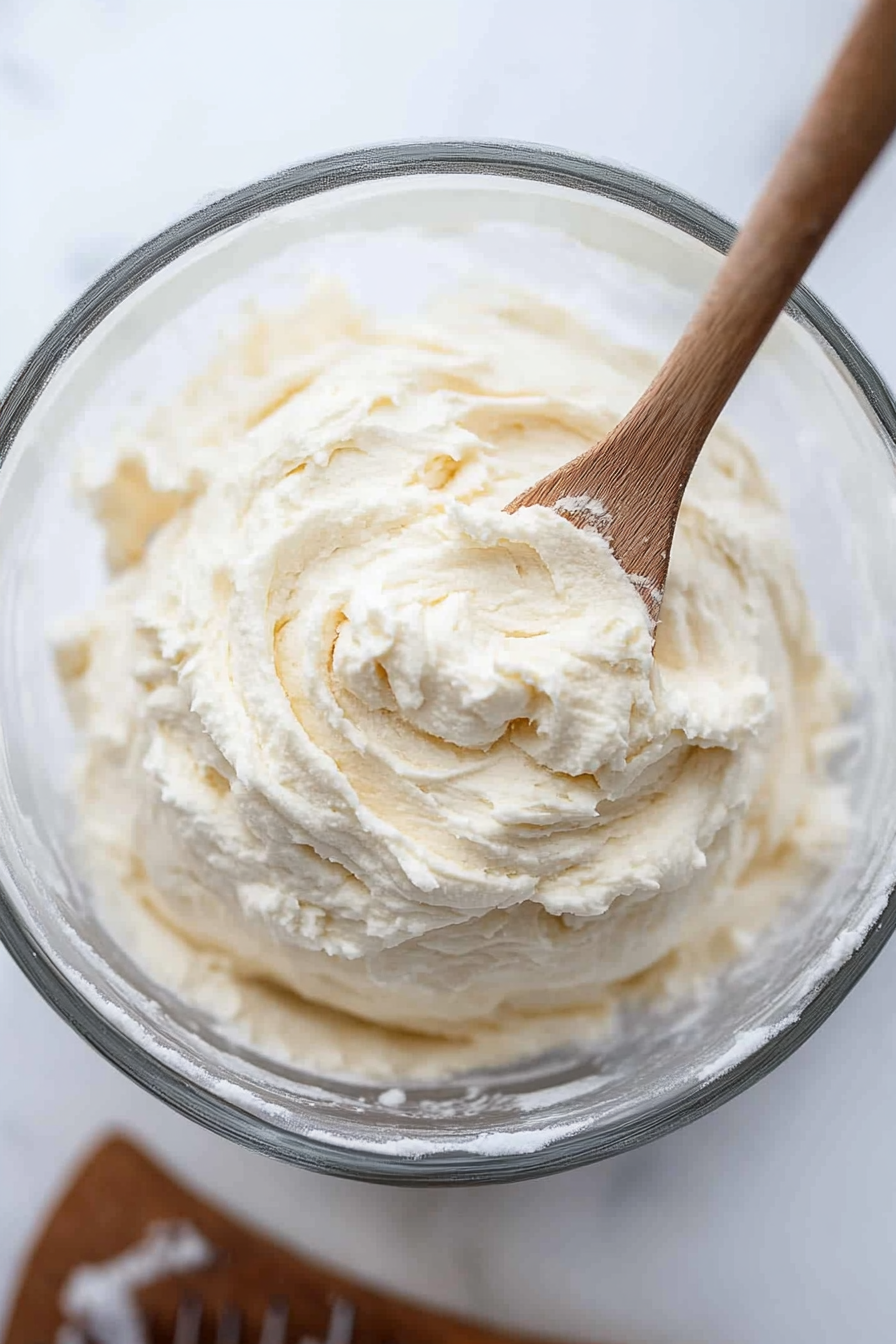
ermine buttercream frosting
Ingredients
Method
- In a medium saucepan over medium heat, whisk together the milk and flour. Cook, whisking constantly, for 3-5 minutes, or until no lumps remain and the mixture thickens and resembles a very thick pudding. It should coat the back of a spoon. Remove the pan from the heat and let the mixture cool to room temperature.
- In the bowl of a stand mixer fitted with the paddle attachment, cream together the butter and sugar on medium speed until light and fluffy (2-3 minutes). Stop the mixer and use a rubber spatula to scrape down the sides of the bowl.
- Add the cooled milk mixture to the bowl of the stand mixer. Beat on medium-high speed until the frosting is light and fluffy (2-3 minutes), pausing to scrape down the sides of the bowl as needed.
- Switch to the whisk attachment. Add vanilla and mix on high for 7-8 minutes, or until the frosting is smooth and creamy.