Best Toasted Nut Chocolate Pie Treat
There are some recipes that just feel like a warm hug. You know, the ones that transport you back to your childhood kitchen, filled with the comforting aroma of something baking. For me, that recipe is my Grandma’s Chocolate Zucchini Bread. Now, I know what you might be thinking – zucchini in a sweet bread? Trust me on this one! It’s not just good; it’s ridiculously, unbelievably good. It’s the kind of bread that’s so moist and decadent, you’d never guess there’s a vegetable hiding inside. Honestly, it’s the closest thing I’ve found to a perfect chocolate chip muffin, but in a loaf form that’s way easier to share… or not share, if you’re feeling selfish! I’ve made countless versions of chocolate zucchini bread over the years, trying to replicate that magic, and this one, this is the one that captures it perfectly. It’s a lifesaver on busy mornings, a welcome treat for unexpected guests, and frankly, my go-to when I need a serious chocolate fix that feels a little bit virtuous.
What is chocolate Zucchini bread?
So, what exactly is this mystical Chocolate Zucchini Bread? Think of it as your favorite moist chocolate cake got a fabulous makeover. It’s essentially a quick bread, meaning it uses baking soda or powder as a leavening agent instead of yeast, which makes it super simple and fast to whip up. The “zucchini” part is where the magic happens. Grated zucchini adds an incredible amount of moisture and a tender crumb without imparting any discernible zucchini flavor, especially when it’s all dolled up with chocolate. It’s like a stealthy way to get a serving of veggies into your day, but the real star is that rich, chocolatey goodness. It’s not overly sweet, which is something I really appreciate, and the texture is just divine – dense enough to be satisfying, but light and airy enough to not feel heavy. It’s the kind of treat that disappears in minutes at my house, and I’m pretty sure your family will feel the same way.
Why you’ll love this recipe?
There are so many reasons why this Chocolate Zucchini Bread has become a staple in my kitchen, and I have a feeling it’ll become one in yours too. First off, the flavor. Oh. My. Goodness. It’s intensely chocolatey, without being cloying. The chocolate chips melt into gooey pockets, and the cocoa powder gives it a deep, rich flavor that’s just irresistible. It’s like a warm hug in every bite. Then there’s the simplicity. This is not one of those fussy recipes that requires a million steps or special equipment. You can literally mix it up in one bowl (if you’re brave and don’t mind a little extra washing up later, like me!) and have it in the oven in under 15 minutes. It’s incredibly forgiving, too, which is a huge plus for beginner bakers or those of us who sometimes get a little distracted in the kitchen. And let’s talk cost-efficiency. Zucchini is usually pretty affordable, especially when it’s in season, and the rest of the ingredients are pantry staples. You get a fantastic, gourmet-tasting treat for next to nothing, which is a win-win in my book. Plus, it’s so versatile! I often serve this as a simple dessert, but it’s equally amazing for breakfast or a mid-afternoon snack. It’s a fantastic alternative to a more traditional pound cake if you’re looking for something with a chocolatey twist.
How do I make Zucchini bread?
Quick Overview
Get ready for the easiest, most delicious chocolate bread you’ve ever made! This recipe is all about combining simple ingredients to create pure chocolatey bliss. You’ll start by whisking together your dry ingredients, then mixing in your wet ingredients, and finally, folding in those irresistible chocolate chips. The grated zucchini does all the heavy lifting to keep it unbelievably moist. Bake it until a toothpick comes out clean, let it cool slightly, and prepare for perfection. It’s genuinely that straightforward, making it ideal for a quick bake any day of the week.
Ingredients
For the Main Batter:
This is where the magic begins. You’ll want to use all-purpose flour here for the best texture. I always recommend sifting your flour, even if the recipe doesn’t explicitly say so – it just makes for a lighter, airier crumb. And don’t skimp on the cocoa powder! A good quality unsweetened cocoa powder will make all the difference. I usually reach for Dutch-processed if I have it, as it gives a deeper, richer flavor and color. For the sugar, a mix of granulated and brown sugar is my secret weapon. The granulated sugar gives it structure, while the brown sugar adds a lovely moistness and a hint of caramel notes. And of course, the star ingredient for moisture: fresh zucchini! Make sure it’s finely grated. I usually use about two medium zucchini, but it can vary. A good teaspoon of baking soda is crucial for that lift, and a pinch of salt to balance everything out.
For the Filling:
This is the part everyone gets excited about: chocolate chips! I am a huge fan of semi-sweet chocolate chips, as they strike the perfect balance between sweetness and richness. You can absolutely use milk chocolate chips if you prefer it sweeter, or even dark chocolate if you like a more intense chocolate flavor. I usually throw in a generous amount, because more chocolate is always better, right? Some people also like to add a handful of chopped walnuts or pecans for a bit of crunch, which is a delicious addition if you’re feeling adventurous.
For the Glaze:
This glaze is optional but highly recommended if you want to take your bread to the next level of decadence. It’s a simple powdered sugar glaze, but I like to add a little extra cocoa powder and a splash of milk (or even coffee for a mocha twist!) to make it extra chocolatey and luxurious. The key is to get the consistency just right – thick enough to drizzle but not so thick it’s hard to spread. I aim for something that flows but still holds its shape a little.
Step-by-Step Instructions
Step 1: Preheat & Prep Pan
First things first, let’s get your oven warmed up and your pan ready. Preheat your oven to 350°F (175°C). This consistent temperature is key for even baking. Now, grab a standard loaf pan – the 9×5 inch size is perfect. Grease it really well with butter or non-stick spray, then flour it. I like to go a step further and line the bottom and sides with parchment paper, leaving a little overhang. This makes lifting the finished loaf out a breeze and ensures you don’t have any sticking disasters. Trust me, this little extra step has saved me so many times!
Step 2: Mix Dry Ingredients
In a large mixing bowl, we’re going to combine all our dry ingredients. This includes your all-purpose flour, unsweetened cocoa powder, granulated sugar, brown sugar, baking soda, and salt. Give it a really good whisk. You want everything to be evenly distributed. This is important because it ensures your leavening agent (the baking soda) is spread out, so you don’t get any dense spots in your bread. It also helps break up any lumps in the flour and cocoa powder, leading to a smoother batter.
Step 3: Mix Wet Ingredients
In a separate, medium-sized bowl, whisk together your wet ingredients. This typically includes eggs, vegetable oil (or melted butter – I’ve tried both and oil gives it a slightly more tender crumb, but butter adds a richer flavor!), and vanilla extract. Make sure your eggs are at room temperature; they incorporate better into the batter. Whisk until everything is well combined and slightly frothy. This is where you get that lovely fragrant vanilla scent starting to bloom!
Step 4: Combine
Now it’s time to bring it all together! Pour the wet ingredients into the bowl with the dry ingredients. Add your finely grated zucchini. Here’s the crucial part: do NOT overmix! Gently fold everything together with a spatula or wooden spoon until *just* combined. You should still see a few streaks of flour; that’s perfectly fine. Overmixing develops the gluten too much, which can result in a tough, dense bread. We want moist and tender, remember? I’ve learned this the hard way over the years – a gentle hand is key here!
Step 5: Prepare Filling
If you’re using chocolate chips (and why wouldn’t you?!), it’s time to stir them in. I like to reserve about a quarter cup to sprinkle on top before baking for extra chocolatey goodness. Gently fold the remaining chocolate chips into the batter until they are evenly distributed. If you’re adding nuts, this is also the time to fold them in. Again, be gentle!
Step 6: Layer & Swirl
Spoon the batter evenly into your prepared loaf pan. Smooth the top gently with your spatula. If you reserved some chocolate chips, sprinkle them over the top now. For an extra touch, you can sometimes get a nice visual with a few extra grated zucchini shreds on top before baking, but that’s purely for aesthetics!
Step 7: Bake
Pop that loaf pan into your preheated oven. Bake for about 50-65 minutes. The exact time will depend on your oven, so keep an eye on it. You’ll know it’s done when a wooden skewer or toothpick inserted into the center comes out clean, or with just a few moist crumbs attached (but no wet batter!). If the top starts to brown too quickly, you can loosely tent it with foil for the last 15-20 minutes of baking.
Step 8: Cool & Glaze
Once baked, let the bread cool in the pan for about 10-15 minutes. This allows it to set up properly. Then, carefully lift it out using the parchment paper overhang and place it on a wire rack to cool completely. This is important! Trying to glaze a warm loaf will result in a melted, runny mess. Patience, my friends! Once completely cool, whip up your glaze (if using). Whisk together powdered sugar, cocoa powder, and just enough milk or liquid until you reach your desired drizzling consistency. Drizzle it generously over the cooled loaf. Let the glaze set for about 15-20 minutes before slicing.
Step 9: Slice & Serve
And there you have it! The most incredible Chocolate Zucchini Bread. Use a sharp knife to slice it into thick, generous slices. I like to serve it slightly warm or at room temperature. The texture is just perfect when it’s had a little time to settle after baking.
What to Serve It With
This Chocolate Zucchini Bread is honestly a star all on its own, but if you’re looking to elevate it or pair it with something special, I’ve got a few ideas! For a simple breakfast, a slice of this alongside a steaming mug of your favorite coffee is pure bliss. The richness of the bread and the boldness of the coffee are a match made in heaven. If you’re serving this for brunch, I love to cut it into smaller squares and arrange them on a platter with some fresh berries – maybe some raspberries or strawberries to cut through the richness. A dollop of whipped cream or a light cream cheese frosting wouldn’t go amiss either! As a dessert, this bread is a winner. A small scoop of vanilla bean ice cream melting alongside a warm slice is pure indulgence. You could also dust it with a little extra powdered sugar or serve it with a side of chocolate sauce. And for those cozy snack times? It’s perfect with a glass of cold milk. My kids devour it this way! Honestly, though, the best thing to serve it with is good company. It’s a recipe that’s made for sharing and bringing people together.
Top Tips for Perfecting Your Chocolate Zucchini Bread
Over the years, I’ve learned a few tricks that have helped me make this Chocolate Zucchini Bread consistently amazing. Let’s talk about the zucchini itself: it’s vital to squeeze out as much moisture as you can after grating. I usually use a cheesecloth or a clean kitchen towel and really wring it out. Excess water can make your bread soggy and dense, which is the opposite of what we want! For mixing, remember my earlier point: less is more. Seriously, don’t beat that batter into submission. A few lumps are fine; they’ll disappear during baking. It’s better to have a slightly under-mixed batter than an over-mixed one. When it comes to the chocolate chips, I’ve found that tossing them with a tablespoon of the flour before adding them to the batter helps prevent them from sinking to the bottom. It’s a small step, but it makes a difference in distributing those chocolatey treasures evenly throughout the loaf. If you’re feeling experimental with ingredient swaps, I’ve had success using half whole wheat flour for a slightly nuttier flavor, though it can make the bread a touch denser. I’ve also tried it with a dairy-free milk in the glaze, and it works beautifully. For baking, know your oven! If you find your oven runs hot, you might want to reduce the temperature slightly or shorten the baking time. The toothpick test is your best friend here. And don’t be afraid to adjust the sweetness. If you prefer a less sweet bread, you can reduce the sugar by a quarter cup, but remember the zucchini does add some natural sweetness. Lastly, for the glaze, if it’s too thick, add milk a teaspoon at a time until it’s pourable. If it’s too thin, add more powdered sugar, a tablespoon at a time. It’s all about finding that perfect balance!
Storing and Reheating Tips
This Chocolate Zucchini Bread is so good, you’ll want to make sure you can enjoy it for as long as possible. At room temperature, it stays wonderfully moist and delicious for about 2-3 days. Just make sure to store it in an airtight container or wrap it tightly in plastic wrap and then foil. I find it tastes even better on the second day! If you need to keep it for longer, your refrigerator is your best friend. Wrapped tightly in plastic wrap and then placed in an airtight container, it can last up to a week in the fridge. The texture might firm up a bit, but it’s still incredibly tasty. For longer storage, freezing is the way to go. Once the bread is completely cooled and glazed (if you glazed it), wrap it tightly in a layer of plastic wrap, then a layer of aluminum foil, and finally place it in a freezer-safe bag or container. It can stay frozen for up to 2-3 months. To thaw, simply remove it from the freezer the night before and let it thaw at room temperature. If you didn’t glaze it before freezing, it’s best to add the glaze once it’s thawed and at room temperature. Reheating is simple too! If it’s slightly stale or you just want it warm, you can pop a slice in the toaster oven for a few minutes, or gently warm it in a microwave for about 15-20 seconds. It brings back that lovely moist texture and makes the chocolate chips extra gooey!
Frequently Asked Questions
Final Thoughts
There you have it, my absolute favorite Chocolate Zucchini Bread recipe! It’s a testament to how simple ingredients, when treated with a little care and love, can create something truly magical. The way it stays so moist and tender, the deep chocolate flavor, and the fact that it’s secretly packed with a vegetable – it’s just a dream come true for any baker. This recipe is more than just a bake; it’s a connection to my grandma, a reminder of cozy kitchen days, and a guaranteed crowd-pleaser. If you love a good chocolate baked good, but want something that feels a little more wholesome and incredibly moist, you absolutely have to give this a try. I promise, you won’t regret it. Give it a whirl and let me know what you think in the comments below! I’d love to hear about your baking adventures and any variations you come up with. Happy baking, everyone!
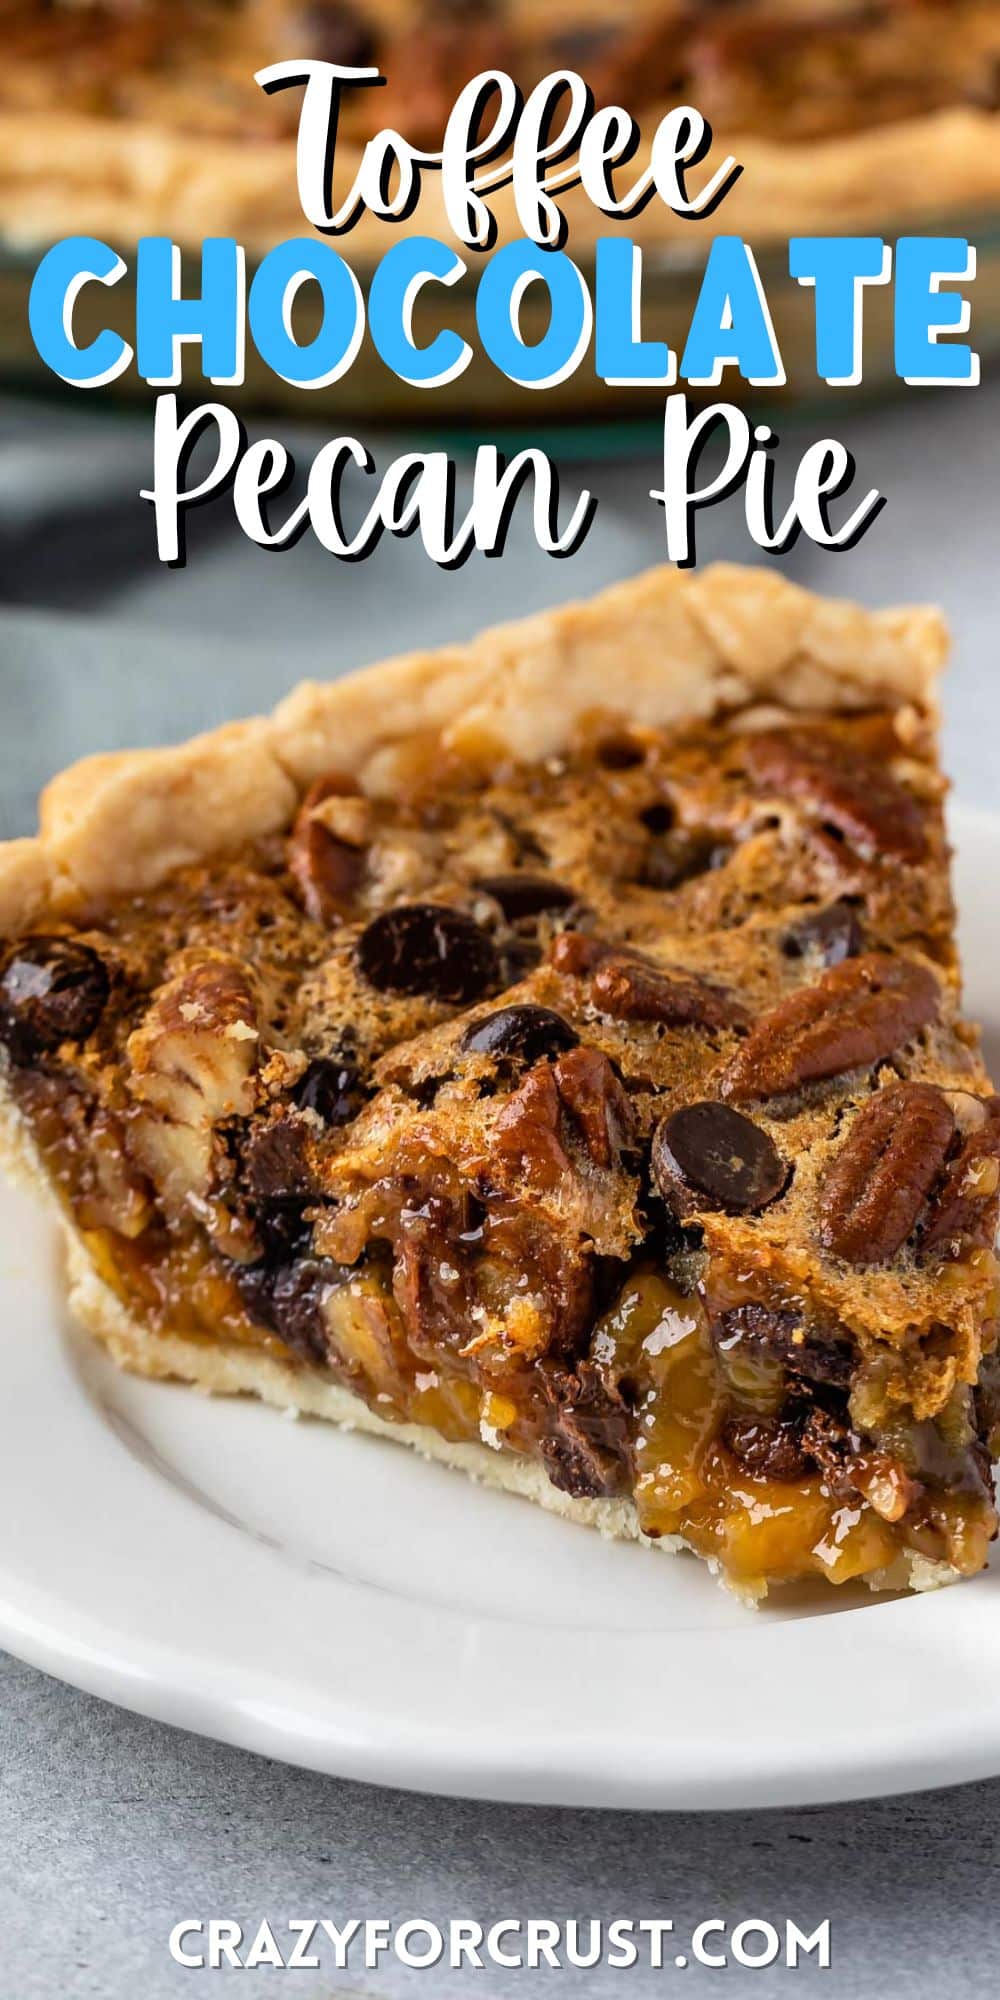
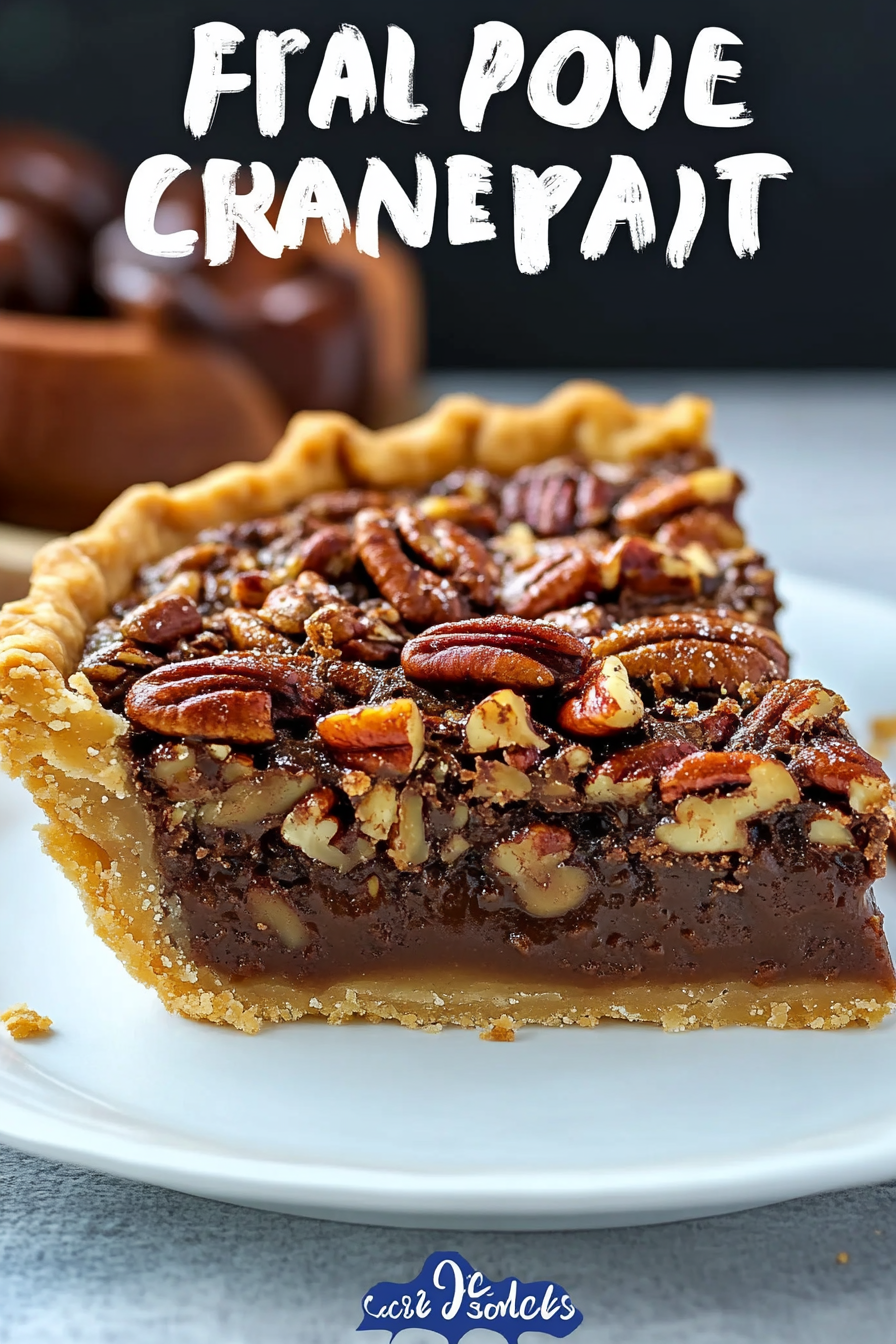
Toffee Chocolate Pecan Pie
Ingredients
Method
- Preheat oven to 450°F (232°C).
- Place your pie crust in a 9-inch pie plate and crimp edges as desired. Chill until filling is ready and oven is preheated.
- Whisk eggs, corn syrup, granulated sugar, salt, and melted butter together in a bowl until well combined.
- Remove pie shell from refrigerator. Sprinkle the chocolate chips and toffee bits evenly on the bottom of the crust. Sprinkle the pecan halves over the top of the chocolate and toffee. Pour the liquid filling over the top of the pecans. Let it sit for a minute so the pecans can rise to the top; ensure they are fully coated in the liquid to prevent burning.
- Place the pie on a cookie sheet for baking to catch any potential spillage. Cover the edges of the pie crust with a pie crust shield or aluminum foil to prevent burning.
- Place the pie in the preheated 450°F (232°C) oven and bake for 10 minutes. Then, reduce the oven temperature to 350°F (175°C) and continue to bake for an additional 40-50 minutes, or until the pie is puffed, only slightly jiggly in the center, and appears slightly cracked around the edges.
- Cool the pie completely on a wire rack before cutting and serving. Store any leftover pie covered in the refrigerator for up to 3 days, or freeze for up to 3 months.